- 解析JSON的这 6 种方案(带示例)
浪九天
企业级开发效率提升javaspringspringbootspringcloud
目录1.使用Gson详细解释运用场景代码示例2.使用Jackson详细解释运用场景代码示例3.使用JSON.simple详细解释运用场景代码示例4.使用org.json详细解释运用场景代码示例5.使用FastJSON详细解释运用场景代码示例6.使用Moshi详细解释运用场景代码示例在Java中,有多种方案可以用于解析JSON数据,以下为你详细介绍6种常见的方案:1.使用Gson详细解释Gson是G
- 逆天!外包都开始嫌弃外包了。。。
java
大家好,我是R哥。最近看我的Java面试群里聊天真的笑死了。。。外包卡学历不说,外包都要提交之前干过的所有公司社保流水来验证年限不说,现在连外包都开始嫌弃从外包出来的了?真是滑天下之大稽,现在有的外包公司都不要脸到这地步了吗?说到外包,我发现很多程序员对外包公司offer都有一种复杂的感情,既离不开它,又看不上它,食之无味,弃之可惜,拿了个外包的offer纠结万分。很多大厂项目一多、人手不够的时候
- 利用Java爬虫获取衣联网商品详情:实战指南
Jason-河山
java爬虫开发语言
在电商领域,获取商品详情是数据分析和市场研究的重要环节。衣联网作为知名的电商平台,提供了丰富的服装商品资源。本文将详细介绍如何利用Java编写爬虫程序,通过商品ID获取衣联网商品详情。一、准备工作(一)环境搭建Java安装:确保已安装Java开发环境,推荐使用JDK11或更高版本。开发工具配置:使用IntelliJIDEA或Eclipse等Java开发工具,创建一个新的Maven项目。依赖库添加:
- 面试了一个 7 年 Java 程序员,结果真让我哭笑不得。。。
java
大家好,我是R哥。作为一名资深的Java程序员、面试官,同时也做后端面试辅导,面试过许多人,也见过不少神奇的面试经历。但昨晚的一次模拟面试,真的让我哭笑不得。这兄弟来自92名校,毕业7年,干了几个中厂,想冲大厂,目标:40K,于是想模拟面试一下,体验下我们导师的实力。模拟面试之前,说自己八股文准备好了,面试完,竟然连许多常见的八股文都答不上来,而且他还很疑惑地问我:“你们的面试题是哪来的?怎么和我
- Yarn:包管理优化与工作空间的最佳实践
在现代前端开发中,包管理工具是不可或缺的工具之一。Yarn作为一个快速、可靠且安全的包管理工具,相对于npm,提供了一些独特的功能和优化,尤其是在工作空间管理和性能优化方面尤为突出。本文将深入探讨Yarn的专业使用,包括其工作空间的强大功能、性能优化技术以及在大型项目中的最佳实践。Yarn简介Yarn是由Facebook开发的一个JavaScript包管理工具,它旨在解决npm的一些关键问题,如安
- 如何在Spring Boot中实现数据加密
后端springboot
如何在SpringBoot中实现数据加密大家好,我是免费搭建查券返利机器人省钱赚佣金就用微赚淘客系统3.0的小编,也是冬天不穿秋裤,天冷也要风度的程序猿!一、数据加密的重要性与应用场景在当今信息安全日益受到重视的背景下,数据加密成为保护敏感信息不被未授权访问的重要手段。SpringBoot作为一种流行的Java开发框架,提供了多种方式来实现数据加密,适用于用户密码、数据库连接、敏感配置等场景。二、
- ES6 解构赋值详解
修己xj
webes6javascriptes6
ES6是JavaScript语言的一次重大更新,引入了许多新特性和语法改进,其中解构赋值是一个非常实用和灵活的语法特性。它可以让我们从数组或对象中提取值,并赋给对应的变量,让代码变得更加简洁和易读。本文将深入探讨ES6解构赋值的语法、用法及其在实际开发中的应用。数组解构赋值数组解构赋值允许我们通过类似模式匹配的方式,从数组中提取值并赋给变量,即只要等会两边的变量模式相同,左边的变量就会被赋予对应的
- java vscode跳转类定义_快速使用 vscode 进行 Java 编程
weixin_39894932
javavscode跳转类定义
任何一个程序员都有自己喜爱的编辑器、工具、开发利器,有这样一群人,对于vim这种上古神器难以驾驭、IDE又太笨重,这时候多了一个选择vscode!!!vscode重新定义了编辑器,它开源、免费、Runseverywhere,是一款介于IDE和编辑器之间的产物,我们不能用IDE的所有特性都往它身上压,如果都可以的话不就是IDE吗?不就是吗?所以用起来的感觉你懂的,美滋滋(๑•̀ㅂ•́)✧那么这家伙都
- ES6之解构
Hopebearer_
ES6es6前端javascript开发语言ecmascript
文章目录ES6之解构一、数组解构1.基本解构2.部分解构3.默认值4.剩余参数5.嵌套解构6.交换变量二、对象解构1.基本解构2.重命名3.默认值4.剩余参数三、函数参数结构1.数组参数解构2.对象参数解构3.默认值四、注意事项1.解构顺序2.undefined情况3.剩余元素4.对象的方法解构ES6之解构解构是JavaScript(ES6及以后版本)中一种非常强大的语法特性,它允许我们按照一定模
- Java的定时器Timer和TimerTask使用全解析
程序员总部
javajavapython开发语言
在Java编程中,定时任务是一个常见的需求。无论是定期执行某些操作,还是在特定时间点执行任务,Java提供的Timer和TimerTask类就可以帮助我们轻松实现这些功能。今天将详细介绍如何使用这两个类,包括任务的执行和暂停。理解Timer和TimerTaskTimer是一个可以安排任务在指定的时间或周期性地执行的类。TimerTask是一个抽象类,表示要被定时执行的任务。使用Timer时,我们需
- HIBERNATE - 符合Java习惯的关系数据库持久化
popkiler
Atleap代码读解hibernate数据库javasessionclasspayment
HIBERNATE-符合Java习惯的关系数据库持久化Hibernate2参考文档2.1.1TableofContents前言1.在Tomcat中快速上手1.1.开始Hibernate之旅1.2.第一个可持久化类1.3.映射cat1.4.与猫同乐1.5.结语2.体系结构2.1.总览2.2.持久化对象标识(PersistentObjectIdentity)2.3.JMX集成2.4.JCA支持3.Se
- CentOS停更;阿里发布全新操作系统(Anolis OS)
萌褚
Linux运维
镜像下载、域名解析、时间同步请点击阿里云开源镜像站Linux系统对于Java程序员来说,就好比“乞丐手里的碗”,任何业务都离不开他的身影,因为服务端的广泛使用,也因此衍生出了各种不同的发行版,其中我个人用的最多、且最喜欢的就是CentOS;不幸的是,2021年底CentOS8宣布停止了维护;不过,喜欢CentOS的朋友们不用为此而难过;21年的云栖大会上,阿里云发布全新操作系统“龙蜥”(Anoli
- ES6解构赋值详解
漫天转悠
ES6es6前端ecmascript
ES6解构赋值详解ES6解构赋值是JavaScript语言的一项强大特性,它允许从数组或对象中提取数据,并将其赋值给变量。这一特性不仅简化了代码,提高了可读性,还增强了代码的灵活性。本文将详细介绍ES6解构赋值的基本概念、语法、应用场景以及一些高级用法。1.基本概念解构赋值是对赋值运算符的扩展。它允许按照一定的模式,从数组或对象中提取值,并赋值给变量。这种语法使得从复杂数据结构中提取数据变得更加简
- web前端期末大作业:婚纱网页主题网站设计——唯一旅拍婚纱公司网站HTML+CSS+JavaScript
IT-司马青衫
前端课程设计html
静态网站的编写主要是用HTMLDⅣV+CSSJS等来完成页面的排版设计,一般的网页作业需要融入以下知识点:div布局、浮动定位、高级css、表格、表单及验证、js轮播图、音频视频Fash的应用、uli、下拉导航栏、鼠标划过效果等知识点,学生网页作业源码,制作水平和原创度都适合学习或交作业用,记得点赞。精彩专栏推荐【作者主页——获取更多优质源码】【web前端期末大作业——毕设项目精品实战案例(1
- Vue初体验
码上跑步
vue.js前端
Vue基础Vue是什么?Vue是javascript的渐进式框架。Vue初识Vue工作时必须要创建一个Vue的实例,并且传入一个配置对象。root容器里的代码是符合html的语法但是新添加了一些Vue语法,在这些地方Vue会自动进行解析。root容器里的代码称为Vue模版。Vue实例和容器是一一对应的。在实际开发中只有一个Vue,配合组件使用。在vue里的插值{{}}内部只要写js表达式就能正常解
- MAC电脑配置VSCode写JAVA
davidson1471
macosvscodejavahomebrew
一、安装JDK(Homebrew安装openJDK)使用清华源安装Homebrew清华源安装Home-brew教程Homebrew安装JDK8brewtapadoptopenjdk/openjdkbrewinstall--caskadoptopenjdk8查看JDK路径/usr/libexec/java_home二、配置VSCodeMAC配置VSCode教程
- 【推荐项目】044-中医门诊管理系统
蜗牛 | ICU
推荐项目java前端框架毕设springmybatis
044-中医门诊管理系统介绍javaspringbootvuejs中医门诊管理系统为了帮助您更清晰地整理中医门诊管理系统的功能,我将按照您提供的角色和功能进行归类和整理。以下是整理后的功能列表:角色划分核心管理员医生药师用户(普通患者)管理端功能(核心管理员)统计用户统计(按注册时间、活跃度等)药物销售统计处方统计咨询统计用户管理用户列表(查看、编辑、删除)用户角色分配用户权限管理医生管理医生列表
- 2.10 Spring Boot定时任务:@Scheduled与Quartz对比分析
Sendingab
springboot后端java
SpringBoot定时任务:@Scheduled与Quartz对比分析一、核心特性对比特性**@Scheduled**Quartz依赖复杂度内置于Spring(零配置)需额外依赖与配置任务持久化不支持(内存存储)支持(数据库持久化)动态任务管理仅静态配置支持运行时增删改查分布式支持需自行实现原生集群支持调度策略固定速率/延迟Cron表达式/日历触发错误处理简单异常捕获完善的重试与错误日志机制性能
- 由 Mybatis 源码畅谈软件设计(五):ResultMap 的循环引用
方圆想当图灵
由Mybatis源码畅谈软件设计mybatis代码规范
本节我们来了解Mybatis是如何处理ResultMap的循环引用,它的解决方案非常值得在软件设计中参考。另外作为引申,大家可以了解一下Spring是如何解决Bean的循环注入的。以单测org.apache.ibatis.submitted.permissions.PermissionsTest#checkNestedResultMapLoop为例,它对应表结构和表中的数据为:createtabl
- springMVC RestFul接口设计模式详解,包括前后端设计详解。@GetMapping、@PostMapping、@PutMapping@DeleteMapping@PathVariable
漫慢丶
springmvcrestful设计模式java
目录1、什么是RestFul接口设计模式2、使用该接口设计模式后端还需要配置什么3、使用该接口设计模式前端需要注意什么4、Controller具体实现方式1、什么是RestFul接口设计模式RestFul这是一种springmvc接口的设计模式,用来区别不同类型的请求,来匹配控制器处理映射。例如请求URL为/test/那么中根据Get、put、post等请求方式,就可以具体映射到对应的控制器方法。
- 学习笔记09——并发编程之线程基础
码代码的小仙女
高级开发必备技能学习笔记python
线程基础1.1进程与线程的区别,Java中线程的实现(用户线程与内核线程)进程是操作系统分配资源的基本单位,而线程是CPU调度的基本单位。每个进程有独立的内存空间,而同一进程内的线程共享内存.可以从资源分配、切换开销、通信方式和独立性四个方面来比较两者的区别资源分配进程:操作系统分配资源(如内存、文件句柄等)的基本单位,拥有独立的地址空间。线程:隶属于进程,共享进程的资源(如内存、文件等),是CP
- Java学习笔记——并发编程(三)
__________习惯
javajava
一、wait和notifywait和notify原理Owner线程发现条件不满足,调用wait方法,即可进入WaitSet变为WAITING状态BLOCKED和WAITING的线程都处于阻塞状态,不占用CPU时间片BLOCKED线程会在Owner线程释放锁时唤醒WAITING线程会在Owner线程调用notify或notifyAll时唤醒,但唤醒后并不意味着立刻获得锁,仍需进入EntryList重
- Spring Boot 与 Spring MVC 有何不同
大G哥
springspringbootmvc后端java
SpringBoot和SpringMVC都是Spring框架的一部分,但它们有不同的目标和功能。以下是它们之间的主要区别:1.核心目标SpringBoot:SpringBoot的目标是简化Spring应用的配置和部署。它通过提供默认配置和嵌入式服务器(如Tomcat、Jetty或Undertow),使开发者能够快速构建和启动Spring应用,而无需配置繁琐的XML或类配置。SpringMVC:Sp
- 【推荐项目】 043-停车管理系统
蜗牛 | ICU
推荐项目springbootvue.jsjava前端框架
043-停车管理系统介绍使用springbootvuejsmysql技术搭建框架。智能停车管理系统描述后端框架:采用SpringBoot与MySQL的强强联合,为系统提供稳健、高效的服务支撑。前端框架:前端选用Vue.js,打造流畅、美观的用户交互界面。管理员功能:用户信息管理:轻松管理用户信息,包括新增、编辑、删除及查询用户。界面清晰,操作便捷,确保用户数据的安全与准确。车位信息管理:实时查看车
- zookeeper与kafka集群配置
zhangpeng455547940
计算机linuxjava运维
基本配置修改ipvi/etc/sysconfig/network-scripts/ifcfg-ens33BOOTPROTO=staticONBOOT=yesIPADDR=192.168.139.133NETMASK=255.255.255.0GATEWAY=192.168.139.2DNS1=192.168.1.1修改主机名hostnamectlset-hostnameSSH免密登录vi/etc/
- Spring MVC 拦截器
跪在镜子前喊帅
javajava
前言SpringMVC提供了一个拦截器的机制,它专门用于拦截controller层的路由请求。它的本质是:AOP面向切面的编程,也就是说符合横切关注点的功能都可以考虑使用拦截器实现。比如一些应用场景:权限检查例如:用户登录检查,访问项目的内部接口时,可以通过拦截器检测用户是否登录,如果登录,直接放回用户登录页面。日志记录更新推荐用原生的AOP机制会更好一点,粒度会更细,控制起来也更方便,如果你是针
- Spring IOC 容器核心功能解析与优化架构
我不是少爷.
Java基础spring架构java
一、IOC容器创建Bean的四种方式1.1普通创建方式使用场景:直接通过类默认构造器创建对象实现步骤:代码说明:id:Bean的唯一标识符class:指定类的全限定名Spring会调用默认无参构造器实例化对象1.2工厂模式创建使用场景:需要工厂类处理复杂初始化逻辑时实现步骤://工厂类publicclassBookFactory{publicBookcreateBook(){returnnewBo
- JavaScript -闭包
嗷呜~嗷呜~呜呜~
JavaScript前端javascript开发语言
闭包定义:函数声明时会保存其所在的作用域(词法环境),必然有一个全局作用域,除了全局作用域剩余的对于当前函数来说叫--闭包闭包特征:函数在声明时会保存其所在的所有作用域(词法环境)闭包本质:作用域中所使用到的值组成的对象闭包的作用:把使用到的来自于其他作用域的值保存起来,保障函数在执行时能顺利运行window里面的ashow对象拥有一个scopes属性,其中存放了函数使用到的其他作用域中的值:这些
- java面试题框架篇
老汤姆.
面试javaspringboot开发语言
文章目录1.Spring框架1.1Spring两大核心:IOC与AOPIOCDIAOP切面=切入点表达式+通知方法关于JDK代理和CGlib代理总结(高程/架构)!!!AOP常用注解1.2BeanFactory(懒加载初始bean)和ApplicationContext(立即初始bean)有什么区别1.3Spring框架用到了哪些设计模式1.4spring框架的优缺点1.5Spring常用注解2.
- java ik分词器
大波V5
java开发语言
org.apache.lucenelucene-core7.4.0org.apache.lucenelucene-analyzers-common7.4.0com.github.mageseik-analyzer8.5.0publicstaticvoidmain(String[]args)throwsException{Stringtext="今天是个好日子";//创建一个StringReader
- html页面js获取参数值
0624chenhong
html
1.js获取参数值js
function GetQueryString(name)
{
var reg = new RegExp("(^|&)"+ name +"=([^&]*)(&|$)");
var r = windo
- MongoDB 在多线程高并发下的问题
BigCat2013
mongodbDB高并发重复数据
最近项目用到 MongoDB , 主要是一些读取数据及改状态位的操作. 因为是结合了最近流行的 Storm进行大数据的分析处理,并将分析结果插入Vertica数据库,所以在多线程高并发的情境下, 会发现 Vertica 数据库中有部分重复的数据. 这到底是什么原因导致的呢?笔者开始也是一筹莫 展,重复去看 MongoDB 的 API , 终于有了新发现 :
com.mongodb.DB 这个类有
- c++ 用类模版实现链表(c++语言程序设计第四版示例代码)
CrazyMizzz
数据结构C++
#include<iostream>
#include<cassert>
using namespace std;
template<class T>
class Node
{
private:
Node<T> * next;
public:
T data;
- 最近情况
麦田的设计者
感慨考试生活
在五月黄梅天的岁月里,一年两次的软考又要开始了。到目前为止,我已经考了多达三次的软考,最后的结果就是通过了初级考试(程序员)。人啊,就是不满足,考了初级就希望考中级,于是,这学期我就报考了中级,明天就要考试。感觉机会不大,期待奇迹发生吧。这个学期忙于练车,写项目,反正最后是一团糟。后天还要考试科目二。这个星期真的是很艰难的一周,希望能快点度过。
- linux系统中用pkill踢出在线登录用户
被触发
linux
由于linux服务器允许多用户登录,公司很多人知道密码,工作造成一定的障碍所以需要有时踢出指定的用户
1/#who 查出当前有那些终端登录(用 w 命令更详细)
# who
root pts/0 2010-10-28 09:36 (192
- 仿QQ聊天第二版
肆无忌惮_
qq
在第一版之上的改进内容:
第一版链接:
http://479001499.iteye.com/admin/blogs/2100893
用map存起来号码对应的聊天窗口对象,解决私聊的时候所有消息发到一个窗口的问题.
增加ViewInfo类,这个是信息预览的窗口,如果是自己的信息,则可以进行编辑.
信息修改后上传至服务器再告诉所有用户,自己的窗口
- java读取配置文件
知了ing
1,java读取.properties配置文件
InputStream in;
try {
in = test.class.getClassLoader().getResourceAsStream("config/ipnetOracle.properties");//配置文件的路径
Properties p = new Properties()
- __attribute__ 你知多少?
矮蛋蛋
C++gcc
原文地址:
http://www.cnblogs.com/astwish/p/3460618.html
GNU C 的一大特色就是__attribute__ 机制。__attribute__ 可以设置函数属性(Function Attribute )、变量属性(Variable Attribute )和类型属性(Type Attribute )。
__attribute__ 书写特征是:
- jsoup使用笔记
alleni123
java爬虫JSoup
<dependency>
<groupId>org.jsoup</groupId>
<artifactId>jsoup</artifactId>
<version>1.7.3</version>
</dependency>
2014/08/28
今天遇到这种形式,
- JAVA中的集合 Collectio 和Map的简单使用及方法
百合不是茶
listmapset
List ,set ,map的使用方法和区别
java容器类类库的用途是保存对象,并将其分为两个概念:
Collection集合:一个独立的序列,这些序列都服从一条或多条规则;List必须按顺序保存元素 ,set不能重复元素;Queue按照排队规则来确定对象产生的顺序(通常与他们被插入的
- 杀LINUX的JOB进程
bijian1013
linuxunix
今天发现数据库一个JOB一直在执行,都执行了好几个小时还在执行,所以想办法给删除掉
系统环境:
ORACLE 10G
Linux操作系统
操作步骤如下:
第一步.查询出来那个job在运行,找个对应的SID字段
select * from dba_jobs_running--找到job对应的sid
&n
- Spring AOP详解
bijian1013
javaspringAOP
最近项目中遇到了以下几点需求,仔细思考之后,觉得采用AOP来解决。一方面是为了以更加灵活的方式来解决问题,另一方面是借此机会深入学习Spring AOP相关的内容。例如,以下需求不用AOP肯定也能解决,至于是否牵强附会,仁者见仁智者见智。
1.对部分函数的调用进行日志记录,用于观察特定问题在运行过程中的函数调用
- [Gson六]Gson类型适配器(TypeAdapter)
bit1129
Adapter
TypeAdapter的使用动机
Gson在序列化和反序列化时,默认情况下,是按照POJO类的字段属性名和JSON串键进行一一映射匹配,然后把JSON串的键对应的值转换成POJO相同字段对应的值,反之亦然,在这个过程中有一个JSON串Key对应的Value和对象之间如何转换(序列化/反序列化)的问题。
以Date为例,在序列化和反序列化时,Gson默认使用java.
- 【spark八十七】给定Driver Program, 如何判断哪些代码在Driver运行,哪些代码在Worker上执行
bit1129
driver
Driver Program是用户编写的提交给Spark集群执行的application,它包含两部分
作为驱动: Driver与Master、Worker协作完成application进程的启动、DAG划分、计算任务封装、计算任务分发到各个计算节点(Worker)、计算资源的分配等。
计算逻辑本身,当计算任务在Worker执行时,执行计算逻辑完成application的计算任务
- nginx 经验总结
ronin47
nginx 总结
深感nginx的强大,只学了皮毛,把学下的记录。
获取Header 信息,一般是以$http_XX(XX是小写)
获取body,通过接口,再展开,根据K取V
获取uri,以$arg_XX
&n
- 轩辕互动-1.求三个整数中第二大的数2.整型数组的平衡点
bylijinnan
数组
import java.util.ArrayList;
import java.util.Arrays;
import java.util.List;
public class ExoWeb {
public static void main(String[] args) {
ExoWeb ew=new ExoWeb();
System.out.pri
- Netty源码学习-Java-NIO-Reactor
bylijinnan
java多线程netty
Netty里面采用了NIO-based Reactor Pattern
了解这个模式对学习Netty非常有帮助
参考以下两篇文章:
http://jeewanthad.blogspot.com/2013/02/reactor-pattern-explained-part-1.html
http://gee.cs.oswego.edu/dl/cpjslides/nio.pdf
- AOP通俗理解
cngolon
springAOP
1.我所知道的aop 初看aop,上来就是一大堆术语,而且还有个拉风的名字,面向切面编程,都说是OOP的一种有益补充等等。一下子让你不知所措,心想着:怪不得很多人都和 我说aop多难多难。当我看进去以后,我才发现:它就是一些java基础上的朴实无华的应用,包括ioc,包括许许多多这样的名词,都是万变不离其宗而 已。 2.为什么用aop&nb
- cursor variable 实例
ctrain
variable
create or replace procedure proc_test01
as
type emp_row is record(
empno emp.empno%type,
ename emp.ename%type,
job emp.job%type,
mgr emp.mgr%type,
hiberdate emp.hiredate%type,
sal emp.sal%t
- shell报bash: service: command not found解决方法
daizj
linuxshellservicejps
今天在执行一个脚本时,本来是想在脚本中启动hdfs和hive等程序,可以在执行到service hive-server start等启动服务的命令时会报错,最终解决方法记录一下:
脚本报错如下:
./olap_quick_intall.sh: line 57: service: command not found
./olap_quick_intall.sh: line 59
- 40个迹象表明你还是PHP菜鸟
dcj3sjt126com
设计模式PHP正则表达式oop
你是PHP菜鸟,如果你:1. 不会利用如phpDoc 这样的工具来恰当地注释你的代码2. 对优秀的集成开发环境如Zend Studio 或Eclipse PDT 视而不见3. 从未用过任何形式的版本控制系统,如Subclipse4. 不采用某种编码与命名标准 ,以及通用约定,不能在项目开发周期里贯彻落实5. 不使用统一开发方式6. 不转换(或)也不验证某些输入或SQL查询串(译注:参考PHP相关函
- Android逐帧动画的实现
dcj3sjt126com
android
一、代码实现:
private ImageView iv;
private AnimationDrawable ad;
@Override
protected void onCreate(Bundle savedInstanceState)
{
super.onCreate(savedInstanceState);
setContentView(R.layout
- java远程调用linux的命令或者脚本
eksliang
linuxganymed-ssh2
转载请出自出处:
http://eksliang.iteye.com/blog/2105862
Java通过SSH2协议执行远程Shell脚本(ganymed-ssh2-build210.jar)
使用步骤如下:
1.导包
官网下载:
http://www.ganymed.ethz.ch/ssh2/
ma
- adb端口被占用问题
gqdy365
adb
最近重新安装的电脑,配置了新环境,老是出现:
adb server is out of date. killing...
ADB server didn't ACK
* failed to start daemon *
百度了一下,说是端口被占用,我开个eclipse,然后打开cmd,就提示这个,很烦人。
一个比较彻底的解决办法就是修改
- ASP.NET使用FileUpload上传文件
hvt
.netC#hovertreeasp.netwebform
前台代码:
<asp:FileUpload ID="fuKeleyi" runat="server" />
<asp:Button ID="BtnUp" runat="server" onclick="BtnUp_Click" Text="上 传" />
- 代码之谜(四)- 浮点数(从惊讶到思考)
justjavac
浮点数精度代码之谜IEEE
在『代码之谜』系列的前几篇文章中,很多次出现了浮点数。 浮点数在很多编程语言中被称为简单数据类型,其实,浮点数比起那些复杂数据类型(比如字符串)来说, 一点都不简单。
单单是说明 IEEE浮点数 就可以写一本书了,我将用几篇博文来简单的说说我所理解的浮点数,算是抛砖引玉吧。 一次面试
记得多年前我招聘 Java 程序员时的一次关于浮点数、二分法、编码的面试, 多年以后,他已经称为了一名很出色的
- 数据结构随记_1
lx.asymmetric
数据结构笔记
第一章
1.数据结构包括数据的
逻辑结构、数据的物理/存储结构和数据的逻辑关系这三个方面的内容。 2.数据的存储结构可用四种基本的存储方法表示,它们分别是
顺序存储、链式存储 、索引存储 和 散列存储。 3.数据运算最常用的有五种,分别是
查找/检索、排序、插入、删除、修改。 4.算法主要有以下五个特性:
输入、输出、可行性、确定性和有穷性。 5.算法分析的
- linux的会话和进程组
网络接口
linux
会话: 一个或多个进程组。起于用户登录,终止于用户退出。此期间所有进程都属于这个会话期。会话首进程:调用setsid创建会话的进程1.规定组长进程不能调用setsid,因为调用setsid后,调用进程会成为新的进程组的组长进程.如何保证? 先调用fork,然后终止父进程,此时由于子进程的进程组ID为父进程的进程组ID,而子进程的ID是重新分配的,所以保证子进程不会是进程组长,从而子进程可以调用se
- 二维数组 元素的连续求解
1140566087
二维数组ACM
import java.util.HashMap;
public class Title {
public static void main(String[] args){
f();
}
// 二位数组的应用
//12、二维数组中,哪一行或哪一列的连续存放的0的个数最多,是几个0。注意,是“连续”。
public static void f(){
- 也谈什么时候Java比C++快
windshome
javaC++
刚打开iteye就看到这个标题“Java什么时候比C++快”,觉得很好笑。
你要比,就比同等水平的基础上的相比,笨蛋写得C代码和C++代码,去和高手写的Java代码比效率,有什么意义呢?
我是写密码算法的,深刻知道算法C和C++实现和Java实现之间的效率差,甚至也比对过C代码和汇编代码的效率差,计算机是个死的东西,再怎么优化,Java也就是和C
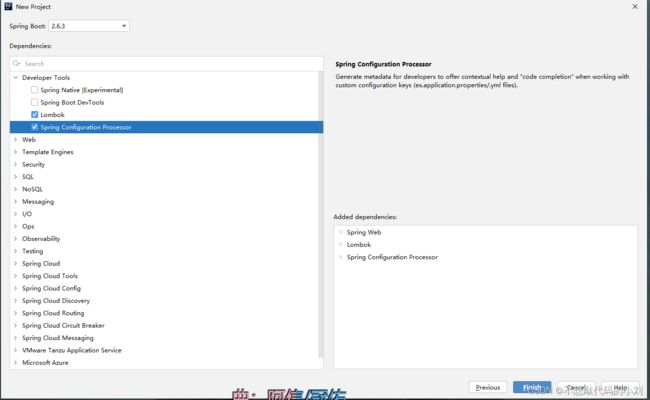 这里我们从springboot依赖库中勾选出我们所需要的依赖