【viewbpmn / SpiffWorkflow / TimeAwareBPMN-js】Quick Start
文章目录
- Ref
- viewflow 运行流程
-
- 1. git clone和建立虚拟环境,安装包
- 2. Initial steps
- 3. Configuration
- 4. Define models
- 5. Define flow
- 6. Enable frontend
- 7. Run and explore
- SpiffWorkflow 运行流程
-
- 1. Git clone 和虚拟环境配置
- 2. Test
- TimeAwareBPMN-js 运行流程
-
- 1. git clone 和虚拟环境配置
- 2. npm
- 3. Install and Run
Ref
【viewflow 官网说明 Quick Start】:http://docs.viewflow.io/viewflow_quickstart.html
【viewflow Github】:https://github.com/viewflow/viewflow
【SpiffWorkflow 官网说明 Quick start】:https://github.com/sartography/SpiffWorkflow
【SpiffWorkflow Github】:https://github.com/sartography/SpiffWorkflow
【TimeAwareBPMN-js Github】:https://github.com/ElsevierSoftwareX/SOFTX-D-21-00180
【TimeAwareBPMN-js 论文原文:TimeAwareBPMN-js: An editor and temporal verification tool for Time-Aware BPMN processes】https://www.sciencedirect.com/science/article/pii/S2352711021001734
viewflow 运行流程
【官网说明:Quick Start】http://docs.viewflow.io/viewflow_quickstart.html
1. git clone和建立虚拟环境,安装包
【viewflow github】:https://github.com/viewflow/viewflow
virtualenv -p python3.7 ~/venv/viewflow
source ~/venv/viewflow/bin/activate
python3.7 -m pip install django django-material django-viewflow
2. Initial steps
- 创建子文件夹,例如demo_20220821:
- In the current directory, scaffold a new django project:
django-admin startproject demo .
- Create an app:
./manage.py startapp helloworld
符合官网所说结构:
Now you should have following file structure:
demo/
├── asgi.py
├── init.py
├── settings.py
├── urls.py
└── wsgi.py
helloworld
├── admin.py
├── apps.py
├── init.py
├── migrations
│ └── init.py
├── models.py
├── tests.py
└── views.py
manage.py
3. Configuration
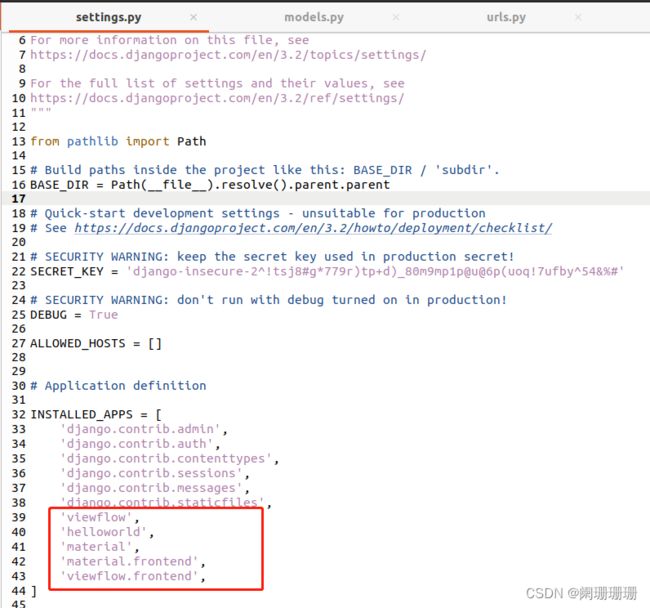
Open the demo_20220821/settings.py and add viewflow and demo_20220821.helloworld into INSTALLED_APPS setting
INSTALLED_APPS = [
    ...
    'viewflow',
    'helloworld',
]
最终结果如下(包括后面的configure):
4. Define models
Open helloworld/models.py file and define a process model with text and approved fields, to capture the process state during execution.
from django.db import models
from viewflow.models import Process


class HelloWorldProcess(Process):
    text = models.CharField(max_length=150)
    approved = models.BooleanField(default=False)
5. Define flow
Open(其实为create) the demo_20220821/helloworld/flows.py file and define:
from viewflow import flow
from viewflow.base import this, Flow
from viewflow.flow.views import CreateProcessView, UpdateProcessView

from .models import HelloWorldProcess


class HelloWorldFlow(Flow):
    process_class = HelloWorldProcess

    start = (
        flow.Start(
            CreateProcessView,
            fields=["text"]
        ).Permission(
            auto_create=True
        ).Next(this.approve)
    )

    approve = (
        flow.View(
            UpdateProcessView,
            fields=["approved"]
        ).Permission(
            auto_create=True
        ).Next(this.check_approve)
    )

    check_approve = (
        flow.If(lambda activation: activation.process.approved)
        .Then(this.send)
        .Else(this.end)
    )

    send = (
        flow.Handler(
            this.send_hello_world_request
        ).Next(this.end)
    )

    end = flow.End()

    def send_hello_world_request(self, activation):
        print(activation.process.text)
6. Enable frontend
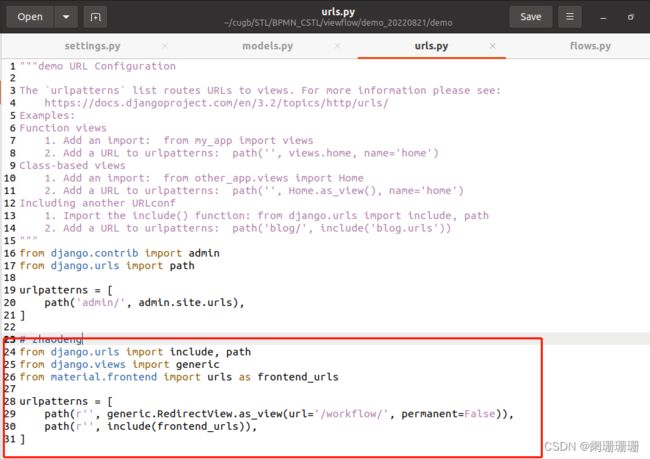
Add frontend URLs into global URL conf module at demo/urls.py
from django.urls import include, path
from django.views import generic
from material.frontend import urls as frontend_urls

urlpatterns = [
    path(r'', generic.RedirectView.as_view(url='/workflow/', permanent=False)),
    path(r'', include(frontend_urls)),
]
At the last step, register our flow in the viewflow.frontend.
from viewflow import frontend

@frontend.register
class HelloWorldFlow(Flow):
    ...
7. Run and explore
Create migrations for the helloworld app.
./manage.py makemigrations helloworld

Apply it
./manage.py migrate

Create an admin user to initial login
./manage.py createsuperuser

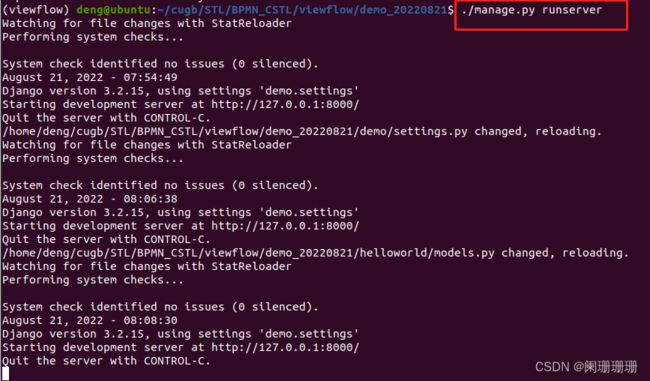
Run the server
./manage.py runserver
Go to http://127.0.0.1:8000 and see the viewflow in action!
(由于我是虚拟机内的ubuntu系统,所以需要在Ubuntu系统里的浏览器打开http://127.0.0.1:8000)
SpiffWorkflow 运行流程
【官网Quick start】https://github.com/sartography/SpiffWorkflow
1. Git clone 和虚拟环境配置
- git clone
git clone https://github.com/sartography/SpiffWorkflow.git
- 创建虚拟环境
virtualenv -p python3.7 ~/venv/spiffwk
source ~/venv/spiffwk/bin/activate
- 安装包spiffworkflow
python3.7 -m pip install spiffworkflow
2. Test
cd tests/SpiffWorkflow
coverage run --source=SpiffWorkflow -m unittest discover -v . "*Test.py"
注意这里coverage包需要安装:
python3.7 -m pip install -U coverage
TimeAwareBPMN-js 运行流程
【github官网】https://github.com/ElsevierSoftwareX/SOFTX-D-21-00180
【论文原文:TimeAwareBPMN-js: An editor and temporal verification tool for Time-Aware BPMN processes】https://www.sciencedirect.com/science/article/pii/S2352711021001734
1. git clone 和虚拟环境配置
git clone https://github.com/ElsevierSoftwareX/SOFTX-D-21-00180.git

virtualenv -p python3.7 ~/venv/timeawareBPMN
source ~/venv/timeawareBPMN/bin/activate
2. npm
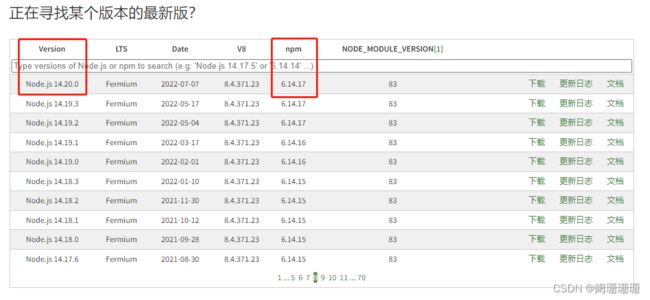
需安装npm和node.js,并且和两者版本应当匹配:
【Node.js 与 npm版本匹配】:https://nodejs.org/zh-cn/download/releases/
可以从上述网址上看到两者匹配:
3. Install and Run
- install all other dependencies
npm install
- run project
npm start
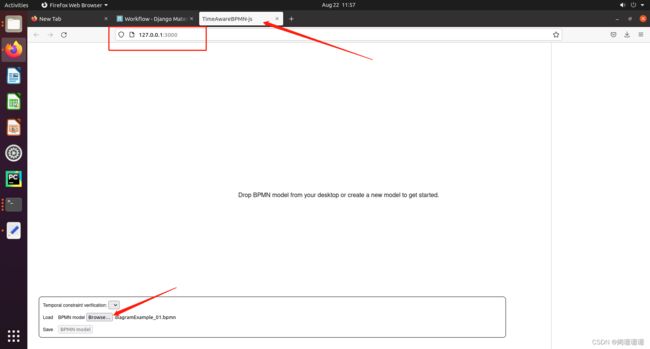
然后,就会自动打开http://127.0.0.1:3000/
此时可以载入xxx.bpmn,例如点击【Browse】,选择【./SOFTX-D-21-00180/examples/models】,选择【diagramExample_01.bpmn】:
此时即显示主界面


