【AndroidUI设计】个人信息界面
- 描述:写一个简单的个人信息界面,需要具备以下需求。
- 需求:
– 1、使用icon矢量图标,能够动态修改图标颜色,减少静态资源所占空间
– 2、如何使操作模块,像Vue一样,添加方便。
– 3、点击、长按、松开触发色变事件 - 难度:初级
- 知识点:
- 1、Icon矢量图标的使用
- 2、Adapter适配的使用
- 3、setOnTouchListener事件的使用
个人信息界面(拿来就可以用)
一、UI界面设计
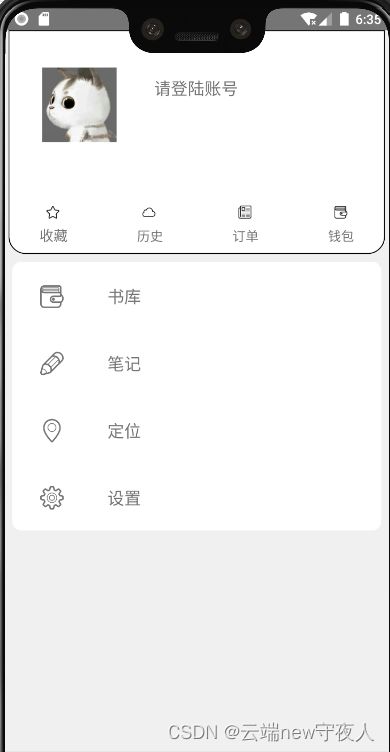
1、效果
2、xml代码
需要先学习 样式设计 地址:http://t.csdn.cn/ljSln,不想学可以直接copy源代码 地址:https://download.csdn.net/download/weixin_48916759/87796130
<RelativeLayout xmlns:android="http://schemas.android.com/apk/res/android"
    xmlns:app="http://schemas.android.com/apk/res-auto"
    xmlns:tools="http://schemas.android.com/tools"
    android:layout_width="match_parent"
    android:layout_height="match_parent"
    android:scrollbars="vertical"
    android:background="#F0F0F0">

    <TextView
        android:id="@+id/home_ys"
        android:layout_width="match_parent"
        android:layout_height="240dp"
        android:layout_marginLeft="4dp"
        android:layout_marginRight="4dp"
        android:background="@drawable/shape23" />

    <ImageView
        android:id="@+id/fragment_tx"
        android:layout_width="80dp"
        android:layout_height="80dp"
        android:layout_margin="40dp"
        android:src="@drawable/tx1"/>

    <ImageButton
        android:id="@+id/fragment_avatar"
        android:layout_width="80dp"
        android:layout_height="80dp"
        android:layout_margin="40dp"
        android:background="#07000000" />

    <TextView
        android:id="@+id/wd_name"
        android:layout_width="180dp"
        android:layout_height="30dp"
        android:layout_marginTop="50dp"
        android:layout_toRightOf="@id/fragment_tx"
        android:text="请登陆账号"
        android:textSize="18dp" />

    <LinearLayout
        android:id="@+id/inter"
        android:layout_width="match_parent"
        android:layout_height="wrap_content"
        android:layout_below="@id/fragment_tx"
        android:orientation="horizontal"
        android:textSize="30dp">

        <Button
            android:id="@+id/XPQ_FAVORITES"
            android:layout_width="wrap_content"
            android:layout_height="70dp"
            android:layout_weight="1"
            android:background="#00FFFFFF" />

        <Button
            android:id="@+id/XPQ_RECORDING"
            android:layout_width="wrap_content"
            android:layout_height="70dp"
            android:layout_weight="1"
            android:background="#00FFFFFF" />

        <Button
            android:id="@+id/XPQ_ORDER"
            android:layout_width="wrap_content"
            android:layout_height="70dp"
            android:layout_weight="1"
            android:background="#00FFFFFF"/>

        <Button
            android:id="@+id/XPQ_WALLET"
            android:layout_width="wrap_content"
            android:layout_height="70dp"
            android:layout_weight="1"
            android:background="#00FFFFFF"/>

    LinearLayout>

    <LinearLayout
        android:id="@+id/inters"
        android:layout_width="match_parent"
        android:layout_height="wrap_content"
        android:layout_below="@id/fragment_tx"
        android:layout_marginTop="50dp"
        android:orientation="horizontal">

        <TextView
            android:id="@+id/FAVORITES"
            android:layout_width="wrap_content"
            android:layout_height="wrap_content"
            android:layout_weight="1"
            android:background="#00FFFFFF"
            android:text="收藏"
            android:gravity="center"
            android:textSize="15dp" />

        <TextView
            android:id="@+id/RECORDING"
            android:layout_width="wrap_content"
            android:layout_height="wrap_content"
            android:layout_weight="1"
            android:background="#00FFFFFF"
            android:gravity="center"
            android:text="历史" />

        <TextView
            android:id="@+id/ORDER"
            android:layout_width="wrap_content"
            android:layout_height="wrap_content"
            android:layout_weight="1"
            android:background="#00FFFFFF"
            android:gravity="center"
            android:text="订单" />

        <TextView
            android:id="@+id/WALLET"
            android:layout_width="wrap_content"
            android:layout_height="wrap_content"
            android:layout_weight="1"
            android:background="#00FFFFFF"
            android:gravity="center"
            android:text="钱包" />

    LinearLayout>

    <LinearLayout
        android:layout_width="match_parent"
        android:layout_height="match_parent"
        android:layout_below="@id/inters"
        android:layout_marginTop="10dp">

        <androidx.recyclerview.widget.RecyclerView
            android:id="@+id/r1"
            android:layout_width="match_parent"
            android:layout_height="wrap_content"
            android:layout_margin="8dp"
            android:background="@drawable/shape_circular"/>

    LinearLayout>

RelativeLayout>
二、后台逻辑
1、代码目录

2、说明
- icon映射,学习地址icon矢量图标应用(低内存高复用) http://t.csdn.cn/BAkxp
- Adapter适配器,学习地址三种常见的适配器(Adapter) http://t.csdn.cn/RtayQ
- setOnTouchListener事件的使用
		holder.fileView.setOnTouchListener(new View.OnTouchListener() {
            @Override
            public boolean onTouch(View v, MotionEvent event) {
                switch (event.getAction()) {
                    case MotionEvent.ACTION_DOWN:
                        Log.i("data", "按下");
                        break;
                    case MotionEvent.ACTION_UP:
                        Log.i("data", "松开");
                        break;
                    default:
                        Log.i("data", "其他");
                        break;
                }
                return false;
            }
        });
- 实体Op.java
public class Op {

    String icon;
    String name;
    Object cla;

    public String getIcon() {
        return icon;
    }

    public String getName() {
        return name;
    }

    public Object getCla() {
        return cla;
    }

    public void setIcon(String icon) {
        this.icon = icon;
    }

    public void setName(String name) {
        this.name = name;
    }

    public void setCla(Object cla) {
        this.cla = cla;
    }

    public Op(String icon, String name, Object cla) {
        this.icon = icon;
        this.name = name;
        this.cla = cla;
    }
}
- 操作模块List数据
    private List<Op> getListOp() {
        List<Op> list = new ArrayList<>();
        String[] icon = {XpqIcoMoon.MAKE, XpqIcoMoon.ENTER, XpqIcoMoon.POSITION, XpqIcoMoon.SET};
        String[] name = {"书库", "笔记", "定位", "设置"};
        Object[] acl = {SkActivity.class, BjActivity.class, DwActivity.class, SzActivity.class};
        for (int i = 0; i < icon.length; i++) {
            Op o = new Op(icon[i], name[i], acl[i]);
            list.add(o);
        }
        return list;
    }
- 初始化代码
	// 初始化
    private void init() {
        favorites = findViewById(R.id.XPQ_FAVORITES);
        recording = findViewById(R.id.XPQ_RECORDING);
        wallet = findViewById(R.id.XPQ_WALLET);
        order = findViewById(R.id.XPQ_ORDER);
        r2 = findViewById(R.id.r1);
        // 上层图标
        favorites.setText(XpqIcoMoon.FAVORITES);
        recording.setText(XpqIcoMoon.RECORDING);
        wallet.setText(XpqIcoMoon.WALLET);
        order.setText(XpqIcoMoon.ORDER);
        XpqIcoMoonUtils.setIOC(favorites,recording,wallet,order);
        // 获取操作模块数据
        List<Op> list = getListOp();
        // 操作模块布局
        listAdapter(list);
    }

    // 初始化布局
    private void listAdapter(List<Op> list) {
        StaggeredGridLayoutManager layoutManager = new StaggeredGridLayoutManager(1,StaggeredGridLayoutManager.VERTICAL);
        r2.setLayoutManager(layoutManager);
        ListAdapter adapter = new ListAdapter(list);
        r2.setAdapter(adapter);
    }
三、源代码
Android开发一个简单的个人信息界面