golang web学习随便记1-快速入门
Hello world
直接上第一个例子代码 first_webapp/server.go
package main

import (
	"fmt"
	"net/http"
)

func handler(writer http.ResponseWriter, request *http.Request) {
	fmt.Fprintf(writer, "hello world, %s!", request.URL.Path[1:])
}

func main() {
	http.HandleFunc("/", handler)
	http.ListenAndServe(":8088", nil)
}
确保golang基本环境已经具备,然后到项目目录 first_webapp下
sjg@sjg-PC:~/go/src/gostudy/first_webapp$ go mod init
sjg@sjg-PC:~/go/src/gostudy/first_webapp$ go run .
然后浏览器打开 http://localhost:8088 就可以看到输出 (如果输入 http://localhost:8088/yes/it/is,那么 request.URL.Path 对应字符串 /yes/it/is,代码中用字符串切片[1:]去掉了第1个字符/)
一个handler可以是一个handler func,它带有两个参数,类型分别为 http.ResponseWriter 和 *http.Request 。主程序中主要是2个动作:(为指定的路由)设定 handler 和在指定端口启动监听。
http.Server对象、多路复用器
接下来,我们新建项目chitchat,来修改一下上面的代码:先创建 http.Server 对象server(使用Server结构的好处是可以对服务器进行配置),设定好handler、监听端口等,然后调用该对象的 server.ListenAndServe() 启动监听。在此时,我们使用多路复用器(multiplexer)作为server的handler (前面的例子,http.ListenAndServe第二个参数为nil,将使用默认的多路复用器DefaultServeMux。多路复用器概念参见 golang学习随便记11-goroutine和channel(3)_sjg20010414的博客-CSDN博客)。多路复用器概念有点类似Windows里面的WaitForMultipleObjects,即等待多个事件信号,其中任何一个触发就进入相应处理。
package main

import (
	"fmt"
	"net/http"
)

func main() {
	mux := http.NewServeMux()
	files := http.FileServer(http.Dir("./public"))
	mux.Handle("/static/", http.StripPrefix("/static/", files))
	mux.HandleFunc("/", index)

	server := &http.Server{
		Addr:    "0.0.0.0:8088",
		Handler: mux,
	}
	server.ListenAndServe()
}

func index(w http.ResponseWriter, r *http.Request) {
	fmt.Fprintf(w, "暂未实现首页")
}
两种 handler
上面的代码中,多路复用器mux设定了两种信号处理方式:对路由 /static/* 用一个 (http.FileServer函数创建的)http.Handler对象处理,去掉URL路径前缀/static/,返回(相对于当前项目根目录的)/public路径下的*所代表的文件(例如,浏览器访问 http://localhost:8088/static/css/bootstrap.min.css,返回给客户的是
使用多路复用器的Handle方法时,我们需要使用处理器handler;当使用HandleFunc方法时,需要使用处理器函数handler func。处理器和处理器函数的签名都是:(h *T) ServeHTTP(w http.ResponseWriter, r *http.Request),无非后者没有方法的接收者部分h *T。任何一个空结构体T,只要实现了ServeHTTP,它就是个合法的handler。而对于符合(w http.ResponseWriter, r *http.Request)参数形式的函数,HandlerFunc方法都可以把它转换成合法的handler。
静态内容与动态内容
对于 css、fonts、js 、图片等静态内容,前述处理基本能解决问题。对于动态部分,我们来看看html模板 (关于文本模板和html模板的基础知识,可以参考 golang学习随便记5-类型:JSON、文本与HTML模板_sjg20010414的博客-CSDN博客)。
模板与布局
先来看3个模板: chitchat/templates/layout.html 中定义了布局模板 layout,在布局模板 layout 中引用了模板 navbar 和 content,不同的文件可以定义相同名字的模板,例如 chitchat/templates下的public.navbar.html 和 private.navbar.html都定义了navbar模板,index.html和login.html都定义了content模板,具体使用了哪个文件的模板,这要看你解析模板前指定了哪个模板文件。
修改上面的 main.go 为如下代码:
package main

import (
	"html/template"
	"log"
	"net/http"
	"time"
)

func main() {
	mux := http.NewServeMux()
	files := http.FileServer(http.Dir("./public"))
	mux.Handle("/static/", http.StripPrefix("/static/", files))
	mux.HandleFunc("/", index)

	server := &http.Server{
		Addr:    "0.0.0.0:8088",
		Handler: mux,
	}
	server.ListenAndServe()
}

func index(w http.ResponseWriter, r *http.Request) {
	files := []string{
		"templates/layout.html",
		"templates/public.navbar.html",
		"templates/index.html",
	}
	templates := template.Must(template.ParseFiles(files...))

	type User struct {
		Id        int
		Uuid      string
		Name      string
		Email     string
		Password  string
		CreatedAt time.Time
	}

	type Thread struct {
		Id            int
		Uuid          string
		Topic         string
		User          User
		CreatedAtDate string
		NumReplies    int
	}

	t, err := time.ParseInLocation("2006-01-02 15:04:05", "2023-01-01 10:10:10", time.Local)
	if err != nil {
		log.Fatal(err)
	}

	threads := [3]Thread{
		{1, "2ffwe-fwfefe", "主题1",
			User{1, "fwefoi-23fo3j", "张三", "[email protected]", "", t},
			"2023-01-01 12:12:12", 3},
		{2, "2ffwe-222222", "主题2",
			User{2, "fwefoi-23fo3j", "李四", "[email protected]", "", t},
			"2023-01-01 12:22:12", 4},
		{3, "2ffwe-333333", "主题3",
			User{1, "fwefoi-23fo3j", "张三", "[email protected]", "", t},
			"2023-01-01 12:33:12", 3},
	}

	templates.ExecuteTemplate(w, "layout", threads)
}
templates/layout.html 如下:
{{ define "layout" }}


    ChitChat


    {{ template "navbar" . }}


      {{ template "content" . }}


{{ end }}
templates/public.navbar.html 如下:
{{ define "navbar" }}
{{ end }}templates/index.html 如下:
{{ define "content" }}
开启新帖 或者加入下面某个帖子!
{{ range . }}
{{ .Topic }}
创建者 {{ .User.Name }} - {{ .CreatedAtDate }} - {{ .NumReplies }} 个帖子.
{{ end }}
{{ end }}go run . ,然后浏览器打开 http://localhost:8088 显示如下:

下面的内容是增补的:
net/http标准库概览
在golang的net/http标准库中,同时包含了支持客户端和服务端的结构和函数,一些结构同时支持客户端和服务端,大致情况为:

证书与https
用golang实现https服务与实现http服务没有太大差别,只是需要先准备好SSL证书和服务器私钥。 在开发和测试环境,我们可以生成个人使用的SSL证书来代替。
package main

import (
	"crypto/rand"
	"crypto/rsa"
	"crypto/x509"
	"crypto/x509/pkix"
	"encoding/pem"
	"math/big"
	"net"
	"os"
	"time"
)

func main() {
	max := new(big.Int).Lsh(big.NewInt(1), 128) // max = 1 << 128
	sn, _ := rand.Int(rand.Reader, max)         // sn  [0, max)之间的随机数作为序列号
	subject := pkix.Name{                       // X.509 证书识别名(主题)
		Organization:       []string{"Zhejiang Institute of Mechanical and Electronical Engineering"},
		OrganizationalUnit: []string{"Modern Information Technology School"},
		CommonName:         "Golang Web SSL/TLS Test",
	}
	template := x509.Certificate{ // X.509 证书信息, https://www.rfc-editor.org/rfc/rfc5280
		SerialNumber: sn,
		Subject:      subject,
		NotBefore:    time.Now(),
		NotAfter:     time.Now().Add(365 * 24 * time.Hour),
		KeyUsage:     x509.KeyUsageKeyEncipherment | x509.KeyUsageDigitalSignature, // 给定秘钥的有效行为(bitmap)
		ExtKeyUsage:  []x509.ExtKeyUsage{x509.ExtKeyUsageServerAuth},               // 给定秘钥有效行为的扩展集合
		IPAddresses:  []net.IP{net.ParseIP("127.0.0.1")},
	}
	pk, _ := rsa.GenerateKey(rand.Reader, 2048) // 根据随机源的随机性创建指定位数的RSA秘钥对

	derBytes, _ := x509.CreateCertificate(rand.Reader, &template, &template, &pk.PublicKey, pk) // 创建 X.509 v3证书(DER编码)
	certOut, _ := os.Create("cert.pem")                                                         // 创建公钥文件
	pem.Encode(certOut, &pem.Block{Type: "CERTIFICATE", Bytes: derBytes})                       // DER格式数据按PEM编码写入公钥
	certOut.Close()

	keyOut, _ := os.Create("key.pem") // 创建私钥文件,  // RSA私钥转 PKCS#1, ASN.1 DER形式,最后 PEM编码写入私钥文件
	pem.Encode(keyOut, &pem.Block{Type: "RSA PRIVATE KEY", Bytes: x509.MarshalPKCS1PrivateKey(pk)})
	keyOut.Close()
}
代码中,变量pk包含了公钥和私钥信息,打印pk,得到信息依次为 {N E} D [P Q] {Dp Dq Qinv []},其中 N=P*Q,E为公钥,D为私钥,Dp = E^-1 mod (P-1),Dq=E^-1 mod (Q-1),Qinv=Q^-1 mod P,后面这些参数是用中国剩余定理(CRT)计算时用到的参数。
上面生成证书的过程大致为:生成 [0, 2^128)范围的一个大整数sn作为序列号,创建证书模板,生成最多2048bit的RSA秘钥对,用秘钥对中的公钥和证书模板生成证书(二进制DER编码格式),再将DER格式证书编码成PEM格式,将密码对中私钥先编码成DER格式,再转PEM格式作为私钥文件。
使用证书时,其他没有差别,就是用ListenAndServeTLS代替ListenAndServe(先把证书和私钥放到新建的项目httpstest下,然后编写代码):
package main

import (
	"fmt"
	"net/http"
)

func main() {
	server := http.Server{
		Addr:    "127.0.0.1:8089",
		Handler: nil,
	}
	http.HandleFunc("/", handler)
	server.ListenAndServeTLS("cert.pem", "key.pem")
}

func handler(writer http.ResponseWriter, request *http.Request) {
	fmt.Fprintf(writer, "hello world, %s!", request.URL.Path[1:])
}
然后用浏览器打开 https://127.0.0.1:8089,浏览器会给出警告,不同浏览器的警告略有不同,下面的是查看Firefox里关于证书的信息:
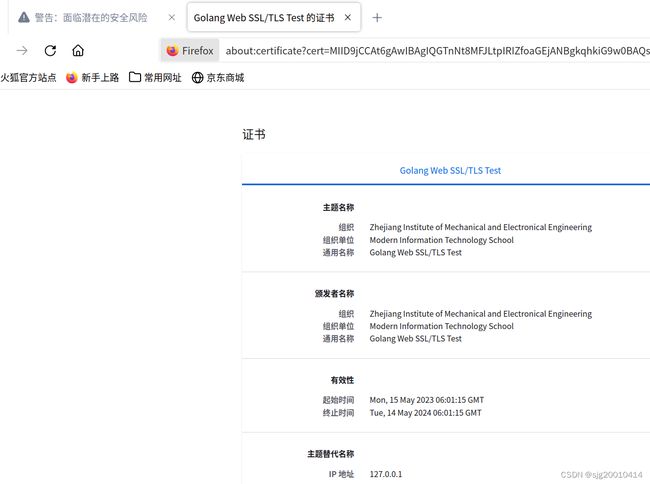
接受风险并继续(Firefox会把该网址加入到例外里),就可以看到结果:

串联handler
我们来看一个串联处理器的例子:
package main

import (
	"fmt"
	"net/http"
	"time"
)

// type MyHandler struct{}

// func (h *MyHandler) ServeHTTP(w http.ResponseWriter, r *http.Request) {
func hello(w http.ResponseWriter, r *http.Request) {
	fmt.Fprintf(w, "你好! 这是 MyHandler")
}

// func log(h http.Handler) http.Handler {
func log(h http.HandlerFunc) http.HandlerFunc {
	// return http.HandlerFunc(func(w http.ResponseWriter, r *http.Request) {
	return func(w http.ResponseWriter, r *http.Request) {
		fmt.Printf("记录日志: Handler 被调用 - %T\n", h)
		h.ServeHTTP(w, r)
		// })
	}
}

// func authenticate(h http.Handler) http.Handler {
func authenticate(h http.HandlerFunc) http.HandlerFunc {
	// return http.HandlerFunc(func(w http.ResponseWriter, r *http.Request) {
	return func(w http.ResponseWriter, r *http.Request) {
		fmt.Printf(time.Now().Format("2006-01-02 15:04:05") + " 用户验证: Pass\n")
		h.ServeHTTP(w, r)
		// })
	}
}

func main() {
	server := http.Server{
		Addr: "127.0.0.1:8088",
	}
	// h := MyHandler{}
	// http.Handle("/hello", authenticate(log(&h)))
	http.HandleFunc("/hello", authenticate(log(hello)))
	server.ListenAndServe()
}
运行后,用浏览器访问 http://localhost:8088/hello两次,显示结果类似如下:
sjg@sjg-PC:~/go/src/chainhandler$ go run .
2023-05-16 13:40:17 用户验证: Pass
记录日志: Handler 被调用 - *main.MyHandler
2023-05-16 13:40:24 用户验证: Pass
记录日志: Handler 被调用 - *main.MyHandler
在上述代码中,log函数和authenticate函数内,把一个handler func转换成了 http.Handler,而函数参数和返回值都是一个http.Handler,handler func内只是为了插入执行一些任务,实际对HTTP请求的处理都是转发给下一级的,类似管道效果,这是实现了cross-cutting concern(横切关注)。事实上,实现串联的,既可以是 http.Handler,也可以是 handler func。(代码中注释掉的是http.Handler串联方式,未注释的是handler func串联方式)
ServeMux是一个HTTP请求多路复用器(当没有指明ServeMux时,DefaultServeMux将被使用),它负责接收HTTP请求并根据请求中的URL将请求重定向到正确的处理器。事实上,ServeMux本身就是一个处理器,因为它实现了 ServeHTTP 方法,不过它的任务是根据路由信息进行请求分发。我们自己也可以实现一个HTTP请求多路复用器,唯一必须实现的就是ServeHTTP方法——标准库的 ServeMux 在处理路由上是很弱的,所以,实际应用中会使用一些第三方多路复用器,如 HTTPRouter。
浅尝 HTTP/2
最后浅尝HTTP/2:创建项目http2test,添加以下代码,go get golang.org/x/net/http2 添加包
package main

import (
	"fmt"
	"net/http"

	"golang.org/x/net/http2"
)

type MyHandler struct{}

func (h *MyHandler) ServeHTTP(w http.ResponseWriter, r *http.Request) {
	fmt.Fprintf(w, "你好, Golang")
}

func main() {
	h := MyHandler{}
	server := http.Server{
		Addr:    "127.0.0.1:8088",
		Handler: &h,
	}
	http2.ConfigureServer(&server, &http2.Server{})
	server.ListenAndServeTLS("cert.pem", "key.pem")
}
运行,然后用curl命令来测试(不清楚哪款浏览器支持HTTP 2,而且因为使用的是自签名证书,必须添加 --insecure选项)
sjg@sjg-PC:~/go/src/http2test$ curl -I --http2 --insecure https://localhost:8088/
HTTP/2 200
content-type: text/plain; charset=utf-8
content-length: 14
date: Tue, 16 May 2023 06:44:47 GMT

sjg@sjg-PC:~/go/src/http2test$ curl  --http2 --insecure https://localhost:8088/
你好, Golang