Spring Boot集成Swagger3,与集成Swagger2的不同
Swagger3与Swagger2的区别:
(1)、更好的UI显示
(2)、配置启动类的注解不同:
Swagger3使用 :@EnableOpenApi
Swagger2使用 :@EnableSwagger2
(3)、Swagger UI页面的访问地址不同:
Swagger3使用:“http://localhost:8080/swagger-ui/”
Swagger2使用 :“http://localhost:8080/swagger-ui.html”
(4)、Swagger3需要配置一个springfox-boot-starter的启动器,老版本不需要配置
Spring Boot 集成Swagger3的步骤:
1、在pom.xml中导入所需依赖包
使用的是Swagger3所以需要导入springfox启动器,老版本Swagger2不需要导入
            io.springfox
            springfox-swagger2
            3.0.0


            io.springfox
            springfox-swagger-ui
            3.0.0


            io.springfox
            springfox-boot-starter
            3.0.0
2、若Spring Boot版本高于2.5.6需要在application.yml文件中进行路径的配置:
spring:
  mvc:
    path match:
      matching-strategy: ant_path_matcher
3、配置Swagger的配置类:SwaggerConfig.java
import org.springframework.context.annotation.Bean;
import org.springframework.context.annotation.Configuration;
import springfox.documentation.builders.PathSelectors;
import springfox.documentation.builders.RequestHandlerSelectors;
import springfox.documentation.oas.annotations.EnableOpenApi;
import springfox.documentation.service.ApiInfo;
import springfox.documentation.service.Contact;
import springfox.documentation.spi.DocumentationType;
import springfox.documentation.spring.web.plugins.Docket;

import java.util.ArrayList;

@Configuration
@EnableOpenApi          //开启Swagger3
public class SwaggerConfig {

    //配置多人文档
    @Bean
    public Docket docket1(){return new Docket(DocumentationType.OAS_30).groupName("AA");}
    @Bean
    public Docket docket2(){return new Docket(DocumentationType.OAS_30).groupName("BB");}
    @Bean
    public Docket docket3(){return new Docket(DocumentationType.OAS_30).groupName("CC");}

    //配置Swagger的Docket的bean实例
    @Bean
    public Docket docket(){
        return new Docket(DocumentationType.OAS_30)
                .apiInfo(apiInfo())
                .groupName("HH")
                .select()
                //RequestHandlerSelectors配置要扫描接口的方式
                //basePackage配置要扫描的包
                //any():扫描全部   none():不扫描   withClassAnnotation:扫描类上的注解,参数是-个注解的反射对象   withMethodAnnotation:扫描方法上的注解
                .apis(RequestHandlerSelectors.basePackage("com.hh.controller"))
                //过滤
                .paths(PathSelectors.any())
                .build();
    }

    //配置Swagger   apiInfo()
    private ApiInfo apiInfo(){
        Contact contact = new Contact("hh","https://aabbcc.com","[email protected]");
        return new ApiInfo(
                "Swagger测试",
                "Swagger测试",
                "v1.0",
                "[email protected]",
                contact,
                "Apache 2.0",
                "http://www.apache.org/licenses/LICENSE-2.0",
                new ArrayList()
        );
    }

}
4、创建User实体类,并使用Swagger中的注解:
import io.swagger.annotations.ApiModel;
import io.swagger.annotations.ApiModelProperty;
import lombok.Data;

@Data
@ApiModel("用户实体类")
public class User {

    @ApiModelProperty("用户id")
    private Integer id;
    @ApiModelProperty("用户名")
    private String name;
    @ApiModelProperty("用户密码")
    private String password;

}
5、创建UserController.java控制类,并使用Swagger中的注解:
import com.hh.pojo.User;
import io.swagger.annotations.ApiOperation;
import io.swagger.annotations.ApiParam;
import org.springframework.web.bind.annotation.GetMapping;
import org.springframework.web.bind.annotation.PathVariable;
import org.springframework.web.bind.annotation.RestController;

@RestController
public class UserController {

    //只要我们的接口中,返回值存在实体类,就会扫描到Swagger中
    @ApiOperation("User控制类")
    @GetMapping(value = "/user")
    public User user(@ApiParam("用户编号") @PathVariable("id") Integer id){
        return new User();
    }
}
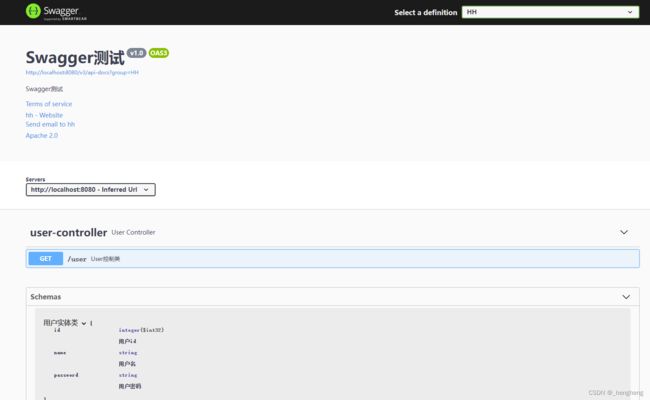
6、访问http://localhost:8080/swagger-ui/:
至此完成集成Swagger
Swagger常用注解:
       (1)、@Api:用在类上,描述该类的作用
       (2)、@ApiOperation:用在方法上,描述方法的作用,标注在具体请求上
       (3)、@ApiModel:描述一个Model的信息,用于class上
       (4)、@ApiModelProperty:与@ApiModel连用,描述实体类的字段
       (5)、@ApiImplicitParams:用在方法上包含一组参数说明
       (6)、@ApiImplicitParam:用在@ApiImplicitParams注解中,指定一个请求参数的各个方面。
       (7)、@ApiResponses:用于表示一组响应
       (8)、@ApiResponse:用在@ApiResponses中,一般用于表达一个错误的响应信息
