源码解析(个人收录,并不标准)

有志不在年高,无志空长百岁
Spring系源码分析(load do regist…)
Spring源码分析
SpringFactory
古代的Spring容器:BeanFactory
现代的Spring容器:SpringApplicationContext 允许容器通过应用程序上下文环境创建、获取、管理bean
https://blog.csdn.net/ac_dao_di/article/details/123764281?ops_request_misc=&request_id=&biz_id=102&utm_term=SpringApplicationContext%E6%B5%81%E7%A8%8B&utm_medium=distribute.pc_search_result.none-task-blog-2allsobaiduweb~default-0-123764281.142v31pc_rank_34,185v2control&spm=1018.2226.3001.4187
ClassLoader原理
引用:
https://blog.csdn.net/qq_31594647/article/details/120509159?ops_request_misc=&request_id=&biz_id=102&utm_term=classloader%E5%8A%A0%E8%BD%BD%E5%8E%9F%E7%90%86&utm_medium=distribute.pc_search_result.none-task-blog-2allsobaiduweb~default-0-120509159.142v30pc_rank_34,185v2control&spm=1018.2226.3001.4187
[外链图片转存失败,源站可能有防盗链机制,建议将图片保存下来直接上传(img-vlMhp2Ub-1657707722919)(C:\Users\Administrator\AppData\Roaming\Typora\typora-user-images\image-20220705161144883.png)]
[外链图片转存失败,源站可能有防盗链机制,建议将图片保存下来直接上传(img-fJuwADiK-1657707722920)(C:\Users\Administrator\AppData\Roaming\Typora\typora-user-images\image-20220705160951871.png)]
整个java虚拟机的类加载层次关系如上图所示,
启动类加载器(Bootstrap Classloader)负责将
**扩展类加载器(Extention Classloader)**负责加载JVM扩展类,比如swing系列、内置的js引擎、xml解析器等,这些类库以javax开头,它们的jar包位于
**应用程序加载器(Application Classloader)**也叫系统类加载器,它负责加载用户路径(ClassPath)上所指定的类库。我们自己编写的代码以及使用的第三方的jar包都是由它来加载的。 加载classpath上指定的类库
**自定义加载器(Custom Classloader)**通常是我们为了某些特殊目的实现的自定义加载器,后面我们得会详细介绍到它的作用以及使用场景。
Bootstrap ClassLoader–>Extention ClassLoader–>AppClass Loader即Bootstrap ClassLoader最先启动,接着是Extenion ClassLoader,最后是AppClass Loader(双亲委派)
[外链图片转存失败,源站可能有防盗链机制,建议将图片保存下来直接上传(img-yd8DnZLQ-1657707722921)(C:\Users\Administrator\AppData\Roaming\Typora\typora-user-images\image-20220706164803000.png)]
通过ClassLoader 装载到 内存中:
Spring系对Classloader的使用:
SpringBean分析
什么是SpringBean
是由Spring工厂统一管理的实例化的对象
Bean首先是单例模式(在BeanDefinetion中就已经确定了)
Bean最终存储于SingtonBeanFactory中(单例池)
Bean的分种
普通bean
FactoryBean:
通过实现FactoryBean去装载类
@Component
public class HelloFactoryBean implements FactoryBean<Hello> {
    @Override
    public Hello getObject() throws Exception {
        Hello hello = new Hello();
        hello.setName("NLER");
        return hello;
    }

    @Override
    public Class<?> getObjectType() {
        return Hello.class;
    }

    @Override
    public boolean isSingleton() {
        return true;
    }
}
Spring生命周期
[外链图片转存失败,源站可能有防盗链机制,建议将图片保存下来直接上传(img-atvNbzup-1657707722922)(C:\Users\NLER\AppData\Roaming\Typora\typora-user-images\image-20220704164049482.png)]
ApplicationContext:Spring上下文(负责装填bean - 类注解Context方式或XML方式)
ApplicationContext 继承BeanFactory(Spring本质 - 利用Spring工厂,生产所需要的bean对象,达到松耦合)
BeanFactory - Bean工厂
通过XML解析器,配置类解析器生成SpringBeanDefinition(Bean说明“图纸”)——》后置处理器(BeanFactoryProcess - InstantiationAwareBeanPostProcessor 实际上做的事情就是属性的填充等事情)——》自定义后置处理器(BeanPostProcessor)——》然后生成Bean(构造器,创建实例类)“实例化“ ——》init初始化
BeanDefinition(Bean的各种属性) -> 构造推断(Spring推断构造方法) -> 实例化(通过构造方法反射生成对象) ->属性填充(依赖注入/自动注入) -> 初始化(对bean需要的属性进行赋值) -> 初始化后——(后置处理器)->(AOP机制)
BeanDefinition
注解也是一种Bean的描述,描述他是什么功能
https://blog.csdn.net/ygy162/article/details/105566002?ops_request_misc=%257B%2522request%255Fid%2522%253A%2522165710078816782246445849%2522%252C%2522scm%2522%253A%252220140713.130102334…%2522%257D&request_id=165710078816782246445849&biz_id=0&utm_medium=distribute.pc_search_result.none-task-blog-2allsobaiduend~default-1-105566002-null-null.142v31pc_rank_34,185v2control&utm_term=beandefinition%E5%88%9B%E5%BB%BA%E8%BF%87%E7%A8%8B&spm=1018.2226.3001.4187
Processor(后置处理器——拓展处理)
@Component
public class FactoryBeanProcessor implements BeanFactoryPostProcessor {
    @Override
    public void postProcessBeanFactory(ConfigurableListableBeanFactory configurableListableBeanFactory) throws BeansException {
        System.out.println("——————执行测试———————");
        BeanDefinition hello = configurableListableBeanFactory.getBeanDefinition("hello");
//        System.out.println(hello.getBeanClassName());
        System.out.println(hello.getFactoryBeanName());
    }
}
生产Bean的过程(懒加载)(DefaultSingletonBeanRegistry):
getBeansOfType -> getBean -> doGetBean -> getSingleton -> getObject(实例化)
(饿汉式加载)
getBean会有三级缓存(DefaultSingletonBeanRegistry)
Object singletonObject = this.singletonObjects.get(beanName);
singletonObject = this.earlySingletonObjects.get(beanName);(二级缓存)
ObjectFactory<?> singletonFactory = this.singletonFactories.get(beanName);(解决循环依赖问题,AOP问题)
SpringIOC分析
1.控制反转
控制反转就是对对象控制权的转移,从程序代码本身反转到了外部容器。把对象的创建、初始化、销毁等工作交给spring容器来做。由spring容器控制对象的生命周期。
2.依赖注入
DI—Dependency Injection,即“依赖注入”:组件之间依赖关系由容器在运行期决定,形象的说,即由容器动态的将某个依赖关系注入到组件之中。依赖注入的目的并非为软件系统带来更多功能,而是为了提升组件重用的频率,并为系统搭建一个灵活、可扩展的平台。通过依赖注入机制,我们只需要通过简单的配置,而无需任何代码就可指定目标需要的资源,完成自身的业务逻辑,而不需要关心具体的资源来自何处,由谁实现。
容器初始化
容器初始化阶段:这个阶段主要是通过某些工具类加载Configuration MetaData,并将相关信息解析成BeanDefinition注册到BeanDefinitionRegistry中,即对象管理信息的收集。同时也会进行各种处理器的注册、上下文的初始化、事件广播的初始化等等准备工作。
Bean实例化(instantiation)阶段:这个阶段主要是Bean的实例化,其实就是Bean对象的构造。不过此时构造出的对象,他们内部的依赖对象仍然没有注入,只是通过反射(或Cglib)生成了具体对象的实例(执行构造函数),其实有点类似于我们手动new对象,new出的对象已经执行过了构造函数,并且内部的基本数据也已经准备好了,但如果内部还有其他对象的依赖,就需要后续的流程去主动注入。
Bean初始化(initialization)阶段:这个阶段主要是对实例化好后的Bean进行依赖注入的过程。同时还会执行用户自定义的一些初始化方法,注册Bean的销毁方法、缓存初始化好的Bean等。
相关实现分析
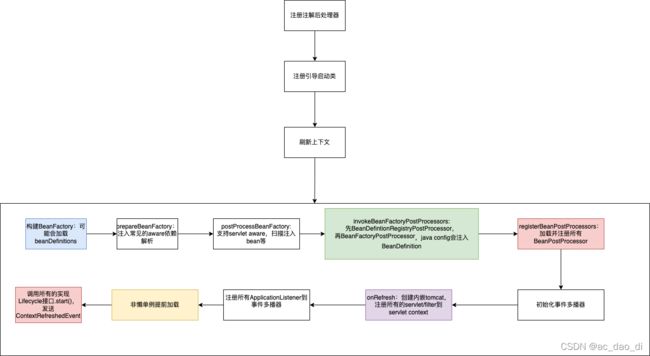
使用refresh方法扫描所有的bean,将bean注入到SpringBean工厂中
public void refresh() throws BeansException, IllegalStateException {
        synchronized(this.startupShutdownMonitor) {
            StartupStep contextRefresh =                     this.applicationStartup.start("spring.context.refresh");
            this.prepareRefresh();  // 初始化spring context,加载环境变量
            ConfigurableListableBeanFactory beanFactory = this.obtainFreshBeanFactory();  // 刷新beanFactory,	加载beanDefinition
            this.prepareBeanFactory(beanFactory); //预处理,准备beanfactory

            try {
                // 拓展后置处理器
                this.postProcessBeanFactory(beanFactory);
                StartupStep beanPostProcess = this.applicationStartup.start("spring.context.beans.post-process");
                this.invokeBeanFactoryPostProcessors(beanFactory); // 执行后置处理器
                this.registerBeanPostProcessors(beanFactory);// 注册后置处理器
                beanPostProcess.end();
                this.initMessageSource();//国际化
                this.initApplicationEventMulticaster();
                this.onRefresh(); //开始,初始化容器
                this.registerListeners(); //多播器(存储事件监听器)
                this.finishBeanFactoryInitialization(beanFactory); // 实例化剩余的bean
                this.finishRefresh(); //发布相关的事件
            } catch (BeansException var10) {
                if (this.logger.isWarnEnabled()) {
                    this.logger.warn("Exception encountered during context initialization - cancelling refresh attempt: " + var10);
                }

                this.destroyBeans();
                this.cancelRefresh(var10);
                throw var10;
            } finally {
                this.resetCommonCaches();
                contextRefresh.end();
            }

        }
    }
appcation
public interface ApplicationContext
extends EnvironmentCapable, 环境
		ListableBeanFactory, Bean工厂
		HierarchicalBeanFactory,
		MessageSource, 消息
		ApplicationEventPublisher, 事件
		ResourcePatternResolver
SpringApplication分析
https://blog.csdn.net/ac_dao_di/article/details/123764281?ops_request_misc=&request_id=&biz_id=102&utm_term=SpringApplicationContext%E6%B5%81%E7%A8%8B&utm_medium=distribute.pc_search_result.none-task-blog-2allsobaiduweb~default-0-123764281.142v31pc_rank_34,185v2control&spm=1018.2226.3001.4187
具体流程为:
启动java应用(启动类) -》启动类调用new方法 -》启动ClassLoader(ApplicationLoader)将每个类扫描进入内存(同时调用注解中的自动装配类-将相关类扫描进入内存)-》启动SpringBeanFactory-》将内存中的Bean类产生BeanDefinition-》初始化Bean-》存入单例池中
new SpringApplication()的分析
this.resourceLoader = resourceLoader;// 获取XML等资源
Assert.notNull(primarySources, "PrimarySources must not be null" ); //“主类不能为空”
this.primarySources = new LinkedHashSet(Arrays.asList(primarySources)); // 将主类赋给primarysource
this.webApplicationType = WebApplicationType.deduceFromClasspath(); // SERVLET
this.bootstrapRegistryInitializers = new  ArrayList(this.getSpringFactoriesInstances(BootstrapRegistryInitializer.class));
// 获取所必要的类(ClassLoader)
// bootstrapRegistryInitializers 获取启动所必要的条件
this.setInitializers(this.getSpringFactoriesInstances(ApplicationContextInitializer.class));
// 初始化 --- 从缓存中获取
this.setListeners(this.getSpringFactoriesInstances(ApplicationListener.class));
this.mainApplicationClass = this.deduceMainApplicationClass();
————》BootStrap分析(类SPI机制):
Set<String> names = new LinkedHashSet(SpringFactoriesLoader.loadFactoryNames(type, classLoader));
————————》
return (List)loadSpringFactories(classLoaderToUse).getOrDefault(factoryTypeName, Collections.emptyList());
————————》
Map<String, List<String>> result = (Map)cache.get(classLoader);
	key     value
   	需要的功能 对应的类
if(!null) 如果没从缓存中拿到
{
    return result;
}
else 就从SpringBoot的factories中提取
{
   Enumeration<URL> urls = classLoader.getResources("META-INF/spring.factories");
}
配置文件加载
# PropertySource Loaders
org.springframework.boot.env.PropertySourceLoader=\
org.springframework.boot.env.PropertiesPropertySourceLoader,\
org.springframework.boot.env.YamlPropertySourceLoader
.run()分析
context = this.createApplicationContext(); //初始化上下文(null)
context.setApplicationStartup(this.applicationStartup);// 设置标记(预备启动)
this.prepareContext(bootstrapContext, context, environment, listeners, 			      applicationArguments, printedBanner); // 准备启动(设置环境)
this.refreshContext(context); // Refresh !!!!Bean启动流程 (准备容器-》刷新容器)
this.afterRefresh(context, applicationArguments);
refresh Spring核心流程
public void refresh() throws BeansException, IllegalStateException {
    synchronized(this.startupShutdownMonitor) {
        StartupStep contextRefresh = this.applicationStartup.start("spring.context.refresh");
        this.prepareRefresh();
        ConfigurableListableBeanFactory beanFactory = this.obtainFreshBeanFactory();
        this.prepareBeanFactory(beanFactory);

        try {
            this.postProcessBeanFactory(beanFactory);
            StartupStep beanPostProcess = this.applicationStartup.start("spring.context.beans.post-process");
            this.invokeBeanFactoryPostProcessors(beanFactory);
            this.registerBeanPostPryr1um5knocessors(beanFactory);
            beanPostProcess.end();
            this.initMessageSource();
            this.initApplicationEventMulticaster();
            this.onRefresh();
            this.registerListeners();
            this.finishBeanFactoryInitialization(beanFactory);
            this.finishRefresh();
        } catch (BeansException var10) {
            if (this.logger.isWarnEnabled()) {
                this.logger.warn("Exception encountered during context initialization - cancelling refresh attempt: " + var10);
            }

            this.destroyBeans();
            this.cancelRefresh(var10);
            throw var10;
        } finally {
            this.resetCommonCaches();
            contextRefresh.end();
        }

    }
}
SpringBoot分析
SpringBoot 自动装配原理分析
引用:https://blog.csdn.net/weixin_38405253/article/details/100849920?ops_request_misc=%257B%2522request%255Fid%2522%253A%2522165701056416782390591579%2522%252C%2522scm%2522%253A%252220140713.130102334…%2522%257D&request_id=165701056416782390591579&biz_id=0&utm_medium=distribute.pc_search_result.none-task-blog-2allbaidu_landing_v2~default-1-100849920-null-null.142v30pc_rank_34,185v2control&utm_term=fireAutoConfigurationImportEvents&spm=1018.2226.3001.4187
SpringBoot的源码分析:学相伴-飞哥YYDS!
大概的逻辑就是new SpringApplication的时候,调用classloader(BootStraploader根加载器)会加载所有class里的包和类,加入缓存中,剩余两个加载初始化器和监听器,在run方法里面,获得SpringApplicationContext上下文,并刷新容器(Refresh),此时会执行SpringBean的生命周期,将Bean全部加载到Spring容器中,同时,启动Tomcat,Tomcat将DispatcherServlet装入Servlet上下文中
本质上说注解是一种功能性注释,可以给这个类加上功能,在扫描该类并创建实例的时候会实现对应的功能
Springboot中的核心类中必定有对应扫描Spring注解的功能的Classloader
public static void doSomething(List<String> classPaths, ClassLoader classLoader){
        //遍历所有的对象找出带有@Table注解的class对象
        //对这些class对象做业务处理
        for (String s : classPaths) {
            try {
                Class cls = classLoader.loadClass(s);
                //获取类中的所有的方法
                if(cls.isAnnotationPresent(Table.class)){
                    Table annotation = (Table) cls.getAnnotation(Table.class);

                    System.out.println(annotation.name().toUpperCase());

                }
            } catch (ClassNotFoundException e) {
                e.printStackTrace();
            }
        }
    }
三个配置类:
@SpringBootApplication -》
@SpringBootConfiguration  标记为Springboot配置类
@EnableAutoConfiguration  实现自动装配
@EnableAutoConfiguration-》
@Import(AutoConfigurationImportSelector.class)
->
AutoConfigurationEntry autoConfigurationEntry =  getAutoConfigurationEntry(annotationMetadata);
// 扫描相关的配置类
-> ClassLoader classLoaderToUse = classLoader // 加载了依赖包等(环境扫描) bootStrapClassLoader
-> SpringFactoriesLoader // 类SPI机制加载
-> String factoryTypeName = factoryType.getName();
-> SpringFactoriesLoader // 加载Bean工厂
该方法,获得了Springboot里面的自动配置类
protected List<String> getCandidateConfigurations(AnnotationMetadata metadata, AnnotationAttributes attributes) {
		List<String> configurations = SpringFactoriesLoader.loadFactoryNames(getSpringFactoriesLoaderFactoryClass(),
				getBeanClassLoader());
		Assert.notEmpty(configurations, "No auto configuration classes found in META-INF/spring.factories. If you "
				+ "are using a custom packaging, make sure that file is correct.");
		return configurations;
}
configurations = removeDuplicates(configurations); // 删除某些类
fireAutoConfigurationImportEvents(configurations, exclusions); // 返回所有符合要求的类,准备装配成bean
if (this.reader == null) {
    this.reader = new ConfigurationClassBeanDefinitionReader(registry, this.sourceExtractor, this.resourceLoader, 		this.environment, this.importBeanNameGenerator, parser.getImportRegistry());
}  // 调用阅读器(开始生成beanDefinition)
this.reader.loadBeanDefinitions(configClasses); // 加载beanDefinition - 设置BeanName
外部式Tomcat
Tomcat作用?
Tomcat本身是一个支持Servlet规范的容器
外部式tomcat:通过扫描server.xml实现Tomcat容器的创建,主:选择Servlet
嵌入式tomcat(Springboot):通过ApplicationContext加载Tomcat容器,同时将DispatcherServlet填入Tomcat中,从:由SpringIOC容器去取舍
Tomcat的内部结构?
总结构:
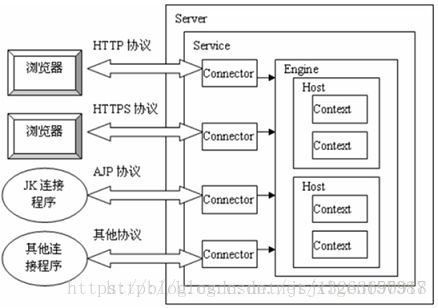
子结构:
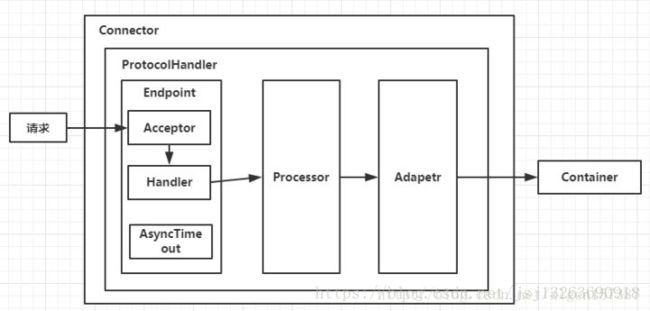
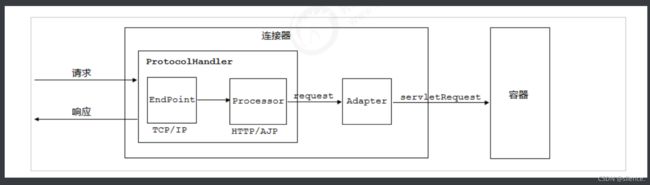
Connector就是使用ProtocolHandler来处理请求的,不同的ProtocolHandler代表不同的连接类型,比如:Http11Protocol使用的是普通Socket来连接的,Http11NioProtocol使用的是NioSocket来连接的。
其中ProtocolHandler由包含了三个部件:Endpoint、Processor、Adapter。
(1)Endpoint用来处理底层Socket的网络连接,Processor用于将Endpoint接收到的Socket封装成Request,Adapter用于将Request交给Container进行具体的处理。
(2)Endpoint由于是处理底层的Socket网络连接,因此Endpoint是用来实现TCP/IP协议的,而Processor用来实现HTTP协议的,Adapter将请求适配到Servlet容器进行具体的处理。
(3)Endpoint的抽象实现AbstractEndpoint里面定义的Acceptor和AsyncTimeout两个内部类和一个Handler接口。Acceptor用于监听请求,AsyncTimeout用于检查异步Request的超时,Handler用于处理接收到的Socket,在内部调用Processor进行处理。

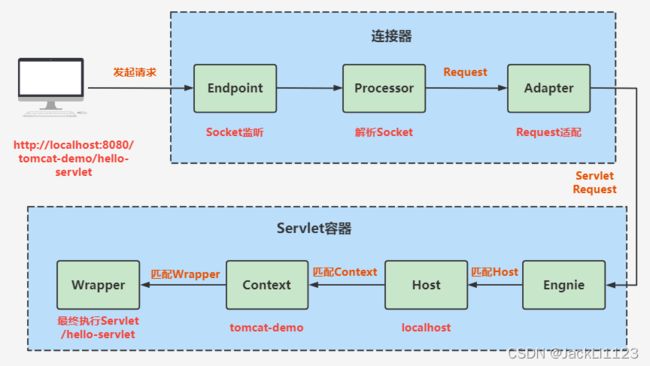
4个子容器的作用分别是:
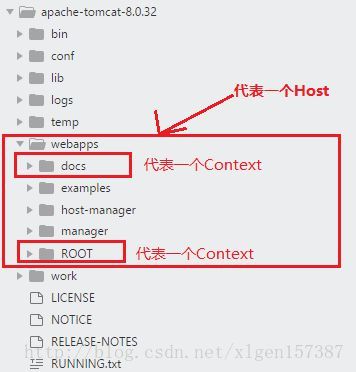
(1)Engine:引擎,用来管理多个站点,一个Service最多只能有一个Engine;(StandardEngine)
(2)Host:代表一个站点,也可以叫虚拟主机,通过配置Host就可以添加站点;(StandardHost)
(3)Context:代表一个应用程序,对应着平时开发的一套程序,或者一个WEB-INF目录以及下面的web.xml文件;(StandardContext)
(4)Wrapper:每一Wrapper封装着一个Servlet;(StandardWrapper)
目录对照
Tomcat的创建运行时序
Tomcat调用main方法创建Catalina对象
Catalina.startup.Bootstrap(Main) 启动脚本从这里开始
Bootstrap bootstrap = new Bootstrap()
--> catalinaHomeFile 扫描所有关于tomcat的文件夹
commonLoader = createClassLoader("common", null);
catalinaLoader = createClassLoader("server", commonLoader);
sharedLoader = createClassLoader("shared", commonLoader);
// 打破了双亲委派
SecurityClassLoad.securityClassLoad(catalinaLoader);
paramValues[0] = sharedLoader;
Method method = startupInstance.getClass().getMethod(methodName, paramTypes);
method.invoke(startupInstance, paramValues);
catalinaLoader(本身是一个UrlClassLoader) catalinaLoader会被设置为Tomcat主线程的线程上下文类加载器,并且使用catalinaLoader加载Tomcat容器自身容器下的class
- ClassLoader:Java提供的类加载器抽象类,用户自定义的类加载器需要继承实现;
- commonLoader:Tomcat最基本的类加载器,加载路径中的class可以被Tomcat容器本身以及各个Webapp访问;
- catalinaLoader:Tomcat容器私有的类加载器,加载路径中的class对于Webapp不可见;
- sharedLoader:各个Webapp共享的类加载器,加载路径中的class对于所有Webapp可见,但是对于Tomcat容器不可见;
- WebappClassLoader:各个Webapp私有的类加载器,加载路径中的class只对当前Webapp可见。
CataLina是一个关键的类,包含核心信息(初始化的时候首先创建)-》StartUpInstance
Class<?> startupClass = catalinaLoader.loadClass("org.apache.catalina.startup.Catalina");
Object startupInstance = startupClass.getConstructor().newInstance();
将核心类放入Catalina中的CatalinaDaemon属性中
再将新建好的Catalina放入daemon中
进入Catalina的时序周期
判断是否进入start阶段
Daemon是守护线程(等待用户线程全部关闭以后,守护线程才会关闭)
daemon.load(args)
Digester解释
aprocesses an XML input stream by matching a
*  * series of element nesting patterns to execute Rules that have been added
*  * prior to the start of parsing.  This package was inspired by the
*  * <code>XmlMapper</code> class tht was part of Tomcat 3.0 and 3.1,
* but is organized somewhat differently.
Create and configure the Digester we will be using for startup.
* @return the main digester to parse <b>server.xml</b>
调用Digester去解析server.xml(创建StandardContext)
在Digester中添加一堆的Map(解析规则)
解析server.xml的内容
digester.push(this);
digester.parse(inputSource);
getServer().setCatalina(this);
getServer().setCatalinaHome(Bootstrap.getCatalinaHomeFile());
getServer().setCatalinaBase(Bootstrap.getCatalinaBaseFile());
getServer().init();
init方法(均基于LifeCycleBase),
(都在调用 initInternal)
初始化(StandardServer)
开始初始化service(StandardService)
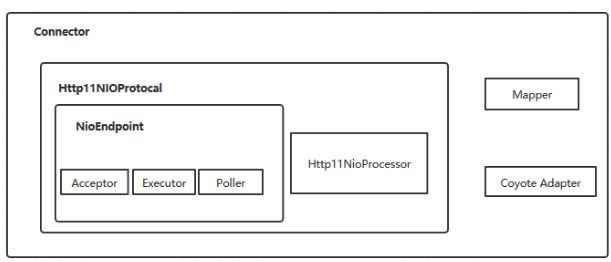
然后初始化connect(同时创建Endpoint,开启NIO通信端点,创建接受、轮询线程(接受线程,也就是接受请求的监听线程) this.init初始 endpoint(通讯接口 - 最后通过JNI))
接着初始化CoyoteAdapter和初始化 protocolHandler
(递归创建,最后一个,也是最核心的一个Endpoint创建完,再往前传 - 我觉得是责任链模式)
Endpoint that provides low-level network I/O - must be matched to the
* ProtocolHandler implementation (ProtocolHandler using NIO, requires NIO
* Endpoint etc.).
创建完成,开始启动tomcat
daemon.start();
startInternal();
globalNamingResources.start(); // JNDI相关
service.start(); // 启动相关的服务
Tomcat的运行时序
调用WrappingRunnable中的run方法
socketwrapper(封装socket)
coyote是tomcat的Connector框架的名字,简单说就是coyote来处理底层的socket,并将http请求、响应等字节流层面的东西,包装成Request和Response两个类(这两个类是tomcat定义的,而非servlet中的ServletRequest和ServletResponse),供容器使用;同时,为了能让我们编写的servlet能够得到ServletRequest,tomcat使用了facade模式,将比较底层、低级的Request包装成为ServletRequest(这一过程通常发生在Wrapper容器一级),这也是为很多人津津乐道的tomcat对设计模式的一个巧妙的运用,具体过程将会在以后讨论。
所以,coyote本质上是为tomcat的容器提供了对底层socket连接数据的封装,以Request类的形式,让容器能够访问到底层的数据。
而关于连接池、线程池等直接和socket打交道的事情,tomcat交给了org.apache.tomcat.util.net包的类去完成,
StandardWrapper:
StandardWrapper对象的主要任务就是载入他所代表的servlet类,并进行实例化。StandardWrapper并不调用servlet的service方法,而是再基础阀中完成调用。StandardWrapperValve对象通过allocate方法获取servlet实例。
当Tomcat NioEndpoint中的poller线程监测到一个待处理的socket NIO事件时,它会将该事件委托给SocketProcessor在一个线程池或者当前线程完成相应的处理逻辑。
Java NIO : 同步非阻塞,服务器实现模式为一个请求一个线程,即客户端发送的连接请求都会注册到多路复用器上,多路复用器轮询到连接有I/O请求时才启动一个线程进行处理。
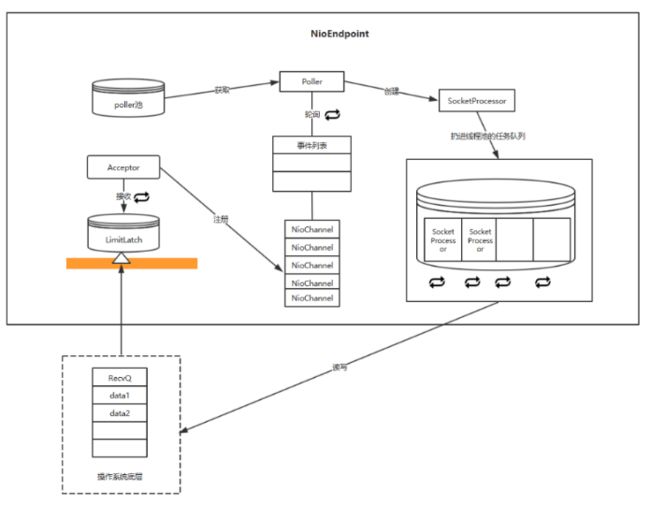
tomcat下utils.NioEndpoint生产了线程,当然也会有启动监听线程,所以如果有连接请求,会注册到多路复用器,然后轮询器产生线程->SocketProcessorBase(run,线程类)->(应该有唤醒过线程池-去执行责任链)NioEndpoint(doRun) 【底层socket,NIO提高了IO性能(非阻塞IO)】 ->ProtocolHandler(process) 协议处理器->Http11Processor(getAdapter().service(request, response))->CoyoteAdapter【Coyote - 转换成Http】->StandardEngineValve(Engine.invoke)【调用Engine最后打到Wrapper去处理Servlet】->CoyoteAdapter->Http11Processor(endRequest())->socket.getPoller().cancelledKey(key);
嵌入式Tomcat分析
关于传统的springmvc和现代的springboot应用组件之间的对应关系:
1,springServletContainerInitializer对应于TomcatStarter
2,webApplicationInitializer对应于ServletContextInitializer
简易Tomcat启动器
核心机制就是把Tomcat的核心类搬迁过来,使用SpringBoot自动配置类以注解形式构建一个web.xml和webapps目录,将Tomcat的配置等信息以及初始化流程交由SpringBeanFactory管理,
SPI机制
创建一个接口 (PTA)
public interface PTA {
    public void say();
}
public class GetA implements PTA{
    @Override
    public void say() {
        System.out.println("A");
    }
}
public class GetB implements PTA{
    @Override
    public void say() {
        System.out.println("B");
    }
}
在Resource下创建META-INF.services
com.wang.PTA
com.wang.GetA
com.wang.GetB
然后在主类中调用:
@SpringBootApplication
public class SpringsourceanalyzeApplication {

   public static void main(String[] args) {
      SpringApplication.run(SpringsourceanalyzeApplication.class, args);
      ServiceLoader<PTA> load = ServiceLoader.load(PTA.class);
      load.forEach(item->item.say());
   }

}
原本的Tomcat需要扫描web.xml去生成Tomcat容器,但现在可以利用SPI机制,去利用ServletContainerInitializer接口类去实现,然后生成该有的内容(例如DispatcherServlet)
嵌入原理(流程分析)
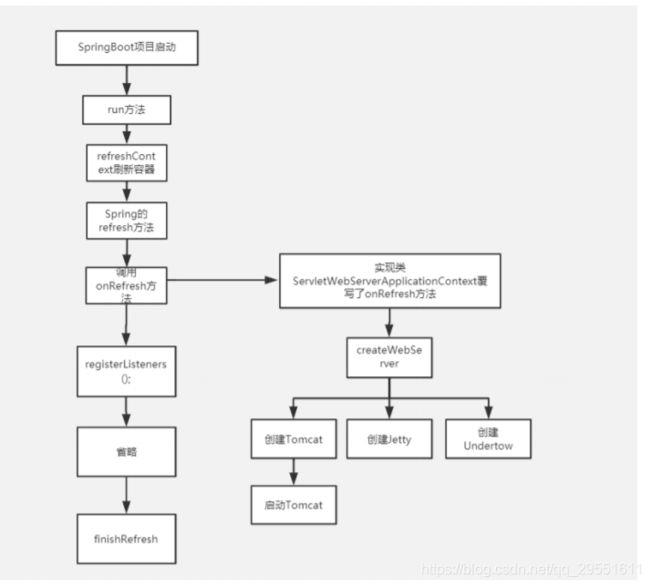
Application.run方法中,当执行到RefreshContext时,(自动配置类中,对Tomcat,Jetty,Undertow有所判断)装填bean(实例化bean - 当中就会有Web的实例化invokeBeanFactoryPostProcessors(beanFactory),Beandefinition之后的内容),并初始化Tomcat容器(onRefresh->createWebServer->(在此处,调用getBean -> doGetBean -> getSingleton -> getObject -> newInstance -> init方法(Bean的实例化和初始化))->getWebServer(Tomcat tomcat = new Tomcat() -> 装填必要的Connect,LifecycleListener,Engine,Host,Service))
@Import({ ServletWebServerFactoryAutoConfiguration.BeanPostProcessorsRegistrar.class,
      ServletWebServerFactoryConfiguration.EmbeddedTomcat.class,
      ServletWebServerFactoryConfiguration.EmbeddedJetty.class,
      ServletWebServerFactoryConfiguration.EmbeddedUndertow.class })
public class ServletWebServerFactoryAutoConfiguration {
SpringMVC分析
1.SpringMVC本身也是一个Servlet,如果不是,也就加载不在Tomcat容器里了(Tomcat只支持Servlet)— 由Context进行管理(将Servlet封装成Wrapper对象)— Tomcat里面的context是standcontext(扫描web.xml生成wrapper),
SPI机制干了什么??
2.WEB容器扫描WEB-INF下的文件,并注册到Web容器中(舍弃了Web.xml)
想要在无web.xml文件的情况下使用springMVC,只需要提供一个org.springframework.web.WebApplicationInitializer(SpringServletContainerInitializer)的实现类,然后在其onStartup方法中注册web容器相关组件就可以了
所有的流程都是基于ServletContext中,那么直接将内容注到ServletContext里面呢?
[Springboot启动时,将Tomcat顺带启动,按照自动配置类,将Tomcat核心组件生成,并且将DispatcherServlet生成,启动轮询器,准备接收核心线程,当Socket请求来的时候,轮询器唤醒对应的Servlet(SpringMVC-dispatcherServlet)《-(StandardWrapper唤起init),doService等方法(重写方法) ]
所以在ServletWebServerApplicationContext(此处的ServletContext是ApplicationContext,在StandAndContext中调用getServletContext()创建而成)中:
private void selfInitialize(ServletContext servletContext) throws ServletException {
   prepareWebApplicationContext(servletContext);
   registerApplicationScope(servletContext);
   WebApplicationContextUtils.registerEnvironmentBeans(getBeanFactory(), servletContext);
   for (ServletContextInitializer beans : getServletContextInitializerBeans()) {
      beans.onStartup(servletContext);
   }
}
剩下的启动流程都交给Spring web包下的TomcatStarter调用直到创建SpringMVC

工作流程
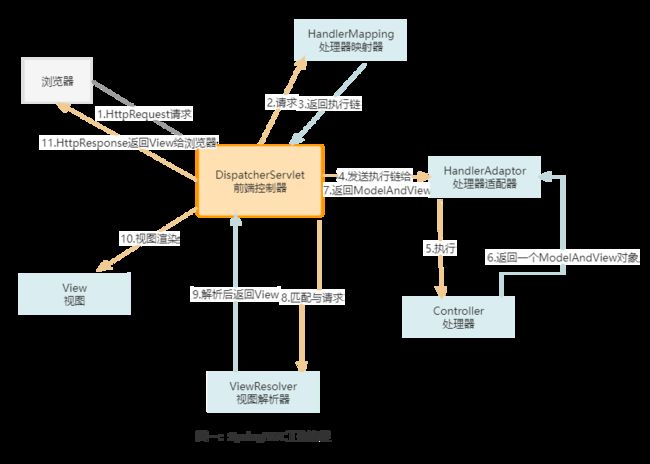
HanderMapping — @RequestMapping 返回的是( HandlerExecutionChain )
Tomcat将地址解析权全部交给SpringMVC(DispatcherServlet),而不是原生的DefaultServlet
初始化流程
万物皆有生命周期
通过生命周期就可以了解到他的初始化流程

org.springframework.web.SpringServletContainerInitializer
// 该类设计的目的是让开发人员基于编码的方式来支持servlet容器,看到@HandlesTypes(WebApplicationInitializer.class),代表该类设置web容器在回调时,将classpath下的WebApplicationInitializer的实现类作为参数传递到方法onStartup的参数webAppInitializerClasses
// 中,这种是和web.xml对立的方式(也可能和web.xml方式混合使用)
// 操作机制:当支持servlet3的web容器启动的时候,会通过jar servicec API(ServiceLoader.load(xxx))从classpath下的spring-web.jar包中读取META-INF/services/javax.servlet.ServletContainerInitializer文件,在该文件中配置的实现类正是该类,
// 然后就会调用该类的onStartup方法,并将classpath下WebApplicationInitializer的实现类作为参数传递到webAppInitializerClasses参数中
@HandlesTypes(WebApplicationInitializer.class)
public class SpringServletContainerInitializer implements ServletContainerInitializer {

	// 参数webAppInitializerClasses:classpath下WebApplicationInitializer的实现类
	// 参数servletContext:web容器servlet上下文对象
	@Override
	public void onStartup(@Nullable Set<Class<?>> webAppInitializerClasses, ServletContext servletContext)
			throws ServletException {

		List<WebApplicationInitializer> initializers = new LinkedList<>();
		// web容器传进来的webAppInitializerClasses不为空
		if (webAppInitializerClasses != null) {
			for (Class<?> waiClass : webAppInitializerClasses) {
				// 因为一些web容器会将@HandlesTypes指定的类型外的一些类传进来,所以再进一步做个判断,可以说是因为web容器的bug而不得不写的代码
				if (!waiClass.isInterface() && !Modifier.isAbstract(waiClass.getModifiers()) &&
						WebApplicationInitializer.class.isAssignableFrom(waiClass)) {
					try {
						// 添加到initializers集合中
						initializers.add((WebApplicationInitializer)
								ReflectionUtils.accessibleConstructor(waiClass).newInstance());
					}
					catch (Throwable ex) {
						throw new ServletException("Failed to instantiate WebApplicationInitializer class", ex);
					}
				}
			}
		}
		// initializers为空,即在classpath下没有WebApplicationInitializer的子类,简单的给出日志提示,并return
		if (initializers.isEmpty()) {
			servletContext.log("No Spring WebApplicationInitializer types detected on classpath");
			return;
		}
		// 日志记录在classpath下发现了多少个WebApplicationInitializer的子类
		servletContext.log(initializers.size() + " Spring WebApplicationInitializers detected on classpath");
		// 排序
		AnnotationAwareOrderComparator.sort(initializers);
		// 循环调用onoStartup方法,注册web组件到ServletContext中
		for (WebApplicationInitializer initializer : initializers) {
			initializer.onStartup(servletContext);
		}
	}
}
@SpringBootApplication注解,提供了自动装配注解和扫描注解,扫描该类同级的类和包(以及包下的类)
将所有关于@Controller的和@RequestMapping交付给DispatcherController处理
初始化Spring容器 -》初始化SpringMVC容器(父子关系)->创建Tomcat的时候,会扫描Web.xml,也就是初始化SpringMVC -》初始DispatcherServlet(init)->createWebApplicationContext ->设置上下文,配置文件,命名,初始化九大内置对象->Spring容器执行OnRefresh -> 执行DispatcherServletOnFresh方法初始化
由tomcat在启动时根据SPI机制的ServiceLoader#load方法拿到所有JavaEE接口(ServletContainerInitializer)注册的实现类。
Spring对该接口的实现类是SpringServletContainerInitializer,其类上标注了@HandlesTypes({WebApplicationInitializer.class})。
tomcat从classpath下找到所有的WebApplicationInitializer实现类,将所有的实现类传入SpringServletContainerInitializer#onStartup方法的第一个参数,调用方法。
回到SpringServletContainerInitializer#onStartup方法中的逻辑,将所有的WebApplicationInitializer实现类的onStartup方法一一调用。
WebApplicationInitializer的实现类之一是AbstractDispatcherServletInitializer,会创建spring容器、配置web.xml、注册过滤器。
Mybatis源码分析
大概的逻辑:
1.创建SessionFactory
扫描mybatis.xml将所有的信息利用XML解析器装进Configuration
2.SessionFactory创建Session对象
将执行器等配置初始化为一个对象中
3.获取Mapper
4.反射调用执行器 - 将Mapper生成statement对象之后进入底层JDBC流程 然后做ResultMap解析返回ObjectList
https://blog.csdn.net/WinnerBear/article/details/123725218?ops_request_misc=&request_id=&biz_id=102&utm_term=Mybatis%E6%BA%90%E7%A0%81&utm_medium=distribute.pc_search_result.none-task-blog-2allsobaiduweb~default-3-123725218.142v32pc_rank_34,185v2control&spm=1018.2226.3001.4187

OpenSessionFactory(创建连接工厂)- 初始化
进入XMLConfigBuilder----》this(new XPathParser(inputStream, true, props, new XMLMapperEntityResolver()), environment, props); -> this.document = this.createDocument(new InputSource(inputStream)) -> builder.parse(inputSource) -> domParser.parse(is) -> parseConfiguration(parser.evalNode(“/configuration”)) -> parseConfiguration(XNode root)
创建一个Document对象,然后解析Document结点,生成Configuration对象,存储Map等 (默认开启一级缓存)- 数据不一致问题就此产生
propertiesElement(root.evalNode("properties"));
Properties settings = settingsAsProperties(root.evalNode("settings"));
loadCustomVfs(settings);
loadCustomLogImpl(settings);
typeAliasesElement(root.evalNode("typeAliases"));
pluginElement(root.evalNode("plugins"));
objectFactoryElement(root.evalNode("objectFactory"));
objectWrapperFactoryElement(root.evalNode("objectWrapperFactory"));
reflectorFactoryElement(root.evalNode("reflectorFactory"));
settingsElement(settings);
// read it after objectFactory and objectWrapperFactory issue #631
environmentsElement(root.evalNode("environments"));
databaseIdProviderElement(root.evalNode("databaseIdProvider"));
typeHandlerElement(root.evalNode("typeHandlers"));
mapperElement(root.evalNode("mappers"));
扫描相关的mapper:
private void mapperElement(XNode parent) throws Exception {
  if (parent != null) {
    for (XNode child : parent.getChildren()) {
      if ("package".equals(child.getName())) {
        String mapperPackage = child.getStringAttribute("name");
        // 先扫包名,再扫描资源,再扫描url,再扫描class
        configuration.addMappers(mapperPackage);
      } else {
        String resource = child.getStringAttribute("resource");
        String url = child.getStringAttribute("url");
        String mapperClass = child.getStringAttribute("class");
        if (resource != null && url == null && mapperClass == null) {
          ErrorContext.instance().resource(resource);
          try(InputStream inputStream = Resources.getResourceAsStream(resource)) {
            XMLMapperBuilder mapperParser = new XMLMapperBuilder(inputStream, configuration, resource, configuration.getSqlFragments());
            mapperParser.parse();
          }
        } else if (resource == null && url != null && mapperClass == null) {
          ErrorContext.instance().resource(url);
          try(InputStream inputStream = Resources.getUrlAsStream(url)){
            XMLMapperBuilder mapperParser = new XMLMapperBuilder(inputStream, configuration, url, configuration.getSqlFragments());
            mapperParser.parse();
          }
        } else if (resource == null && url == null && mapperClass != null) {
          Class<?> mapperInterface = Resources.classForName(mapperClass);
          configuration.addMapper(mapperInterface);
        } else {
          throw new BuilderException("A mapper element may only specify a url, resource or class, but not more than one.");
        }
      }
    }
  }
}
Factory生成Session
final Environment environment = configuration.getEnvironment();
final TransactionFactory transactionFactory = getTransactionFactoryFromEnvironment(environment);
tx = transactionFactory.newTransaction(environment.getDataSource(), level, autoCommit);
final Executor executor = configuration.newExecutor(tx, execType); // 执行器 (默认为简单执行器,还有可重复执行器和批处理器)
return new DefaultSqlSession(configuration, executor, autoCommit);
调用:
method.invoke(this, args);
return mapperMethod.execute(sqlSession, args);
 switch (command.getType()) {
      case INSERT: {
        Object param = method.convertArgsToSqlCommandParam(args);
        result = rowCountResult(sqlSession.insert(command.getName(), param));
        break;
      }
      case UPDATE: {
        Object param = method.convertArgsToSqlCommandParam(args);
        result = rowCountResult(sqlSession.update(command.getName(), param));
        break;
      }
      case DELETE: {
        Object param = method.convertArgsToSqlCommandParam(args);
        result = rowCountResult(sqlSession.delete(command.getName(), param));
        break;
      }
      case SELECT:
        if (method.returnsVoid() && method.hasResultHandler()) {
          executeWithResultHandler(sqlSession, args);
          result = null;
        } else if (method.returnsMany()) {
          result = executeForMany(sqlSession, args);
        } else if (method.returnsMap()) {
          result = executeForMap(sqlSession, args);
        } else if (method.returnsCursor()) {
          result = executeForCursor(sqlSession, args);
        } else {
          Object param = method.convertArgsToSqlCommandParam(args);
          result = sqlSession.selectOne(command.getName(), param);
          if (method.returnsOptional()
              && (result == null || !method.getReturnType().equals(result.getClass()))) {
            result = Optional.ofNullable(result);
          }
        }
        break;
      case FLUSH:
        result = sqlSession.flushStatements();
        break;
      default:
        throw new BindingException("Unknown execution method for: " + command.getName());
    }
private <E> List<E> selectList(String statement, Object parameter, RowBounds rowBounds, ResultHandler handler) {
    try {
      MappedStatement ms = configuration.getMappedStatement(statement);
      return executor.query(ms, wrapCollection(parameter), rowBounds, handler);
    } catch (Exception e) {
      throw ExceptionFactory.wrapException("Error querying database.  Cause: " + e, e);
    } finally {
      ErrorContext.instance().reset();
    }
  }
public <E> List<E> query(MappedStatement ms, Object parameterObject, RowBounds rowBounds, ResultHandler resultHandler) throws SQLException {
  BoundSql boundSql = ms.getBoundSql(parameterObject);
  CacheKey key = createCacheKey(ms, parameterObject, rowBounds, boundSql); // 创建缓存Key,下次查询的时候就会从缓存中拿了
  return query(ms, parameterObject, rowBounds, resultHandler, key, boundSql);
}
BoundSql boundSql = sqlSource.getBoundSql(parameterObject);
  List<ParameterMapping> parameterMappings = boundSql.getParameterMappings();
  if (parameterMappings == null || parameterMappings.isEmpty()) {
    boundSql = new BoundSql(configuration, boundSql.getSql(), parameterMap.getParameterMappings(), parameterObject);
  }

  // check for nested result maps in parameter mappings (issue #30)
  for (ParameterMapping pm : boundSql.getParameterMappings()) {
    String rmId = pm.getResultMapId();
    if (rmId != null) {
      ResultMap rm = configuration.getResultMap(rmId);
      if (rm != null) {
        hasNestedResultMaps |= rm.hasNestedResultMaps();
      }
    }
  }

  return boundSql;
}
@Override
public <E> List<E> query(MappedStatement ms, Object parameterObject, RowBounds rowBounds, ResultHandler resultHandler, CacheKey key, BoundSql boundSql)
    throws SQLException {
  Cache cache = ms.getCache();
  if (cache != null) {
    flushCacheIfRequired(ms);
    if (ms.isUseCache() && resultHandler == null) {
      ensureNoOutParams(ms, boundSql);
      @SuppressWarnings("unchecked")
      List<E> list = (List<E>) tcm.getObject(cache, key);
      if (list == null) {
        list = delegate.query(ms, parameterObject, rowBounds, resultHandler, key, boundSql);
        tcm.putObject(cache, key, list); // issue #578 and #116
      }
      return list;
    }
  }
  return delegate.query(ms, parameterObject, rowBounds, resultHandler, key, boundSql);
}
list = queryFromDatabase(ms, parameter, rowBounds, resultHandler, key, boundSql);
@Override
public <E> List<E> doQuery(MappedStatement ms, Object parameter, RowBounds rowBounds, ResultHandler resultHandler, BoundSql boundSql) throws SQLException {
  Statement stmt = null;
  try {
    Configuration configuration = ms.getConfiguration();
    StatementHandler handler = configuration.newStatementHandler(wrapper, ms, parameter, rowBounds, resultHandler, boundSql);
    stmt = prepareStatement(handler, ms.getStatementLog());
    return handler.query(stmt, resultHandler);
  } finally {
    closeStatement(stmt);
  }
}
Java基础
注解
1.Annotation是从JDK5.0开始引入的新技术
2.Annotation的作用 :
(1)不是程序本身,可以对程序作出解释(这一点和注释(comment)没什么区别)
(2)可以被其他程序(比如:编译器等)读取
3.Annotation的格式:
注解是以"@注释名"在代码中存在的,还可以添加一-些参数值,例如:@SuppressWarnings(value=“unchecked”)
4.Annotation在哪里使用?
可以附加在package , class , method , field 等上面,相当于给他们添加了额外的辅助信息,我们可以通过反射机制编程实现对这些元数据的访问
Spring完美的使用了注解开发
@Target({ElementType.FIELD, ElementType.TYPE})
@Retention(RetentionPolicy.RUNTIME)
@Documented
public @interface Hello {
    String info();
}
@Hello(info = "A")
public class TestA {

}
Class<?> aClass = Class.forName("com.wang.TestA");
Hello annotation = aClass.getAnnotation(Hello.class);
System.out.println(annotation.info());