CKA 01_docker部署Kubernetes 部署docker 使用kubeadm引导集群 安装Pod网络
文章目录
- 1. 虚拟机步骤
- 2. Docker 部署 Kubernetes
-
- 2.1 部署 docker
-
- 2.1.1 环境要求
- 2.1.2 安装 docker 引擎
- 2.1.3 worker 节点对 master 节点免密
- 2.1.4 设定 docker 开机自启
- 2.1.5 打开桥接,查看桥接流量
- 2.1.6 设定 systemd 方式管理 cgroup
- 2.1.7 docker部署完成
- 2.1.8 其余节点的操作(与上述是相同的操作)
- 2.2 使用 kubeadm 引导集群
-
- 2.2.1 安装 kubeadm
- 2.2.2 使用 kubeadm 创建单个控制平面的 Kubernetes 集群
- 2.2.3 设置补齐键
- 2.2.4 集群加入节点
- 2.2.5 运行容器
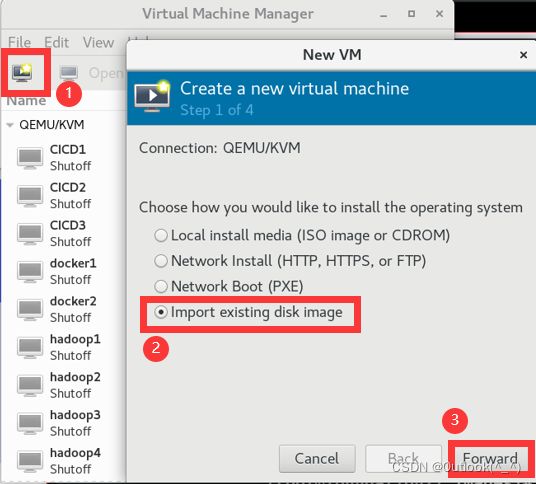
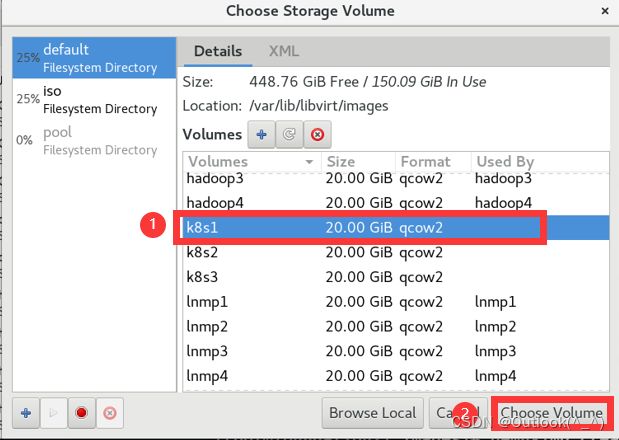
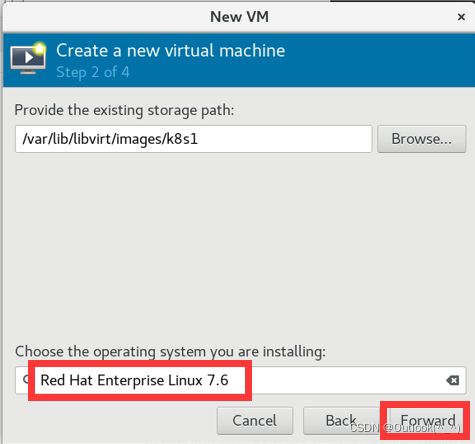
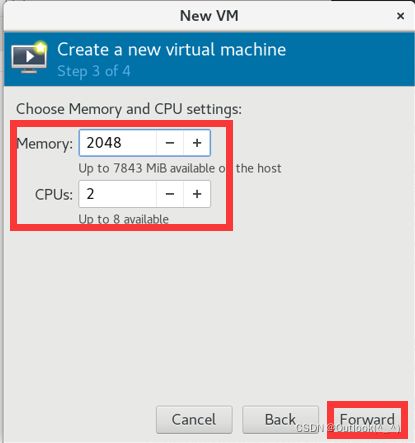
1. 虚拟机步骤
-
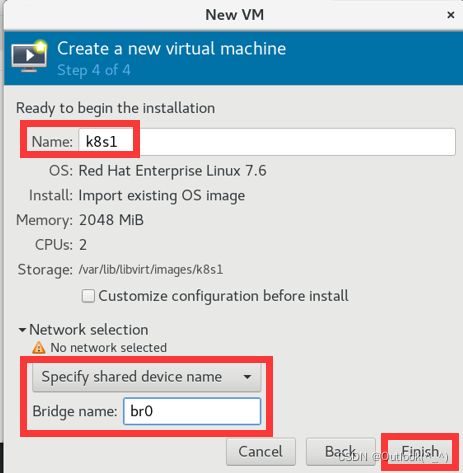
记录一下自己的步骤(怕忘了)
-
考试的情况下,只需要3台主机
[root@foundation21 ~]# cd /var/lib/libvirt/images/
[root@foundation21 images]# qemu-img create -f qcow2 -b rhel7.6-base.qcow2 k8s1
Formatting 'k8s1', fmt=qcow2 size=21474836480 backing_file=rhel7.6-base.qcow2 cluster_size=65536 lazy_refcounts=off refcount_bits=16
[root@foundation21 images]# qemu-img create -f qcow2 -b rhel7.6-base.qcow2 k8s2
Formatting 'k8s2', fmt=qcow2 size=21474836480 backing_file=rhel7.6-base.qcow2 cluster_size=65536 lazy_refcounts=off refcount_bits=16
[root@foundation21 images]# qemu-img create -f qcow2 -b rhel7.6-base.qcow2 k8s3
Formatting 'k8s3', fmt=qcow2 size=21474836480 backing_file=rhel7.6-base.qcow2 cluster_size=65536 lazy_refcounts=off refcount_bits=16
[root@k8s1 ~]# cat /etc/redhat-release
Red Hat Enterprise Linux Server release 7.6 (Maipo)
[root@k8s1 ~]# uname -r
3.10.0-957.el7.x86_64
2. Docker 部署 Kubernetes
官方文档:容器运行时 | Kubernetes
-
我需要在集群内每个节点上安装一个 容器运行时 以使 Pod 可以运行在上面。
-
容器运行时:负责运行容器的软件
-
本文列出了在 Linux 上结合 Kubernetes 使用的两种通用容器运行时的详细信息: containerd 和 Docker
考试的情况下,使用containerd
2.1 部署 docker
2.1.1 环境要求
Linux 环境要求关闭 selinux 和 iptables
Ubuntu 不使用 selinux,所以,不需要考虑担心这一点
除此之外,还要求集群中每个节点都必须做到 时间同步
2.1.2 安装 docker 引擎
- 安装Docker前,我们需要搭建镜像仓库,这里我搭建了 docker-ce 和 extras 的仓库,使用的都是阿里云镜像站的源。
需要注意的一点是,如果你使用 Linux 版本是 CentOS ,那么就不需要搭建 extras 库
[root@k8s1 ~]# cd /etc/yum.repos.d/
[root@k8s1 yum.repos.d]# vim docker.repo
[docker]
name=docker-ce
baseurl=https://mirrors.aliyun.com/docker-ce/linux/centos/7/x86_64/stable/
gpgcheck=0
[extras]
name=extras
baseurl=https://mirrors.aliyun.com/centos/7/extras/x86_64/
gpgcheck=0
- 虚拟机要与外网通信
[root@foundation21 ~]# firewall-cmd --list-all
FirewallD is not running
[root@foundation21 ~]# systemctl start firewalld.service
[root@foundation21 ~]# firewall-cmd --list-all
public (active)
  target: default
  icmp-block-inversion: no
  interfaces: br0 enp8s0 wlp7s0
  sources:
  services: cockpit dhcpv6-client http ssh
  ports:
  protocols:
  masquerade: yes
  forward-ports:
  source-ports:
  icmp-blocks:
  rich rules:
- 现在开始安装
[root@k8s1 yum.repos.d]# yum repolist
Loaded plugins: product-id, search-disabled-repos, subscription-manager
This system is not registered with an entitlement server. You can use subscription-manager to register.
docker                                                            | 3.5 kB  00:00:00
extras                                                            | 2.9 kB  00:00:00
(1/3): docker/updateinfo                                          |   55 B  00:00:00
(2/3): extras/primary_db                                          | 246 kB  00:00:00
(3/3): docker/primary_db                                          |  75 kB  00:00:00
repo id                                 repo name                                  status
docker                                  docker-ce                                    150
extras                                  extras                                       509
rhel7.6                                 rhel7.6                                    5,152
repolist: 5,811
- 安装 docker 时,观察到 docker 已经安装过了containerd.io(后续会再次使用 containerd 去部署 Kubernetes)
[root@k8s1 yum.repos.d]# yum install docker-ce
Dependencies Resolved

=========================================================================================
 Package                      Arch      Version                         Repository  Size
=========================================================================================
Installing:
 docker-ce                    x86_64    3:20.10.14-3.el7                docker      22 M
Installing for dependencies:
 audit-libs-python            x86_64    2.8.4-4.el7                     rhel7.6     76 k
 checkpolicy                  x86_64    2.5-8.el7                       rhel7.6    295 k
 container-selinux            noarch    2:2.119.2-1.911c772.el7_8       extras      40 k
 containerd.io                x86_64    1.5.11-3.1.el7                  docker      29 M
 docker-ce-cli                x86_64    1:20.10.14-3.el7                docker      30 M
 docker-ce-rootless-extras    x86_64    20.10.14-3.el7                  docker     8.1 M
 docker-scan-plugin           x86_64    0.17.0-3.el7                    docker     3.7 M
 fuse-overlayfs               x86_64    0.7.2-6.el7_8                   extras      54 k
 fuse3-libs                   x86_64    3.6.1-4.el7                     extras      82 k
 libcgroup                    x86_64    0.41-20.el7                     rhel7.6     66 k
 libseccomp                   x86_64    2.3.1-3.el7                     rhel7.6     56 k
 libsemanage-python           x86_64    2.5-14.el7                      rhel7.6    113 k
 policycoreutils-python       x86_64    2.5-29.el7                      rhel7.6    456 k
 python-IPy                   noarch    0.75-6.el7                      rhel7.6     32 k
 setools-libs                 x86_64    3.3.8-4.el7                     rhel7.6    620 k
 slirp4netns                  x86_64    0.4.3-4.el7_8                   extras      81 k

Transaction Summary
=========================================================================================
Install  1 Package (+16 Dependent packages)
2.1.3 worker 节点对 master 节点免密
- 首先 master 节点 k8s1 上使用 ssh-keygen 命令生成公钥和私钥
[root@k8s1 ~]# ssh-keygen
Generating public/private rsa key pair.
Enter file in which to save the key (/root/.ssh/id_rsa):
Created directory '/root/.ssh'.
Enter passphrase (empty for no passphrase):
Enter same passphrase again:
Your identification has been saved in /root/.ssh/id_rsa.
Your public key has been saved in /root/.ssh/id_rsa.pub.
The key fingerprint is:
SHA256:JIZyYex0AR89SbUedSzK0eemy2nW+YvXF/WZXKxZUmg root@k8s1
The key's randomart image is:
+---[RSA 2048]----+
|   .+.o+.o...... |
|   .o+..+ .oo.E .|
|  .oo.+ .ooo = o |
|   o.. o .o.  + =|
|        S .  o.=*|
|            . o=.|
|           . + .o|
|            * +.o|
|           o ..o+|
+----[SHA256]-----+
- 其次,k8s1 maste r节点将公钥(锁)发送给 k8s2 和 k8s3 主机
(k8s1 可以免密访问其余2个节点)
[root@k8s1 ~]# ssh-copy-id k8s2
/usr/bin/ssh-copy-id: INFO: Source of key(s) to be installed: "/root/.ssh/id_rsa.pub"
The authenticity of host 'k8s2 (172.25.21.2)' can't be established.
ECDSA key fingerprint is SHA256:6Hj8wv4PhAp7AtH/zzbO+ZWEhotG9dy7f/vdQj6mi/A.
ECDSA key fingerprint is MD5:2a:45:4c:7d:7a:18:4d:70:7f:f1:cc:62:97:b8:41:42.
Are you sure you want to continue connecting (yes/no)? yes
/usr/bin/ssh-copy-id: INFO: attempting to log in with the new key(s), to filter out any that are already installed
/usr/bin/ssh-copy-id: INFO: 1 key(s) remain to be installed -- if you are prompted now it is to install the new keys
root@k8s2's password:

Number of key(s) added: 1

Now try logging into the machine, with:   "ssh 'k8s2'"
and check to make sure that only the key(s) you wanted were added.
[root@k8s1 ~]# ssh-copy-id k8s3
- 免密的工作主要是为了方便完成后面的实验,减少操作量。
2.1.4 设定 docker 开机自启
[root@k8s1 yum.repos.d]# systemctl enable --now docker
Created symlink from /etc/systemd/system/multi-user.target.wants/docker.service to /usr/lib/systemd/system/docker.service.
2.1.5 打开桥接,查看桥接流量
- 经过观察,我们发现docker的桥接没有打开
- 为了让 Linux 节点上的 iptables 能够正确地查看桥接流量,需要确保在 sysctl 配置中将 net.bridge.bridge-nf-call-iptables 设置为 1。
[root@k8s1 ~]# docker info
Client:
 Context:    default
 Debug Mode: false
 Plugins:
  app: Docker App (Docker Inc., v0.9.1-beta3)
  buildx: Docker Buildx (Docker Inc., v0.8.1-docker)
  scan: Docker Scan (Docker Inc., v0.17.0)

Server:
 Containers: 0
  Running: 0
  Paused: 0
  Stopped: 0
 Images: 0
 Server Version: 20.10.14
 Storage Driver: overlay2
  Backing Filesystem: xfs
  Supports d_type: true
  Native Overlay Diff: true
  userxattr: false
 Logging Driver: json-file
 Cgroup Driver: cgroupfs
 Cgroup Version: 1
 Plugins:
  Volume: local
  Network: bridge host ipvlan macvlan null overlay
  Log: awslogs fluentd gcplogs gelf journald json-file local logentries splunk syslog
 Swarm: inactive
 Runtimes: io.containerd.runc.v2 io.containerd.runtime.v1.linux runc
 Default Runtime: runc
 Init Binary: docker-init
 containerd version: 3df54a852345ae127d1fa3092b95168e4a88e2f8
 runc version: v1.0.3-0-gf46b6ba
 init version: de40ad0
 Security Options:
  seccomp
   Profile: default
 Kernel Version: 3.10.0-957.el7.x86_64
 Operating System: Red Hat Enterprise Linux Server 7.6 (Maipo)
 OSType: linux
 Architecture: x86_64
 CPUs: 2
 Total Memory: 1.952GiB
 Name: k8s1
 ID: BPRA:FVZ6:MDXX:7POM:T7BE:JELY:FMH3:H3W4:FU76:3VY4:OKXN:GML2
 Docker Root Dir: /var/lib/docker
 Debug Mode: false
 Registry: https://index.docker.io/v1/
 Labels:
 Experimental: false
 Insecure Registries:
  127.0.0.0/8
 Live Restore Enabled: false

WARNING: bridge-nf-call-iptables is disabled		//没有开启
WARNING: bridge-nf-call-ip6tables is disabled
- 打开桥接,调整内核选项
[root@k8s1 ~]# cd /etc/sysctl.d/
[root@k8s1 sysctl.d]# ls
99-sysctl.conf
[root@k8s1 sysctl.d]# vim k8s.conf
net.bridge.bridge-nf-call-ip6tables = 1
net.bridge.bridge-nf-call-iptables = 1
- 生效
[root@k8s1 sysctl.d]# sysctl --system
* Applying /usr/lib/sysctl.d/00-system.conf ...
net.bridge.bridge-nf-call-ip6tables = 0
net.bridge.bridge-nf-call-iptables = 0
net.bridge.bridge-nf-call-arptables = 0
* Applying /usr/lib/sysctl.d/10-default-yama-scope.conf ...
kernel.yama.ptrace_scope = 0
* Applying /usr/lib/sysctl.d/50-default.conf ...
kernel.sysrq = 16
kernel.core_uses_pid = 1
net.ipv4.conf.default.rp_filter = 1
net.ipv4.conf.all.rp_filter = 1
net.ipv4.conf.default.accept_source_route = 0
net.ipv4.conf.all.accept_source_route = 0
net.ipv4.conf.default.promote_secondaries = 1
net.ipv4.conf.all.promote_secondaries = 1
fs.protected_hardlinks = 1
fs.protected_symlinks = 1
* Applying /etc/sysctl.d/99-sysctl.conf ...
* Applying /etc/sysctl.d/k8s.conf ...
net.bridge.bridge-nf-call-ip6tables = 1
net.bridge.bridge-nf-call-iptables = 1
* Applying /etc/sysctl.conf ...
2.1.6 设定 systemd 方式管理 cgroup
官方文档:容器运行时 | Kubernetes | docker
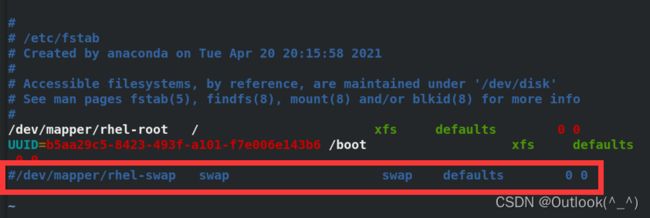
- 禁掉swap分区
[root@k8s1 ~]# swapoff -a
[root@k8s1 ~]# vim /etc/fstab
#/dev/mapper/rhel-swap   swap                    swap    defaults        0 0
# 注释
- 确认有以下的模块
[root@k8s1 ~]# modprobe br_netfilter
docker info当前使用 cgroupfs 的方式管理 cgroup
[root@k8s1 docker]# docker info
 ...
 Cgroup Driver: cgroupfs
 Default Runtime: runc
 ...
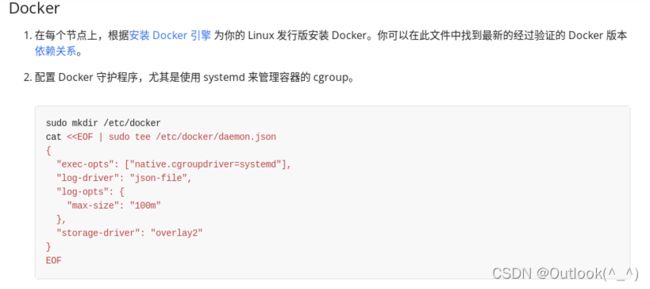
- 配置 Docker 守护程序,使用 systemd 来管理容器的 cgroup
[root@k8s1 ~]# cat <
> {
>   "exec-opts": ["native.cgroupdriver=systemd"],
>   "log-driver": "json-file",
>   "log-opts": {
>     "max-size": "100m"
>   },
>   "storage-driver": "overlay2"
> }
> EOF		//回车
{
  "exec-opts": ["native.cgroupdriver=systemd"],
  "log-driver": "json-file",
  "log-opts": {
    "max-size": "100m"
  },
  "storage-driver": "overlay2"
}
[root@k8s1 ~]# cd /etc/docker/
[root@k8s1 docker]# ls
daemon.json  key.json
[root@k8s1 docker]# cat daemon.json
{
  "exec-opts": ["native.cgroupdriver=systemd"],
  "log-driver": "json-file",
  "log-opts": {
    "max-size": "100m"
  },
  "storage-driver": "overlay2"
}
- 重启docker后,服务生效。现在管理 cgroup 的是 systemd
[root@k8s1 docker]# systemctl restart docker
[root@k8s1 docker]# docker info
...
 Cgroup Driver: systemd			// 管理Cgroup
 Cgroup Version: 1
 Plugins:
  Volume: local
  Network: bridge host ipvlan macvlan null overlay
  Log: awslogs fluentd gcplogs gelf journald json-file local
...
2.1.7 docker部署完成
[root@k8s1 ~]# docker images
REPOSITORY   TAG       IMAGE ID   CREATED   SIZE
[root@k8s1 ~]# docker ps
CONTAINER ID   IMAGE     COMMAND   CREATED   STATUS    PORTS     NAMES
[root@k8s1 ~]# docker ps -a
CONTAINER ID   IMAGE     COMMAND   CREATED   STATUS    PORTS     NAMES
2.1.8 其余节点的操作(与上述是相同的操作)
- 镜像仓库 ——> 安装docker ——> 开机自启docker
[root@k8s1 yum.repos.d]# scp docker.repo k8s2:/etc/yum.repos.d
docker.repo                                            100%  201   402.6KB/s   00:00
[root@k8s1 yum.repos.d]# scp docker.repo k8s3:/etc/yum.repos.d
docker.repo                                            100%  201   348.5KB/s   00:00
[root@k8s2 ~]# yum install -y docker-ce
[root@k8s2 ~]# systemctl enable --now docker
Created symlink from /etc/systemd/system/multi-user.target.wants/docker.service to /usr/lib/systemd/system/docker.service.
- 开启桥接 vim /etc/sysctl.d/k8s.conf ——> 生效 sysctl --system
[root@k8s1 sysctl.d]# pwd
/etc/sysctl.d
[root@k8s1 sysctl.d]# scp k8s.conf k8s2:/etc/sysctl.d
k8s.conf                                               100%   79    90.4KB/s   00:00
[root@k8s1 sysctl.d]# scp k8s.conf k8s3:/etc/sysctl.d
k8s.conf                                               100%   79   102.4KB/s   00:00
[root@k8s1 sysctl.d]# ssh k8s2 sysctl --system
* Applying /usr/lib/sysctl.d/00-system.conf ...
net.bridge.bridge-nf-call-ip6tables = 0
net.bridge.bridge-nf-call-iptables = 0
net.bridge.bridge-nf-call-arptables = 0
* Applying /usr/lib/sysctl.d/10-default-yama-scope.conf ...
kernel.yama.ptrace_scope = 0
* Applying /usr/lib/sysctl.d/50-default.conf ...
kernel.sysrq = 16
kernel.core_uses_pid = 1
net.ipv4.conf.default.rp_filter = 1
net.ipv4.conf.all.rp_filter = 1
net.ipv4.conf.default.accept_source_route = 0
net.ipv4.conf.all.accept_source_route = 0
net.ipv4.conf.default.promote_secondaries = 1
net.ipv4.conf.all.promote_secondaries = 1
fs.protected_hardlinks = 1
fs.protected_symlinks = 1
* Applying /etc/sysctl.d/99-sysctl.conf ...
* Applying /etc/sysctl.d/k8s.conf ...
net.bridge.bridge-nf-call-ip6tables = 1
net.bridge.bridge-nf-call-iptables = 1
* Applying /etc/sysctl.conf ...
[root@k8s1 sysctl.d]# ssh k8s3 sysctl --system
- 禁用 swap 分区 ——> systemd 方式管理 cgroup (vim /etc/docker/daemon.json) ——> 重启 docker
——> docker info 验证服务生效 ——> 所有节点的 docker 部署完成
[root@k8s2 ~]# swapoff -a
[root@k8s2 ~]# vim /etc/fstab
[root@k8s1 docker]# pwd
/etc/docker
[root@k8s1 docker]# scp daemon.json k8s2:/etc/docker
daemon.json                                            100%  156   120.5KB/s   00:00
[root@k8s1 docker]# scp daemon.json k8s3:/etc/docker
daemon.json                                            100%  156   183.4KB/s   00:00
[root@k8s2 ~]# systemctl restart docker
[root@k8s2 ~]# docker info
...
 Cgroup Driver: systemd
...
2.2 使用 kubeadm 引导集群
官方文档:使用 kubeadm 引导集群 | Kubernetes
- 使用 kubeadm,你能创建一个符合最佳实践的最小化 Kubernetes 集群。事实上,你可以使用 kubeadm 配置一个通过 Kubernetes 一致性测试 的集群。 kubeadm 还支持其他集群生命周期功能, 例如 启动引导令牌 和集群升级。
2.2.1 安装 kubeadm
官方文档:使用 kubeadm 引导集群 | 安装 kubeadm
- 部署 Kubernetes 镜像仓库
- 在之前镜像仓库的基础上,再写入新的库
- 该库同样采用了阿里云镜像站的源,后续要安装的 kubernetes 组件都从这里下载
[root@k8s1 ~]# cd /etc/yum.repos.d/
[root@k8s1 yum.repos.d]# vim docker.repo
[docker]
name=docker-ce
baseurl=https://mirrors.aliyun.com/docker-ce/linux/centos/7/x86_64/stable/
gpgcheck=0
[extras]
name=extras
baseurl=https://mirrors.aliyun.com/centos/7/extras/x86_64/
gpgcheck=0
[kubernetes]			//新镜像库
name=Kubernetes
baseurl=https://mirrors.aliyun.com/kubernetes/yum/repos/kubernetes-el7-x86_64/
enabled=1
gpgcheck=0
[root@k8s1 yum.repos.d]# yum list kubeadm
Loaded plugins: product-id, search-disabled-repos, subscription-manager
This system is not registered with an entitlement server. You can use subscription-manager to register.
docker                                                            | 3.5 kB  00:00:00
extras                                                            | 2.9 kB  00:00:00
kubernetes                                                        | 1.4 kB  00:00:00
kubernetes/primary                                                | 107 kB  00:00:00
kubernetes                                                                       785/785
Available Packages
kubeadm.x86_64                            1.23.5-0                             kubernetes
- 安装 Kubenetes 组件 kubeadm , kubectl , kubelet
-
kubeadm:用来初始化集群的指令。
-
kubelet:在集群中的每个节点上用来启动 Pod 和容器等。
-
kubectl:用来与集群通信的命令行工具。
-
kubeadm 不能 帮你安装或者管理 kubelet 或 kubectl,所以你需要 确保它们与通过 kubeadm 安装的控制平面的版本相匹配。 如果不这样做,则存在发生版本偏差的风险,可能会导致一些预料之外的错误和问题。 然而,控制平面与 kubelet 间的相差一个次要版本不一致是支持的,但 kubelet 的版本不可以超过 API 服务器的版本。 例如,1.7.0 版本的 kubelet 可以完全兼容 1.8.0 版本的 API 服务器,反之则不可以。
[root@k8s1 yum.repos.d]# yum install -y kubeadm kubelet kubectl
- 其余节点的操作同上
- 创建 Kubernetes 镜像仓库 ——> 安装三套组件
[root@k8s1 yum.repos.d]# scp docker.repo k8s2:/etc/yum.repos.d
docker.repo                                            100%  330   472.8KB/s   00:00
[root@k8s1 yum.repos.d]# scp docker.repo k8s3:/etc/yum.repos.d
docker.repo                                            100%  330   347.5KB/s   00:00
[root@k8s1 yum.repos.d]# ssh k8s2 yum install -y kubeadm kubelet kubectl
[root@k8s1 yum.repos.d]# ssh k8s3 yum install -y kubeadm kubelet kubectl
- 设定 kubelet 开机自启
[root@k8s1 yum.repos.d]# systemctl enable --now kubelet
Created symlink from /etc/systemd/system/multi-user.target.wants/kubelet.service to /usr/lib/systemd/system/kubelet.service.
[root@k8s1 yum.repos.d]# ssh k8s2 systemctl enable --now kubelet
Created symlink from /etc/systemd/system/multi-user.target.wants/kubelet.service to /usr/lib/systemd/system/kubelet.service.
[root@k8s1 yum.repos.d]# ssh k8s3 systemctl enable --now kubelet
Created symlink from /etc/systemd/system/multi-user.target.wants/kubelet.service to /usr/lib/systemd/system/kubelet.service.
2.2.2 使用 kubeadm 创建单个控制平面的 Kubernetes 集群
官方文档:使用 kubeadm 引导集群 | 使用 kubeadm 创建集群
- 查看初始选项(考试的时候,需要科学上网)
[root@k8s1 ~]# kubeadm config print init-defaults
apiVersion: kubeadm.k8s.io/v1beta3
bootstrapTokens:
- groups:
  - system:bootstrappers:kubeadm:default-node-token
  token: abcdef.0123456789abcdef
  ttl: 24h0m0s
  usages:
  - signing
  - authentication
kind: InitConfiguration
localAPIEndpoint:
  advertiseAddress: 1.2.3.4
  bindPort: 6443
nodeRegistration:
  criSocket: /var/run/dockershim.sock
  imagePullPolicy: IfNotPresent
  name: node
  taints: null
---
apiServer:
  timeoutForControlPlane: 4m0s
apiVersion: kubeadm.k8s.io/v1beta3
certificatesDir: /etc/kubernetes/pki
clusterName: kubernetes
controllerManager: {}
dns: {}
etcd:
  local:
    dataDir: /var/lib/etcd
imageRepository: k8s.gcr.io
kind: ClusterConfiguration
kubernetesVersion: 1.23.0
networking:
  dnsDomain: cluster.local
  serviceSubnet: 10.96.0.0/12
scheduler: {}
- 查看默认镜像
[root@k8s1 ~]# kubeadm config images list
k8s.gcr.io/kube-apiserver:v1.23.5
k8s.gcr.io/kube-controller-manager:v1.23.5
k8s.gcr.io/kube-scheduler:v1.23.5
k8s.gcr.io/kube-proxy:v1.23.5
k8s.gcr.io/pause:3.6
k8s.gcr.io/etcd:3.5.1-0
k8s.gcr.io/coredns/coredns:v1.8.6
[root@k8s1 ~]# kubeadm config images list --image-repository registry.aliyuncs.com/google_containers
registry.aliyuncs.com/google_containers/kube-apiserver:v1.23.5
registry.aliyuncs.com/google_containers/kube-controller-manager:v1.23.5
registry.aliyuncs.com/google_containers/kube-scheduler:v1.23.5
registry.aliyuncs.com/google_containers/kube-proxy:v1.23.5
registry.aliyuncs.com/google_containers/pause:3.6
registry.aliyuncs.com/google_containers/etcd:3.5.1-0
registry.aliyuncs.com/google_containers/coredns:v1.8.6
- 初始化控制平面节点
-
控制平面节点是运行控制平面组件的机器, 包括 etcd (集群数据库) 和 API Server (命令行工具 kubectl 与之通信)。
-
etcd 是兼具一致性和高可用性的键值数据库,可以作为保存 Kubernetes 所有集群数据的后台数据库
-
Kubernetes API 服务器验证并配置 API 对象的数据, 这些对象包括 pods、services、replicationcontrollers 等。 API 服务器为 REST 操作提供服务,并为集群的共享状态提供前端, 所有其他组件都通过该前端进行交互。
-
首先需要将创建集群所需要的应用组件拉取到本地仓库
[root@k8s1 ~]# kubeadm config images pull --image-repository registry.aliyuncs.com/google_containers
[config/images] Pulled registry.aliyuncs.com/google_containers/kube-apiserver:v1.23.5
[config/images] Pulled registry.aliyuncs.com/google_containers/kube-controller-manager:v1.23.5
[config/images] Pulled registry.aliyuncs.com/google_containers/kube-scheduler:v1.23.5
[config/images] Pulled registry.aliyuncs.com/google_containers/kube-proxy:v1.23.5
[config/images] Pulled registry.aliyuncs.com/google_containers/pause:3.6
[config/images] Pulled registry.aliyuncs.com/google_containers/etcd:3.5.1-0
[config/images] Pulled registry.aliyuncs.com/google_containers/coredns:v1.8.6
- 拉取成功后,初始化控制平面节点(下文称为 master 节点)
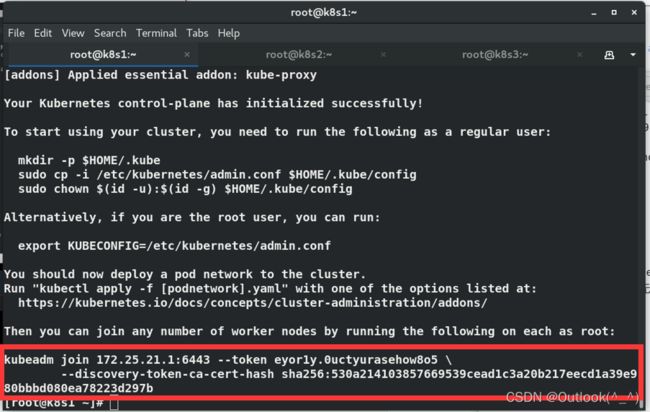
- 初始化后,master 节点会得到一个 join 命令;
- 记录 kubeadm init 输出的 kubeadm join 命令。 你需要此命令将节点加入集群。
[root@k8s1 ~]# kubeadm init --pod-network-cidr=10.244.0.0/16 --image-repository registry.aliyuncs.com/google_containers
[init] Using Kubernetes version: v1.23.5
[preflight] Running pre-flight checks
[preflight] Pulling images required for setting up a Kubernetes cluster
[preflight] This might take a minute or two, depending on the speed of your internet connection
[preflight] You can also perform this action in beforehand using 'kubeadm config images pull'
[certs] Using certificateDir folder "/etc/kubernetes/pki"
[certs] Generating "ca" certificate and key
[certs] Generating "apiserver" certificate and key
[certs] apiserver serving cert is signed for DNS names [k8s1 kubernetes kubernetes.default kubernetes.default.svc kubernetes.default.svc.cluster.local] and IPs [10.96.0.1 172.25.21.1]
[certs] Generating "apiserver-kubelet-client" certificate and key
[certs] Generating "front-proxy-ca" certificate and key
[certs] Generating "front-proxy-client" certificate and key
[certs] Generating "etcd/ca" certificate and key
[certs] Generating "etcd/server" certificate and key
[certs] etcd/server serving cert is signed for DNS names [k8s1 localhost] and IPs [172.25.21.1 127.0.0.1 ::1]
[certs] Generating "etcd/peer" certificate and key
[certs] etcd/peer serving cert is signed for DNS names [k8s1 localhost] and IPs [172.25.21.1 127.0.0.1 ::1]
[certs] Generating "etcd/healthcheck-client" certificate and key
[certs] Generating "apiserver-etcd-client" certificate and key
[certs] Generating "sa" key and public key
[kubeconfig] Using kubeconfig folder "/etc/kubernetes"
[kubeconfig] Writing "admin.conf" kubeconfig file
[kubeconfig] Writing "kubelet.conf" kubeconfig file
[kubeconfig] Writing "controller-manager.conf" kubeconfig file
[kubeconfig] Writing "scheduler.conf" kubeconfig file
[kubelet-start] Writing kubelet environment file with flags to file "/var/lib/kubelet/kubeadm-flags.env"
[kubelet-start] Writing kubelet configuration to file "/var/lib/kubelet/config.yaml"
[kubelet-start] Starting the kubelet
[control-plane] Using manifest folder "/etc/kubernetes/manifests"
[control-plane] Creating static Pod manifest for "kube-apiserver"
[control-plane] Creating static Pod manifest for "kube-controller-manager"
[control-plane] Creating static Pod manifest for "kube-scheduler"
[etcd] Creating static Pod manifest for local etcd in "/etc/kubernetes/manifests"
[wait-control-plane] Waiting for the kubelet to boot up the control plane as static Pods from directory "/etc/kubernetes/manifests". This can take up to 4m0s
[apiclient] All control plane components are healthy after 17.298912 seconds
[upload-config] Storing the configuration used in ConfigMap "kubeadm-config" in the "kube-system" Namespace
[kubelet] Creating a ConfigMap "kubelet-config-1.23" in namespace kube-system with the configuration for the kubelets in the cluster
NOTE: The "kubelet-config-1.23" naming of the kubelet ConfigMap is deprecated. Once the UnversionedKubeletConfigMap feature gate graduates to Beta the default name will become just "kubelet-config". Kubeadm upgrade will handle this transition transparently.
[upload-certs] Skipping phase. Please see --upload-certs
[mark-control-plane] Marking the node k8s1 as control-plane by adding the labels: [node-role.kubernetes.io/master(deprecated) node-role.kubernetes.io/control-plane node.kubernetes.io/exclude-from-external-load-balancers]
[mark-control-plane] Marking the node k8s1 as control-plane by adding the taints [node-role.kubernetes.io/master:NoSchedule]
[bootstrap-token] Using token: eyor1y.0uctyurasehow8o5
[bootstrap-token] Configuring bootstrap tokens, cluster-info ConfigMap, RBAC Roles
[bootstrap-token] configured RBAC rules to allow Node Bootstrap tokens to get nodes
[bootstrap-token] configured RBAC rules to allow Node Bootstrap tokens to post CSRs in order for nodes to get long term certificate credentials
[bootstrap-token] configured RBAC rules to allow the csrapprover controller automatically approve CSRs from a Node Bootstrap Token
[bootstrap-token] configured RBAC rules to allow certificate rotation for all node client certificates in the cluster
[bootstrap-token] Creating the "cluster-info" ConfigMap in the "kube-public" namespace
[kubelet-finalize] Updating "/etc/kubernetes/kubelet.conf" to point to a rotatable kubelet client certificate and key
[addons] Applied essential addon: CoreDNS
[addons] Applied essential addon: kube-proxy

Your Kubernetes control-plane has initialized successfully!

To start using your cluster, you need to run the following as a regular user:

  mkdir -p $HOME/.kube
  sudo cp -i /etc/kubernetes/admin.conf $HOME/.kube/config
  sudo chown $(id -u):$(id -g) $HOME/.kube/config

Alternatively, if you are the root user, you can run:

  export KUBECONFIG=/etc/kubernetes/admin.conf

You should now deploy a pod network to the cluster.
Run "kubectl apply -f [podnetwork].yaml" with one of the options listed at:
  https://kubernetes.io/docs/concepts/cluster-administration/addons/

Then you can join any number of worker nodes by running the following on each as root:

kubeadm join 172.25.21.1:6443 --token eyor1y.0uctyurasehow8o5 \
	--discovery-token-ca-cert-hash sha256:530a214103857669539cead1c3a20b217eecd1a39e980bbbd080ea78223d297b
- 令牌用于控制平面节点和加入节点之间的相互身份验证。 这里包含的令牌是密钥。确保它的安全, 因为拥有此令牌的任何人都可以将经过身份验证的节点添加到你的集群中。 可以使用 kubeadm token 命令列出,创建和删除这些令牌。
- 因为我当前使用的是 root 用户,所以,我直接运行 export 命令。
[root@k8s1 ~]# export KUBECONFIG=/etc/kubernetes/admin.conf
- export 命令只在当前 shell 环境中生效,重启或新打开终端的话,该命令就失效了,无法执行 Kubernetes 的命令。为了后面实验的方便,我将 export 命令写入到 系统环境变量里了
[root@k8s1 ~]# vim .bash_profile
[root@k8s1 ~]# unset KUBECONFIG 		// 生效
- 要使非 root 用户可以运行 kubectl,请运行以下命令, 它们也是 kubeadm init 输出的一部分;
- 换言之,如果你使用的是 Ubuntu ,则需要执行以下命令
- 检测效果
[root@k8s1 ~]# kubectl get pod -A
NAMESPACE     NAME                           READY   STATUS    RESTARTS   AGE
kube-system   coredns-6d8c4cb4d-jnsqt        0/1     Pending   0          4m35s
kube-system   coredns-6d8c4cb4d-zm5xh        0/1     Pending   0          4m34s
kube-system   etcd-k8s1                      1/1     Running   0          4m50s
kube-system   kube-apiserver-k8s1            1/1     Running   0          4m54s
kube-system   kube-controller-manager-k8s1   1/1     Running   0          4m48s
kube-system   kube-proxy-9cn89               1/1     Running   0          4m35s
kube-system   kube-scheduler-k8s1            1/1     Running   0          4m48s
- 安装 Pod 网络附加组件
- 首先安装 wget
[root@k8s1 ~]# yum install -y wget
- 通过 wget 命令下载 Kubernetes 网络组件 flannel 的 yaml 文件
[root@k8s1 ~]# wget https://raw.githubusercontent.com/coreos/flannel/master/Documentation/kube-flannel.yml
--2022-04-20 00:24:28--  https://raw.githubusercontent.com/coreos/flannel/master/Documentation/kube-flannel.yml
Resolving raw.githubusercontent.com (raw.githubusercontent.com)... 185.199.108.133, 185.199.110.133, 185.199.109.133, ...
Connecting to raw.githubusercontent.com (raw.githubusercontent.com)|185.199.108.133|:443... connected.
HTTP request sent, awaiting response... 200 OK
Length: 5750 (5.6K) [text/plain]
Saving to: ‘kube-flannel.yml’

100%[===============================================>] 5,750       30.8KB/s   in 0.2s

2022-04-20 00:24:36 (30.8 KB/s) - ‘kube-flannel.yml’ saved [5750/5750]
- 使用 kubectl apply -f 命令在控制平面节点上安装 Pod 网络附加组件
[root@k8s1 ~]# ls
kube-flannel.yml
[root@k8s1 ~]# kubectl apply -f kube-flannel.yml
Warning: policy/v1beta1 PodSecurityPolicy is deprecated in v1.21+, unavailable in v1.25+
podsecuritypolicy.policy/psp.flannel.unprivileged created
clusterrole.rbac.authorization.k8s.io/flannel created
clusterrolebinding.rbac.authorization.k8s.io/flannel created
serviceaccount/flannel created
configmap/kube-flannel-cfg created
daemonset.apps/kube-flannel-ds created
- 查看结果,每个组件都处于 running 状态才能证明当前 Kubernetes 运行正常
[root@k8s1 ~]# kubectl get pod -A
NAMESPACE     NAME                           READY   STATUS    RESTARTS   AGE
kube-system   coredns-6d8c4cb4d-jnsqt        1/1     Running   0          11m
kube-system   coredns-6d8c4cb4d-zm5xh        1/1     Running   0          11m
kube-system   etcd-k8s1                      1/1     Running   0          11m
kube-system   kube-apiserver-k8s1            1/1     Running   0          11m
kube-system   kube-controller-manager-k8s1   1/1     Running   0          11m
kube-system   kube-flannel-ds-hdb2x          1/1     Running   0          2m52s
kube-system   kube-proxy-9cn89               1/1     Running   0          11m
kube-system   kube-scheduler-k8s1            1/1     Running   0          11m
- 每个集群只能安装一个 Pod 网络。
- 控制平面节点隔离:默认情况下,出于安全原因,你的集群不会在控制平面节点上调度 Pod。
2.2.3 设置补齐键
[root@k8s1 ~]# echo 'source <(kubectl completion bash)' >> .bashrc
[root@k8s1 ~]# source .bashrc
[root@k8s1 ~]# kubectl 			// 补齐键成功
alpha          cluster-info   diff           label          run
annotate       completion     drain          logs           scale
api-resources  config         edit           options        set
api-versions   cordon         exec           patch          taint
apply          cp             explain        plugin         top
attach         create         expose         port-forward   uncordon
auth           debug          get            proxy          version
autoscale      delete         help           replace        wait
certificate    describe       kustomize      rollout
2.2.4 集群加入节点
官方文档:使用 kubeadm 引导集群 | 使用 kubeadm 创建集群 | 加入节点
-
节点是你的工作负载(容器和 Pod 等)运行的地方
-
在 master 节点上运行以下命令来获取令牌
[root@k8s1 ~]# kubeadm token list
TOKEN                     TTL         EXPIRES                USAGES                   DESCRIPTION                                                EXTRA GROUPS
eyor1y.0uctyurasehow8o5   23h         2022-04-20T16:17:29Z   authentication,signing   The default bootstrap token generated by 'kubeadm init'.   system:bootstrappers:kubeadm:default-node-token
- 如果没有令牌或者令牌超过24小时过期了,则可以通过在 master 节点上运行以下命令来创建新令牌:
[root@k8s1 ~]# kubeadm token create --print-join-command
kubeadm join 172.25.21.1:6443 --token 693dhq.d3wezqy89xbp9ljd --discovery-token-ca-cert-hash sha256:530a214103857669539cead1c3a20b217eecd1a39e980bbbd080ea78223d297b
- 在选定的节点执行 join 命令,使之加入集群
[root@k8s2 ~]# kubeadm join 172.25.21.1:6443 --token 693dhq.d3wezqy89xbp9ljd --discovery-token-ca-cert-hash sha256:530a214103857669539cead1c3a20b217eecd1a39e980bbbd080ea78223d297b
[preflight] Running pre-flight checks
[preflight] Reading configuration from the cluster...
[preflight] FYI: You can look at this config file with 'kubectl -n kube-system get cm kubeadm-config -o yaml'
[kubelet-start] Writing kubelet configuration to file "/var/lib/kubelet/config.yaml"
[kubelet-start] Writing kubelet environment file with flags to file "/var/lib/kubelet/kubeadm-flags.env"
[kubelet-start] Starting the kubelet
[kubelet-start] Waiting for the kubelet to perform the TLS Bootstrap...

This node has joined the cluster:
* Certificate signing request was sent to apiserver and a response was received.
* The Kubelet was informed of the new secure connection details.

Run 'kubectl get nodes' on the control-plane to see this node join the cluster.
[root@k8s3 ~]# kubeadm join 172.25.21.1:6443 --token 693dhq.d3wezqy89xbp9ljd --discovery-token-ca-cert-hash sha256:530a214103857669539cead1c3a20b217eecd1a39e980bbbd080ea78223d297b
[preflight] Running pre-flight checks
[preflight] Reading configuration from the cluster...
[preflight] FYI: You can look at this config file with 'kubectl -n kube-system get cm kubeadm-config -o yaml'
[kubelet-start] Writing kubelet configuration to file "/var/lib/kubelet/config.yaml"
[kubelet-start] Writing kubelet environment file with flags to file "/var/lib/kubelet/kubeadm-flags.env"
[kubelet-start] Starting the kubelet
[kubelet-start] Waiting for the kubelet to perform the TLS Bootstrap...

This node has joined the cluster:
* Certificate signing request was sent to apiserver and a response was received.
* The Kubelet was informed of the new secure connection details.

Run 'kubectl get nodes' on the control-plane to see this node join the cluster.
- 查看当前的令牌信息
[root@k8s1 ~]# kubeadm token list
TOKEN                     TTL         EXPIRES                USAGES                   DESCRIPTION                                                EXTRA GROUPS
693dhq.d3wezqy89xbp9ljd   23h         2022-04-20T16:36:53Z   authentication,signing   <none>                                                     system:bootstrappers:kubeadm:default-node-token
eyor1y.0uctyurasehow8o5   23h         2022-04-20T16:17:29Z   authentication,signing   The default bootstrap token generated by 'kubeadm init'.   system:bootstrappers:kubeadm:default-node-token
- 节点添加成功
- 稍等片刻再次查看 node 节点,可以发现所有的节点运行正常,处于 Ready 状态
[root@k8s1 ~]# kubectl get node
NAME   STATUS     ROLES                  AGE     VERSION
k8s1   Ready      control-plane,master   22m     v1.23.5
k8s2   NotReady   <none>                 2m29s   v1.23.5
k8s3   NotReady   <none>                 76s     v1.23.5
2.2.5 运行容器
- 创建并运行容器
[root@k8s1 ~]# kubectl run demo --image=nginx
pod/demo created
- 运行成功
[root@k8s1 ~]# kubectl get pod
NAME   READY   STATUS    RESTARTS   AGE
demo   1/1     Running   0          2m16s
[root@k8s1 ~]# kubectl get pod -A -o wide
NAMESPACE     NAME                           READY   STATUS    RESTARTS   AGE     IP            NODE   NOMINATED NODE   READINESS GATES
default       demo                           1/1     Running   0          114s    10.244.1.2    k8s2   <none>           <none>
kube-system   coredns-6d8c4cb4d-jnsqt        1/1     Running   0          27m     10.244.0.2    k8s1   <none>           <none>
kube-system   coredns-6d8c4cb4d-zm5xh        1/1     Running   0          27m     10.244.0.3    k8s1   <none>           <none>
kube-system   etcd-k8s1                      1/1     Running   0          28m     172.25.21.1   k8s1   <none>           <none>
kube-system   kube-apiserver-k8s1            1/1     Running   0          28m     172.25.21.1   k8s1   <none>           <none>
kube-system   kube-controller-manager-k8s1   1/1     Running   0          28m     172.25.21.1   k8s1   <none>           <none>
kube-system   kube-flannel-ds-dkdks          1/1     Running   0          6m40s   172.25.21.3   k8s3   <none>           <none>
kube-system   kube-flannel-ds-hdb2x          1/1     Running   0          19m     172.25.21.1   k8s1   <none>           <none>
kube-system   kube-flannel-ds-s4qn7          1/1     Running   0          7m54s   172.25.21.2   k8s2   <none>           <none>
kube-system   kube-proxy-7xfp4               1/1     Running   0          7m54s   172.25.21.2   k8s2   <none>           <none>
kube-system   kube-proxy-9cn89               1/1     Running   0          27m     172.25.21.1   k8s1   <none>           <none>
kube-system   kube-proxy-bknhq               1/1     Running   0          6m40s   172.25.21.3   k8s3   <none>           <none>
kube-system   kube-scheduler-k8s1            1/1     Running   0          28m     172.25.21.1   k8s1   <none>           <none>
- 验证结果
[root@k8s1 ~]# curl 10.244.1.2
<!DOCTYPE html>
<html>
<head>
<title>Welcome to nginx!</title>
<style>
html { color-scheme: light dark; }
body { width: 35em; margin: 0 auto;
font-family: Tahoma, Verdana, Arial, sans-serif; }
</style>
</head>
<body>
<h1>Welcome to nginx!</h1>
<p>If you see this page, the nginx web server is successfully installed and
working. Further configuration is required.</p>

<p>For online documentation and support please refer to
<a href="http://nginx.org/">nginx.org</a>.<br/>
Commercial support is available at
<a href="http://nginx.com/">nginx.com</a>.</p>

<p><em>Thank you for using nginx.</em></p>
</body>
</html>
- 集群部署完成啦!
以上是docker的方式
