【Springboot实用功能开发】发送QQ邮件以及邮件验证码对话框
文章目录
- 参考博客
- 1. 发送一封QQ邮件
-
- 添加Maven依赖
- QQ邮箱开启POP服务
- 配置application.properties文件
- Controller层
- 编写 vue前端(也可以直接省略使用PostMan测试接口)
- 2. 做一个发送邮件验证的对话框
参考博客
- vue实现验证码倒计时功能
- SpringBoot实现邮箱发送验证码(QQ,163等同理)
1. 发送一封QQ邮件
该模块使用Controller方法发送邮件给用户,用户将会在QQ邮箱中收到6位验证码
添加Maven依赖
 <dependency>
     <groupId>org.springframework.bootgroupId>
     <artifactId>spring-boot-starter-mailartifactId>
 dependency>
QQ邮箱开启POP服务
进入QQ邮箱界面, 打开邮箱–设置–账户
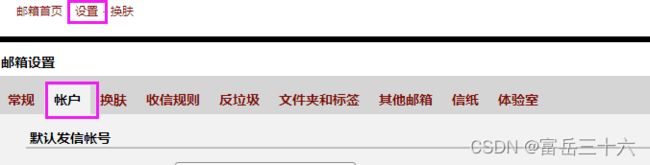
找到POP3/IMAP/SMTP/Exchange/CardDAV/CalDAV服务 ,如果没有开启,选择管理服务

点击进入后,点击“生成授权码”,后面按照QQ邮箱提示的操作,把授权码复制下来,后期会在项目配置文件中配置。
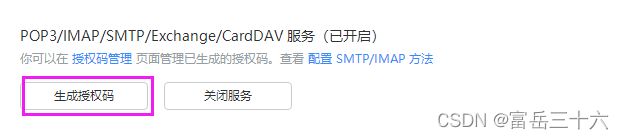
需要发送手机短信给QQ邮箱,然后才能生成QQ邮箱授权码。
生成的授权码就是application.properties中的email.password值,application.properties具体内容如下:
配置application.properties文件
# # smtp用户名
spring.mail.username= #写绑定授权码的QQ邮箱,一般做邮箱发送测试就是写你自己的邮箱。
# # 服务授权码
spring.mail.password=  # 输入QQ邮箱给你的授权码,这个授权码要和上面的邮箱对应。
#smtp服务器,下面的其实都不用变
spring.mail.host=smtp.qq.com
spring.mail.properties.mail.smtp.ssl.enable=true
# 默认的邮件编码为UTF-8
spring.mail.default-encoding=UTF-8
Controller层
Spring邮箱验证测试类,尽量不要使用测试类,即使用@Test注解的测试方法测试。容易出现空指针异常。测试邮箱发送可以使用Controller方法
最后我们使用PostMan进行接口测试:
Controller类如下:
import com.feng.generation_design.entity.ApiResult;
import com.feng.generation_design.util.ApiResultHandler;
import org.springframework.beans.factory.annotation.Autowired;
import org.springframework.mail.SimpleMailMessage;
import org.springframework.mail.javamail.JavaMailSender;
import org.springframework.web.bind.annotation.*;
@RestController
public class EmailController {
    //存储随机生成的校验码
    private String cdoe_store = null;
    @Autowired(required = false)
    private JavaMailSender sender; // 引入Spring Mail依赖后,会自动装配到IOC容器
@GetMapping("/send")
    public ApiResult sendEmail() {
        String code = (Math.random() + "").substring(2, 8);	//生成6位随机数
        cdoe_store = code;
        String email = "[email protected]";	//你想发给哪个邮箱
        SimpleMailMessage message = new SimpleMailMessage();
        message.setSubject("来自题库系统的提示"); // 发送邮件的主题
        message.setText("您好,您正在操作敏感信息,需要核验您的身份,您收到的验证码为:" + code); // 邮件的内容
        message.setTo(email); // 指定要接收邮件的用户邮箱账号
        message.setFrom("[email protected]"); // 邮件发送方,也就是配置文件中的邮件地址。
        sender.send(message); // 调用send方法发送邮件
        return ApiResultHandler.buildApiResult(200, "邮件发送成功!", null);
}
关于@Autowired(required=false)的使用
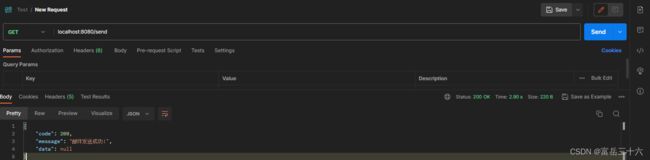
打开PostMan,我们对接口进行测试,选择GET方式,并输入url:localhost:8080/send,不传入任何参数,点击"Send".
上面其实用PostMan就可以直接看到请求结果了,用户也能接受到邮件。但是为了可视化性更好,我们编写一个具有发送邮件功能的按钮,请求成功后会有提示。
前端使用vue,做一个简单的发送邮件请求的按钮。
编写 vue前端(也可以直接省略使用PostMan测试接口)
<template>
  <div>
    <el-button @click="sendEmail()" type="text" size="large"
      >生成邮件el-button
    >
  div>
template>
<script>
export default {
  data() {
    return {};
  },
  methods: {
    sendEmail() {
      console.log("执行");
      //如果你的项目中使用cookies存储用户信息,可以使用当前用户存在系统cookie中的email值 作为邮件接收对象。
      //   let teacher_email = this.$cookies.get("c_email");

      this.$axios({
        url: `/api/send`,
      })
        .then((res) => {
          if (res.status === 200) {
            console.log(res);
            this.$message({
              type: "success",
              message: "邮件发送成功,请注意查收!",
            });
          }
        })
        .catch((error) => {
        console.log("打印出错信息")
        console.log(error)
          this.$message.error("邮件发送失败!!");
        });
    },
  },
};
script>
<style>style>
有人可能会问,上面的/api啥意思,这个其实是在前端定义的,这里我就省略不写定义的地方了。这里实际上是对localhost:8088端口号的另称,不然前端的请求都要加上个localhost:8088得多麻烦!
上面UI用的是ElementU控件。写得很简单。
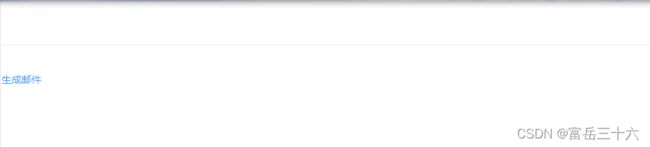
上面写的是text形式的按钮。点击后,如果请求数据成功,会提示:

邮件长这样:

其实这里可能会有小伙伴问,为什么这边是res.status呢?其实这里需要具体看,后端传过来的返回数据格式是什么样的。我们打开控制台(F12),(输出已经定义在我上面写的方法里了。)可以发现后端返回的数据如下:
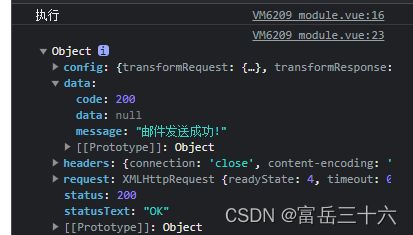
res下面有status属性,所以我们前端如果想要获取到status,就用res.status来接收,200代表数据请求成功。
如果不清楚前端如何接收,可以在前端使用console.log(res);或者看看控制台输出的内容是什么。根据控制台打印的属性名获取即可。
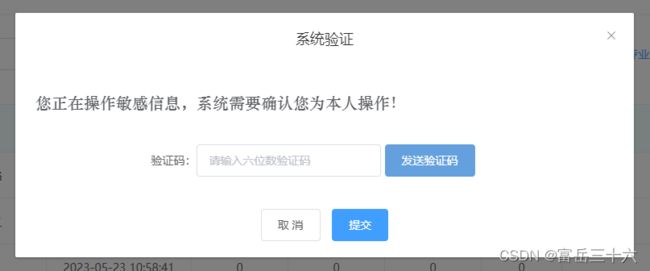
2. 做一个发送邮件验证的对话框
在原有的仅有倒计时功能的对话框基础上,现在做一个简单的验证码接收对话框,点击 发送验证码 后,系统发送验证码给用户,在倒计时过程中用户不能再次请求发送验证码请求。
业务场景如下:
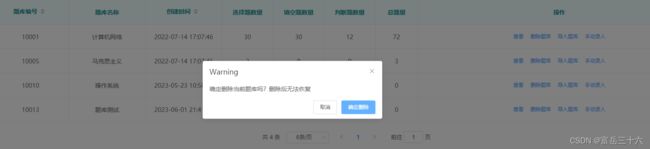
上面的删除确认对话框就不展示了,现在直接点击“删除” 触发对话框。
代码如下:
<template>
  <div>
    <el-button @click="sendEmail()" type="text" size="large">生成邮件el-button>
    <el-button @click="deleteIt()" type="text" size="large">删除题库el-button>


    <el-dialog title="系统验证" :visible.sync="centerDialogVisible" width="40%" center>
      <br />
      <span class="warning_info"
        >您正在操作敏感信息,系统需要确认您为本人操作!系统已发送验证码至您邮箱,请注意查收!span
      ><br /><br /><br />
      <div class="input_examcode_style">
        验证码:<el-input
          v-model="input_email_code"
          style="width: 40%"
          placeholder="请输入六位数验证码"
        >el-input>

        <el-button
          v-bind:class="{ grey: isGrey, blue: !isGrey }"
          v-bind:disabled="dis"
          type="primary"
          @click="getCode"
        >
          <span v-if="show">发送验证码span>
          <span v-else>重新发送({{ count }}s)span>
        el-button>
      div>
      <span slot="footer" class="dialog-footer">
        <el-button @click="centerDialogVisible = false">取 消el-button>
        <el-button type="primary" @click="submitExamCode()">提交el-button>
      span>
    el-dialog>
  div>
template>
<script>
export default {
  data() {
    return {
      input_email_code: "",
      centerDialogVisible: false,
      // 邮件发送
      centerDialogVisible: false,
      dis: false,
      show: true,
      isGrey: false, //按钮样式
      timer: null, //设置计时器,
      count: "",
      //邮件发送
    };
  },
  methods: {
    getCode() {
      this.sendEmail();
      let TIME_COUNT = 60;
      if (!this.timer) {
        this.count = TIME_COUNT;
        this.isGrey = true;
        this.show = false;
        this.dis = true;
        this.timer = setInterval(() => {
          if (this.count > 0 && this.count <= TIME_COUNT) {
            this.count--;
          } else {
            this.dis = false;
            this.isGrey = false;
            this.show = true;
            clearInterval(this.timer);
            this.timer = null;
          }
        }, 1000);
      }
    },

    deleteIt() {
      console.log("删除");
      this.centerDialogVisible = true;
    },
    sendEmail() {
      console.log("执行");
      //如果你的项目中使用cookies存储用户信息,可以使用当前用户存在系统cookie中的email值 作为邮件接收对象。
      //   let teacher_email = this.$cookies.get("c_email");
      this.$axios({
        url: `/api/Email/send`,	//注意这个改成自己的接口URL
      })
        .then((res) => {
          if (res.status === 200) {
            console.log(res);
            this.$message({
              type: "success",
              message: "邮件发送成功,请注意查收!",
            });
          }
        })
        .catch((error) => {
          console.log("错误信息如下:");
          console.log(error);
          this.$message.error("邮件发送失败!!");
        });
    },
    submitExamCode() {
      let input = this.input_email_code;
      console.log("您输入的验证码为:" + this.input_email_code);
       this.$axios({
		...
		后续提交逻辑请求
		})
      this.input_email_code = null;
      this.centerDialogVisible = false;
    },
  },
};
script>
<style>
.selector {
  margin-left: 10%;
}
.tableStyle {
  margin-left: 10%;
  width: 100%;
}
.page {
  margin-top: 20px;
  display: flex;
  justify-content: center;
  align-items: center;
}
.dialog_content {
  margin-left: 20%;
}
.grey {
  background-color: #edeef1;
  border-color: #edeef1;
  color: #666;
  width: 30%;
}
.blue {
  background-color: #64a0dd;
  border-color: #64a0dd;
}
.input_examcode_style {
  margin-left: 20%;
}
.warning_info {
  font-family: "华文中宋";
  font-size: 20px;
}
style>