【Python】在同一图形中的绘制多个子图
1. 引言
有时我们需要并排绘制两个图形,这不仅是为了更好地利用空间,而且主要是因为为了更加直观地对比分析数据。其实在python中可以利用subplot来实现上述功能。
闲话少说,我们直接开始吧!
2. 准备工作
这里,我们不妨先来举个例子,比方说,我们正在分析一家出租车公司的出行分布,假设我们想知道在Manhattan 和Brooklyn的皮卡车的出行距离有什么不同。
首先让我们来加载数据集,这里将使用seaborn软件包中的一个样本数据集Taxis,我们可以使用load函数直接加载,如下:
import seaborn as sns
# Load dataset
df = sns.load_dataset('taxis')
加载后的结果如下:

接着,我们使用以下代码来挑选我们关注的Manhattan 和Brooklyn的样本数据,如下:
# Brooklyn travels
df_bklyn = df.query(' pickup_borough == "Brooklyn" ')
# Manhattan Travels
df_mhtn = df.query(' pickup_borough == "Manhattan" ')
3. 绘制
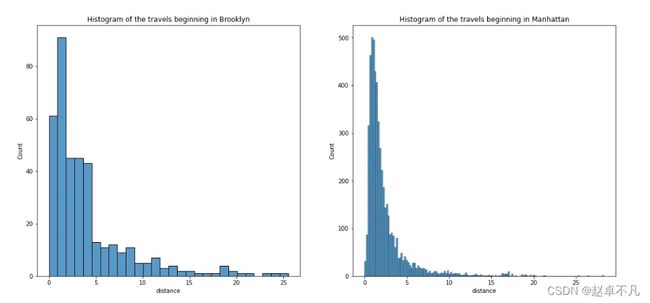
接着就是鉴定奇迹的时刻了。首先,我们要创建一个图形,并指示我们想要的行和列的数量(在下面的示例中,它是同一行上的两个图)。
# Creating a grid figure with matplotlib
fig, my_grid = plt.subplots(nrows=1, ncols=2, figsize=(18,8))
然后我们应该创建我们的子图,并使用切片表示法指示这些子图在网格中的位置。样例如下:
# Histograms
# Plot 1
g1 = sns.histplot(data=df_bklyn, x='distance', ax=my_grid[0])
# Title of the Plot 1
g1.set_title('Histogram of the travels beginning in Brooklyn')

# Plot 2
g2 = sns.histplot(data=df_mhtn, x='distance', ax=my_grid[1])
# Title of the Plot 2
g2.set_title('Histogram of the travels beginning in Manhattan');
4. 扩展
matplotlib的多个子图的绘制方法非常相似,但让我们观察下在对其进行编码时看看有什么不同。
首先来看一个一行三列的例子,如下:
# Creating a grid figure with matplotlib SINGLE ROW EXAMPLE
fig, (g1, g2, g3) = plt.subplots(nrows=1, ncols=3, figsize=(18,8))
但如果我们有多行,此时需要使用元组构成的列表,列表中的每一行表示一个元组。
# Creating a grid figure with matplotlib MULTIPLE ROWS EXAMPLE
fig, [(g1, g2, g3), (g4, g5, g6)] = plt.subplots(nrows=2, ncols=3, figsize=(18,8))
让我们看看距离纽约市4个不同社区的直方图的一个实际例子。请注意,这里不再需要使用ax参数。
# Creating a grid figure with matplotlib
fig, [(g1, g2), (g3, g4)] = plt.subplots(nrows=2, ncols=2, figsize=(18,8))
# Histograms
# Plot 1
g1.hist(data=df_bklyn, x='distance')
# Title of the Plot 1
g1.set_title('Histogram of the travels beginning in Brooklyn')
# Plot 2
g2.hist(data=df_mhtn, x='distance')
# Title of the Plot 2
g2.set_title('Histogram of the travels beginning in Manhattan')
# Plot 3
g3.hist(data=df_queens, x='distance')
# Title of the Plot 3
g3.set_title('Histogram of the travels beginning in Queens')
# Plot 4
g4.hist(data=df_bronx, x='distance')
# Title of the Plot 4
g4.set_title('Histogram of the travels beginning in Bronx');
5. 总结
帖子很短,但里面的技巧非常有用。在实际应用中,经常不得不回来重新思考如何做到这一点,特此记录,方便下次查看。最后希望这篇文章帮助初学者轻松地在同一个图形中绘制多个子图。
您学废了嘛?

