【Mysql】安装和基础环境配置
本文首发于 慕雪的寒舍
在本地安装mysql,以mariadb为例。
所有命令都需要在root下面执行or使用sudo
系统 CentOS 8
1.安装mariadb开发包
yum install -y mariadb
yum install -y mariadb-server
yum install -y mariadb-devel
2.修改配置文件中的编码
为了保证对中文的支持,我们需要修改几个配置文件。他们都在如下目录中
$ ls /etc/my.cnf.d/
auth_gssapi.cnf  client.cnf  enable_encryption.preset  mariadb-server.cnf  mysql-clients.cnf
需要修改的是如下3个,修改之前,建议使用cp命令进行备份,避免修改错了无法复原。
/etc/my.cnf.d/client.cnf
/etc/my.cnf.d/mysql-clients.cnf
/etc/my.cnf.d/mariadb-server.cnf
我的已经是修改好的了,需要修改的配置看注释就ok
$ cat /etc/my.cnf.d/client.cnf
#
# These two groups are read by the client library
# Use it for options that affect all clients, but not the server
#


[client]
# 新增下边一行配置,设置客户端默认字符集为utf8
default-character-set = utf8

# This group is not read by mysql client library,
# If you use the same .cnf file for MySQL and MariaDB,
# use it for MariaDB-only client options
[client-mariadb]
$ cat /etc/my.cnf.d/mysql-clients.cnf
#
# These groups are read by MariaDB command-line tools
# Use it for options that affect only one utility
#

[mysql]
# 新增字符配置
default-character-set = utf8

[mysql_upgrade]
$ cat /etc/my.cnf.d/mariadb-server.cnf
#
# These groups are read by MariaDB server.
# Use it for options that only the server (but not clients) should see
#
# See the examples of server my.cnf files in /usr/share/mysql/
#

# this is read by the standalone daemon and embedded servers
[server]

# this is only for the mysqld standalone daemon
# Settings user and group are ignored when systemd is used.
# If you need to run mysqld under a different user or group,
# customize your systemd unit file for mysqld/mariadb according to the
# instructions in http://fedoraproject.org/wiki/Systemd
[mysqld]
datadir=/var/lib/mysql
socket=/var/lib/mysql/mysql.sock
log-error=/var/log/mariadb/mariadb.log
pid-file=/run/mariadb/mariadb.pid
# 新增以下字符集的配置
collation-server = utf8_general_ci
init-connect = 'SET NAMES utf8'
character-set-server = utf8
sql-mode = TRADITIONAL
3.测试
3.1 启动/关闭
systemctl start mariadb
看看状态
systemctl status mariadb
显示如下,那就是正常运行中的
● mariadb.service - MariaDB 10.3 database server
   Loaded: loaded (/usr/lib/systemd/system/mariadb.service; disabled; vendor preset: disabled)
   Active: active (running) since Tue 2023-04-04 14:10:00 CST; 2 days ago
     Docs: man:mysqld(8)
           https://mariadb.com/kb/en/library/systemd/
  Process: 633453 ExecStartPost=/usr/libexec/mysql-check-upgrade (code=exited, status=0/SUCCESS)
  Process: 633289 ExecStartPre=/usr/libexec/mysql-prepare-db-dir mariadb.service (code=exited, status=0/SUCCESS)
  Process: 633265 ExecStartPre=/usr/libexec/mysql-check-socket (code=exited, status=0/SUCCESS)
 Main PID: 633422 (mysqld)
   Status: "Taking your SQL requests now..."
    Tasks: 31 (limit: 75691)
   Memory: 67.4M
   CGroup: /system.slice/mariadb.service
           └─633422 /usr/libexec/mysqld --basedir=/usr
用ps命令也能看到相关的进程
$ ps jax | grep mysql
      1  633422  633422  633422 ?             -1 Ssl     27   4:10 /usr/libexec/mysqld --basedir=/usr
 625302  634104  634104  625302 pts/48    634104 S+    1000   0:00 mysql -uroot
 642521  642555  642554  642521 pts/51    642554 S+    1000   0:00 grep --color=auto mysql
如果想关闭,使用如下命令即可
systemctl stop mariadb
3.2 进入mysql命令行
mysql -uroot
会显示出如下信息,包括mariadb的版本
Welcome to the MariaDB monitor.  Commands end with ; or \g.
Your MariaDB connection id is 11
Server version: 10.3.28-MariaDB MariaDB Server

Copyright (c) 2000, 2018, Oracle, MariaDB Corporation Ab and others.

Type 'help;' or '\h' for help. Type '\c' to clear the current input statement.

MariaDB [(none)]>
3.3 看看字符编码是否修改成功
输入如下命令 (记得要输入末尾的分号)
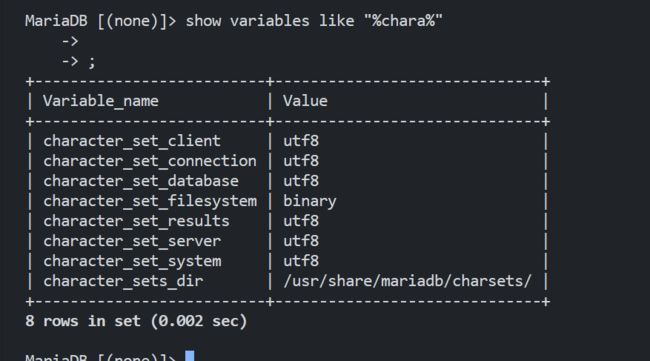
show variables like "%chara%";
看看是否都配置为了utf-8,如下图,除了filesystem是二进制,其他都是utf8,那就是ok的
修改之前的是这样的
修改后
到这里,就ok菈!
3.4 端口
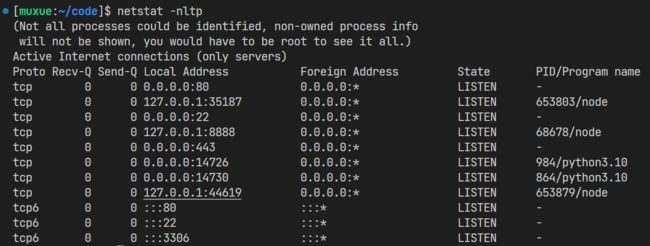
mysql服务的默认端口为3306,:::代表它是采用ipv6协议在本地进行访问的。但这不影响我们的使用
4.彻底卸载
有的时候,一个环境中已有mysql,但不是我们需要的版本。就需要将其删除后重新安装新的mysql。
rpm -qa | grep mysql
rpm -qa | grep mariadb
使用这两个命令,可以查看当前系统中安装的mysql(mariadb)的包
[root@1c2261732150:~]# rpm -qa | grep mysql
[root@1c2261732150:~]# rpm -qa | grep mariadb
mariadb-10.3.28-1.module_el8.3.0+757+d382997d.x86_64
mariadb-server-10.3.28-1.module_el8.3.0+757+d382997d.x86_64
mariadb-common-10.3.28-1.module_el8.3.0+757+d382997d.x86_64
mariadb-errmsg-10.3.28-1.module_el8.3.0+757+d382997d.x86_64
mariadb-connector-c-3.1.11-2.el8_3.x86_64
mariadb-backup-10.3.28-1.module_el8.3.0+757+d382997d.x86_64
mariadb-server-utils-10.3.28-1.module_el8.3.0+757+d382997d.x86_64
mariadb-devel-10.3.28-1.module_el8.3.0+757+d382997d.x86_64
mariadb-connector-c-config-3.1.11-2.el8_3.noarch
mariadb-gssapi-server-10.3.28-1.module_el8.3.0+757+d382997d.x86_64
mariadb-connector-c-devel-3.1.11-2.el8_3.x86_64
可以看到,我的系统中安装的是mariadb(而不是mysql)
这时候就可以用一条命令,快速进行批量卸载
rpm -qa | grep mariadb | xargs yum -y remove
这条命令中xargs的作用就是把前面这个grep命令的结果,按行喂给yum进行删除。
删除之后,再次执行。
rpm -qa | grep mariadb
如果没有软件,那就是卸载完毕了!
[root@1c2261732150:~/package]# rpm -qa | grep mariadb
[root@1c2261732150:~/package]#
注意,卸载mysql并不会连带删除数据文件
5.安装特定版本的
5.1 查看系统版本
$ cat /etc/system-release
CentOS Linux release 8.5.2111
当前我使用的系统为CentOS 8.5,使用yum安装的mariadb的版本比较高
# mysql --version
mysql  Ver 15.1 Distrib 10.3.28-MariaDB, for Linux (x86_64) using readline 5.1
假设我需要一个老版本的mysql,就需要去安装特定的rpm版本
5.2 获取yum源
http://repo.mysql.com/
找到el8后缀的包,el指代的就是CentOS
mysql80-community-release-el8-3.noarch.rpm
如上,就是一个mysql 8.0版本的CentOS8的rpm源。
在很多教程中,使用的都是5.7版本的mysql,可惜CentOS8已经不支持这个旧版本了(找不到对应的mysql57的包)
5.3 安装yum源
可以使用windows下载了rpm文件后,上传到服务器中。或者用如下命令在linux内部下载。
如下目录是我们系统源的路径,一般情况下,内部不会带有和mysql相关的源。
ls -al /etc/yum.repos.d/
total 92
drwxr-xr-x 1 root root 4096 Apr  6 19:14 .
drwxr-xr-x 1 root root 4096 Apr  6 19:14 ..
-rw-r--r-- 1 root root 2590 Feb 24 08:08 CentOS-Base.repo
-rw-r--r-- 1 root root  966 Feb 24 08:00 CentOS-Linux-AppStream.repo
-rw-r--r-- 1 root root  710 Feb 24 07:56 CentOS-Linux-BaseOS.repo
-rw-r--r-- 1 root root 1136 Feb 24 07:56 CentOS-Linux-ContinuousRelease.repo
-rw-r--r-- 1 root root  318 Feb 24 07:56 CentOS-Linux-Debuginfo.repo
-rw-r--r-- 1 root root  738 Feb 24 07:56 CentOS-Linux-Devel.repo
-rw-r--r-- 1 root root  710 Feb 24 07:56 CentOS-Linux-Extras.repo
-rw-r--r-- 1 root root  725 Feb 24 07:56 CentOS-Linux-FastTrack.repo
-rw-r--r-- 1 root root  746 Feb 24 07:56 CentOS-Linux-HighAvailability.repo
-rw-r--r-- 1 root root  693 Feb 24 07:56 CentOS-Linux-Media.repo
-rw-r--r-- 1 root root  712 Feb 24 07:56 CentOS-Linux-Plus.repo
-rw-r--r-- 1 root root  730 Feb 24 07:56 CentOS-Linux-PowerTools.repo
-rw-r--r-- 1 root root 1124 Feb 24 07:56 CentOS-Linux-Sources.repo
-rw-r--r-- 1 root root    0 Feb 24 08:05 epel-8.repo
-rw-r--r-- 1 root root 1698 Oct  4  2022 epel-modular.repo
-rw-r--r-- 1 root root 1332 Oct  4  2022 epel.repo
-rw-r--r-- 1 root root 1417 Jun  8  2021 epel.repo.rpmnew
-rw-r--r-- 1 root root 2318 Feb 24 08:08 epel.repo.rpmsave
-rw-r--r-- 1 root root 1797 Oct  4  2022 epel-testing-modular.repo
-rw-r--r-- 1 root root 1431 Oct  4  2022 epel-testing.repo
-rw-r--r-- 1 root root  164 Feb 27 12:21 vscode.repo
将数据传到云服务器后,使用如下命令,进行源安装
rpm -Uvh mysql80-community-release-el8-3.noarch.rpm
输出如下
warning: mysql80-community-release-el8-3.noarch.rpm: Header V4 RSA/SHA256 Signature, key ID 3a79bd29: NOKEY
Verifying...                          ################################# [100%]
warning: Unable to get systemd shutdown inhibition lock: Unit systemd-logind.service is masked.
Preparing...                          ################################# [100%]
Updating / installing...
   1:mysql80-community-release-el8-3  ################################# [100%]
安装完毕,再次查看yum源路径,可以看到比原来多了两个mysql的包
# ls -al /etc/yum.repos.d/
total 100
drwxr-xr-x 1 root root 4096 Apr  7 16:12 .
drwxr-xr-x 1 root root 4096 Apr  6 19:14 ..
-rw-r--r-- 1 root root 2590 Feb 24 08:08 CentOS-Base.repo
-rw-r--r-- 1 root root  966 Feb 24 08:00 CentOS-Linux-AppStream.repo
-rw-r--r-- 1 root root  710 Feb 24 07:56 CentOS-Linux-BaseOS.repo
-rw-r--r-- 1 root root 1136 Feb 24 07:56 CentOS-Linux-ContinuousRelease.repo
-rw-r--r-- 1 root root  318 Feb 24 07:56 CentOS-Linux-Debuginfo.repo
-rw-r--r-- 1 root root  738 Feb 24 07:56 CentOS-Linux-Devel.repo
-rw-r--r-- 1 root root  710 Feb 24 07:56 CentOS-Linux-Extras.repo
-rw-r--r-- 1 root root  725 Feb 24 07:56 CentOS-Linux-FastTrack.repo
-rw-r--r-- 1 root root  746 Feb 24 07:56 CentOS-Linux-HighAvailability.repo
-rw-r--r-- 1 root root  693 Feb 24 07:56 CentOS-Linux-Media.repo
-rw-r--r-- 1 root root  712 Feb 24 07:56 CentOS-Linux-Plus.repo
-rw-r--r-- 1 root root  730 Feb 24 07:56 CentOS-Linux-PowerTools.repo
-rw-r--r-- 1 root root 1124 Feb 24 07:56 CentOS-Linux-Sources.repo
-rw-r--r-- 1 root root    0 Feb 24 08:05 epel-8.repo
-rw-r--r-- 1 root root 1698 Oct  4  2022 epel-modular.repo
-rw-r--r-- 1 root root 1332 Oct  4  2022 epel.repo
-rw-r--r-- 1 root root 1417 Jun  8  2021 epel.repo.rpmnew
-rw-r--r-- 1 root root 2318 Feb 24 08:08 epel.repo.rpmsave
-rw-r--r-- 1 root root 1797 Oct  4  2022 epel-testing-modular.repo
-rw-r--r-- 1 root root 1431 Oct  4  2022 epel-testing.repo
-rw-r--r-- 1 root root 1265 Jan 10  2022 mysql-community.repo
-rw-r--r-- 1 root root 1321 Jan 10  2022 mysql-community-source.repo
-rw-r--r-- 1 root root  164 Feb 27 12:21 vscode.repo
这时候,yum源就已经安装成功了
yum list | grep mysql
执行后,可以看到,列在最前面的就是el8-3,即为刚刚我们添加的的yum源中的mysql版本
Repository AppStream is listed more than once in the configuration
Repository extras is listed more than once in the configuration
mysql80-community-release.noarch                                  el8-3                                                  @System
anope-mysql.x86_64                                                2.0.12-1.el8                                           epel
ansible-collection-community-mysql.noarch                         3.5.1-1.el8                                            epel
apr-util-mysql.x86_64                                             1.6.1-6.el8                                            AppStream
5.4 卸载旧版本的
如果需要安装新版本的,那就需要依照第四步的操作,彻底卸载旧版本的mysql
5.5 安装指定版本
此时我们指定mysql进行安装,就肯定能安装到刚刚添加的mysql8.0版本
yum install -y mysql
yum install -y mysql-server
yum install -y mysql-devel
可以看到,版本就是8.0的,不再是之前安装的Ver 15.1
$ mysql --version
mysql  Ver 8.0.26 for Linux on x86_64 (Source distribution)
共安装了下面的这些包
# rpm -qa | grep mysql
mysql-8.0.26-1.module_el8.4.0+915+de215114.x86_64
mysql-errmsg-8.0.26-1.module_el8.4.0+915+de215114.x86_64
mysql-server-8.0.26-1.module_el8.4.0+915+de215114.x86_64
mysql-devel-8.0.26-1.module_el8.4.0+915+de215114.x86_64
mysql-common-8.0.26-1.module_el8.4.0+915+de215114.x86_64
mysql80-community-release-el8-4.noarch
mysql-libs-8.0.26-1.module_el8.4.0+915+de215114.x86_64
# rpm -qa | grep mariadb
mariadb-connector-c-config-3.1.11-2.el8_3.noarch
5.6 启动报错(未解决)
但是这次启动的时候,却遇到了下面的报错
# systemctl start mysqld
Job for mysqld.service failed because the control process exited with error code.
See "systemctl status mysqld.service" and "journalctl -xe" for details.
查看报错信息也看不出个所以然
# systemctl status mysqld.service
● mysqld.service - MySQL 8.0 database server
   Loaded: loaded (/usr/lib/systemd/system/mysqld.service; disabled; vendor preset: disabled)
   Active: failed (Result: exit-code) since Fri 2023-04-07 16:39:51 CST; 7s ago
  Process: 648073 ExecStopPost=/usr/libexec/mysql-wait-stop (code=exited, status=0/SUCCESS)
  Process: 648059 ExecStart=/usr/libexec/mysqld --basedir=/usr (code=exited, status=1/FAILURE)
  Process: 648023 ExecStartPre=/usr/libexec/mysql-prepare-db-dir mysqld.service (code=exited, status=0/SUCCESS)
  Process: 647999 ExecStartPre=/usr/libexec/mysql-check-socket (code=exited, status=0/SUCCESS)
 Main PID: 648059 (code=exited, status=1/FAILURE)
   Status: "Data Dictionary upgrade from MySQL 5.7 in progress"

Apr 07 16:39:50 1c2261732150 systemd[1]: Starting MySQL 8.0 database server...
Apr 07 16:39:51 1c2261732150 systemd[1]: mysqld.service: Main process exited, code=exited, status=1/FAILURE
Apr 07 16:39:51 1c2261732150 systemd[1]: mysqld.service: Failed with result 'exit-code'.
Apr 07 16:39:51 1c2261732150 systemd[1]: Failed to start MySQL 8.0 database server.
百度了一下,这个问题是因为mysql的路径权限不足
https://blog.csdn.net/Shockang/article/details/118061120
https://blog.csdn.net/weixin_44198965/article/details/104145043
但是我修改了之后还是没有用,百度了另外几个操作,都没有办法正常启动mysqld,那能咋办,放弃了。
用回最开始安装的mariadb了


