ElasticSearch7.9.2安装指南(二)
安装版本配置
操作系统:CentOS7ES版本:7.9.2ES集群节点数:3个[node1,node2,node3]ES集群Master节点集群:[node1,node2]JDK版本:本人使用的是JDK 8;ES建议使用JDK 11,且如果不是JDK 11的话,启动的时候会有警告,但是不会报错,只是简单的警告而已,问题不大,可以忽略。
官网下载
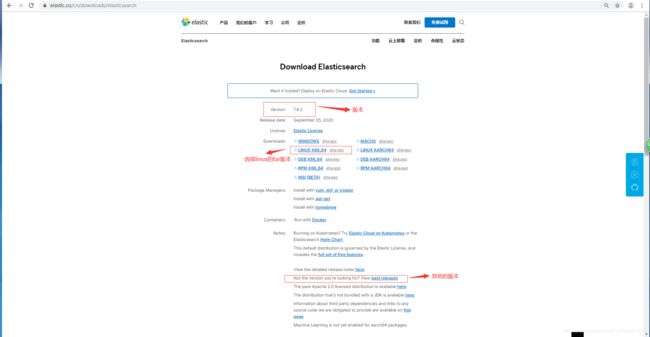
官网下载:传送门地址
具体如图1,这里我们选择Linux的tar包模式下载,这个看个人习惯,ElasticSearch 也是支持rpm和docker两种模式的安装,但是博主个人装软件还是喜欢tar包,喜欢这种软件目录等被自己安排的明明白白的感觉。
题外话:官网下载tar包可能比较慢,有需要的可以留言!
安装准备
配置集群3个节点之间免密登录和JDK
这个没什么好说的,和安装Hadoop集群的要求一样,这里不再累赘,不会的可以参考博客Hadoop集群大数据解决方案之搭建Hadoop3.X+HA模式(二)的准备阶段;
关闭防火墙
涉及到夸集群机器以及其他客户端访问集群端口,关闭防火墙设置,否则给自己带来很多坑,以下是关于CentOS7的防火墙设置,不同操作系统的防火墙关闭略有不同,不可一概而论。
CentOS 7
# 查看防火墙状态
firewall-cmd --state

# 临时关闭防火墙
systemctl stop firewalld.service

# 永久关闭防火墙`
systemctl disable firewalld
Ubuntu
# 查看防火墙状态
ufw status
# 关闭防火墙
ufw disable
CentOS 6
# 查看防火墙状态
service iptables status
# 关闭防火墙
chkconfig iptables off
解压安装包
博主将下载好的elasticsearch-7.9.2-linux-x86_64.tar.gz放在/data/tools/目录下,解压后得到目录如下,标记重要的是指后续会和运维人员频繁的交互的操作,不是指其他文件就不重要了,文件还是缺一不可的。
[hadoop@node1 elasticsearch-7.9.2]$ ll
总用量 572
drwxr-xr-x.  2 hadoop hadoop   4096 10月  6 02:20 bin                #启动的文件目录  重要
drwxr-xr-x.  3 hadoop hadoop    199 10月  6 05:58 config            #配置文件目录      重要
drwxr-xr-x.  9 hadoop hadoop    107 9月  23 08:48 jdk                 #自带JDK
drwxr-xr-x.  3 hadoop hadoop   4096 9月  23 08:48 lib                 #依赖的
-rw-r--r--.  1 hadoop hadoop  13675 9月  23 08:43 LICENSE.txt
drwxr-xr-x.  2 hadoop hadoop     30 10月  5 22:25 logs
drwxr-xr-x. 51 hadoop hadoop   4096 9月  23 08:49 modules
-rw-r--r--.  1 hadoop hadoop 544318 9月  23 08:47 NOTICE.txt
-rw-rw-r--.  1 hadoop hadoop      4 10月  7 16:18 pid
drwxr-xr-x.  2 hadoop hadoop      6 9月  23 08:47 plugins           #安装的插件目录,重要
-rw-r--r--.  1 hadoop hadoop   7007 9月  23 08:43 README.asciidoc
建好data和logs文件夹
先建好文件夹/opt/elasticsearch/data和/opt/elasticsearch/logs,为后面配置文件重新定义的data和logs准备,注意你自己定义的data和logs文件目录一定要保证你的操作es的linux账号有权限对这些文件夹进行读写,不然后续使用es时会报错。
安装ElasticSearch 7.9.2
修改配置文件elasticsearch.yml
切换到目录/data/tools/elasticsearch-7.9.2/config下,利用指令vim elasticsearch.yml编辑配置文件,具体参考如下;
 #======================== Elasticsearch Configuration =========================
#
# NOTE: Elasticsearch comes with reasonable defaults for most settings.
#       Before you set out to tweak and tune the configuration, make sure you
#       understand what are you trying to accomplish and the consequences.
#
# The primary way of configuring a node is via this file. This template lists
# the most important settings you may want to configure for a production cluster.
#
# Please consult the documentation for further information on configuration options:
# https://www.elastic.co/guide/en/elasticsearch/reference/index.html
#
# ---------------------------------- Cluster -----------------------------------
#
# Use a descriptive name for your cluster:
#
cluster.name: rowyet-es-cluster  #集群的名字,每个节点的拥有同一个名字才能认为是同一个集群
#
# ------------------------------------ Node ------------------------------------
#
# Use a descriptive name for the node:
#
node.name: node-1       #节点的名字,保证唯一,每个节点不同,需要修改
#
# Add custom attributes to the node:
#
node.attr.rack: r1
#
# ----------------------------------- Paths ------------------------------------
#
# Path to directory where to store the data (separate multiple locations by comma):
#
path.data: /opt/elasticsearch/data       #根据自己的习惯配置data文件夹
#
# Path to log files:
#
path.logs: /opt/elasticsearch/logs      #根据自己的习惯配置日志文件夹
#
# ----------------------------------- Memory -----------------------------------
#
# Lock the memory on startup:
#
bootstrap.memory_lock: true
#
# Make sure that the heap size is set to about half the memory available
# on the system and that the owner of the process is allowed to use this
# limit.
#
# Elasticsearch performs poorly when the system is swapping the memory.
#
# ---------------------------------- Network -----------------------------------
#
# Set the bind address to a specific IP (IPv4 or IPv6):
#
network.host: 0.0.0.0                 #设置成 0.0.0.0即可
#
# Set a custom port for HTTP:
#设置各种端口信息
http.cors.enabled: true
http.cors.allow-origin: "*"
http.port: 9200
transport.tcp.port: 9300

#
# For more information, consult the network module documentation.
#
# --------------------------------- Discovery ----------------------------------
#
# Pass an initial list of hosts to perform discovery when this node is started:
# The default list of hosts is ["127.0.0.1", "[::1]"]
#
discovery.seed_hosts: ["node1","node2","node3"]
#
# Bootstrap the cluster using an initial set of master-eligible nodes:
#
cluster.initial_master_nodes: ["node1","node2"]
discovery.zen.minimum_master_nodes: 2   #广播区域,和上面保持个数一样

#设置默认master节点,7.0版本新特性,否则加入不了集群,很坑,head插件也用不了。集群中可以成为master节点的节点名,最好这里指定唯一的一个,防止脑裂
#
# For more information, consult the discovery and cluster formation module documentation.

#
# ---------------------------------- Gateway -----------------------------------
#
# Block initial recovery after a full cluster restart until N nodes are started:
#
#
# For more information, consult the gateway module documentation.
gateway.recover_after_nodes: 2
gateway.expected_nodes: 3
gateway.recover_after_time: 10m


#
# ---------------------------------- Various -----------------------------------
#
# Require explicit names when deleting indices:
#
action.destructive_requires_name: true
更多的配置信息详细介绍如下;
elasticsearch的config文件夹里面有两个配置文 件:elasticsearch.yml和logging.yml,第一个是es的基本配置文件,第二个是日志配置文件,es也是使用log4j来记录日 志的,所以logging.yml里的设置按普通log4j配置文件来设置就行了。下面主要讲解下elasticsearch.yml这个文件中可配置的 东西。
cluster.name: rowyet-es-cluster
配置es的集群名称,默认是elasticsearch,es会自动发现在同一网段下的es,如果在同一网段下有多个集群,就可以用这个属性来区分不同的集群。
node.name: “node-1”
节点名,默认随机指定一个name列表中名字,该列表在es的jar包中config文件夹里name.txt文件中,其中有很多作者添加的有趣名字。
node.master: true
指定该节点是否有资格被选举成为node,默认是true,es是默认集群中的第一台机器为master,如果这台机挂了就会重新选举master。
node.data: true
指定该节点是否存储索引数据,默认为true。
index.number_of_shards: 8
设置默认索引分片个数,默认为5片。
index.number_of_replicas: 3
设置默认索引副本个数,默认为1个副本。
path.conf: /path/to/conf
设置配置文件的存储路径,默认是es根目录下的config文件夹。
path.data: /opt/elasticsearch/data
设置索引数据的存储路径,默认是es根目录下的data文件夹,可以设置多个存储路径,用逗号隔开,例:path.data: /path/to/data1,/path/to/data2
path.work: /path/to/work
设置临时文件的存储路径,默认是es根目录下的work文件夹。
path.logs: /opt/elasticsearch/logs
设置日志文件的存储路径,默认是es根目录下的logs文件夹
path.plugins: /path/to/plugins
设置插件的存放路径,默认是es根目录下的plugins文件夹
bootstrap.mlockall: true
设置为true来锁住内存。因为当jvm开始swapping时es的效率 会降低,所以要保证它不swap,可以把ES_MIN_MEM和ES_MAX_MEM两个环境变量设置成同一个值,并且保证机器有足够的内存分配给es。 同时也要允许elasticsearch的进程可以锁住内存,linux下可以通过ulimit -l unlimited命令。
network.bind_host: 192.168.0.1
设置绑定的ip地址,可以是ipv4或ipv6的,默认为0.0.0.0。
network.publish_host: 192.168.0.1
设置其它节点和该节点交互的ip地址,如果不设置它会自动判断,值必须是个真实的ip地址。
network.host: 192.168.0.1
这个参数是用来同时设置bind_host和publish_host上面两个参数。
transport.tcp.port: 9300
设置节点间交互的tcp端口,默认是9300。
transport.tcp.compress: true
设置是否压缩tcp传输时的数据,默认为false,不压缩。
http.port: 9200
设置对外服务的http端口,默认为9200。
http.max_content_length: 100mb
设置内容的最大容量,默认100mb
http.enabled: false
是否使用http协议对外提供服务,默认为true,开启。
gateway.type: local
gateway的类型,默认为local即为本地文件系统,可以设置为本地文件系统,分布式文件系统,hadoop的HDFS,和amazon的s3服务器,其它文件系统的设置方法下次再详细说。
gateway.recover_after_nodes: 1
设置集群中N个节点启动时进行数据恢复,默认为1。
gateway.recover_after_time: 5m
设置初始化数据恢复进程的超时时间,默认是5分钟。
gateway.expected_nodes: 2
设置这个集群中节点的数量,默认为2,一旦这N个节点启动,就会立即进行数据恢复。
cluster.routing.allocation.node_initial_primaries_recoveries: 4
初始化数据恢复时,并发恢复线程的个数,默认为4。
cluster.routing.allocation.node_concurrent_recoveries: 2
添加删除节点或负载均衡时并发恢复线程的个数,默认为4。
indices.recovery.max_size_per_sec: 0
设置数据恢复时限制的带宽,如入100mb,默认为0,即无限制。
indices.recovery.concurrent_streams: 5
设置这个参数来限制从其它分片恢复数据时最大同时打开并发流的个数,默认为5。
discovery.zen.minimum_master_nodes: 1
设置这个参数来保证集群中的节点可以知道其它N个有master资格的节点。默认为1,对于大的集群来说,可以设置大一点的值(2-4)
discovery.zen.ping.timeout: 3s
设置集群中自动发现其它节点时ping连接超时时间,默认为3秒,对于比较差的网络环境可以高点的值来防止自动发现时出错。
discovery.zen.ping.multicast.enabled: false
设置是否打开多播发现节点,默认是true。
discovery.zen.ping.unicast.hosts: [“host1”, “host2:port”, “host3[portX-portY]”]
设置集群中master节点的初始列表,可以通过这些节点来自动发现新加入集群的节点。
下面是一些查询时的慢日志参数设置
index.search.slowlog.level: TRACE
index.search.slowlog.threshold.query.warn: 10s
index.search.slowlog.threshold.query.info: 5s
index.search.slowlog.threshold.query.debug: 2s
index.search.slowlog.threshold.query.trace: 500ms
index.search.slowlog.threshold.fetch.warn: 1s
index.search.slowlog.threshold.fetch.info: 800ms
index.search.slowlog.threshold.fetch.debug:500ms
index.search.slowlog.threshold.fetch.trace: 200ms
启动时遇到的常见问题调试
进入/data/tools/elasticsearch-7.9.2/bin文件夹,使用以下指令进行es的启动和关闭,每个节点的操作一样;
./elasticsearch -d      #启动es


#关闭es  ,利用jps查到java进程 然后kill掉进程id即可
[hadoop@node1 bin]$ jps
1828 Jps
1622 Elasticsearch
[hadoop@node1 bin]$ kill -9 1622
- 启动报错
Exception in thread "main" java.nio.file.AccessDeniedException: ……;
解决:你使用的用户没有es文件夹的权限,切换到有es根目录/data/tools/elasticsearch-7.9.2操作权限的user再启动,或者也可以对你的user进行赋权; max file descriptors [4096] for elasticsearch process is too low, increase to at least [65536];
解决:问题2和问题3一般会一起出现,可以一起解决,是需要修改同一个文件夹,每个进程最大同时打开文件数太小,es最少需要65536个,可通过下面2个命令查看当前数量,可以看到目前的每个进程最大同时打开文件数不满足要求;
ulimit -Hn
ulimit -Sn
修改/etc/security/limits.conf文件,增加配置,用户退出后重新登录生效,即可以切换一下其他用户,在再切换回来就行了,不用重启服务器,切换好以后可以再次使用以上指令查看,确认下修改是否生效;
*               soft    nofile          65536
*               hard    nofile          65536
max number of threads [3818] for user [es] is too low, increase to at least [4096];
解决: 问题2和问题3一般会一起出现,可以一起解决,是需要修改同一个文件夹,最大线程个数太低,可通过命令查看
ulimit -Hu
ulimit -Su
修改配置文件/etc/security/limits.conf(和问题1是一个文件),增加配置,用户退出后重新登录生效,即可以切换一下其他用户,在再切换回来就行了,不用重启服务器,切换好以后可以再次使用以上指令查看,确认下修改是否生效;
*               soft    nproc           4096
*               hard    nproc           4096
max virtual memory areas vm.max_map_count [65530] is too low, increase to at least [262144];
解决: 修改/etc/sysctl.conf文件,增加配置vm.max_map_count=262144
vi /etc/sysctl.conf   #编辑/etc/sysctl.conf,最后添加vm.max_map_count=262144
sysctl -p             #刷新/etc/sysctl.conf文件,使得刚刚的修改生效
memory locking requested for elasticsearch process but memory is not locked
解决:先确保config/elasticsearch.yml文件内的bootstrap.memory_lock: true没有被注释,然后/etc/security/limits.conf后追加如下;
hadoop      hard    nofile      65536
hadoop      soft    nofile      65536
hadoop      soft    memlock     unlimited
hadoop      hard    memlock     unlimited
hadoop      -       nofile      65535
这里的hadoop是你启动es的账号,可以根据自己的启动账号来配置,注意需要su 其他账号再切换回来或者sudo reboot重启才能生效;亦可参考官网页:Configuring system settings
- 其他问题,过程中可能还会有其他坑,遇到问题可以查看启动日志,就是我们指定的
/opt/elasticsearch/logs/rowyet-es-cluster.log文件,这里也不可能一一列举,大家谷歌,必应吧,也可以一起留言探讨。
正常启动
以守护进程的方式运行,可以添加-d参数:
$ bin/elasticsearch -d
ES在Linux系统中支持修改PID,这样可以通过PID手动停止进程,这样的话可以通过shell脚本自动化启动和关闭,是目前官网推荐的最理想的启动和关闭es;
$ bin/elasticsearch -d -p pid
$ kill `cat pid`
在每个节点的启动日志都不报错后在每个节点内部先 执行以下操作,确定集群真正的启动好了;
利用jps指定确定ElasticSearch的java进程在线,如果查询不到,说明没有启动成功;
[hadoop@node1 elasticsearch-7.9.2]$ jps
2289 Elasticsearch
2485 Jps
查看启动节点
在节点linux客户端使用一下curl node1:9200,查看一下当前ES节点信息;如果在本节点能获取到以下信息,说明该节点正常启动了;如果本节点能获取到,但是其他节点如在node2里面也curl node1:9200却失败报错curl: (7) Failed connect to node1:9200; 没有到主机的路由,说明是因为防火墙没关,导致其他机器无法访问到node1节点的9200端口,可以用telnet node1 9200指令确认,能通代表能访问,否则不能。
[hadoop@node1 elasticsearch-7.9.2]$ curl node1:9200
{
  "name" : "node-1",
  "cluster_name" : "rowyet-es-cluster",
  "cluster_uuid" : "GSe0LvhZTj2iFYPH5mhryg",
  "version" : {
    "number" : "7.9.2",
    "build_flavor" : "default",
    "build_type" : "tar",
    "build_hash" : "d34da0ea4a966c4e49417f2da2f244e3e97b4e6e",
    "build_date" : "2020-09-23T00:45:33.626720Z",
    "build_snapshot" : false,
    "lucene_version" : "8.6.2",
    "minimum_wire_compatibility_version" : "6.8.0",
    "minimum_index_compatibility_version" : "6.0.0-beta1"
  },
  "tagline" : "You Know, for Search"
}
如果节点自生能访问9200端口,其他节点也能访问,就可以在一台能访问node1节点9200端口的Windows客户端上的浏览器上访问这些ES集群,如下图2;

利用Chrome浏览器扩展插件JSONView-for-Chrome-master访问看起来舒服一些 ,如图3。

看到这种指令大家其实就比较熟悉了,典型的RESTFul风格的代码,这种http请求,也可以使用postman等工具访问,这个就看大家自己的喜爱后,后续也有经典插件kibana的安装教程,一般会用kibana访问es;
监控集群
利用curl -sXGET http://node1:9200/_cluster/health?pretty=true指令来监控ES集群的健康状况,如下,一样的,先在节点内部测试,然后再在其他能访问9200端口的节点上测试,详情如下;
[hadoop@node1 config]$ curl  -sXGET http://node1:9200/_cluster/health?pretty=true
{
  "cluster_name" : "rowyet-es-cluster",
  "status" : "green",
  "timed_out" : false,
  "number_of_nodes" : 3,
  "number_of_data_nodes" : 3,
  "active_primary_shards" : 0,
  "active_shards" : 0,
  "relocating_shards" : 0,
  "initializing_shards" : 0,
  "unassigned_shards" : 0,
  "delayed_unassigned_shards" : 0,
  "number_of_pending_tasks" : 0,
  "number_of_in_flight_fetch" : 0,
  "task_max_waiting_in_queue_millis" : 0,
  "active_shards_percent_as_number" : 100.0
}
利用浏览器访问监控,如下图4;

#!/usr/bin/nev python

#coding:utf8

import  subprocess

body = ''

false = 'false'

obj = subprocess.Popen(("curl  -sXGET http://node1:9200/_cluster/health?pretty=true"),shell=True,stdout=subprocess.PIPE)

data = obj.stdout.read()

#print(data)

data1 = eval(data)

status = data1.get("status")

if status == "green" :

    print("\033[32melasticesearch集群状态好\033[0m")

else:

    print("发短信啦,发邮件啦,发钉钉报警了")
    print("\033[31m集群有点问题了\033[0m"]
优化
最好先安装走到这一步,再优化,否则太乱了。
-
修改内存限制,可以参考官网;
-
要尽量到进程的地址空间锁定到RAM中,防止任何Elasticsearch内存被交换出去
修改/data/tools/elasticsearch-7.9.2/config/elasticsearch.yml中的配置:bootstrap.memory_lock: true,具体如下;
40  # ----------------------------------- Memory -----------------------------------
41  #
42  # Lock the memory on startup:
43  #
44  bootstrap.memory_lock: true
45  #
46  # Make sure that the heap size is set to about half the memory available
47  # on the system and that the owner of the process is allowed to use this
48  # limit.
49  #
50  # Elasticsearch performs poorly when the system is swapping the memory.
51  #
到此就愉快的安装完了,当然为了使用方便,可以安装插件kibana,head等,这个是后话;