Vue.js 比较重要知识点总结四
概述
- ref toRef toRefs进阶,深入理解
- vue3 setup
- Vue3为何比Vue2快?
- 怎样理解 Vue 的单向数据流?
- Vue 中事件绑定原理
- vue3 mitt 使用
ref toRef toRefs进阶,深入理解
-
为何需要ref?
- 返回值类型,会丢失响应式
- setup、computed、合成函数,都有可能返回值类型
- Vue如果不定义ref,用户将自定义ref,反而混乱
-
为何需要.value?
- ref是一个对象(不丢失响应式),value存储值
- 通过.value属性的get和set实现响应式
- 用于模板、reactive时,不需要.value,其他情况都需要
-
为何需要toRef toRefs
- 初衷:不丢失响应式的情况下,把对象数据进行分解和扩散
- 前提:针对的事响应式对象,不是普通对象
- 注意:不创造响应式,而是延续响应式
更多精彩内容,请微信搜索“前端爱好者“, 戳我 查看 。
vue3 setup
script setup 是干啥的?
scrtpt setup 是 vue3 的语法糖,简化了组合式 API 的写法,并且运行性能更好。
使用 script setup 语法糖的特点:
- 属性和方法无需返回,可以直接使用。
- 引入组件的时候,会自动注册,无需通过 components 手动注册。
- 使用 defineProps 接收父组件传递的值。
- useAttrs 获取属性,useSlots 获取插槽,defineEmits 获取自定义事件。
- 默认不会对外暴露任何属性,如果有需要可使用 defineExpose 。
setup中如何获取组件实例?
- setup和其他Composition API中都没有this
- 在Options API中仍然可以使用this
- Composition API中可以使用 getCurrentInstance 方法获取
vue3 getCurrentInstance
Vue2中,可以通过this来获取当前组件实例;
Vue3中,在setup中无法通过this获取组件实例,console.log(this)打印出来的值是undefined。
在Vue3中,getCurrentInstance()可以用来获取当前组件实例 vue3官方文档解释
let { proxy } = getCurrentInstance();
在setup中分别打印下面3个值,结果如下:
console.log(getCurrentInstance,typeof(getCurrentInstance));
console.log(getCurrentInstance(),typeof(getCurrentInstance()));
console.log(proxy,typeof(proxy));
结果

可以看到:
- getCurrentInstance是一个function方法,
- getCurrentInstance()是一个对象,proxy也是一个对象。
- proxy是getCurrentInstance()对象中的一个属性,通过对象的解构赋值方式拿到proxy。
getCurrentInstance只能在setup或生命周期钩子中使用。
在onMunted生命周期中打印getCurrentInstance
定义一个test方法,通过click事件触发方法
onMounted(() => {
  console.log(getCurrentInstance(), typeof getCurrentInstance());
});
function test() {
  console.log(getCurrentInstance(), typeof getCurrentInstance());
}
![]()
可以看到在function中是无法获取该实例的。
let { ctx } = getCurrentInstance();
console.log(ctx, typeof ctx);
let { proxy } = getCurrentInstance();
console.log(proxy, typeof proxy);
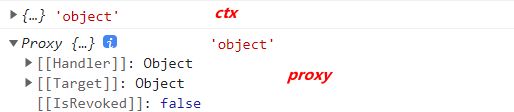
ctx和proxy都是getCurrentInstance()对象中的属性,通过解构赋值的方式拿到。可以看到,2者有所区别。
ctx是普通对象,proxy是Proxy对象。
补充:Vue3中关于getCurrentInstance的大坑
开发中只适用于调试! 不要用于线上环境,否则会有问题!
解决方案:
方案1.
获取挂载到全局中的方法
const instance = getCurrentInstance()
console.log(instance.appContext.config.globalProperties)
方案2.
使用proxy线上也不会出现问题
const { proxy } = getCurrentInstance()
Vue3为何比Vue2快?
- Proxy实现响应式
- patchFlag https://vue-next-template-explorer.netlify.app/
- 编译模板时,动态节点做标记
- 标记,分为不同的类型,如TEXT,PROPS
- diff时,区分静态节点和不同类型的动态节点
- hoistStatic
- 将静态节点的定义,提升到父作用域,缓存起来,空间换时间
- 多个相邻的静态节点,会被合并起来,编译优化
- cacheHandler
缓存事件 - SSR优化
静态节点直接输出为dom,绕过vdom - tree-shaking
编译时,按需引入API
怎样理解 Vue 的单向数据流?
所有的 prop 都使得其父子 prop 之间形成了 一个单向下行 绑定:
父级 prop 的更新会向下流动到子组件中,但是反过来则不行。这样会防止从子组件意外改变父级组件的状态,从而导致你的应用的数据流向难以理解。
额外的,每次父级组件发生更新时,子组件中所有的 prop 都将会刷新为最新的值。这意味着你不应该在一个子组件内部改变 prop。
如果你这样做了,Vue 会在浏览器的控制台中发出警告。子组件想修改时,只能通过 $emit 派发一个自定义事件,父组件接收到后,由父组件修改。
有两种常⻅的试图改变一个 prop 的情形 :
这个 prop 用来传递一个初始值;这个子组件接下来希望将其作为一个本地的 prop 数据来使用。
在这种情况下,最好定义一个本地的 data 属性并将这个 prop 用作其初始值:
props: ['initialCounter'],
data: function () {
  return {
    counter: this.initialCounter
  }
}
这个 prop 以一种原始的值传入且需要进行转换。
在这种情况下,最好使用这个 prop 的值来定义 一个计算属性
props: ['size'],
computed: {
  normalizedSize: function () {
    return this.size.trim().toLowerCase()
  }
}
Vue 中事件绑定原理
$emit
vm.$emit('事件名称', 可选参数)
触发当前实例上的事件,要传递的数据会传给监听器;
$on
vm.$on('事件名称', callback) callback回调emit要传送的数据
监听当前实例上自定义事件;
$off
vm.$off( [event, callback] )
移除自定义事件监听器。
- 如果没有提供参数,则移除所有的事件监听器;
- 如果只提供了事件,则移除该事件所有的监听器;
- 如果同时提供了事件与回调,则只移除这个回调的监听器。
vue2 使用例子
//父组件
父组件使用@select-type=“onSelectType”@就是v-on的简写,监听由子组件vm.$emit触发的事件,通过onSelectType()接受从子组件传递过来的数据,通知父组件数据改变了。
// 子组件
子组件通过$emit来触发事件,将参数传递出去。
vue3 使用例子 – Vue3.x推荐使用外部库mitt来代替 $on $emit $off
mitt源码使用的是typescript编写的,源码加注释一共不到90行,阅读起来比较轻松。
typescript不是本次的重点,所以将mitt源码以js的形式展示如下。
/**
 * 向外暴露的默认函数
 * @param 入参为 EventHandlerMap 对象 (ts真香,我们能清楚的知道参数的类型是什么,返回值是什么)
 * @returns 返回一个对象,对象包含属性 all,方法 on,off,emit
 */
export default function mitt (all) {
  /*
    此处实参可传一个EventHandlerMap对象,实现多个 mitt 的合并。例如:
    const m1 = mitt();
    m1.on('hi', () => { console.log('Hi, I am belongs to m1.'); });

    const m2 = mitt(m1.all);
    m2.emit('hi') // Hi, I am belongs to m1.
    m2.on('hello', () => { console.log('Hello, I am belongs to m2.'); });

    m1.emit('hello'); // Hello, I am belongs to m2.

    m1.all === m2.all // true
  */
  all = all || new Map();

  return {
    // 事件键值对映射对象
    all,

    /**
     * 注册一个命名的事件处理
     * @param type 事件名,官方表示事件名如是 *,用来标记为通用事件,调用任何事件,都会触发命名为 * 的事件
     * @param handler 事件处理函数
     */
    on (type, handler) {
      // 根据type去查找事件
      const handlers = all.get(type);
      // 如果找到有相同的事件,则继续添加,Array.prototype.push 返回值为添加后的新长度,
      const added = handlers && handlers.push(handler);
      // 如果已添加了type事件,则不再执行set操作
      if (!added) {
        all.set(type, [handler]); // 注意此处值是数组类型,可以添加多个相同的事件
      }
    },

    /**
     * 移除指定的事件处理
     * @param type 事件名,和第二个参数一起用来移除指定的事件,
     * @param handler 事件处理函数
     */
    off (type, handler) {
      // 根据type去查找事件
      const handlers = all.get(type);
      // 如果找到则进行删除操作
      if (handlers) {
        // 这里用了个骚操作,其实就是找到了,则删除(多个相同的只会删除找到的第一个),没找到则不会对原数组有任何影响
        handlers.splice(handlers.indexOf(handler) >>> 0, 1);
      }
    },

    /**
     * 触发所有 type 事件,如果有type为 * 的事件,则最后会执行。
     * @param type 事件名
     * @param evt 传递给处理函数的参数
     */
    emit (type, evt) {
      // 找到type的事件循环执行
      (all.get(type) || []).slice().map((handler) => { handler(evt); });
      // 然后找到所有为*的事件,循环执行
      (all.get('*') || []).slice().map((handler) => { handler(type, evt); });
    }
  };
}
vue3 mitt 使用
mitt优势
- 首先它足够小,仅有200bytes。
- 其次支持全部事件的监听和批量移除。
- 它还不依赖 Vue 实例,可以跨框架使用,React 或者 Vue,甚至 jQuery 项目都能使用同一套库。
API
// 创建mitt实例
mitt()

// 事件名称到注册处理程序函数的映射。
all

//触发事件,两个参数:name:触发的方法名,data:需要传递的参数
emit(name,data)

// 绑定事件,两个参数:name:绑定的方法名,callback:触发后执行的回调函数
on(name,callback)

// 解绑事件,一个参数:name:需要解绑的方法名
off(name)
安装mitt:
npm install mitt -save
新建EventBus.js文件:
// 事件总线第三方库:
import mitt from 'mitt';
const bus = mitt();
export default bus;
案例使用
发出事件的页面:send.vue
send页面视图
接收事件的页面:response.vue
response页面视图
移除监听事件
Bus.off('Event');
参考地址:
- https://tangjiusheng.com/web/4935.html
- https://blog.csdn.net/weixin_41759744/article/details/125305021
- https://www.jb51.net/article/263720.htm