python接口自动化教程
一、目录
- 为什么要进行接口测试
- jenkins安装和使用
- postman安装和使用
- postman&newman
- jenkins鉴权---basic-auth
- python的http请求
- unittest框架下的断言
- unittest框架
- 测试Jenkins get接口
- get、post请求的写法和断言的使用
- mock_server是使用
- 写个获取log的mock接口
- mock接口写法
- mock接口的测试用例
- 四种请求方式
- sqlite3的使用一
- sqlite3的使用二
- flask_restful的使用一
- flask_restful的使用二
- peewee使用
- peewee和flask的使用
二、内容详细讲解
1讲:为什么要进行接口测试
1.1 假设我们在开发一个移动端的jenkins客户端
①查看所有构建
②执行构建
③查看构建结果
1.2 需要测试的部分
1.3 什么是jenkins
1.4 持续集成定义
1.5 持续集成的价值
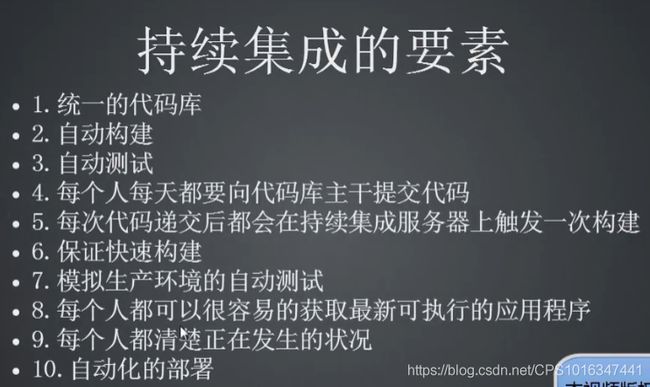
1.6 持续集成的要素
1.7 为什么要进行接口测试
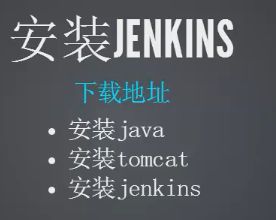
2.讲:jenkins安装和使用
2.1 安装java
测试安装是否正常:
https://blog.csdn.net/CPS1016347441/article/details/101150711
2.2 安装tomcat
网上直接下载tomcat文件包,解压后就可以使用了。保证8080端口是空闲的,未被占用的。否则tomcat启动异常
2.3 安装jenkins
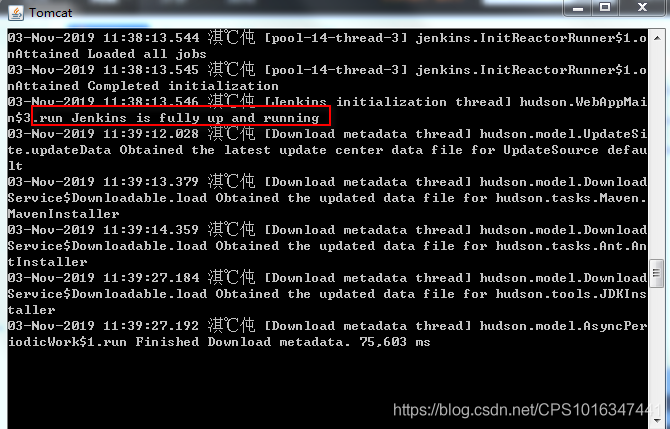
把jenkins.war包放到apache-tomcat-9.0.26\webapps文件夹下,在启动tomcat的时候就会看到关键字:Jenkins is fully up and running
2.4 监控端口
①端口监控命令:Netstat -ano
②找到8080端口对应的PID
③找到进程PID=4892的任务名称,输入进程查找命令:tasklist ,如果java的进程PID=4729就代表tomcat启动正常,并且使用端口是8080
2.5 python 安装
略
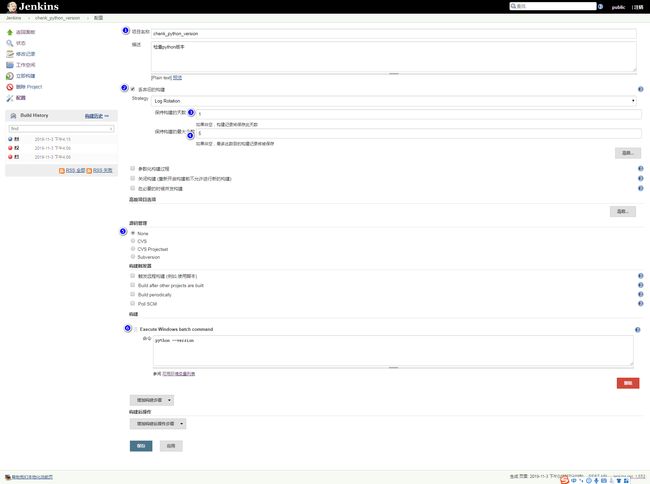
2.6 第一个构建:查看python版本号
①新建一个构建
配置如下:
3讲:postman安装和使用
①插件版postman
②exe版postman
4讲:postman&newman
4.1 newman安装
①安装nodejs
一路下一步
②安装npm /newman
【win+R】进入cmd命令行界面,输入node -v,如果有版本号,说明node安装成功。输入npm,有命令提示语,说明npm已经有了。一般nodejs自带npm。然后使用npm安装nodejs的包newman
npm install -g newman --registry=https://registry.npm.taobao.org
Npm是nodejs package manage的缩写,是nodejs包管理工具。可以帮助下载newman
4.2 输出用例的json文件或者链接
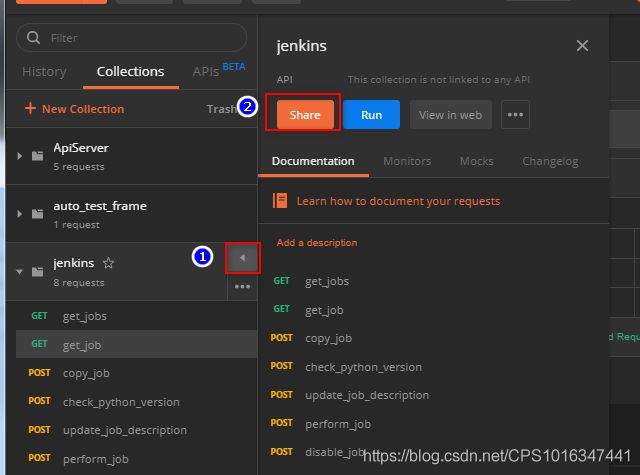
①把postman上用例输出成json格式
②把postman上用例输出成link模式
4.3 运行collection
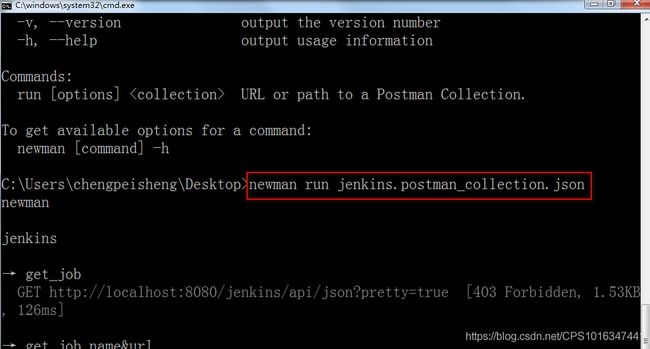
①运行json形式的collection
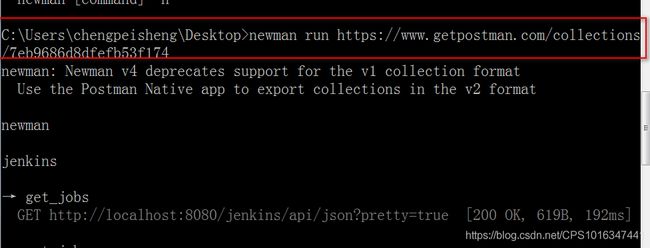
②运行link形式的collection
总结:运行命令 newman run json版用例/link版用例。通过这种方式就可以一下子运行一套用例,瞬间返回结果。
5讲:jenkins鉴权---basic-auth
①Jenkins主界面内进入【系统管理】界面,点击【Configure Global Security】进入全局安全界面,详细配置如下:
为不同用户添加不同权限,退出后就要按照权限要求输入账号和密码。切记,一定要给自己的账号配置所有权限,否则会导致权限不够无法进入Jenkin主界面。一旦因为权限原因导致无法进入Jenkins,请参考博客:
https://blog.csdn.net/xiaoyu_0217/article/details/60962738
6讲:python的http请求
略
7讲:unittest框架下的断言
7.1 pytho断言(用于永远不可能发生的情况)
Assert 表达式,”表达式不成立则显示此字符串”
X=8
Assert x>0,”8小于0,判断异常”
7.2 if+raise断言
X=-100
If x<0:
Raise Exception:
“-100<0 判断异常”
7.3 断言的讲解
8讲:Unittest框架
8.1 导入unittest框架
8.2 每个用例都是以test开头,不是以test开头的用例都不执行。
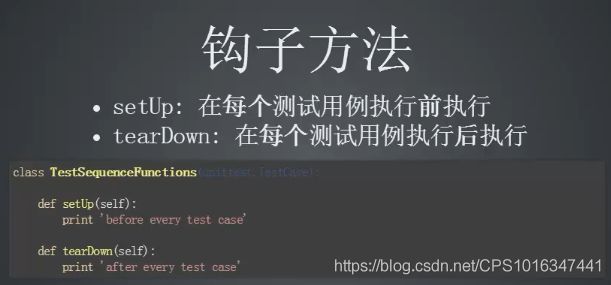
8.3 钩子方法
setUp:用例执行前准备
tearDown:用例执行后准备
8.4 断言
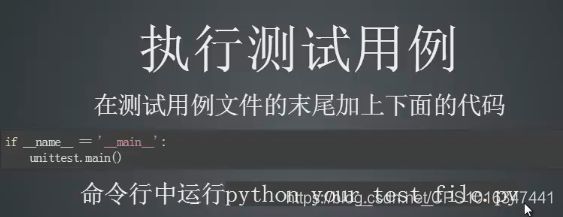
8.5 在测试用例文件末尾加上unittest.man()
9讲: 测试Jenkins get接口
9.1 序列化和反序列化
9.2 json(str)和dict转化
Json.dumps(dict) 序列化,得到str
Json.loads(str) 反序列化,得到字典,得到字典好比较
10讲:get、post请求的写法和断言的使用
import  unittest
import requests
import random

class TestJenkins(unittest.TestCase):
    def setUp(self):
        self.get_jobs_url="http://localhost:8080/jenkins/api/json?pretty=true"
        self.get_job_url="http://localhost:8080/jenkins/job/check_python_version/api/json"
        self.copy_job_url = "http://localhost:8080/jenkins/createItem?name=check_python_version_%s&mode=copy&from=check_python_version"%random.randint(1,9999999)
        self.check_python_version_url = "http://localhost:8080/jenkins/job/check_python_version/polling"
        self.update_job_description_url = "http://localhost:8080/jenkins/job/check_python_version/description?description=100555"
        self.perform_job_url = "http://localhost:8080/jenkins/job/check_python_version/build"
        self.disable_job_url = "http://localhost:8080/jenkins/job/check_python_version/disable"
        self.enable_job_url = "http://localhost:8080/jenkins/job/check_python_version/enable"
        print("数据初始化完毕")
    def tearDown(self):
        print("数据清理完毕")

    def test_get_jobs(self):
        response=requests.get(url=self.get_jobs_url,auth=("admin","cwx528938"))
        self.assertEqual(200,response.status_code,"test_get_jobs---fail!")
        self.assertEqual("NORMAL",response.json()["mode"],"test_get_jobs---fail!")
        self.assertEqual("the master Jenkins node", response.json()["nodeDescription"], "test_get_jobs---fail!")
        self.assertEqual("check_python_version", response.json()["jobs"][0]["name"], "test_get_jobs---fail!")#找到jobs的第0个name

    def test_copy_job(self):
        response=requests.post(url=self.copy_job_url,data={},auth=("admin","cwx528938"))
        self.assertEqual(200,response.status_code,"test_copy_job---fail!")

    def test_check_python_version(self):
        response = requests.post(url=self.copy_job_url, data={}, auth=("admin", "cwx528938"))
        self.assertEqual(200, response.status_code, "test_check_python_version---fail!")

    def test_update_job_description(self):
        response=requests.post(url=self.update_job_description_url,data={}, auth=("admin", "cwx528938"))
        self.assertEqual(204, response.status_code, "test_update_job_description---fail!")

    def test_perform_job(self):
        response = requests.post(url=self.perform_job_url, data={}, auth=("admin", "cwx528938"))
        self.assertEqual(201, response.status_code, "test_perform_job---fail!")

    def test_disable_job(self):
        response1=requests.get(url=self.get_job_url, auth=("admin", "cwx528938"))
        if response1.json()["buildable"]==True:#job是开启状态,直接下发禁用请求
            response = requests.post(url=self.disable_job_url, data={}, auth=("admin", "cwx528938"))
            self.assertEqual(200, response.status_code, "test_disable_job---fail!")
        else:#job是禁用状态,要先下发启用请求,再下发禁用请求
            self.test_enable_job()
            response = requests.post(url=self.disable_job_url, data={}, auth=("admin", "cwx528938"))
            self.assertEqual(200, response.status_code, "test_disable_job---fail!")

    def test_enable_job(self):
        response1 = requests.get(url=self.get_job_url, auth=("admin", "cwx528938"))#先获取job状态
        if response1.json()["buildable"] == False:  # job是禁用状态,直接下发启用请求
            response = requests.post(url=self.enable_job_url, data={}, auth=("admin", "cwx528938"))
            self.assertEqual(200, response.status_code, "test_enable_job---fail!")
        else: # job是启用用状态,先下发禁用请求,再下发启用请求
            self.test_disable_job()
            response=requests.post(url=self.enable_job_url,data={},auth=("admin","cwx528938"))
            self.assertEqual(200,response.status_code,"test_enable_job fail!")

if __name__=="__main__":
    unittest.main()
11讲:mock-server的使用
11.1 什么是mock_server
11.2
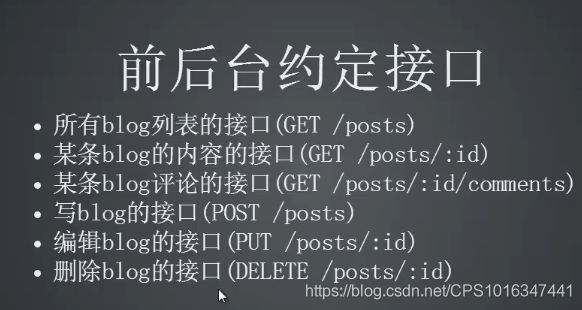
11.3 前后台约定
11.4 工具安装
①安装jdk
②安装standalone mock runner
没有安装jdk的话mock包无法运行
11.5 编辑api_config.json
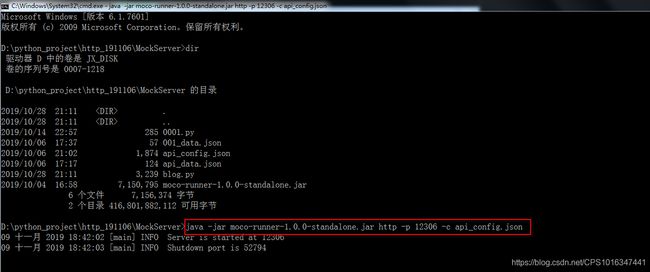
11.6 运行工具
命令解释:
①http:代表是http协议,如果想要https协议,要加入证书,否则无效
详细见:https://blog.csdn.net/CPS1016347441/article/details/102154691
②-p :端口是12306
③api_config.json: 被mock的接口定义文本
12讲: blog请求
12.1 实现获取所有blog请求
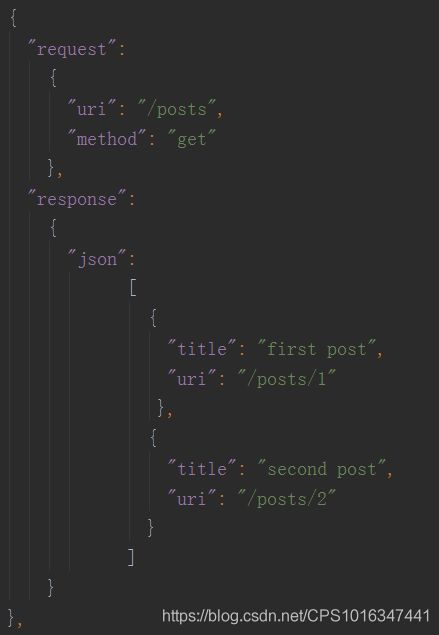
api_config.json文件内容(这个json文件就是规定了接口的request和response)
[
  {
    "request":
    {
      "uri": "/hello"
    },
    "response":
    {
      "text": "kitty"
    }
  },
  {
    "request":
      {
        "uri": "/posts"
      },
    "response":
      {
        "json":
              [
                {
                  "title": "first post",
                  "uri": "/posts/1"
                 },
                {
                  "title": "second post",
                  "uri": "/posts/2"
                }
              ]
      }
  },
  {
    "request":
      {
        "uri": "/posts/1",
        "method": "GET"
      },
    "response":
      {
        "file": "get_posts_1.json"
      }
  },
  {
    "request":
      {
        "uri": "/posts/2",
        "method": "GET"
      },
    "response":
      {
       "file": "get_posts_2.json"
      }
  },
  {
    "request":
      {
        "uri": "/posts/3",
         "method": "GET"
      },
    "response":
      {
        "file": "get_posts_3.json"
      }
  }
]
注意点:
①成对出现原则:
“request”:{“uri”:”xxx”},
“response”:{“json”:[{“title”:”xxx”},{“uri”:”xxx”}]}
②关键字定义:
"method":请求方式
"headers":请求header
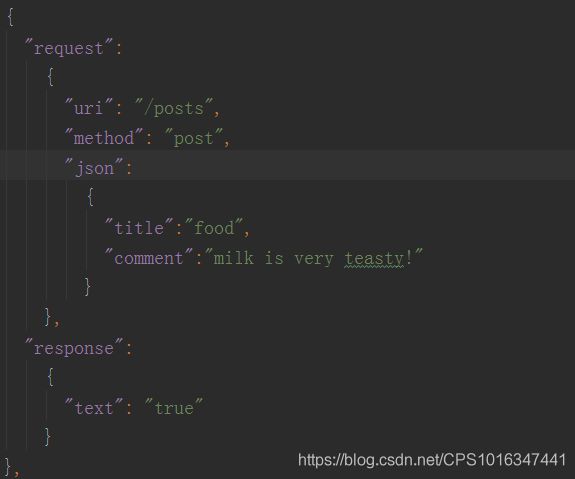
"json":json格式的数据,可以是请求体格式也可以是返回体的格式
"factory":???
"uri":请求的路径
"text":text格式的数据,可以是请求体格式也可以是返回体的格式
"cookies":cookie
"xpaths":???
"json_paths":???
"version":???
"file":??
"queries":???
"path_resource":???
"forms":???
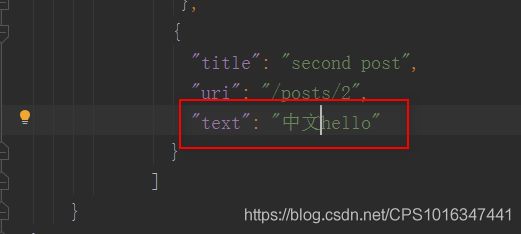
③由于mock不支持utf-8字符串,就会导致config文件出现中文可能就会导致乱码。所以在config文件里避免出现中文。 (有其他方法可以突破,不过效果不要,大家可以自己试试看。)
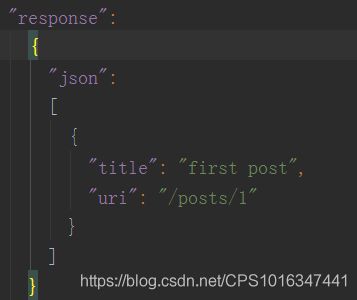
④response返回可以有2种写法:
第一种是简单写法,返回的数据不多时候采用。
第二种是复杂写法:采用数据分离的理念。
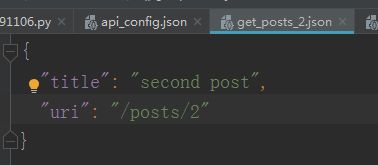
get_posts_1.json文件写法:
如果是多组字典,就要用列表方式显示
[
{“xxx”:”xxx”},
{“XXX”:”XXX”},
{“xxx”:”xxx”}
]
13.mock接口的写法
详细见代码
Config.json文件编写指南
①request、responses比较简短()
②response 、request比较复杂,不采用数据分离形式
Response比较复杂
Request比较复杂
③response、request,采用数据分离形式
14讲:mock接口的测试用例
###############################
#1.测试获取所有文章接口
#2.测试获取某篇文章的接口
###############################
import unittest
import requests

class TestBlog(unittest.TestCase):
    def setUp(self):
        self.url_get_all_blogs="http://localhost:12306/posts"
        self.url_get_a_blog="http://localhost:12306/posts/3"
        print("用例初始化完毕!")
    def tearDown(self):
        print("脏数据清理完毕!")
    def test_get_all_blogs(self):
        response=requests.get(url=self.url_get_all_blogs,data={},auth=("cwx528938","528938"))
        self.assertEqual(200,response.status_code,"获取所有blog失败")
        self.assertEqual("first post",response.json()[0]["title"],"title 异常")
        self.assertEqual("/posts/1",response.json()[0]["uri"],"uri 异常")
        self.assertEqual("second post",response.json()[1]["title"], "title 异常")
        self.assertEqual("/posts/2", response.json()[1]["uri"], "uri 异常")

    def test_get_a_blog(self):
        response = requests.get(url=self.url_get_a_blog, data={}, auth=("cwx528938", "528938"))
        self.assertEqual(200, response.status_code, "获取blog失败")
        self.assertEqual("third post", response.json()["title"], "title 异常")
        self.assertEqual("/posts/3", response.json()["uri"], "uri 异常")


if __name__ == "__main__":
    unittest.main()
15讲:四种请求方式
###############################
#1.测试获取所有文章接口
#2.测试获取某篇文章的接口
###############################
import unittest
import requests
import json

class TestBlog(unittest.TestCase):
    def setUp(self):
        self.url_get_all_blogs="http://localhost:12306/posts"
        self.url_get_a_blog="http://localhost:12306/posts/3"
        self.url_create_blog="http://localhost:12306/posts"
        self.url_edit_a_blog="http://localhost:12306/posts/2"
        self.url_delete_a_blog = "http://localhost:12306/posts/1"
        print("用例初始化完毕!")
    def tearDown(self):
        print("脏数据清理完毕!")
    def test_get_all_blogs(self):
        response=requests.get(url=self.url_get_all_blogs,data={},auth=("cwx528938","528938"))
        self.assertEqual(200,response.status_code,"获取所有blog失败")
        self.assertEqual("first post",response.json()[0]["title"],"title 异常")
        self.assertEqual("/posts/1",response.json()[0]["uri"],"uri 异常")
        self.assertEqual("second post",response.json()[1]["title"], "title 异常")
        self.assertEqual("/posts/2", response.json()[1]["uri"], "uri 异常")


    def test_get_a_blog(self):
        response = requests.get(url=self.url_get_a_blog, data={}, auth=("cwx528938", "528938"))
        self.assertEqual(200, response.status_code, "获取blog失败")
        self.assertEqual("third post", response.json()["title"], "title 异常")
        self.assertEqual("/posts/3", response.json()["uri"], "uri 异常")

    def test_create_blog(self):
        headers = {"Content-Type": "application/json"}#发送有body的请求要有headers, 规定好body是什么类型数据,不写的话系统默认是json类型
        request = {"title": "food", "comment": "milk is very teasty!"}
        request=json.dumps(request)
        response=requests.post(url=self.url_create_blog,headers=headers,data=request,auth=("cwx528938","528938"))
        self.assertEqual(200,response.status_code,"创建blog失败!")
        self.assertEqual(True,response.json())

    def test_edit_a_blog(self):
        headers = {"Content-Type": "application/json"}  # 发送有body的请求要有headers, 规定好body是什么类型数据,不写的话系统默认是json类型
        request = { "title": "first post has been fixed", "uri": "/posts/2"}
        request = json.dumps(request)
        response = requests.put(url=self.url_edit_a_blog, headers=headers, data=request, auth=("cwx528938", "528938"))
        self.assertEqual(400,response.status_code,"编辑blog失败")

    def test_delete_a_blog(self):
        headers={"Content-Type":"application/json"}#没有请求体,可以不写
        response=requests.delete(url=self.url_delete_a_blog,headers=headers,data=None,auth=("cwx528938","528938"))
        self.assertEqual(200,response.status_code,"删除失败,返回码异常!")
        self.assertEqual("delete success !", response.text, "删除失败,返回码异常!")


if __name__ == "__main__":
    unittest.main()
16讲.sqlite3的使用
- 安装软件


-
数据库创建
.save sample

数据打开
.open sample (如果数据库存在就是打开,不存在即使创建并打开数据库)

创建表
create table marks(name char ,socres char);

插入数据
insert into marks values(“cheng”,”99”);

查询数据
查询一张表:select * from marks;

查询表中某个数据:select * from marks where name=”cheng”;

修改数据
update marks set name=”chengpeisheng” where name=”cheng”;

删除数据
delete from marks where name=”chengpeisheng”;

输出数据
①重定向输出

output marks.txt

select * from marks.txt;

.exit

②导出为csv格式

.header on

.mode csv

.once d:\marks.csv

select * from marks;

.system d:\marks.csv

调整显示格式
①列表形式展示

.mode list

select * from marks;

②行形式展示

.mode column

select * from marks;

③第三种方式展示

.mode insert new_marks

select * from marks;

查看数据库和表
.databases

.tables

获取帮助
.help

退出sqlite
.q
17讲.sqlite3的使用二
内容略,见16讲,基本一样
18讲:flask_restful接口
- restful的理解
2.四种请求方式举例
3.安装
4.flask文档
https://flask-restful.readthedocs.io/en/latest/index.html
5.实例代码展示4种接口的写法
#coding:utf-8
from flask import Flask
from flask_restful import Resource,Api,abort,request

POSTS = [
	{},
    {'title': 'first post', 'content': 'first post'},
    {'title': 'last post', 'content': 'last post'},
    {'title': 'how to learn interface test', 'content': 'how to learn interface test'}
]

app=Flask(__name__)#用Flask构造一个app
api=Api(app)#用Api给app构造接口

def abort_if_postid_not_exist(post_id):
    post_id=int(post_id)#无论什么类型都要转化为int型
    if post_id >= len(POSTS):
        abort(401,message="post_id does not exist!")


#同一个路由的接口放在一个类下
class Post(Resource):
    def get(self,post_id):#构造 get /posts/1
        post_id=int(post_id)
        abort_if_postid_not_exist(post_id)
        return POSTS[post_id]

    def delete(self,post_id):#构造 delete /posts/1
        post_id = int(post_id)
        abort_if_postid_not_exist(post_id)
        #列表的三种删除方法
        # del POSTS[post_id]
        # POSTS.remove(POSTS[post_id])
        POSTS.pop(-1)
        return "successfully delete!"

    def put(self,post_id):#构造 put /poosts/1
        post_id = int(post_id)
        abort_if_postid_not_exist(post_id)
        dict_data = request.get_json(force=True)#获取要修改的内容,以json格式显示dict数据
        post={"title":dict_data["title"],"content":dict_data["content"]}#修改数据
        POSTS[post_id]=post#把修改的数据赋值给列表
        return POSTS

class PostList(Resource):
    def get(self):#构造 get /posts
        return POSTS

    def post(self):  # 构造 post /posts
        post=request.get_json()#获取要发送的数据,并以json格式显示dict数据
        POSTS.append(post)#将要发送的数据直接粘贴到列表上
        return POSTS

api.add_resource(Post,"/posts/")
api.add_resource(PostList,"/posts")

if __name__ =="__main__":
    app.run(debug=True)
19讲:简单的flask_restful接口实例
#coding:utf-8
from flask import Flask
from flask_restful import Resource,Api,abort,reqparse,request

POSTS = [
	{},
    {'title': 'first post', 'content': 'first post'},
    {'title': 'last post', 'content': 'last post'},
    {'title': 'how to learn interface test', 'content': 'how to learn interface test'}
]

app=Flask(__name__)#用Flask构造一个app
api=Api(app)#用Api给app构造接口

def abort_if_postid_not_exist(post_id):
    post_id=int(post_id)#无论什么类型都要转化为int型
    if post_id >= len(POSTS):
        abort(401,message="post_id does not exist!")
    #也可以用异常捕获方法
    # try:
    #     POSTS[post_id]
    # except IndexError:
    #     abort(401,message="post_id does not exist!")


#同一个路由的接口放在一个类下
class Post(Resource):
    def get(self,post_id):#构造 get /posts/1
        post_id=int(post_id)
        abort_if_postid_not_exist(post_id)
        return POSTS[post_id]

    def delete(self,post_id):#构造 delete /posts/1
        post_id = int(post_id)
        abort_if_postid_not_exist(post_id)
        #列表的三种删除方法
        # del POSTS[post_id]
        # POSTS.remove(POSTS[post_id])
        POSTS.pop(-1)
        return "successfully delete!"

    def put(self,post_id):#构造 put /poosts/1
        post_id = int(post_id)
        abort_if_postid_not_exist(post_id)
        dict_data = request.get_json(force=True)#获取要修改的内容,以json格式显示dict数据
        post={"title":dict_data["title"],"content":dict_data["content"]}#修改数据
        POSTS[post_id]=post#把修改的数据赋值给列表
        return POSTS

class PostList(Resource):
    def get(self):#构造 get /posts
        return POSTS

    def post(self):  # 构造 post /posts
        post=request.get_json()#获取要发送的数据,并以json格式显示dict数据
        POSTS.append(post)#将要发送的数据直接粘贴到列表上
        return POSTS[-1]

api.add_resource(Post,"/posts/")
api.add_resource(PostList,"/posts")

if __name__ =="__main__":
    app.run(debug=True)
19讲:flask_restful的使用二
同18讲,内容略
20讲:peewee使用
1.安装
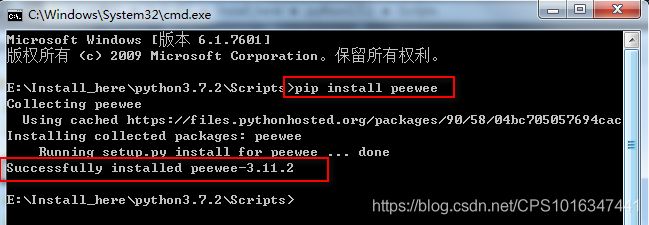
pip install peewee
2.定义一个model.py文件
from peewee import *#peewee 支持Sqlite、MySQL、postgresql、
db=SqliteDatabase("post.db")#定义一个数据库post

class Post(Model):#给数据库定义一个Post表
    title=CharField(unique=True)
    content=TextField()

    class Meta:#将数据存入数据库
        database=db
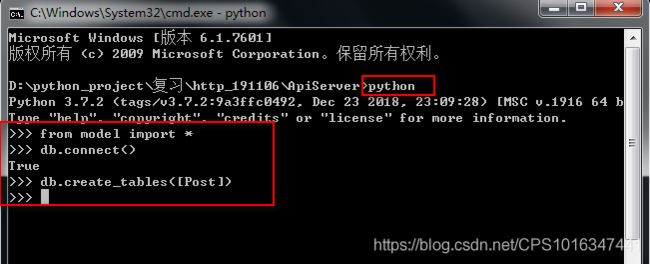
3.进入交互式环境,导入并创建Table
这个目录下进入命令行界面,进入python,
出现post.db就代表数据库创建成功了。
在peewee上对Sqlite3进行数据库的操作:
#创建数据库
from model import *
db.connect()

#创建表
db.create_tables([表名])
例如:
db.create_tables([Post])

#创建数据
表名.create(赋值表达式1,赋值表达式2,....)
例如:
Post.create(title="first post",content="this is the first post")

#查询单数据
data=表名.get(查询条件)
例如:
data=Post.get(Post.id==1)
print(data)

#查询多数据
data=表名.select()
例如:
data=Post.select()
for data1 in data:#是冒号不是分号
    print(data1.id)
    print(data1.title)
    print(data1.content)


#更新数据
表名.update(赋值表达式).where(查询条件).execute()
例如:
Post.update(title="has been update!").where(title=="你好").execute()

#删除数据
表名.get(查询条件).delete_instance()
例如:
Post.get(Post.id==1).delete_instance()
21讲:peewee和flask的使用
#coding:utf-8
from flask import Flask,g
from flask_restful import Api,Resource,abort,request

app=Flask(__name__)#定义一个Flask框架,
api=Api(app)#定义个Api框架

#引入model
from peewee import *
db=SqliteDatabase("post.db")#创建数据库

class Post(Model):#创建Post表,并规定字段类型
    title=CharField(unique=True)
    content=TextField()
    class Meta():
        database=db

@app.before_request
def berore_request():
    g.db=db
    g.db.connect()

@app.after_request
def after_request(response):
    g.db.close()
    return response

#定义一个判断是否在数据库内
def abort_if_postid_doesnot_exit(post_id):
    post_id=int(post_id)
    try:
        Post.get(Post.id==post_id)
    except Post.DoesNotExist:
        abort(401,message="post_id超出范围!")

#构造资源PostResource,一个资源就是一个class
class PostResource(Resource):
    def get(self,post_id):#定义一个get方法,/posts/1
        abort_if_postid_doesnot_exit(post_id)#判断是否超出范围
        post_id=int(post_id)#确保输入的post_id是int
        data=Post.get(Post.id==post_id)
        response={"title":data.title,"content":data.content}
        return response

    def put(self,post_id):#定义一个put方法,/posts/1
        abort_if_postid_doesnot_exit(post_id)#判断是否超出范围
        post_id = int(post_id)#确保输入的post_id是int
        json_data=request.get_json()#捕获发送的数据,把dict数据以json格式显示
        Post.update(title=json_data["title"]).where(Post.id==post_id).execute()#修改title
        Post.update(content=json_data["content"]).where(Post.id == post_id).execute()#修改content
        return "修改成功!"

    def delete(self,post_id):#定义一个delete方法,/posts/1
        abort_if_postid_doesnot_exit(post_id)
        post_id = int(post_id)  # 确保输入的post_id是int
        Post.get(Post.id==post_id).delete_instance()#删除实例
        return  "delete success!"

#构造资源PostList,一个资源就是一个class
class PostList(Resource):
    def get(self):#定义一个get方法,/posts
        list=[]
        data=Post.select()
        for d in data:#把数据库的数据取出来,重新组成列表返回
            list.append({"title":d.title,"content":d.content})
        return list

    def post(self):
        json_data = request.get_json(force=True)  # 获取发送的body.将dict数据已json格式显示
        try:
            Post.create(title=json_data["title"], content=json_data["content"])#判断title是否重复,重复报错
        except IntegrityError:
            return "title不能重复,请重新填写!"
        return "创建成功"


#将资源挂载到api,并规定访问路由
api.add_resource(PostResource,"/posts/")
api.add_resource(PostList,"/posts")
if __name__=="__main__":
    app.run(debug=True)


