经典伴读_java8实战_一网打尽
经典伴读系列文章,想写的不是读书笔记,也不是读后感,自己的理解加上实际项目中运用,让大家3-4天读懂这本书

预备知识:
- 方法引用,Lambda相关知识点,特别是函数描述符的概念和使用。
请参考 《经典伴读_Java8实战_Lambda》 - 归约操作reduce,数值流,构建流的使用。
请参考《经典伴读_java8实战_Stream基础》 - 收集器,并行流的使用。
请参考《经典伴读_java8实战_Stream高级》
前面的文章中已经学习了Lambda和Stream,它们是java8中最主要的特性,剩下知识点不多了,让我们再接再厉,将它们一网打尽吧。
八、默认方法
1、什么是默认方法
从学习java开始,大家都知道接口用于规范,约束子类的行为。那么现在我们从Comparator接口源码中,学习下它还有那些用途。
@FunctionalInterface
public interface Comparator<T> {
    int compare(T o1, T o2);
    boolean equals(Object obj);

    default Comparator<T> reversed() {
        return Collections.reverseOrder(this);
    }
    default Comparator<T> thenComparing(Comparator<? super T> other) {
        Objects.requireNonNull(other);
        return (Comparator<T> & Serializable) (c1, c2) -> {
            int res = compare(c1, c2);
            return (res != 0) ? res : other.compare(c1, c2);
        };
    }
    .......
    public static <T extends Comparable<? super T>> Comparator<T> reverseOrder() {
        return Collections.reverseOrder();
    }
    @SuppressWarnings("unchecked")
    public static <T extends Comparable<? super T>> Comparator<T> naturalOrder() {
        return (Comparator<T>) Comparators.NaturalOrderComparator.INSTANCE;
    }
    .......
由代码得知,接口的方法从签名上分为三种:
- 抽象方法,无方法体,必须由子类实现。也是最主要的接口方法,如compare,equals。
- 默认方法,使用default修饰,无需子类实现,常利用抽象方法,或者静态方法实现高级功能,类似于模版方法,如reversed,thenComparing等。
- 静态方法,和类中的静态方法一样,有实现代码,常用于静态工厂方法,生成该接口对象,如reverseOrder,naturalOrder等,甚至可以将工具类和接口合二为一,如Collections和Collection。
如果你的工作中要做一些框架构建方面的事情,default方法一定不会陌生,大家有没有想过,在mybatis开发中,将所有的数据访问操作封装在mapper接口里,这在java8之前可是做不到的。
2、默认方法与多继承
“多接口实现"加上"default方法”,java8有了多继承。
(1)实现的多接口中有相同签名的默认方法时会冲突。
	public interface Print1 {
        void print(Integer t);
        default void changeAndPrint(Integer t) {
            print(++t);
        }
    }

    public interface Print2{
        void print(Integer t);
        default void changeAndPrint(Integer t) { //和Print1签名相同,被多继承会冲突
            print(--t);
        }
    }

	public static class PrintImpl implements Print1, Print2 {
        @Override
        public void print(Integer t) {
            System.out.println(t);
        }
    }
PrintImpl报错:PrintImpl inherits unrelated defaults for changeAndPrint(Integer) from types Print1 and Print2
如何解决冲突?
实现类需要明确关联哪个默认方法:
		@Override
        public void changeAndPrint(Integer t) {
            Print1.super.changeAndPrint(t);
        }
(2)默认方法也可以继承被重写,和多态相同,调用方法时,实现类,或者子接口优先。
九、Optional
我们平时遇到最多的异常是空指针异常NullPointException,最不想写的代码是逐层判空。
问题:在学生管理系统中,根据学生查询班主任的姓名。
1、准备实体:
	//学生
    public static class Student {
        private String name;
        private Classes classes; //班级

        public String getName() {
            return name;
        }

        public void setName(String name) {
            this.name = name;
        }

        public Classes getClasses() {
            return classes;
        }

        public void setClasses(Classes classes) {
            this.classes = classes;
        }
    }

    //班级
    public static class Classes {
        private String name;
        private Teacher teacher; //班主任

        public String getName() {
            return name;
        }

        public void setName(String name) {
            this.name = name;
        }

        public Teacher getTeacher() {
            return teacher;
        }

        public void setTeacher(Teacher teacher) {
            this.teacher = teacher;
        }
    }

    //老师
    public static class Teacher {
        private String name;

        public String getName() {
            return name;
        }

        public void setName(String name) {
            this.name = name;
        }
    }
2、为了不报空指针异常,三种方式实现
(1)嵌套if逐层判空,会让代码变得臃肿,影响阅读。
	public static String getTeacherName(Student student) {
        if (student != null) {
            Classes classes = student.getClasses();
            if (classes != null) {
                Teacher teacher = classes.getTeacher();
                if (teacher != null) {
                    return teacher.getName();
                }
            }
        }
        return "Unknown";
    }
(2)提前判空多点退出,可以减少嵌套层数,但会增加了维护成本,有没有更加优雅的解决方案?
	public static String getTeacherName(Student student) {
        if (student == null) {
            return "Unknown";
        }

        if (student.getClasses() != null) {
            return "Unknown";
        }

        if (student.getClasses().getTeacher() == null) {
            return "Unkong";
        }
        return student.getClasses().getTeacher().getName();
    }
(3)使用Optional
	public static String getTeacherName(Student student) {
        return Optional.ofNullable(student)
                .map(Student::getClasses)
                .map(Classes::getTeacher)
                .map(Teacher::getName)
                .orElse("Unknown");
    }
Optional就像一个特殊的容器,最多存放一个值。Optional可以进行类似流的操作,常用方法同样分为三类:
-
创建Optional对象
ofNullable:把值包装成Optional对象,值可以为空,
of:把值包装成Optional对象,值为空抛异常。
empty:创建一个空的Optional对象。 -
中间链操作
map:当值为对象时,映射值的属性
flatmap:当值的属性是一个Optional时使用,将多层嵌套的Optional属性扁平映射一个单层Optional属性。
filter:判断值是否满足提供的谓词(一个返回true/false的函数),不满足返回空的Optional。 -
终端操作
orElse:返回值,如果为空则返回默认值。
get:返回值,如果为空则抛异常。
ifPresent:如果值存在,执行方法调用。
isPresent:判断值是否存在。
十、新的日期和时间API
新版的日期和时间API中,有哪些主要变化:
- 时间对象是不可变的:LocalDate,LocalTime,LocalDateTime
- 使用新的类区分对人和机器不同的时间表示:Instant
- 使用新的类处理时间间隔:Duration,Period
- 使用新的线程安全的时间转换类:DateTimeFormatter
- 使用新的类精细操作日期:TemporalAdjuster
虽然新的API有了本质的变化,但SpringMVC,Mybatis主流版本不支持(默认情况下),阻碍了项目中使用。这里不再一一介绍,分四个常见场景对比新老API:
1、时间转字符串类型
	 public static void testDate2String() {
        //使用传统Date
        Date now1 = new Date();
        SimpleDateFormat sdf = new SimpleDateFormat("yyyy-MM-dd HH:mm:ss");
        String nowStr = sdf.format(now1); //非线程安全
        System.out.println("Date: " + nowStr);

        //使用LocalDateTime
        LocalDateTime now2 = LocalDateTime.now();
        DateTimeFormatter dtf = DateTimeFormatter.ofPattern("yyyy-MM-dd HH:mm:ss");
        nowStr = now2.format(dtf); //线程安全
        System.out.println("LocalDateTime: " + nowStr);
    }
Date: 2022-06-27 11:19:35
LocalDateTime: 2022-06-27 11:19:35
2、字符串转时间类型
	public static void testString2Date() {
        //使用传统Date
        String dateStr = "2022-06-27 09:56:43";
        SimpleDateFormat sdf = new SimpleDateFormat("yyyy-MM-dd HH:mm:ss");
        try {
            Date nowDate = sdf.parse(dateStr); //会抛异常
            System.out.println("Date: " + nowDate);
        } catch (ParseException e) {
            e.printStackTrace();
        }

        //使用LocalDateTime
        DateTimeFormatter dtf = DateTimeFormatter.ofPattern("yyyy-MM-dd HH:mm:ss");
        LocalDateTime nowDateTime = LocalDateTime.parse(dateStr, dtf); //不抛异常
        System.out.println("LocalDateTime: " + nowDateTime);
    }
Date: Mon Jun 27 09:56:43 CST 2022
LocalDateTime: 2022-06-27T09:56:43
3、计算剩余时间
	public static void testDuration() throws ParseException {
        //使用传统Date
        String targetStr = "2022-11-11 00:00:00";
        SimpleDateFormat sdf = new SimpleDateFormat("yyyy-MM-dd HH:mm:ss");
        Date target = sdf.parse(targetStr);
        long targetTime = target.getTime();
        long day = (targetTime - System.currentTimeMillis()) / (24 * 60 * 60 * 1000); //没有提供方法获取,需要计算
        System.out.println("Date:" + day + "天");

        //使用LocalDateTime
        DateTimeFormatter dtf = DateTimeFormatter.ofPattern("yyyy-MM-dd HH:mm:ss");
        LocalDateTime targetDateTime = LocalDateTime.parse(targetStr, dtf);
        Duration d1 = Duration.between(LocalDateTime.now(), targetDateTime);
        day = d1.toDays(); //提供方法获取
        System.out.println("LocalDateTime:" + day + "天");
    }
Date:136天
LocalDateTime:136天
4、计算结束时间
    public static void testEndTime() throws ParseException {
        //使用传统Date
        int addTime = 15; //经过15天
        String targetStr = "2022-06-18 00:00:00";
        SimpleDateFormat sdf = new SimpleDateFormat("yyyy-MM-dd HH:mm:ss");
        Date beginDate = sdf.parse(targetStr);

        Calendar calendar = Calendar.getInstance();
        calendar.setTime(beginDate);
        calendar.add(Calendar.DAY_OF_MONTH, addTime); //Date无法自己处理,需要依靠Calendar
        Date endDate = calendar.getTime();
        System.out.println("Date: " + endDate);

        //使用LocalDateTime
        DateTimeFormatter dtf = DateTimeFormatter.ofPattern("yyyy-MM-dd HH:mm:ss");
        LocalDateTime beginDateTime = LocalDateTime.parse(targetStr, dtf);
        LocalDateTime endDateTime = beginDateTime.plus(addTime, ChronoUnit.DAYS);//LocalDateTime自己处理
        System.out.println("LocalDateTime: " + endDateTime);
    }
Date: Sun Jul 03 00:00:00 CST 2022
LocalDateTime: 2022-07-03T00:00
十一、并行流的实现
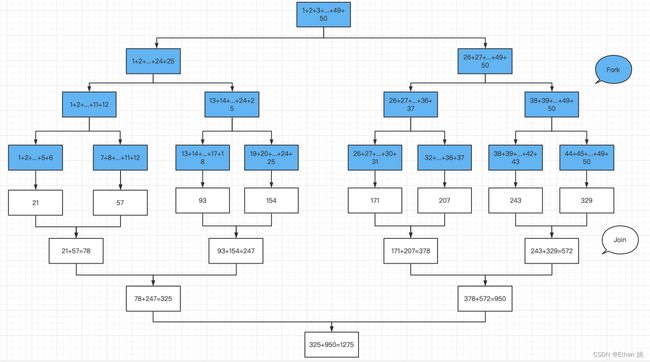
在《经典伴读_java8实战_Stream高级》中介绍的并行流,就是在CPU多核上并行。并行流依靠Fork/Join框架和Spliterator一起实现。让我们回到求和问题:1+2+3+4+…+49+50=?,看看它们如何实现并行。
Fork/Join
1、Fork/Join框架的目的是以递归方式将大任务拆分成更小的任务并行执行,然后将每个子任务的结果合并起来生成整体结果,在算法中也叫分治法。拆分出来的子任务分配给线程池(ForkJoinPool)中的工作线程。
2、定义子任务
(1)需要返回结果的子任务,继承RecursiveTask。
public abstract class RecursiveTask<V> extends ForkJoinTask<V> {
    protected abstract V compute();
(2)不需要返回结果的子任务,继承RecursiveAction。
public abstract class RecursiveAction extends ForkJoinTask<Void> {
    protected abstract void compute();
它们都有的compute()方法,里面是子任务计算逻辑,大致如下:
	if(任务足够小或不可分) {
		顺序计算该任务
	} else {
		将任务拆分成两个子任务,放入线程等待队列
		触发子任务执行(递归),等待所有子任务完成
		合并子任务结果
	}
3、子任务拆分与触发
(1)fork():创建子任务后,调用fork方法,可以将任务放入工作线程的等待队列中。(异步)
(2)join():子任务调用join方法,触发任务执行,等待任务执行结果。(同步)
(3)工作窃取:拆分的所有的子任务平均分配到ForkJoinPool中所有线程上,每一个工作线程都有一个双向等待队列,默认情况下,后进先出LIFO,即调用fork(),从队首(Top端)放入任务,调用join(),也是从队首(Top端)取出下一个任务执行。当某一个线程早早的完成了分配给它的所有任务,则会选择另一个线程,从它的等待队列的尾巴(Base端)“偷走”一个任务执行。这个过程一直继续下去,直到所有任务都执行完毕。
4、使用Fork/Join框架并行计算1+2+3+4+…+49+50=?
public class SumTask extends RecursiveTask<Long> {
    private long[] nums;
    private int start;
    private int end;

    public static final long THRESHOLD = 10;

    public SumTask(long[] nums) {
        this(nums, 0, nums.length);
    }

    public SumTask(long[] nums, int start, int end) {
        this.nums = nums;
        this.start = start;
        this.end = end;
    }

    @Override
    protected Long compute() {
        int length = end - start;
        if (length < THRESHOLD) { //任务足够小或不可分
            long sum = 0;
            for (int i = start; i < end; i++) {
                sum += nums[i]; //顺序计算该任务
            }
            return sum;
        }

        SumTask leftTask = new SumTask(nums, start, start + length/2); //拆分成子任务
        leftTask.fork(); //放入线程等待队列
        SumTask rightTask = new SumTask(nums, start + length/2, end); //拆分成子任务
        rightTask.fork(); //放入线程等待队列

        Long leftResult = leftTask.join(); //触发子任务执行,等待任务返回
        Long rightResult = rightTask.join(); //触发子任务执行,等待任务返回
        System.out.println(leftResult + "+" + rightResult);
        return leftResult + rightResult; //合并子任务结果
    }

    public static void main(String[] args) {
        long[] nums = LongStream.rangeClosed(1, 50).toArray(); //创建1到50数组

        ForkJoinTask<Long> task = new SumTask(nums); //创建原始任务
        Long result = new ForkJoinPool().invoke(task); //创建任务池,并启动原始任务
        System.out.println("结果:" + result);
    }
}
243+329
93+154
171+207
21+57
378+572
78+247
325+950
结果:1275
Spliterator
1、Spliterator简介
Spliterator是一个可拆分的迭代器,为了并行执行而设计。
    public interface Spliterator<T> {
    	boolean tryAdvance(Consumer<? super T> action);
    	Spliterator<T> trySplit();
    	long estimateSize();
    	......
    	default void forEachRemaining(Consumer<? super T> action)
    	......
tryAdvance:获取下一个元素(类似next),进行逻辑处理,返回是否有下一个元素(类似hasNext)。
trySplit:把一些的元素(默认一半)划分出去作为第二个Spliterator返回。
estimateSize:估计还有多少元素没有迭代。
forEachRemaining:迭代剩余元素。
2、使用Spliterator.trySplit方法代替Fork/Join框架中拆分逻辑
public class SpliteratorSumTask extends RecursiveTask<Long> {
    Spliterator<Long> spliterator;
    public static final long THRESHOLD = 10;
    public SpliteratorSumTask(Spliterator<Long> spliterator) {
        this.spliterator = spliterator;
    }

    @Override
    protected Long compute() {
        if(spliterator.estimateSize() < THRESHOLD) {
            //lambda只能使用final变量,无法使用类似sum+=i,因此这里用累加器累加
            Accumulator accumulator = new Accumulator();
            spliterator.forEachRemaining(accumulator::add);
            return accumulator.get();
        }
        //代替SumTask leftTask = new SumTask(nums, start, start + length/2),使用trySplit拆分一半元素
        Spliterator<Long> remainSpliterator = spliterator.trySplit();

        SpliteratorSumTask rightTask = new SpliteratorSumTask(spliterator);
        SpliteratorSumTask leftTask = new SpliteratorSumTask(remainSpliterator);

        leftTask.fork();
        rightTask.fork();
        Long leftResult = leftTask.join();
        Long rightResult = rightTask.join();
        System.out.println(leftResult + "+" + rightResult);
        return leftResult + rightResult;
    }

    //累加器
    public static class Accumulator {
        private long total = 0;
        public void add(long value) {
            total+=value;
        }
        public long get() {
            return total;
        }
    }

    public static void main(String[] args) {
        long[] nums = LongStream.rangeClosed(1, 50).toArray();
        Spliterator<Long> spliterator = Arrays.stream(nums).spliterator();

        ForkJoinTask<Long> task = new SpliteratorSumTask(spliterator);
        long result = new ForkJoinPool().invoke(task);
        System.out.println("结果:" + result);
    }
}
21+57
93+154
243+329
171+207
78+247
378+572
325+950
结果:1275
控制台输出完全一致。
十二、CompletableFuture组合式编程
并行是利用CPU多核的能力同时执行任务的能力,但硬件资源总是有限的,如何继续提高处理能力,比如当请求接口需要等待较长时间时,能否不阻碍主流程继续进行,这类减少资源等待的能力,就是并发,可以简单理解为异步。这一章的主题CompletableFuture就可以理解为异步操作。
1、回顾线程池
线程池顾名思义,是集中管理线程资源的地方,有任务来的时候就从池子里取出线程执行。让我们快速回顾下:
- Runnable和Callable区别
- Future和FutureTask关系
- Executor,Executors,ExecutorService,ThreadPoolExecutor区别
希望一个例子可以回答上面3个问题。
		//1.无返回值的线程
        Runnable runnable = () -> {
            System.out.println("hello");
        };
        new Thread(runnable).start();

        //2.有返回值的线程
        Callable callable = () -> {
            return "hello";
        };
        //FutureTask同时实现了Runnable, Future,
        // 因此可以作为适配器,将Callable适配到Runnable上
        FutureTask futureTask = new FutureTask<>(callable);
        new Thread(futureTask).start(); //Thread需要Runnable
        System.out.println(futureTask.get());//get()需捕获异常,这里抛出了

        //3.无返回值的线程池
        //4种内置线程池工厂方法:
        // newFixedThreadPool,newCachedThreadPool,
        // newSingleThreadExecutor,newScheduledThreadPool
        ExecutorService threadPool = Executors.newCachedThreadPool();
        threadPool.execute(runnable);
        threadPool.shutdown();

        //4.有返回值的线程池
        //如果内置线程池无法满足,可以自定义参数。
        threadPool = new ThreadPoolExecutor(
                5,
                5,
                60,
                TimeUnit.SECONDS,
                new LinkedBlockingQueue<Runnable>(64)
        );
        Future future = threadPool.submit(callable);
        System.out.println(future.get());//get()需捕获异常,这里抛出了
        threadPool.shutdown();
2、CompletableFuture与Future
使用Future可以获取线程中的返回值,但也有两个主要缺陷:
- 通过主动获取的方法get(),阻塞调用线程获取返回值,这和我们印象中的异步似乎不同,如ajax的回调方法不会影响主线程。
- 对于多个异步接口需要串行(前后依赖)或并行,甚至组合时,Future不容易开发。
而CompletableFuture可以使用函数式的思想,可以编织异步调用完成后的所有操作。我们先看个简单问题,直观感受下它们的不同。
问题:计算(1 + 2) * (3 + 4)
(1)准备代码
    //模拟服务器请求耗时
    public static void delay() {
        try {
            Thread.sleep(1000);
        } catch (InterruptedException e) {
            e.printStackTrace();
        }
    }

    public static int add(int a, int b) {
        delay();
        return a + b;
    }

    public static int multiply(int a, int b) {
        delay();
        return a * b;
    }
(2)使用Future
	private static final ExecutorService threadPool = Executors.newCachedThreadPool();
    public static void useFuture() {
        Future<Integer> f1 = threadPool.submit(() -> add(1, 2)); //先算 1+2=3
        Future<Integer>  f2 = threadPool.submit(() -> add(3, 4)); //再算 3+4=7
        try {
            int result = multiply(f1.get(), f2.get()); //最后算 3*7=21
            System.out.println(result);
        } catch (InterruptedException e) {
            e.printStackTrace();
        } catch (ExecutionException e) {
            e.printStackTrace();
        }
    }
21
耗时:2008ms
结果分析:两个add方法异步执行,get方法获取结果时阻塞1s,multiply方法执行1s,主线程共花费2s,注意这里multiply依赖于前面add的结果,因此不需要再开线程。
(3)使用CompletableFuture
	CompletableFuture.supplyAsync(() -> add(1, 2), threadPool) //1+2=3
                .thenCombine(
                        CompletableFuture.supplyAsync(() -> add(3, 4), threadPool), //3+4=7
                        (r1, r2) -> multiply(r1, r2)) //3*7=21
                .thenAccept(System.out::println);
耗时:4ms
21
结果分析:两个add方法异步执行,在第1个add线程中等待两个结果,接着执行multiply方法,最后输出。主线程花费4ms,注意所有操作都在第1个add线程,不在主线程。
3、异步操作
(1)创建异步操作
CompletableFuture可以作为线程传递返回值或异常的桥梁,也可以直接创建异步操作(推荐),借助简单问题1+2,看下它们的不同:
		//CompletableFuture搭配线程或线程池一起完成异步操作
        CompletableFuture<Integer> cf = new CompletableFuture<>();
        new Thread(() -> {
            try {
                int r = add(1, 2);
                cf.complete(r); //放入返回值
            } catch (Exception e) {
                cf.completeExceptionally(e); //抛出异常,get可以捕捉
            }
        }).start();
        //获取返回值,和Future一样阻塞(这里为了缩短代码将已将异常抛出)
        System.out.println(cf.get());

        //CompletableFuture直接创建异步操作
        CompletableFuture cf2 = CompletableFuture.supplyAsync(() -> add(1, 2), threadPool);
        System.out.println(cf2.get());
CompletableFuture直接创建异步操作的方法除了supplyAsync还有runAsync,区别在于后者没有返回值。
    public static <U> CompletableFuture<U> supplyAsync(Supplier<U> supplier,
                                                       Executor executor)
	public static CompletableFuture<Void> runAsync(Runnable runnable,
                                                   Executor executor)
(2)获取异步操作返回值
get和join都可以获取异步操作返回值,它们有什么不同?
问题:计算1 * 1 + 2 * 2 + 3 * 3 +…+10 * 10
		List<CompletableFuture<Integer>> numCompletableFutures = IntStream.rangeClosed(1, 10)
                .mapToObj(t -> CompletableFuture.supplyAsync(() -> multiply(t, t), threadPool))
                .collect(Collectors.toList());
        int sum = numCompletableFutures.stream()
                .map(CompletableFuture::join) //映射为返回值
                .reduce(0, Integer::sum);
        System.out.println(sum);
首先使用流创建数列1到10,然后使用流的映射分别创建每个数的异步操作(计算n * n),最后通过流的归约将所有返回值求和。最后一个map使用CompletableFuture.join方法获取每个返回值而不是使用get方法。这是因为join方法不抛异常,非常适合流的操作。另外,如果只使用一个流完成链式操作,如直接写成Stream.mapToObj.map,那么所有异步操作都会变成串行。
	public T join()
	public T get() throws InterruptedException, ExecutionException
	public T get(long timeout, TimeUnit unit)
(3)异步操作数据处理
单个异步操作返回后的数据处理,主要就两种:无返回值消费 和 有返回值加工:
        CompletableFuture
                .supplyAsync(() -> add(1, 2), threadPool)
                .thenApply(t -> "处理数据" + t) //参数Function用于加工
                .thenAccept(System.out::println); //参数Consumer用于消费
(4)异步操作组合
		//计算(1 + 2) * 3
        CompletableFuture<Integer> cf = CompletableFuture
                    .supplyAsync(() -> add(1, 2), threadPool)
                    .thenCompose(t -> CompletableFuture.supplyAsync(() -> multiply(t, 3), threadPool));
        System.out.println(cf.join());

        //计算(1 * 2) + (3 * 4)
        cf = CompletableFuture
                    .supplyAsync(() -> add(1, 2), threadPool)
                    .thenCombine(CompletableFuture.supplyAsync(() -> add(3, 4), threadPool),
                            (r1, r2) -> multiply(r1, r2));
        System.out.println(cf.join());
当多个异步操作需要前后依赖时使用thenCompose,需要并行时使用thenCombine。
十三、函数式编程
至此,java8的所有新增特性已经讲完,这些特性都围绕着一个主题-函数式编程,那么究竟什么是函数式编程?书从这个问题开始,让我们回答它作为结束。
1、在传统java编程世界中,最知名的一句话,一切都是对象(并非完全是),当调用方法时,有可能修改对象状态,有可能纯粹的逻辑计算。无法判断,也就无法排除方法之间是否会相互影响,从而导致各种并发问题。
2、有没有一种方式,就像数学函数,只做纯粹的逻辑计算,只有一个入口,一个出口,且不产生副作用-修改函数之外的任何数据(共享变量)。这就是java8的函数(和方法概念区分开)。函数式编程就是面向函数编程,将函数作为编程的最小单位(不再是对象)。
3、要让传统的java支持函数式编程,JDKer该怎样做呢?
第1步,要找一个东西表示函数,最接近的就是接口呢,但接口中有很多方法,我们想要的是一个函数就是一个最小的编程单位,于是规定函数就是只有一个方法的接口,没错,这就是函数式接口@FunctionalInterface。
第2步,定义了函数就像声明了类,接着我们要创建函数,存储到变量,让函数像值一样传递。于是,便有了Lambda表达式,这就是函数的值。
第3步,有了函数,如何调用,再不能通过对象点操作了,函数才是主角。我们需要给数据直接附加上操作,也就是函数(不通过对象),接着有了流Stream。注意,流操作之间的数据传递是值传递,是拷贝,不会让函数相互影响。
第4步,数学函数执行过程中也会有异常,如计算1/0,如果出现异常,就会中断函数,这就相当于有了其他出口,于是就有了Optional,Stream也就不能向外抛异常了。
…
是不是这样就把整本书串联了起来,由此可见,函数式编程和面向对象编程主要区别:
(1)不修改共享变量
(2)不抛异常
(3)不进行IO操作
它们都是开发者手中的工具,合适的场景选用合适的工具,以上就是《Java8实战》中主要内容,让我们下一本经典再见。
完
