基于VitePress搭建静态文档系统
文章目录
- 前言
- 一、快速上手
- 二、常用配置
-
- 2.1 类Vue风格首页
- 2.2 顶部导航配置themeConfig.nav
- 2.3 侧边栏导航设置
- 2.3 文档中的链接跳转
-
- 2.3.1 上一页与下一页
- 2.3.2 文档中链接
- 2.3.3 生成成员页
- 三、进阶配置
- 四、参考代码
前言
vitePress:与vue press相似,是一个静态网站生成器,相较于vuepress而言,vitepress是基于vue3的,采用vite构建,拥有更轻量更优秀的性能。VitePress的目标是拥有编写文档所需的最低限度功能。其他功能放在主题中实现。另外一方面,VuePress有更多的现成功能,包括由它的插件的生态系统启用的功能。vuepress则是基于vue2.x通过webpack来构建的。
- VitePress官方文档
- VuePress官方文档
VitePress与VuePress区别总结:
- vitePress基于
Vite,VuePress基于Webpack所以更快的启动时间,热重载等- vitePress使用
Vue3来减少 JS 的有效负载- vitepress目标是所减掉当前vuepress的复杂性并从极简主义的根源重新开始(配置更简单,轻量)
- vitePress页面跳转没有用
vue-router- vue 3 tree shaking+ Rollup 代码分离,打包更快,启动更快
一、快速上手
- Step 1: 创建并进入一个目录
mkdir vitepress-pro && cd vitepress-pro
- Step 2: 初始化
yarn init
- Step 3: 本地安装 VitePress
yarn add --dev vitepress
- Step 4: 创建第一篇文档
mkdir docs && echo '# Hello VitePress' > docs/index.md
- Step 5: 在
package.json中添加一些script
{
  "scripts": {
    "docs:dev": "vitepress dev docs",
    "docs:build": "vitepress build docs",
    "docs:serve": "vitepress serve docs"
  }
}
- Step 6: 本地启动
yar docs:dev
- 文档项目会在
http://localhost:5173/中启动一个热重载的开发服务器。 - 文档系统以
/docs作为根目录,项目中所有相对路径都是相对于`/docs’而言
二、常用配置
为了更好的自定义你的静态网站,首先需要在
/docs/目录下创建一个.vitepress目录,,所有相关配置文件都将会被放在这里。
├─ docs
│  ├─ .vitepress
│  │  └─ config.js
│  └─ index.md
└─ package.json
站点必要的配置文件是.vitepress/config.js
module.exports = {
  title: '网站标题', // 浏览器页签标题
  description: '网站描述.' //
}
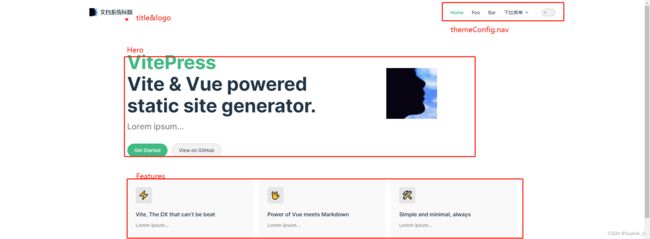
2.1 类Vue风格首页
- 在docs/index.md中输入如下内容后,刷新首页。详细参见文档Layout
- docs/index.md(默认首页)
---
layout: home
hero:
  name: VitePress
  text: Vite & Vue powered static site generator.
  tagline: Lorem ipsum...
  image:
    src: /avatar.png
    alt: VitePress
  actions:
    - theme: brand
      text: Get Started
      link: /
    - theme: alt
      text: View on GitHub
      link: https://github.com/vuejs/vitepress
features:
  - icon: ⚡️
    title: Vite, The DX that can't be beat
    details: Lorem ipsum...
  - icon:
    title: Power of Vue meets Markdown
    details: Lorem ipsum...
  - icon: ️
    title: Simple and minimal, always
    details: Lorem ipsum...
---
关键词:
- layout: 设定文档页风格
- hero: 在layout设置为’home’时才生效,配置文档简要说明
- features: 特性说明样式
2.2 顶部导航配置themeConfig.nav
- 配置属性:顶部右侧导航——
themeConfig.nav,顶部左侧标题Logo——themeConfig.title - 静态资源默认从
/docs/public中去查找,如静态图片等
module.exports = {
  base: "", // 项目的基础路径
  title: "文档网站标题", // 文档的标题,会显示在
  description: "文档网站描述", // 文档描述
  themeConfig: {
    // 顶部左侧内容
    logo: "/avatar.png", // 对应docs/public中的图片。
    siteTitle: "文档系统标题",
    // 顶部右侧导航
    nav: [
      { text: "Home", link: "/" }, // 对应首页
      {
        text: "Foo",
        link: "/foo/", // 对应/foo/index.md
      },
      {
        text: "Bar",
        link: "/bar/", // 对应/bar/index.md
      },
      {
        text: "下拉菜单",
        items: [
          { text: "Item A", link: "/item-1" },
          { text: "Item B", link: "/item-2" },
          { text: "Item C", link: "/item-3" },
        ],
      },
    ],
   }
};
2.3 侧边栏导航设置
这里直接介绍分组侧边栏的配置(即:顶部导航作为一级菜单,侧边栏作为二级菜单的展示方式)
- Step 1: 在docs目录下新建几个目录
├── docs
│   ├── .vitepress
│   │   ├── config.js	# 配置文件
│   ├── bar
│   │   ├── four.md
│   │   ├── index.md
│   │   └── three.md
│   ├── foo
│   │   ├── index.md	# 最终渲染成/foo/index.html
│   │   ├── one.md		# 最终渲染成/foo/one.html
│   │   └── two.md
│   ├── index.md
│   └── public
│       └── avatar.png
- Step 2: 设置侧边栏
module.exports = {
  base: "", // 项目的基础路径
  title: "文档网站标题", // 文档的标题,会显示在
  description: "文档网站描述", // 文档描述
  themeConfig: {
    // 顶部左侧内容
    logo: "/avatar.png",
    siteTitle: "文档系统标题",
    // 顶部右侧导航
    nav: [
      { text: "Home", link: "/" },
      {
        text: "Foo",
        link: "/foo/",
      },
      {
        text: "Bar",
        link: "/bar/",
      },
      {
        text: "下拉菜单",
        items: [
          { text: "Item A", link: "/item-1" },
          { text: "Item B", link: "/item-2" },
          { text: "Item C", link: "/item-3" },
        ],
      },
    ],
    // 侧边栏
    sidebar: {
    // 对应Nav中foo菜单激活时显示的菜单
      "/foo/": [
        {
          text: "Foo",
          collapsible: true,
          items: [
            {text:"index",link:"/foo/"},
            { text: "one", link: "/foo/one" },
            { text: "two", link: "/foo/two" },
          ],
        },
      ],
      "/bar/": [{
        text: "Bar",
        items: [
            {text:"index",link:"/bar/"},
          { text: "san", link: "/bar/three" },
          { text: "si", link: "/bar/four" },
        ],
      }],
      "/": [
        {
            text: "首页",
            items:[
                {text:"home",link:"/"}
            ]
        }
      ],
    },
  },
};
2.3 文档中的链接跳转
2.3.1 上一页与下一页
上一页:在对应md头部写入 prev
下一页:默认情况下会根据对应md在文件夹中的排序来自动生成下一页链接
---
prev: 'Get Started | Markdown'
---
2.3.2 文档中链接
[Home](/)
[foo](/foo/)
[foo heading](./#heading)
[bar - three](../bar/three)
[bar - three](../bar/three.md)
[bar - four](../bar/four.html)
2.3.3 生成成员页
vitePress中内置了成员页样式,有两种方式,一种是生成一整页的成员介绍页,一种是在局部添加成员介绍,以下通过/foo/two.md内容举例(整页成员介绍)。更多配置参见:官方文档
---
layout: page
---

