CKA 02_containerd部署Kubernetes 部署containerd 使用kubeadm引导集群 安装Pod网络
文章目录
- 1. 清空实验环境
- 2. containerd 部署 Kubernetes
-
- 2.1 部署 containerd
-
- 2.1.1 安装 containerd
- 2.1.2 配置 containerd
- 2.1.3 前置条件
- 2.1.4 从 Docker 命令行映射到 crictl
-
- 出现的第一个 error
- 解决方法
- 2.2 使用 kubeadm 引导集群
-
- 2.2.1 使用 kubeadm 创建单个控制平面的 Kubernetes 集群
-
- 出现的第二个 error
- 解决方法
- 出现的第三个 error
- 解决方法
- 2.2.2 集群加入节点
-
- 出现的第四个 error
- 解决方法
前面介绍了 Docker 部署 Kubernetes 的方法,本文介绍 containerd 的方式部署 Kubernetes
1. 清空实验环境
- 集群中所有节点执行 kubeadm reset 命令,并进行 reboot ,这样之前的策略就彻底清除啦!
[root@k8s1 ~]# kubeadm reset
[reset] Reading configuration from the cluster...
[reset] FYI: You can look at this config file with 'kubectl -n kube-system get cm kubeadm-config -o yaml'
[reset] WARNING: Changes made to this host by 'kubeadm init' or 'kubeadm join' will be reverted.
[reset] Are you sure you want to proceed? [y/N]: y
[preflight] Running pre-flight checks
[reset] Stopping the kubelet service
[reset] Unmounting mounted directories in "/var/lib/kubelet"
[reset] Deleting contents of config directories: [/etc/kubernetes/manifests /etc/kubernetes/pki]
[reset] Deleting files: [/etc/kubernetes/admin.conf /etc/kubernetes/kubelet.conf /etc/kubernetes/bootstrap-kubelet.conf /etc/kubernetes/controller-manager.conf /etc/kubernetes/scheduler.conf]
[reset] Deleting contents of stateful directories: [/var/lib/etcd /var/lib/kubelet /var/lib/dockershim /var/run/kubernetes /var/lib/cni]

The reset process does not clean CNI configuration. To do so, you must remove /etc/cni/net.d

The reset process does not reset or clean up iptables rules or IPVS tables.
If you wish to reset iptables, you must do so manually by using the "iptables" command.

If your cluster was setup to utilize IPVS, run ipvsadm --clear (or similar)
to reset your system's IPVS tables.

The reset process does not clean your kubeconfig files and you must remove them manually.
Please, check the contents of the $HOME/.kube/config file.
[root@k8s1 ~]# reboot
[root@k8s2 ~]# kubeadm reset
[root@k8s2 ~]# reboot
[root@k8s3 ~]# kubeadm reset
[root@k8s3 ~]# reboot
- 集群所有节点关闭 docker 服务
- 注意!一定要查看一下 docker.sock 文件是否还存在,如果它还在,最好直接删除了它,否则会影响后面的实验,无法使用 containerd 容器运行时方式
[root@k8s1 ~]# systemctl disable --now docker
Removed symlink /etc/systemd/system/multi-user.target.wants/docker.service.
Warning: Stopping docker.service, but it can still be activated by:
  docker.socket
[root@k8s1 ~]# systemctl disable --now docker.socket
[root@k8s1 ~]# ssh k8s2 systemctl disable --now docker.socket
[root@k8s1 ~]# ssh k8s2 systemctl disable --now docker
Removed symlink /etc/systemd/system/multi-user.target.wants/docker.service.
[root@k8s1 ~]# ssh k8s3 systemctl disable --now docker.socket
[root@k8s1 ~]# ssh k8s3 systemctl disable --now docker
Removed symlink /etc/systemd/system/multi-user.target.wants/docker.service.
- 验证是否关闭成功
[root@k8s1 ~]# docker ps
Cannot connect to the Docker daemon at unix:///var/run/docker.sock. Is the docker daemon running?
2. containerd 部署 Kubernetes
官方文档:容器运行时 | containerd
2.1 部署 containerd
2.1.1 安装 containerd
- 在之前使用 docker 部署 Kubernetes时,已经安装过了 containerd
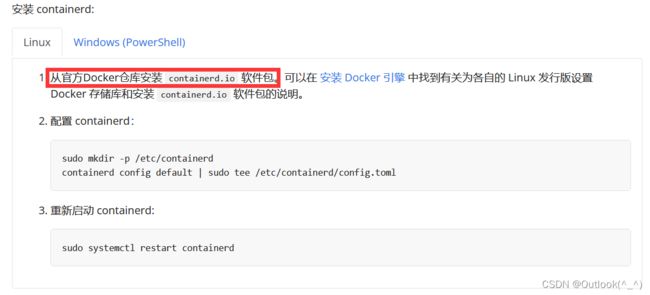
2.1.2 配置 containerd
- 修改 containerd 的配置信息
- 使用 containerd config default 命令查看 containerd 的配置信息
[root@k8s1 ~]# cd /etc/containerd/
[root@k8s1 containerd]# ls
config.toml
[root@k8s1 containerd]# containerd config default
disabled_plugins = []
imports = []
oom_score = 0
plugin_dir = ""
required_plugins = []
root = "/var/lib/containerd"
state = "/run/containerd"
version = 2

[cgroup]
  path = ""

[debug]
  address = ""
  format = ""
  gid = 0
  level = ""
  uid = 0

[grpc]
  address = "/run/containerd/containerd.sock"
  gid = 0
  max_recv_message_size = 16777216
  max_send_message_size = 16777216
  tcp_address = ""
  tcp_tls_cert = ""
  tcp_tls_key = ""
  uid = 0

[metrics]
  address = ""
  grpc_histogram = false

[plugins]

  [plugins."io.containerd.gc.v1.scheduler"]
    deletion_threshold = 0
    mutation_threshold = 100
    pause_threshold = 0.02
    schedule_delay = "0s"
    startup_delay = "100ms"

  [plugins."io.containerd.grpc.v1.cri"]
    disable_apparmor = false
    disable_cgroup = false
    disable_hugetlb_controller = true
    disable_proc_mount = false
    disable_tcp_service = true
    enable_selinux = false
    enable_tls_streaming = false
    ignore_image_defined_volumes = false
    max_concurrent_downloads = 3
    max_container_log_line_size = 16384
    netns_mounts_under_state_dir = false
    restrict_oom_score_adj = false
    sandbox_image = "k8s.gcr.io/pause:3.5"
    selinux_category_range = 1024
    stats_collect_period = 10
    stream_idle_timeout = "4h0m0s"
    stream_server_address = "127.0.0.1"
    stream_server_port = "0"
    systemd_cgroup = false
    tolerate_missing_hugetlb_controller = true
    unset_seccomp_profile = ""

    [plugins."io.containerd.grpc.v1.cri".cni]
      bin_dir = "/opt/cni/bin"
      conf_dir = "/etc/cni/net.d"
      conf_template = ""
      max_conf_num = 1

    [plugins."io.containerd.grpc.v1.cri".containerd]
      default_runtime_name = "runc"
      disable_snapshot_annotations = true
      discard_unpacked_layers = false
      no_pivot = false
      snapshotter = "overlayfs"

      [plugins."io.containerd.grpc.v1.cri".containerd.default_runtime]
        base_runtime_spec = ""
        container_annotations = []
        pod_annotations = []
        privileged_without_host_devices = false
        runtime_engine = ""
        runtime_root = ""
        runtime_type = ""

        [plugins."io.containerd.grpc.v1.cri".containerd.default_runtime.options]

      [plugins."io.containerd.grpc.v1.cri".containerd.runtimes]

        [plugins."io.containerd.grpc.v1.cri".containerd.runtimes.runc]
          base_runtime_spec = ""
          container_annotations = []
          pod_annotations = []
          privileged_without_host_devices = false
          runtime_engine = ""
          runtime_root = ""
          runtime_type = "io.containerd.runc.v2"

          [plugins."io.containerd.grpc.v1.cri".containerd.runtimes.runc.options]
            BinaryName = ""
            CriuImagePath = ""
            CriuPath = ""
            CriuWorkPath = ""
            IoGid = 0
            IoUid = 0
            NoNewKeyring = false
            NoPivotRoot = false
            Root = ""
            ShimCgroup = ""
            SystemdCgroup = false

      [plugins."io.containerd.grpc.v1.cri".containerd.untrusted_workload_runtime]
        base_runtime_spec = ""
        container_annotations = []
        pod_annotations = []
        privileged_without_host_devices = false
        runtime_engine = ""
        runtime_root = ""
        runtime_type = ""

        [plugins."io.containerd.grpc.v1.cri".containerd.untrusted_workload_runtime.options]

    [plugins."io.containerd.grpc.v1.cri".image_decryption]
      key_model = "node"

    [plugins."io.containerd.grpc.v1.cri".registry]
      config_path = ""

      [plugins."io.containerd.grpc.v1.cri".registry.auths]

      [plugins."io.containerd.grpc.v1.cri".registry.configs]

      [plugins."io.containerd.grpc.v1.cri".registry.headers]

      [plugins."io.containerd.grpc.v1.cri".registry.mirrors]

    [plugins."io.containerd.grpc.v1.cri".x509_key_pair_streaming]
      tls_cert_file = ""
      tls_key_file = ""

  [plugins."io.containerd.internal.v1.opt"]
    path = "/opt/containerd"

  [plugins."io.containerd.internal.v1.restart"]
    interval = "10s"

  [plugins."io.containerd.metadata.v1.bolt"]
    content_sharing_policy = "shared"

  [plugins."io.containerd.monitor.v1.cgroups"]
    no_prometheus = false

  [plugins."io.containerd.runtime.v1.linux"]
    no_shim = false
    runtime = "runc"
    runtime_root = ""
    shim = "containerd-shim"
    shim_debug = false

  [plugins."io.containerd.runtime.v2.task"]
    platforms = ["linux/amd64"]

  [plugins."io.containerd.service.v1.diff-service"]
    default = ["walking"]

  [plugins."io.containerd.snapshotter.v1.aufs"]
    root_path = ""

  [plugins."io.containerd.snapshotter.v1.devmapper"]
    async_remove = false
    base_image_size = ""
    pool_name = ""
    root_path = ""

  [plugins."io.containerd.snapshotter.v1.native"]
    root_path = ""

  [plugins."io.containerd.snapshotter.v1.overlayfs"]
    root_path = ""

  [plugins."io.containerd.snapshotter.v1.zfs"]
    root_path = ""

[proxy_plugins]

[stream_processors]

  [stream_processors."io.containerd.ocicrypt.decoder.v1.tar"]
    accepts = ["application/vnd.oci.image.layer.v1.tar+encrypted"]
    args = ["--decryption-keys-path", "/etc/containerd/ocicrypt/keys"]
    env = ["OCICRYPT_KEYPROVIDER_CONFIG=/etc/containerd/ocicrypt/ocicrypt_keyprovider.conf"]
    path = "ctd-decoder"
    returns = "application/vnd.oci.image.layer.v1.tar"

  [stream_processors."io.containerd.ocicrypt.decoder.v1.tar.gzip"]
    accepts = ["application/vnd.oci.image.layer.v1.tar+gzip+encrypted"]
    args = ["--decryption-keys-path", "/etc/containerd/ocicrypt/keys"]
    env = ["OCICRYPT_KEYPROVIDER_CONFIG=/etc/containerd/ocicrypt/ocicrypt_keyprovider.conf"]
    path = "ctd-decoder"
    returns = "application/vnd.oci.image.layer.v1.tar+gzip"

[timeouts]
  "io.containerd.timeout.shim.cleanup" = "5s"
  "io.containerd.timeout.shim.load" = "5s"
  "io.containerd.timeout.shim.shutdown" = "3s"
  "io.containerd.timeout.task.state" = "2s"

[ttrpc]
  address = ""
  gid = 0
  uid = 0
- 将 containerd 的配置信息导入 config.toml 文件中
- 修改 containerd 的配置信息,只需要修改两处
- 第一处:将镜像源修改成国内的阿里云镜像源(否则外网太慢了)
- 第二处:使用 systemd 的方式管理 cgroup
[root@k8s1 containerd]# containerd config default > config.toml
[root@k8s1 containerd]# vim config.toml
    sandbox_image = "registry.aliyuncs.com/google_containers/pause:3.5"
            SystemdCgroup = true

- 设置 containerd 开机自启
[root@k8s1 containerd]# systemctl enable --now containerd
Created symlink from /etc/systemd/system/multi-user.target.wants/containerd.service to /usr/lib/systemd/system/containerd.service.
[root@k8s1 containerd]# ll /var/run/containerd/containerd.sock
srw-rw---- 1 root root 0 Apr 20 16:56 /var/run/containerd/containerd.sock
- 其余节点同样的操作
- 修改 containerd 配置信息 ——> 开机自启 containerd
[root@k8s1 containerd]# pwd
/etc/containerd
[root@k8s1 containerd]# scp config.toml k8s2:/etc/containerd
config.toml                                                      100% 6029     7.3MB/s   00:00
[root@k8s1 containerd]# scp config.toml k8s3:/etc/containerd
config.toml                                                      100% 6029     7.2MB/s   00:00
[root@k8s1 containerd]# ssh k8s2 systemctl enable --now containerd
Created symlink from /etc/systemd/system/multi-user.target.wants/containerd.service to /usr/lib/systemd/system/containerd.service.
[root@k8s1 containerd]# ssh k8s3 systemctl enable --now containerd
Created symlink from /etc/systemd/system/multi-user.target.wants/containerd.service to /usr/lib/systemd/system/containerd.service.
2.1.3 前置条件
- 检查相关模块
- 确保 br_netfilter 模块被加载。这一操作可以通过运行 lsmod | grep br_netfilter 来完成。若要显式加载该模块,可执行 modprobe br_netfilter。
- 设置开机自动加载模块
[root@k8s1 containerd]# modprobe overlay
[root@k8s1 containerd]# cd /etc/modules-load.d/
[root@k8s1 modules-load.d]# ls
[root@k8s1 modules-load.d]# vim containerd.conf		//开机自动加载
overlay
br_netfilter
- 允许 iptables 检查桥接流量
- 这里只补充了一条,是因为之前部署 docekr 的时候写过前两条;
考试时,是不部署docker的,需要写 3 条
[root@k8s1 modules-load.d]# sysctl -a | grep ip_forward
sysctl: reading key "net.ipv6.conf.all.stable_secret"
net.ipv4.ip_forward = 1
net.ipv4.ip_forward_use_pmtu = 0
sysctl: reading key "net.ipv6.conf.default.stable_secret"
sysctl: reading key "net.ipv6.conf.docker0.stable_secret"
sysctl: reading key "net.ipv6.conf.eth0.stable_secret"
sysctl: reading key "net.ipv6.conf.lo.stable_secret"
[root@k8s1 modules-load.d]# cd /etc/sysctl.d/
[root@k8s1 sysctl.d]# ls
99-sysctl.conf  k8s.conf
[root@k8s1 sysctl.d]# vim k8s.conf
net.bridge.bridge-nf-call-ip6tables = 1
net.bridge.bridge-nf-call-iptables = 1
net.ipv4.ip_forward = 1
- 生效
[root@k8s1 sysctl.d]# sysctl --system
* Applying /usr/lib/sysctl.d/00-system.conf ...
net.bridge.bridge-nf-call-ip6tables = 0
net.bridge.bridge-nf-call-iptables = 0
net.bridge.bridge-nf-call-arptables = 0
* Applying /usr/lib/sysctl.d/10-default-yama-scope.conf ...
kernel.yama.ptrace_scope = 0
* Applying /usr/lib/sysctl.d/50-default.conf ...
kernel.sysrq = 16
kernel.core_uses_pid = 1
net.ipv4.conf.default.rp_filter = 1
net.ipv4.conf.all.rp_filter = 1
net.ipv4.conf.default.accept_source_route = 0
net.ipv4.conf.all.accept_source_route = 0
net.ipv4.conf.default.promote_secondaries = 1
net.ipv4.conf.all.promote_secondaries = 1
fs.protected_hardlinks = 1
fs.protected_symlinks = 1
* Applying /etc/sysctl.d/99-sysctl.conf ...
* Applying /etc/sysctl.d/k8s.conf ...
net.bridge.bridge-nf-call-ip6tables = 1
net.bridge.bridge-nf-call-iptables = 1
net.ipv4.ip_forward = 1
* Applying /etc/sysctl.conf ...
- 其余节点同样的操作
- 自动加载相关模块
[root@k8s1 modules-load.d]# pwd
/etc/modules-load.d
[root@k8s1 modules-load.d]# scp containerd.conf k8s2:/etc/modules-load.d
containerd.conf                                                  100%   21     2.4KB/s   00:00
[root@k8s1 modules-load.d]# scp containerd.conf k8s3:/etc/modules-load.d
containerd.conf                                                  100%   21     0.3KB/s   00:00
- 系统内核开启流量桥接
[root@k8s2 ~]# vim /etc/sysctl.d/k8s.conf
net.bridge.bridge-nf-call-ip6tables = 1
net.bridge.bridge-nf-call-iptables = 1
net.ipv4.ip_forward = 1
[root@k8s2 ~]# sysctl --system
* Applying /usr/lib/sysctl.d/00-system.conf ...
net.bridge.bridge-nf-call-ip6tables = 0
net.bridge.bridge-nf-call-iptables = 0
net.bridge.bridge-nf-call-arptables = 0
* Applying /usr/lib/sysctl.d/10-default-yama-scope.conf ...
kernel.yama.ptrace_scope = 0
* Applying /usr/lib/sysctl.d/50-default.conf ...
kernel.sysrq = 16
kernel.core_uses_pid = 1
net.ipv4.conf.default.rp_filter = 1
net.ipv4.conf.all.rp_filter = 1
net.ipv4.conf.default.accept_source_route = 0
net.ipv4.conf.all.accept_source_route = 0
net.ipv4.conf.default.promote_secondaries = 1
net.ipv4.conf.all.promote_secondaries = 1
fs.protected_hardlinks = 1
fs.protected_symlinks = 1
* Applying /etc/sysctl.d/99-sysctl.conf ...
* Applying /etc/sysctl.d/k8s.conf ...
net.bridge.bridge-nf-call-ip6tables = 1
net.bridge.bridge-nf-call-iptables = 1
net.ipv4.ip_forward = 1
* Applying /etc/sysctl.conf ...
2.1.4 从 Docker 命令行映射到 crictl
官方文档:从 Docker 命令行映射到 crictl
- crictl 是兼容 CRI的容器运行时的一种命令行接口。 你可以使用它来在 Kubernetes 节点上检视和调试容器运行时和应用。

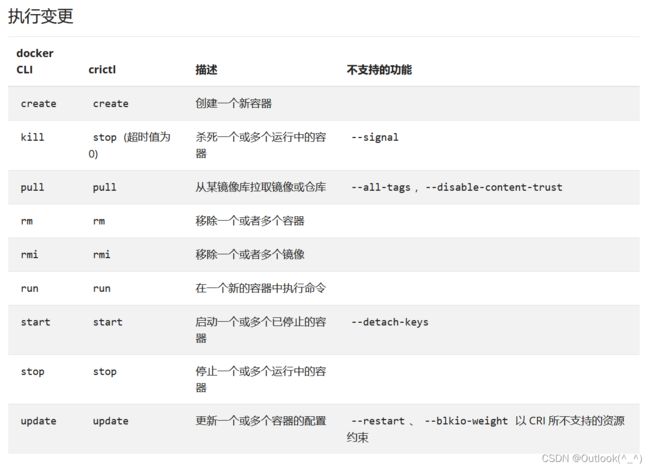
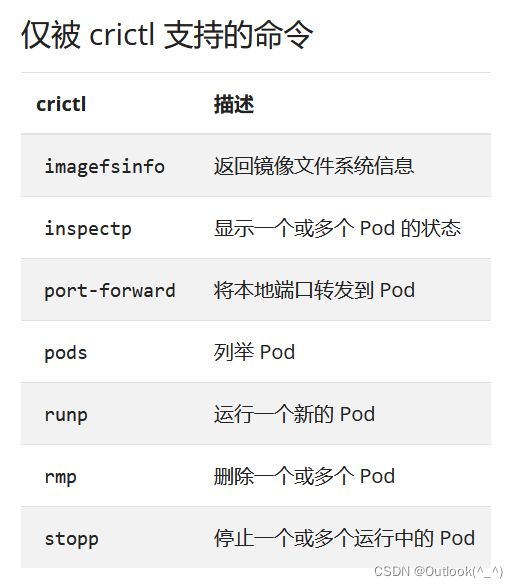
- 运行新的命令 crictl 代替 docker 命令
- 使用新的命令crictl
[root@k8s1 ~]# crictl config runtime-endpoint unix:///run/containerd/containerd.sock
[root@k8s1 ~]# cat /etc/crictl.yaml
runtime-endpoint: "unix:///run/containerd/containerd.sock"
image-endpoint: ""
timeout: 0
debug: false
pull-image-on-create: false
disable-pull-on-run: false
出现的第一个 error
- 无法使用 crictl 命令查看到 kubernetes 运行的情况
[root@k8s1 ~]# crictl ps
FATA[0000] listing containers: rpc error: code = Unimplemented desc = unknown service runtime.v1alpha2.RuntimeService
[root@k8s1 ~]# crictl img
FATA[0000] listing images: rpc error: code = Unimplemented desc = unknown service runtime.v1alpha2.ImageService
解决方法
- 解决方法:重启 containerd 服务
[root@k8s1 ~]# systemctl restart containerd.service
[root@k8s1 ~]# crictl ps
CONTAINER           IMAGE               CREATED             STATE               NAME                ATTEMPT             POD ID
[root@k8s1 ~]# crictl img
IMAGE               TAG                 IMAGE ID            SIZE
[root@k8s1 ~]# ll /run/containerd/containerd.sock
srw-rw---- 1 root root 0 Apr 20 17:21 /run/containerd/containerd.sock
- 其余节点同样的操作
[root@k8s1 ~]# ssh k8s2 systemctl restart containerd.service
[root@k8s1 ~]# ssh k8s2 ls -l /run/containerd/containerd.sock
srw-rw---- 1 root root 0 Apr 20 17:22 /run/containerd/containerd.sock
[root@k8s1 ~]# ssh k8s3 systemctl restart containerd.service
[root@k8s1 ~]# ssh k8s3 ls -l /run/containerd/containerd.sock
srw-rw---- 1 root root 0 Apr 20 17:22 /run/containerd/containerd.sock
[root@k8s2 ~]# crictl config runtime-endpoint unix:///run/containerd/containerd.sock
[root@k8s2 ~]# crictl img
IMAGE               TAG                 IMAGE ID            SIZE
[root@k8s2 ~]# crictl ps
CONTAINER           IMAGE               CREATED             STATE               NAME                ATTEMPT             POD ID
[root@k8s3 ~]# crictl config runtime-endpoint unix:///run/containerd/containerd.sock
2.2 使用 kubeadm 引导集群
官方文档:使用 kubeadm 引导集群 | Kubernetes
- docker 和 contianerd 不同,数据目录的位置也不同。
之前 docker 下载的镜像在docker的数据目录中,
部署 containerd 的时候,需要重新下载
[root@k8s2 ~]# ls /var/lib/docker
buildkit  containers  image  network  overlay2  plugins  runtimes  swarm  tmp  trust  volumes
[root@k8s2 ~]# ls /var/lib/containerd/
io.containerd.content.v1.content  io.containerd.runtime.v2.task           tmpmounts
io.containerd.metadata.v1.bolt    io.containerd.snapshotter.v1.native
io.containerd.runtime.v1.linux    io.containerd.snapshotter.v1.overlayfs
2.2.1 使用 kubeadm 创建单个控制平面的 Kubernetes 集群
- 初始化 Kubernetes 控制平面节点
出现的第二个 error
- 执行初始化命令 kubeadm init ,发现出现了错误
- 报错信息显示,Kubernetes 还是先找 docker 服务,而不是 containerd 服务
[root@k8s1 ~]# kubeadm init --pod-network-cidr=10.244.0.0/16 --image-repository registry.aliyuncs.com/google_containers
W0420 17:27:21.844172    6145 version.go:103] could not fetch a Kubernetes version from the internet: unable to get URL "https://dl.k8s.io/release/stable-1.txt": Get "https://dl.k8s.io/release/stable-1.txt": context deadline exceeded (Client.Timeout exceeded while awaiting headers)
W0420 17:27:21.844221    6145 version.go:104] falling back to the local client version: v1.23.5
[init] Using Kubernetes version: v1.23.5
[preflight] Running pre-flight checks
	[WARNING Service-Docker]: docker service is not enabled, please run 'systemctl enable docker.service'
[preflight] The system verification failed. Printing the output from the verification:
KERNEL_VERSION: 3.10.0-957.el7.x86_64
CONFIG_NAMESPACES: enabled
CONFIG_NET_NS: enabled
CONFIG_PID_NS: enabled
CONFIG_IPC_NS: enabled
CONFIG_UTS_NS: enabled
CONFIG_CGROUPS: enabled
CONFIG_CGROUP_CPUACCT: enabled
CONFIG_CGROUP_DEVICE: enabled
CONFIG_CGROUP_FREEZER: enabled
CONFIG_CGROUP_PIDS: enabled
CONFIG_CGROUP_SCHED: enabled
CONFIG_CPUSETS: enabled
CONFIG_MEMCG: enabled
CONFIG_INET: enabled
CONFIG_EXT4_FS: enabled (as module)
CONFIG_PROC_FS: enabled
CONFIG_NETFILTER_XT_TARGET_REDIRECT: enabled (as module)
CONFIG_NETFILTER_XT_MATCH_COMMENT: enabled (as module)
CONFIG_FAIR_GROUP_SCHED: enabled
CONFIG_OVERLAY_FS: enabled (as module)
CONFIG_AUFS_FS: not set - Required for aufs.
CONFIG_BLK_DEV_DM: enabled (as module)
CONFIG_CFS_BANDWIDTH: enabled
CONFIG_CGROUP_HUGETLB: enabled
CONFIG_SECCOMP: enabled
CONFIG_SECCOMP_FILTER: enabled
OS: Linux
CGROUPS_CPU: enabled
CGROUPS_CPUACCT: enabled
CGROUPS_CPUSET: enabled
CGROUPS_DEVICES: enabled
CGROUPS_FREEZER: enabled
CGROUPS_MEMORY: enabled
CGROUPS_PIDS: enabled
CGROUPS_HUGETLB: enabled
error execution phase preflight: [preflight] Some fatal errors occurred:
	[ERROR CRI]: container runtime is not running: output: Client:
 Context:    default
 Debug Mode: false
 Plugins:
  app: Docker App (Docker Inc., v0.9.1-beta3)
  buildx: Docker Buildx (Docker Inc., v0.8.1-docker)
  scan: Docker Scan (Docker Inc., v0.17.0)

Server:
ERROR: Cannot connect to the Docker daemon at unix:///var/run/docker.sock. Is the docker daemon running?
errors pretty printing info
, error: exit status 1
	[ERROR Service-Docker]: docker service is not active, please run 'systemctl start docker.service'
	[ERROR SystemVerification]: error verifying Docker info: "Cannot connect to the Docker daemon at unix:///var/run/docker.sock. Is the docker daemon running?"
[preflight] If you know what you are doing, you can make a check non-fatal with `--ignore-preflight-errors=...`
To see the stack trace of this error execute with --v=5 or higher
解决方法
- 先检查配置文件
- 发现 kubernetes 依旧使用的是 docker容器运行时
[root@k8s1 ~]# kubeadm config print init-defaults
apiVersion: kubeadm.k8s.io/v1beta3
bootstrapTokens:
- groups:
  - system:bootstrappers:kubeadm:default-node-token
  token: abcdef.0123456789abcdef
  ttl: 24h0m0s
  usages:
  - signing
  - authentication
kind: InitConfiguration
localAPIEndpoint:
  advertiseAddress: 1.2.3.4
  bindPort: 6443
nodeRegistration:
  criSocket: /var/run/dockershim.sock		//发现 kubernetes 依旧使用的是 docker容器运行时
  imagePullPolicy: IfNotPresent
  name: node
  taints: null
---
apiServer:
  timeoutForControlPlane: 4m0s
apiVersion: kubeadm.k8s.io/v1beta3
certificatesDir: /etc/kubernetes/pki
clusterName: kubernetes
controllerManager: {}
dns: {}
etcd:
  local:
    dataDir: /var/lib/etcd
imageRepository: k8s.gcr.io
kind: ClusterConfiguration
kubernetesVersion: 1.23.0
networking:
  dnsDomain: cluster.local
  serviceSubnet: 10.96.0.0/12
scheduler: {}
- 将初始化信息导入 kubeadm-init.yaml 文件
[root@k8s1 ~]# kubeadm config print init-defaults > kubeadm-init.yaml
- 修改初始信息
主要修改 6 处信息
[root@k8s1 ~]# vim kubeadm-init.yaml
  advertiseAddress: 172.25.21.1					//控制面板
  criSocket: /run/containerd/containerd.sock	//containerd容器运行时
  name: k8s1									//主机名,记得写解析
imageRepository: registry.aliyuncs.com/google_containers		//修改镜像源
kubernetesVersion: 1.22.1						//考试的版本
  podSubnet: 10.244.0.0/16
- 注意!这里我设置了 Kubernetes 版本为1.22.1,一定要尽可能保证 组件之间的版本差距不要太大,否则会在初始化的时候出现 “第二个 error ”那样的错误。
(1)kubeadm 先拉取镜像
- 先根据初始化文件列出执行的镜像,再进行镜像拉取(访问外网)
[root@k8s1 ~]# kubeadm config images list --config kubeadm-init.yaml
registry.aliyuncs.com/google_containers/kube-apiserver:v1.22.1
registry.aliyuncs.com/google_containers/kube-controller-manager:v1.22.1
registry.aliyuncs.com/google_containers/kube-scheduler:v1.22.1
registry.aliyuncs.com/google_containers/kube-proxy:v1.22.1
registry.aliyuncs.com/google_containers/pause:3.6
registry.aliyuncs.com/google_containers/etcd:3.5.1-0
registry.aliyuncs.com/google_containers/coredns:v1.8.6
[root@k8s1 ~]# kubeadm config images pull --config kubeadm-init.yaml
[config/images] Pulled registry.aliyuncs.com/google_containers/kube-apiserver:v1.22.1
[config/images] Pulled registry.aliyuncs.com/google_containers/kube-controller-manager:v1.22.1
[config/images] Pulled registry.aliyuncs.com/google_containers/kube-scheduler:v1.22.1
[config/images] Pulled registry.aliyuncs.com/google_containers/kube-proxy:v1.22.1
[config/images] Pulled registry.aliyuncs.com/google_containers/pause:3.6
[config/images] Pulled registry.aliyuncs.com/google_containers/etcd:3.5.1-0
[config/images] Pulled registry.aliyuncs.com/google_containers/coredns:v1.8.6
(2) 再次初始化
出现的第三个 error
- 根据报错信息了解到,kubelet 的版本是1.23.5明显高于了其他控制组件的版本(在初始化文件 kubeadm-init.yaml 中,我们设置的环境是1.22.1)
[root@k8s1 ~]# kubeadm init --config kubeadm-init.yaml
...
[init] Using Kubernetes version: v1.22.1
[preflight] Running pre-flight checks
error execution phase preflight: [preflight] Some fatal errors occurred:
	[ERROR KubeletVersion]: the kubelet version is higher than the control plane version. This is not a supported version skew and may lead to a malfunctional cluster. Kubelet version: "1.23.5" Control plane version: "1.22.1"
[preflight] If you know what you are doing, you can make a check non-fatal with `--ignore-preflight-errors=...`
To see the stack trace of this error execute with --v=5 or higher
解决方法
- 所有节点进行降级
[root@k8s1 ~]# yum downgrade kubeadm-1.22.1-0 kubelet-1.22.1-0 kubectl-1.22.1-0
[root@k8s1 ~]# rpm -qa | grep kube
kubelet-1.22.1-0.x86_64
kubernetes-cni-0.8.7-0.x86_64
kubectl-1.22.1-0.x86_64
kubeadm-1.22.1-0.x86_64
[root@k8s1 ~]# systemctl daemon-reload
[root@k8s1 ~]# systemctl restart kubelet.service
[root@k8s2 ~]# yum downgrade kubeadm-1.22.1-0 kubelet-1.22.1-0 kubectl-1.22.1-0 -y
[root@k8s2 ~]# systemctl daemon-reload
[root@k8s2 ~]# systemctl restart kubelet.service
[root@k8s3 ~]# yum downgrade kubeadm-1.22.1-0 kubelet-1.22.1-0 kubectl-1.22.1-0 -y
[root@k8s3 ~]# systemctl daemon-reload
[root@k8s3 ~]# systemctl restart kubelet.service
(3)再再次初始化
[root@k8s1 ~]# kubeadm init --config kubeadm-init.yaml
[init] Using Kubernetes version: v1.22.1
[preflight] Running pre-flight checks
[preflight] Pulling images required for setting up a Kubernetes cluster
[preflight] This might take a minute or two, depending on the speed of your internet connection
[preflight] You can also perform this action in beforehand using 'kubeadm config images pull'
[certs] Using certificateDir folder "/etc/kubernetes/pki"
[certs] Generating "ca" certificate and key
[certs] Generating "apiserver" certificate and key
[certs] apiserver serving cert is signed for DNS names [k8s1 kubernetes kubernetes.default kubernetes.default.svc kubernetes.default.svc.cluster.local] and IPs [10.96.0.1 172.25.21.1]
[certs] Generating "apiserver-kubelet-client" certificate and key
[certs] Generating "front-proxy-ca" certificate and key
[certs] Generating "front-proxy-client" certificate and key
[certs] Generating "etcd/ca" certificate and key
[certs] Generating "etcd/server" certificate and key
[certs] etcd/server serving cert is signed for DNS names [k8s1 localhost] and IPs [172.25.21.1 127.0.0.1 ::1]
[certs] Generating "etcd/peer" certificate and key
[certs] etcd/peer serving cert is signed for DNS names [k8s1 localhost] and IPs [172.25.21.1 127.0.0.1 ::1]
[certs] Generating "etcd/healthcheck-client" certificate and key
[certs] Generating "apiserver-etcd-client" certificate and key
[certs] Generating "sa" key and public key
[kubeconfig] Using kubeconfig folder "/etc/kubernetes"
[kubeconfig] Writing "admin.conf" kubeconfig file
[kubeconfig] Writing "kubelet.conf" kubeconfig file
[kubeconfig] Writing "controller-manager.conf" kubeconfig file
[kubeconfig] Writing "scheduler.conf" kubeconfig file
[kubelet-start] Writing kubelet environment file with flags to file "/var/lib/kubelet/kubeadm-flags.env"
[kubelet-start] Writing kubelet configuration to file "/var/lib/kubelet/config.yaml"
[kubelet-start] Starting the kubelet
[control-plane] Using manifest folder "/etc/kubernetes/manifests"
[control-plane] Creating static Pod manifest for "kube-apiserver"
[control-plane] Creating static Pod manifest for "kube-controller-manager"
[control-plane] Creating static Pod manifest for "kube-scheduler"
[etcd] Creating static Pod manifest for local etcd in "/etc/kubernetes/manifests"
[wait-control-plane] Waiting for the kubelet to boot up the control plane as static Pods from directory "/etc/kubernetes/manifests". This can take up to 4m0s
[apiclient] All control plane components are healthy after 36.002443 seconds
[upload-config] Storing the configuration used in ConfigMap "kubeadm-config" in the "kube-system" Namespace
[kubelet] Creating a ConfigMap "kubelet-config-1.22" in namespace kube-system with the configuration for the kubelets in the cluster
[upload-certs] Skipping phase. Please see --upload-certs
[mark-control-plane] Marking the node k8s1 as control-plane by adding the labels: [node-role.kubernetes.io/master(deprecated) node-role.kubernetes.io/control-plane node.kubernetes.io/exclude-from-external-load-balancers]
[mark-control-plane] Marking the node k8s1 as control-plane by adding the taints [node-role.kubernetes.io/master:NoSchedule]
[bootstrap-token] Using token: abcdef.0123456789abcdef
[bootstrap-token] Configuring bootstrap tokens, cluster-info ConfigMap, RBAC Roles
[bootstrap-token] configured RBAC rules to allow Node Bootstrap tokens to get nodes
[bootstrap-token] configured RBAC rules to allow Node Bootstrap tokens to post CSRs in order for nodes to get long term certificate credentials
[bootstrap-token] configured RBAC rules to allow the csrapprover controller automatically approve CSRs from a Node Bootstrap Token
[bootstrap-token] configured RBAC rules to allow certificate rotation for all node client certificates in the cluster
[bootstrap-token] Creating the "cluster-info" ConfigMap in the "kube-public" namespace
[kubelet-finalize] Updating "/etc/kubernetes/kubelet.conf" to point to a rotatable kubelet client certificate and key
[addons] Applied essential addon: CoreDNS
[addons] Applied essential addon: kube-proxy

Your Kubernetes control-plane has initialized successfully!

To start using your cluster, you need to run the following as a regular user:

  mkdir -p $HOME/.kube
  sudo cp -i /etc/kubernetes/admin.conf $HOME/.kube/config
  sudo chown $(id -u):$(id -g) $HOME/.kube/config

Alternatively, if you are the root user, you can run:

  export KUBECONFIG=/etc/kubernetes/admin.conf

You should now deploy a pod network to the cluster.
Run "kubectl apply -f [podnetwork].yaml" with one of the options listed at:
  https://kubernetes.io/docs/concepts/cluster-administration/addons/

Then you can join any number of worker nodes by running the following on each as root:

kubeadm join 172.25.21.1:6443 --token abcdef.0123456789abcdef \
	--discovery-token-ca-cert-hash sha256:f61799d386ac9785518d83169489c191982a6c98c1e892b6ca7edcc66f8acd54
- 记录 join 命令,在做 “ 集群加入节点 ” 步骤的时候,需要用到这个命令
- 注意!执行到这一步的时候,一定要将 export 命令(root用户)写入系统环境变量里!之前 docker 部署 Kubernetes 的时候已经把这一步做过了,所以,这里我没有做。但是,一定要记得!
- crictl 查看运行的组件
[root@k8s1 ~]# crictl ps
CONTAINER           IMAGE               CREATED             STATE               NAME                      ATTEMPT             POD ID
19be88b438701       36c4ebbc9d979       2 minutes ago       Running             kube-proxy                0                   fd18465067ffd
2a1069f9aec76       aca5ededae9c8       3 minutes ago       Running             kube-scheduler            0                   7c66e048980c7
5d66713ed2f77       0048118155842       3 minutes ago       Running             etcd                      0                   ff3453a55dba6
df32c2d65a52e       6e002eb89a881       3 minutes ago       Running             kube-controller-manager   0                   8f8e389fc7606
6effa071c2ef3       f30469a2491a5       3 minutes ago       Running             kube-apiserver            0                   55757e92d4e67
- 初始化成功,镜像也拉取成功了
- 安装 Pod 网络附加组件
- 使用 kubectl apply -f 命令在控制平面节点上安装 Pod 网络附加组件
[root@k8s1 ~]# ls
kubeadm-init.yaml  kube-flannel.yml
[root@k8s1 ~]# kubectl apply -f kube-flannel.yml
Warning: policy/v1beta1 PodSecurityPolicy is deprecated in v1.21+, unavailable in v1.25+
podsecuritypolicy.policy/psp.flannel.unprivileged created
clusterrole.rbac.authorization.k8s.io/flannel created
clusterrolebinding.rbac.authorization.k8s.io/flannel created
serviceaccount/flannel created
configmap/kube-flannel-cfg created
daemonset.apps/kube-flannel-ds created
2.2.2 集群加入节点
- 在选定的节点 k8s2 和 k8s3 执行 join 命令,使之加入集群
出现的第四个 error
- 根据报错信息发现,Kubernetes 还是先去找了 docker 服务,因为 docker.sock 还存在
[root@k8s2 ~]# kubeadm join 172.25.21.1:6443 --token abcdef.0123456789abcdef --discovery-token-ca-cert-hash sha256:f61799d386ac9785518d83169489c191982a6c98c1e892b6ca7edcc66f8acd54
[preflight] Running pre-flight checks
	[WARNING Service-Docker]: docker service is not enabled, please run 'systemctl enable docker.service'
[preflight] The system verification failed. Printing the output from the verification:
KERNEL_VERSION: 3.10.0-957.el7.x86_64
CONFIG_NAMESPACES: enabled
CONFIG_NET_NS: enabled
CONFIG_PID_NS: enabled
CONFIG_IPC_NS: enabled
CONFIG_UTS_NS: enabled
CONFIG_CGROUPS: enabled
CONFIG_CGROUP_CPUACCT: enabled
CONFIG_CGROUP_DEVICE: enabled
CONFIG_CGROUP_FREEZER: enabled
CONFIG_CGROUP_PIDS: enabled
CONFIG_CGROUP_SCHED: enabled
CONFIG_CPUSETS: enabled
CONFIG_MEMCG: enabled
CONFIG_INET: enabled
CONFIG_EXT4_FS: enabled (as module)
CONFIG_PROC_FS: enabled
CONFIG_NETFILTER_XT_TARGET_REDIRECT: enabled (as module)
CONFIG_NETFILTER_XT_MATCH_COMMENT: enabled (as module)
CONFIG_FAIR_GROUP_SCHED: enabled
CONFIG_OVERLAY_FS: enabled (as module)
CONFIG_AUFS_FS: not set - Required for aufs.
CONFIG_BLK_DEV_DM: enabled (as module)
CONFIG_CFS_BANDWIDTH: enabled
CONFIG_CGROUP_HUGETLB: enabled
CONFIG_SECCOMP: enabled
CONFIG_SECCOMP_FILTER: enabled
OS: Linux
CGROUPS_CPU: enabled
CGROUPS_CPUACCT: enabled
CGROUPS_CPUSET: enabled
CGROUPS_DEVICES: enabled
CGROUPS_FREEZER: enabled
CGROUPS_MEMORY: enabled
CGROUPS_PIDS: enabled
CGROUPS_HUGETLB: enabled
error execution phase preflight: [preflight] Some fatal errors occurred:
	[ERROR CRI]: container runtime is not running: output: Client:
 Context:    default
 Debug Mode: false
 Plugins:
  app: Docker App (Docker Inc., v0.9.1-beta3)
  buildx: Docker Buildx (Docker Inc., v0.8.1-docker)
  scan: Docker Scan (Docker Inc., v0.17.0)

Server:
ERROR: Cannot connect to the Docker daemon at unix:///var/run/docker.sock. Is the docker daemon running?
errors pretty printing info
, error: exit status 1
	[ERROR Service-Docker]: docker service is not active, please run 'systemctl start docker.service'
	[ERROR SystemVerification]: error verifying Docker info: "Cannot connect to the Docker daemon at unix:///var/run/docker.sock. Is the docker daemon running?"
[preflight] If you know what you are doing, you can make a check non-fatal with `--ignore-preflight-errors=...`
To see the stack trace of this error execute with --v=5 or higher
解决方法
- 发现 docker 的 sock 文件依旧存在,直接删除 sock 文件,卸载 docker 就行
[root@k8s2 ~]# ll /var/run/docker.sock
srw-rw---- 1 root docker 0 Apr 20 16:54 /var/run/docker.sock
[root@k8s2 ~]# yum remove docker-ce -y
[root@k8s2 ~]# rm -f /var/run/docker.sock
- 节点再次尝试加入集群
[root@k8s2 ~]# kubeadm join 172.25.21.1:6443 --token abcdef.0123456789abcdef --discovery-token-ca-cert-hash sha256:f61799d386ac9785518d83169489c191982a6c98c1e892b6ca7edcc66f8acd54
[preflight] Running pre-flight checks
[preflight] Reading configuration from the cluster...
[preflight] FYI: You can look at this config file with 'kubectl -n kube-system get cm kubeadm-config -o yaml'
[kubelet-start] Writing kubelet configuration to file "/var/lib/kubelet/config.yaml"
[kubelet-start] Writing kubelet environment file with flags to file "/var/lib/kubelet/kubeadm-flags.env"
[kubelet-start] Starting the kubelet
[kubelet-start] Waiting for the kubelet to perform the TLS Bootstrap...

This node has joined the cluster:
* Certificate signing request was sent to apiserver and a response was received.
* The Kubelet was informed of the new secure connection details.

Run 'kubectl get nodes' on the control-plane to see this node join the cluster.
[root@k8s3 ~]# rm -f /var/run/docker.sock
[root@k8s3 ~]# kubeadm join 172.25.21.1:6443 --token abcdef.0123456789abcdef --discovery-token-ca-cert-hash sha256:f61799d386ac9785518d83169489c191982a6c98c1e892b6ca7edcc66f8acd54
- 加入集群成功
[root@k8s1 ~]# kubectl get node
NAME   STATUS   ROLES                  AGE    VERSION
k8s1   Ready    control-plane,master   14m    v1.22.1
k8s2   Ready    <none>                 109s   v1.22.1
k8s3   Ready    <none>                 38s    v1.22.1
[root@k8s1 ~]# crictl ps
CONTAINER           IMAGE               CREATED             STATE               NAME                      ATTEMPT             POD ID
cfc04f0f8addb       8d147537fb7d1       5 minutes ago       Running             coredns                   0                   235c583bf2de5
906b1b3cf46a4       8d147537fb7d1       5 minutes ago       Running             coredns                   0                   20b214fc592e5
607a226f653a4       9247abf086779       5 minutes ago       Running             kube-flannel              0                   b50d4c780260a
19be88b438701       36c4ebbc9d979       15 minutes ago      Running             kube-proxy                0                   fd18465067ffd
2a1069f9aec76       aca5ededae9c8       15 minutes ago      Running             kube-scheduler            0                   7c66e048980c7
5d66713ed2f77       0048118155842       15 minutes ago      Running             etcd                      0                   ff3453a55dba6
df32c2d65a52e       6e002eb89a881       15 minutes ago      Running             kube-controller-manager   0                   8f8e389fc7606
6effa071c2ef3       f30469a2491a5       15 minutes ago      Running             kube-apiserver            0                   55757e92d4e67
[root@k8s1 ~]# kubectl get pod -A
NAMESPACE     NAME                           READY   STATUS    RESTARTS   AGE
kube-system   coredns-7f6cbbb7b8-44762       1/1     Running   0          15m
kube-system   coredns-7f6cbbb7b8-z42dt       1/1     Running   0          15m
kube-system   etcd-k8s1                      1/1     Running   0          15m
kube-system   kube-apiserver-k8s1            1/1     Running   0          15m
kube-system   kube-controller-manager-k8s1   1/1     Running   0          15m
kube-system   kube-flannel-ds-d9r55          1/1     Running   0          99s
kube-system   kube-flannel-ds-jjnbp          1/1     Running   0          7m8s
kube-system   kube-flannel-ds-q2lkh          1/1     Running   0          2m51s
kube-system   kube-proxy-l6rc6               1/1     Running   0          99s
kube-system   kube-proxy-nvj8d               1/1     Running   0          15m
kube-system   kube-proxy-r5zcg               1/1     Running   0          2m51s
kube-system   kube-scheduler-k8s1            1/1     Running   0          15m
- 集群部署完成啦!
以上是containerd的方式