将.net5程序封装到docker镜像
文章目录
- 环境
- 需求
- 实现方法
- RabbiteMQ操作类
-
- 主要操作类 QueueOperator
- 异常类 QueueCanNotDoException
- 生产者(桌面程序 不记录)
- 消费者
-
- Program 代码
- Worker 代码
- Dockerfile
- 制作镜像
-
- docker build 命令
- 运行镜像
- 遇见的问题
-
- 问题1 docker run -v 挂在路径无效问题(在window环境中)
- 问题2 visual studio 容器工具首次加载太慢 vsdbg\vs2017u5 exists, deleting 太慢或者卡在这里失败
- 问题3 The framework 'Microsoft.AspNetCore.App', version '5.0.0' was not found. (运行docker内的程序提示框架库找不到)
环境
- .net 5
- Docker Desktop Version 3.3.3 (64133) - May 6 2021
- RabbitMQ 3.8.16 (部署在docker中 部署文档)
需求
一个生产者将生产出来的数据发布到mq中,又多个消费者消费数据,并将消费结果反馈给mq,另外一个消费者消费结果数据。
实现方法
一个Topic的mq,生产者将数据发给交换机,消费者绑定交换机,然后将结果上报给一个简单的mq,另外一个消费者消费结果。

RabbiteMQ操作类
主要操作类 QueueOperator
using System;
using System.Text;
using Newtonsoft.Json;
using RabbitMQ.Client;
using RabbitMQ.Client.Events;
namespace Common.MQ
{
public class QueueOperator : IDisposable
{
/// 异常类 QueueCanNotDoException
using System;
using System.Collections.Generic;
using System.Text;

namespace Common.MQ
{
    public class QueueCanNotDoException : Exception
    {
        public QueueCanNotDoException(Exception ex)
        {
            new Exception(ex?.Message??"", ex);
        }

        public string CanNotType { get; set; }

        public override string ToString()
        {
            return $"{CanNotType} 不能被执行,详细信息:\r\n{Message}";
        }
    }
}
生产者(桌面程序 不记录)
生产者这里没有好记录的,正常操作mq就行了
消费者
.net 5 的 work service
Program 代码
  public static IHostBuilder CreateHostBuilder(string[] args)
        {
            var ihostbuilder = Host.CreateDefaultBuilder(args);
            //window和linux的路径表示方式不一样,虽然/在win10中也能识别,但是尽量保持系统原有风格
            var configFile = AppDomain.CurrentDomain.BaseDirectory;
            if (RuntimeInformation.IsOSPlatform(OSPlatform.Windows))
            {
                ihostbuilder.UseWindowsService();
                configFile += "conf\\appsettings.json";
            }
            else
            {
                ihostbuilder.UseSystemd();
                configFile += "conf/appsettings.json";
            }

            ihostbuilder.ConfigureAppConfiguration((hostingContext, config) =>
            {
                config.Sources.Clear();
                //更改配置文件的路径,方便docker进行外部映射 Volume
                config.AddJsonFile(configFile);
            })
            .ConfigureServices((hostContext, services) =>
            {
                services.AddHostedService<Worker>();
            })
            .ConfigureLogging(logging =>
            {
                logging.ClearProviders();
                logging.SetMinimumLevel(LogLevel.Trace);
            })
            .UseNLog();
            return ihostbuilder;
        }
Worker 代码
  public class Worker : BackgroundService
    {
        private readonly ILogger<Worker> _logger;
        private static QueueOperator queueOperator;
        private MQSetting setting;
        public Worker(ILogger<Worker> logger, IConfiguration configuration)
        {
            _logger = logger;
            setting = configuration.GetSection("MQSetting").Get<MQSetting>();
        }

        public override Task StartAsync(CancellationToken cancellationToken)
        {
            try
            {
                queueOperator = new QueueOperator(setting.UserName, setting.Password, setting.DBName, setting.HostName, setting.Port);
                queueOperator.BindQueue<CarlingData<string>>(setting.ExchangeName, setting.RoutingKey, data =>
                {
                    Console.WriteLine(data.Step);
                    queueOperator.SendSampleAsnyc<CarlingResultData<string>>(setting.ResultRoutingKey, new CarlingResultData<string>() { Step = data.Step, Key = data.Key });
                });
                Console.WriteLine("初始化mq完成");
            }
            catch (Exception ex)
            {
                Console.WriteLine("初始化mq异常:" + ex.Message);
            }


            return base.StartAsync(cancellationToken);
        }
        protected override async Task ExecuteAsync(CancellationToken stoppingToken)
        {
            while (!stoppingToken.IsCancellationRequested)
            {
                Console.WriteLine($"Worker running at: { DateTimeOffset.Now}");
                //  _logger.LogInformation("Worker running at: {time}", DateTimeOffset.Now);
                await Task.Delay(TimeSpan.FromMinutes(1), stoppingToken);
            }
        }
    }
Dockerfile
#See https://aka.ms/containerfastmode to understand how Visual Studio uses this Dockerfile to build your images for faster debugging.
# 这里要注意,vs生成的默认dockerfile中这里的runtime:5.0的版本,这个版本会导致做成镜像无法运行,因为缺少.net 5 库。
FROM mcr.microsoft.com/dotnet/aspnet:5.0-buster-slim AS base
WORKDIR /app

FROM mcr.microsoft.com/dotnet/sdk:5.0-buster-slim AS build
WORKDIR /src

RUN dotnet restore
COPY . .

#FROM mcr.microsoft.com/dotnet/sdk:5.0-buster-slim AS build
#WORKDIR /src
#COPY ["service/Shimada.CarlingService/Shimada.CarlingService.csproj", "service/Shimada.CarlingService/"]
#RUN dotnet restore "service/Shimada.CarlingService/Shimada.CarlingService.csproj"
#COPY . .
#WORKDIR "/src/service/Shimada.CarlingService"
#RUN dotnet build "Shimada.CarlingService.csproj" -c Release -o /app/build
#
#FROM build AS publish
#RUN dotnet publish "Shimada.CarlingService.csproj" -c Release -o /app/publish

#FROM base AS final
#WORKDIR /app
#COPY --from=publish /app/publish .
#ENTRYPOINT ["dotnet", "Shimada.CarlingService.dll"]

FROM base AS debuge
WORKDIR /app
COPY "bin/Debug/net5.0/" "/app"
EXPOSE 8080/tcp
EXPOSE 8080/udp
# 这里将conf配置文件目录和Logs日志文件目录映射出来,方便在docker外面修改和查看数据。
VOLUME ["/app/conf","/app/Logs"]
ENTRYPOINT ["dotnet", "Shimada.CarlingService.dll"]
制作镜像
docker build 命令
docker build -t carlingservice:0.0.5.5 C:\shimada\SY-VIS-2101\src\SY_VIS_2101\service\Shimada.CarlingService
命令语法
Usage:  docker build [OPTIONS] PATH | URL | -

Build an image from a Dockerfile

Options:
      --add-host list           Add a custom host-to-IP mapping (host:ip)
      --build-arg list          Set build-time variables
      --cache-from strings      Images to consider as cache sources
      --disable-content-trust   Skip image verification (default true)
  -f, --file string             Name of the Dockerfile (Default is
                                'PATH/Dockerfile')
      --iidfile string          Write the image ID to the file
      --isolation string        Container isolation technology
      --label list              Set metadata for an image
      --network string          Set the networking mode for the RUN
                                instructions during build (default "default")
      --no-cache                Do not use cache when building the image
  -o, --output stringArray      Output destination (format:
                                type=local,dest=path)
      --platform string         Set platform if server is multi-platform
                                capable
      --progress string         Set type of progress output (auto, plain,
                                tty). Use plain to show container output
                                (default "auto")
      --pull                    Always attempt to pull a newer version of
                                the image
  -q, --quiet                   Suppress the build output and print image
                                ID on success
      --secret stringArray      Secret file to expose to the build (only
                                if BuildKit enabled):
                                id=mysecret,src=/local/secret
      --ssh stringArray         SSH agent socket or keys to expose to the
                                build (only if BuildKit enabled) (format:
                                default|<id>[=<socket>|<key>[,<key>]])
  -t, --tag list                Name and optionally a tag in the
                                'name:tag' format
      --target string           Set the target build stage to build.
运行镜像
docker run --name debug2 -d carlingservice:0.0.5.9 -v /C/shimada/SY-VIS-2101/src/SY_VIS_2101/service/Shimada.CarlingService/bin/Logs:/app/Logs
遇见的问题
问题1 docker run -v 挂在路径无效问题(在window环境中)
https://blog.csdn.net/ap10062kai/article/details/79232582
互联网解决办法,在我这里没有解决
我的解决办法:
使用docker desktop工具运行的镜像,指定的挂在路径就可以了,有谁知道用命令怎么写的可以告诉我
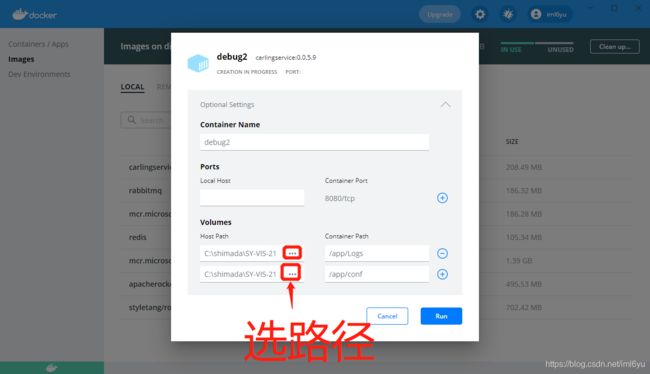
2021年5月13日 补充
使用命令可以实现挂载
docker run -v C:\shimada\SY-VIS-2101\src\SY_VIS_2101\service\Shimada.CarlingService\bin\conf:/app/conf -v C:\shimada\SY-VIS-2101\src\SY_VIS_2101\service\Shimada.CarlingService\bin\Logs:/app/Logs --name debug3 -d carlingservice:0.0.5.5
重点: -v参数一定要紧跟着run 如果在run和-v中间添加了其他参数会导致执行失败。
desktop版本的docker在添加挂载的时候会有确认提示框,提示是否分享目录。(也可以提前在Setting中配置好File Sharing)

问题2 visual studio 容器工具首次加载太慢 vsdbg\vs2017u5 exists, deleting 太慢或者卡在这里失败
可以按照 https://www.cnblogs.com/microestc/p/10784877.html 的办法解决
个人觉得上面这个办法太麻烦了,直接开了个代理,因为国内的墙无法下载一些地址的文件导致的。
问题3 The framework ‘Microsoft.AspNetCore.App’, version ‘5.0.0’ was not found. (运行docker内的程序提示框架库找不到)
在dockerfile中进行修改 (看上面的dockerfile源码)
# 这里要注意,vs生成的默认dockerfile中这里的runtime:5.0的版本,这个版本会导致做成镜像无法运行,因为缺少.net 5 库。
FROM mcr.microsoft.com/dotnet/aspnet:5.0-buster-slim AS base
https://docs.docker.com/engine/reference/builder/#usage (dockerfile 文档)
https://docs.microsoft.com/zh-cn/aspnet/core/fundamentals/configuration/?view=aspnetcore-5.0#file-configuration-provider (appsettings.json 文档)
https://www.cnblogs.com/microestc/p/10784877.html (使用vs生成镜像失败或者非常慢的解决办法)
https://blog.csdn.net/shanghaibao123/article/details/108278639
https://www.rabbitmq.com/tutorials/tutorial-one-dotnet.html