SpringSecurity系列文章 (二)Web权限的解决方案,自定义登录,跳转
文章目录
-
-
- web权限方案--认证(authentication)
-
- 设置登录用户名和密码的三种方式:
-
- 通过配置文件
- 通过配置类
- 通过编写自定义实现类
- 自定义设置登录界面,配置不需要权限的路径
-
- 配置不需要配置的路径
- 自定义登录界面
- 自定义登录界面设置跳转实战:
-
- 自定义登录界面
- SecurityConfig配置
- 认证处理逻辑
- 认证成功后的处理逻辑
- web权限解决方案--用户授权(authorization)
-
- 基于角色或权限进行访问控制
-
- hasAuthority 方法
- hasAnyAuthority 方法
- hasRole方法
- hasAnyRole方法
- 基于数据库实现权限认证
- 自定义403页面
- Web权限解决方案--用户注销
- Web权限解决方案--自动登录
-
- 实现原理
-
web权限方案–认证(authentication)
认证简单地说就是让系统知道是不是你,比如:你有身份证ID卡,那么你刷身份证到火车站,则可以通过人脸识别通过或者能够在系统中查到你的信息。
设置登录用户名和密码的三种方式:
通过配置文件
配置yaml文件:
## 在這配置了就不用代碼配置了
spring.security.user.name=kay
spring.security.user.password=sanshi
通过配置类
package com.kaysanshi.demosecurity.config;
/**
 * Description:
 *
 * @date:2020/10/23 10:52
 * @author: kaysanshi
 **/
//@Configuration
public class SecurityConfigurer extends WebSecurityConfigurerAdapter {
    @Override
    protected void configure(AuthenticationManagerBuilder auth) throws Exception {
        // super.configure(auth); 这个不能使用,要不然程序直接走了父类的,下面的不生效。
         BCryptPasswordEncoder passwordEncoder = new BCryptPasswordEncoder();
        // 在配置类中配置认证的密码与用户
        auth.inMemoryAuthentication()
                .withUser("kay")
                .roles("admin")
                .password(passwordEncoder.encode("123"))
                .and()
        .withUser("kkk")
        .roles("user")
        .password(passwordEncoder.encode("123")); // 这里的password 放置加密后的字符串
    }

    /**
     * 为bean 定义如何解码,必须使用这个,如果不使用则会报错。java.lang.IllegalArgumentException: There is no PasswordEncoder mapped for the id "null"
     * @return
     */
    @Bean
    PasswordEncoder passwordEncoder(){
        return new BCryptPasswordEncoder();
    }
}
通过编写自定义实现类
spring security在读取配置中是否有用户名和密码设置,如果有的话就去使用,如果没有配置则会去UserDetailsService接口查找。
- 创建一个配置类,设置使用哪个userDetailsservice实现类。
- 编写实现类(配置或者查数据库),返回User对象,User对象有用户名密码和操作权限。
@Configuration
public class SecurityConfig extends WebSecurityConfigurerAdapter {
    //
    @Autowired
    private UserDetailsService userDetailsService;

    @Bean
    PasswordEncoder passwordEncoder() {
        return new BCryptPasswordEncoder();
    }


    @Override
    protected void configure(AuthenticationManagerBuilder auth) throws Exception {
        auth.userDetailsService(userDetailsService).passwordEncoder(passwordEncoder());
    }
}


/**
 * @Author kay三石
 * @date:2020/10/24 實現自己的UserDetailsService
 */
@Service("userDetailsService")
public class MyUserDetailsServicce implements UserDetailsService {
    @Override
    public UserDetails loadUserByUsername(String s) throws UsernameNotFoundException {
        // 暫時設置一些權限
        List<GrantedAuthority> authorities= AuthorityUtils.commaSeparatedStringToAuthorityList("role");
        return new User("kay",new BCryptPasswordEncoder().encode("123"),authorities);
    }
}
通过使用配置类去查数据库进行认证(常用)
- 创建一个配置类,注入使用哪个userDetailsservice实现类。
- 编写实现类,查询数据库对应的用户名和密码,返回User对象,User对象有用户名密码和操作权限。
application.properties
mysql在springboot 2.0以后必须配置时区
spring.datasource.driver-class-name=com.mysql.jdbc.Driver
spring.datasource.url=jdbc:mysql://localhost:3306/test?useUnicode=true&characterEncoding=utf-8&useSSL=false&serverTimezone=Asia/Shanghai
spring.datasource.username=root
spring.datasource.password=123
configer配置类
/**
 * @Author kay三石
 * @date:2020/10/24
 */
@Configuration
public class SecurityConfigByDB extends WebSecurityConfigurerAdapter {
    //通过自定义实现UserDetailsService
    @Autowired
    private UserDetailsService userDetailsServiceByDB;


    @Bean
    PasswordEncoder passwordEncoder() {
        return new BCryptPasswordEncoder();
    }

    @Override
    protected void configure(AuthenticationManagerBuilder auth) throws Exception {
        auth.userDetailsService(userDetailsServiceByDB).passwordEncoder(passwordEncoder());
    }
}
/**
 * @Author kay三石
 * @date:2020/10/24
 * 通过注入mapper然后在数据库中进行查询出响应的,然后作授权
 */
@Service("userDetailsServiceByDB")
public class UserDetailsServiceByDB implements UserDetailsService {
    @Autowired
    private UsersMapper usersMapper;


    @Override
    public UserDetails loadUserByUsername(String s) throws UsernameNotFoundException {
        // 調用userMapper 根據用戶名查數據庫
        QueryWrapper <Users> wrapper = new QueryWrapper <>();
        // where email=?
        wrapper.eq("email", s);
        Users users = usersMapper.selectOne(wrapper);
        if (users == null) {
            // 數據庫中認證失敗
            throw new UsernameNotFoundException("用戶名不存在");

        }
        List<GrantedAuthority> authorities= AuthorityUtils.commaSeparatedStringToAuthorityList("role");
        return new User(users.getEmail(),new BCryptPasswordEncoder().encode(users.getPassword()),authorities);
    }
}
实体类:
/**
 * @Author kay三石
 * @date:2020/10/24
 */
@Data
@TableName("user")
public class Users {
    private Integer id;
    private String email;
    private String password;
}
控制器类:
@RestController
public class TestController {

    @GetMapping("/hello")
    public String hello() {
        return "hello";

    }
}
通过访问localhost8080后会出现登录界面,然后输入数据库中的对应用户名和密码即可登录。
自定义设置登录界面,配置不需要权限的路径
配置不需要配置的路径
 /**
     * 核心过滤器配置的方法
     * configure(WebSecurity web)
     * 用于配置WebSecurity webSecurity是基于servlet Filter的配置SpringSecurityFilterChain.而 springSecurityFilterChain 又被委托给了 Spring Security 核心过滤器 Bean DelegatingFilterProxy 。 相关逻辑你可以在 WebSecurityConfiguration 中找到。
     * 我们一般不会过多来自定义 WebSecurity , 使用较多的使其ignoring() 方法用来忽略 Spring Security 对静态资源的控制。
     * 如果一个请求路径不设置拦截:
     * 1.设置地址匿名访问
     * 2.直接过滤掉该地址,及该地址不走Spring Security 过滤器链。
     * 下面方法是演示直接过率掉该地址。
     * WebSecurity的使用
     *
     * @param web
     * @throws Exception
     */
    @Override
    public void configure(WebSecurity web) throws Exception {
        super.configure(web);
        // 忽略那些拦截
        web.ignoring().antMatchers("/vercode");
    }
自定义登录界面
 /**
     * configure(HttpSecurity)方法定义了哪些URL路径应该被保护,哪些不应该。具体来说,“/”和“/ home”路径被配置为不需要任何身份验证。所有其他路径必须经过身份验证。
     * 用来配置 HttpSecurity 。 HttpSecurity 用于构建一个安全过滤器链 SecurityFilterChain 。SecurityFilterChain 最终被注入核心过滤器
     * HttpSecurity的使用:
     *
     * @param http
     * @throws Exception
     */
    @Override
    protected void configure(HttpSecurity http) throws Exception {
        // addFilterBefore 在指定的Filter类的位置添加过滤器
//        http.addFilterBefore(verifyCodeFilter, UsernamePasswordAuthenticationFilter.class);
        http.authorizeRequests()//开启登录配置
                // 可以通过访问的多个URL模式。任何用户都可以访问URL以"/resources/", equals "/signup", 或者 "/about"开头的URL。
//                .antMatchers("/resources/**", "/signup", "/about", "/home").permitAll()
                .antMatchers("/hello").hasRole("admin")//表示访问 /hello 这个接口,需要具备 admin 这个角色
                //	任何以"/db/" 开头的URL需要用户同时具有 "ROLE_ADMIN" 和 "ROLE_DBA"。和上面一样我们的 hasRole 方法也没有使用 "ROLE_" 前缀
                .antMatchers("/db/**").access("hasRole('ADMIN') and hasRole('DBA')")
                .anyRequest().authenticated()//表示剩余的其他接口,登录之后就能访问
                .and()
            // 定义自己编写的登录页面
                .formLogin()
                //定义登录页面(并不是接口),未登录时,访问一个需要登录之后才能访问的接口,会自动跳转到该页面
                .loginPage("/templates/login_p.html")
                //登录处理接口,就是那个controller,这个过程有springsecurity自己实现,不需要自己实现。
                .loginProcessingUrl("/doLogin")
                //定义登录时,用户名的 key,默认为 username
                .usernameParameter("uname")
                //定义登录时,用户密码的 key,默认为 password
                .passwordParameter("passwd")
                //登录成功的处理器
                .successHandler(new AuthenticationSuccessHandler() {
                    @Override
                    public void onAuthenticationSuccess(HttpServletRequest req, HttpServletResponse resp, Authentication authentication) throws IOException, ServletException {
                        resp.setContentType("application/json;charset=utf-8");
                        PrintWriter out = resp.getWriter();
                        out.write("success");
                        out.flush();
                    }
                })
                .failureHandler(new AuthenticationFailureHandler() {
                    @Override
                    public void onAuthenticationFailure(HttpServletRequest req, HttpServletResponse resp, AuthenticationException exception) throws IOException, ServletException {
                        resp.setContentType("application/json;charset=utf-8");
                        PrintWriter out = resp.getWriter();
                        out.write("fail");
                        out.flush();
                    }
                })
                .permitAll()//和表单登录相关的接口统统都直接通过
                .and()
                .logout()  // 提供注销支持,使用WebSecurityConfigurerAdapter会自动被应用。
                .logoutUrl("/logout") // 	设置触发注销操作的URL (默认是/logout). 如果CSRF内启用(默认是启用的)的话这个请求的方式被限定为POST。
                .logoutSuccessHandler(new LogoutSuccessHandler() {
                    // 注销后的操作
                    @Override
                    public void onLogoutSuccess(HttpServletRequest req, HttpServletResponse resp, Authentication authentication) throws IOException, ServletException {
                        resp.setContentType("application/json;charset=utf-8");
                        PrintWriter out = resp.getWriter();
                        out.write("logout success");
                        out.flush();
                    }
                })
                .invalidateHttpSession(true) // 指定是否在注销时让HttpSession无效。 默认设置为 true。
                // 添加一个LogoutHandler.默认SecurityContextLogoutHandler会被添加为最后一个LogoutHandler
                .addLogoutHandler(new LogoutHandler() {
                    @Override
                    public void logout(HttpServletRequest httpServletRequest, HttpServletResponse httpServletResponse, Authentication authentication) {

                    }
                })
                // 允许指定在注销成功时将移除的cookie
                .deleteCookies("")
                .permitAll()
                .and()
                .httpBasic()
                .and()
                .csrf().disable();
    }
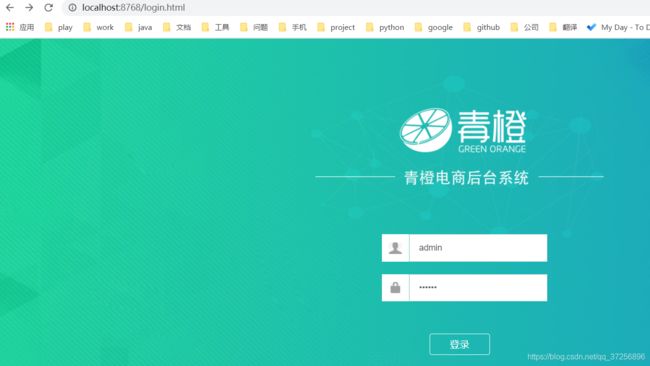
自定义登录界面设置跳转实战:
自定义登录界面
<form class="loginForm clear" action="/admin/doLogin" method="POST">
        <div class="loginMain">
            <div class="loginlogo">div>
            <div style="margin-left: 33%">
              <span class="el-form-item">
                <span class="userIcon">span>
                <span class="el-input">
                  <input class="el-input__inner" name="username" placeholder="管理员账号"/>
                span>
              span>
              <span class="el-form-item">
                 <span class="pwdIcon">span>
                 <span class="el-input">
                   <input class="el-input__inner" name="password" type="password" placeholder="密码"/>
                 span>
              span>
            div>
            <div class="loginBtn">
                <input type="submit" class="el-button el-button--primary" value="登录">
            div>
        div>

    form>
SecurityConfig配置
/**
 * @Author kay三石
 * @date:2020/10/24
 */
@EnableWebSecurity
public class SecurityConfig extends WebSecurityConfigurerAdapter {
    @Autowired
    private UserDetailsService userDetailsServiceImpl;

    @Autowired
    private AuthenticationSuccessHandler authenticationSuccessHandler;


    @Bean
    PasswordEncoder passwordEncoder() {
        return new BCryptPasswordEncoder();
    }
    // 注入数据源对象
    /**
     * 配置认证管理器
     *
     * @param auth
     * @throws Exception
     */
    @Override
    protected void configure(AuthenticationManagerBuilder auth) throws Exception {
        // 这个是内存中的比对
        //auth.inMemoryAuthentication().withUser("admin").password(passwordEncoder().encode("123456")).roles("admin");
        // 通过userDetailsServiceImpl进行认证
        auth.userDetailsService(userDetailsServiceImpl).passwordEncoder(passwordEncoder());
    }

    /**
     * configure(HttpSecurity)方法定义了哪些URL路径应该被保护,哪些不应该。具体来说,“/”和“/ home”路径被配置为不需要任何身份验证。所有其他路径必须经过身份验证。
     * 用来配置 HttpSecurity 。 HttpSecurity 用于构建一个安全过滤器链 SecurityFilterChain 。SecurityFilterChain 最终被注入核心过滤器
     * HttpSecurity的使用:
     *
     * @param http
     * @throws Exception
     */
    @Override
    protected void configure(HttpSecurity http) throws Exception {
        http.csrf().disable(); // 关闭CSrf的配置,但是默认是开启的CERF
        http.authorizeRequests()//开启登录配置
                // 设置哪些访问路径不需要访问权限,可以直接访问
                .antMatchers("/resources/**","/login.html","/css/**","/js/**","/img/**"
                ).permitAll()
                .anyRequest().authenticated()//表示剩余的其他接口,登录之后就能访问
                .and()
                .formLogin()
                //定义登录页面,未登录时,访问一个需要登录之后才能访问的接口,会自动跳转到该页面,和自定义登录处理路径
                .loginPage("/login.html")
                .loginProcessingUrl("/admin/doLogin")
                .permitAll()
                // 定义登录成功的处理界面,跳转在这个里面处理
                .successHandler(authenticationSuccessHandler)
                .permitAll();
        http.exceptionHandling().accessDeniedPage("/login.html");
        // 跳转到log
        http.logout().logoutUrl("/logout").logoutSuccessUrl("/login.html");
        /**
         * 同源策略
         * spring Security下,X-Frame-Options默认为DENY,非spring Security环境下,X-Frame-Options的默认大多也是DENY,
         * 这种情况下,浏览器拒绝当前页面加载任何Frame页面,设置含义如下:
         * • DENY:浏览器拒绝当前页面加载任何Frame页面
         * • SAMEORIGIN:frame页面的地址只能为同源域名下的页面
         * • ALLOW-FROM:origin为允许frame加载的页面地址
         */
        http.headers().frameOptions().sameOrigin();
    }

}
认证处理逻辑
@Slf4j
@Service("userDetailsServiceImpl")
public class UserDetailServiceImpl implements UserDetailsService {

    @Autowired
    private AdminService adminService;

    @Autowired
    private RoleService roleService;

    public UserDetails loadUserByUsername(String s) throws UsernameNotFoundException {
        log.info("经过了UserDetailServiceImpl");

        Map map=new HashMap<>();
        map.put("loginName",s);
        map.put("status","1");
        List<Admin> list = adminService.findList(map);
        if(list.size()==0){
            return null;
        }

        List<Role> allRole = roleService.findAll();
        //实际项目中应该从数据库中提取用户的角色列表
        List<GrantedAuthority> grantedAuthorities=new ArrayList<GrantedAuthority>();
        grantedAuthorities.add( new SimpleGrantedAuthority("ROLE_ADMIN"));
        return new User(s,list.get(0).getPassword(),grantedAuthorities);
    }
}
认证成功后的处理逻辑
@Slf4j
@Service
public class AuthenticationSuccessHandlerImpl extends SavedRequestAwareAuthenticationSuccessHandler {

    @Autowired
    private LoginLogService loginLogService;

    @Override
    public void onAuthenticationSuccess(HttpServletRequest httpServletRequest, HttpServletResponse httpServletResponse, Authentication authentication) throws IOException, ServletException {
        //登录后会调用
        log.info("记录日志");
        String loginName = authentication.getName();
        String ip = httpServletRequest.getRemoteAddr();

        LoginLog loginLog=new LoginLog();
        loginLog.setLoginName(loginName);//当前登录管理员
        loginLog.setLoginTime(new Date());//当前登录时间
        loginLog.setIp(ip);//远程客户端ip
        loginLog.setLocation(WebUtil.getCityByIP(ip)); //地区
        String agent = httpServletRequest.getHeader("user-agent");
        System.out.println("agent:"+agent);
        loginLog.setBrowserName(WebUtil.getBrowserName(agent));//浏览器名称
        loginLogService.add(loginLog);
        log.info("{}已经登录成功",loginName);
        // 这个加入会出现问题 405错误不支持post
//        httpServletRequest.getRequestDispatcher("/main.html").forward(httpServletRequest,httpServletResponse);
        RequestCache requestCache = new HttpSessionRequestCache();
        SavedRequest savedRequest =  requestCache.getRequest(httpServletRequest, httpServletResponse);

        if (savedRequest == null) {
            super.onAuthenticationSuccess(httpServletRequest, httpServletResponse, authentication);
            return;
        }
        //  使用saveRequest.getRedirectUrl会使得获取最后请求的资源的地址,而一般最后请求的资源地址是css之类的。所以这里不使用这个直接自己定义成功的地址。
//        String targetUrl = savedRequest.getRedirectUrl();
//        logger.debug("Redirecting to DefaultSavedRequest Url: " + targetUrl);
        String targetUrl="/main.html";
        //  getRedirectStrategy() 允许在重定向到目标 URL 时覆盖行为
        getRedirectStrategy().sendRedirect(httpServletRequest, httpServletResponse, targetUrl);
    }
}
这里面原本使用的转发的方式但是会报错405问题,实际上看来源码后就能明白用哪个方法了
在SavedRequestAwareAuthenticationSuccessHandler 的处理方法中有这样的一端代码:
// Use the DefaultSavedRequest URL
		String targetUrl = savedRequest.getRedirectUrl();
		logger.debug("Redirecting to DefaultSavedRequest Url: " + targetUrl);
		getRedirectStrategy().sendRedirect(request, response, targetUrl);

/**
	 * Allows overriding of the behaviour when redirecting to a target URL.
	 */
	public void setRedirectStrategy(RedirectStrategy redirectStrategy) {
		this.redirectStrategy = redirectStrategy;
	}

	protected RedirectStrategy getRedirectStrategy() {
		return redirectStrategy;
	}
看了这段代码就应该明白了这个是允许用户使用的重写重定向的方法,所以上面的代码我们直接重写到main界面。看效果

web权限解决方案–用户授权(authorization)
授权就是你在系统中有没有这些权限。比如你进站趁车,那么你必须买票和刷人份证,你刷身份证时可以显示到你的身份信息则是认证的过程。在显示身份信息后可以看到具体的车票信息,这是通过你的身份信息看到了车票信息,让你去哪个地方等候上车,这个地方就是授权
基于角色或权限进行访问控制
hasAuthority 方法
如果当前的主题指定的权限则返回true否则返回false.
下面的hasAuthority(“admins”)必须和权限列表中一致
1.在配置类配置
 // 当前登录用户(可以登录)必须有admins权限才可以访问这个路径。
http.authorizeRequests().antMatchers("/test/index").hasAuthority("admins")
2.在UserDetailsService中把返回User对象设置权限
  List<GrantedAuthority> authorities= AuthorityUtils.commaSeparatedStringToAuthorityList("admins,manager");
        return new User(users.getEmail(),new BCryptPasswordEncoder().encode(users.getPassword()),authorities);
这是访问会出现问题:
hasAnyAuthority 方法
如果当前的主题没有提供任何的角色(给定的作为一个逗号分隔的字符串列表)的话,返回true
// 当用户权限有其中一个就可以
                .antMatchers("/hello").hasAnyAuthority("admins,manager")

  List<GrantedAuthority> authorities= AuthorityUtils.commaSeparatedStringToAuthorityList("admins,manager");
        return new User(users.getEmail(),new BCryptPasswordEncoder().encode(users.getPassword()),authorities);
hasRole方法
如果用户具备给定的角色就允许访问否则403
如果当前主题具有指定的角色,则返回true
                // 必须有这个role 的,才可以访问 hasRole("sale")==>ROLE_sale
                .antMatchers("/hello").hasRole("sale")
List<GrantedAuthority> authorities= AuthorityUtils.commaSeparatedStringToAuthorityList("admins,ROLE_sale");
        return new User(users.getEmail(),new BCryptPasswordEncoder().encode(users.getPassword()),authorities);
如果配置的hasRole(“sale1”) AuthorityUtils.commaSeparatedStringToAuthorityList(“admins,ROLE_sale”); 为这个是则访问失败403
hasAnyRole方法
表示用户具备任何一个条件都可访问。
.antMatchers("/hello").hasAnyRole("sale1,admin")


        List<GrantedAuthority> authorities= AuthorityUtils.commaSeparatedStringToAuthorityList("admins,ROLE_sale");
基于数据库实现权限认证
自定义403页面
在配置类中进行配置即可
@Override
protected void configure(HttpSecurity http) throws Exception {
        http.exceptionHandling().accessDeniedPage("/unauth.html");
}
Web权限解决方案–用户注销
http.logout()  // 提供注销支持,使用WebSecurityConfigurerAdapter会自动被应用。
                .logoutUrl("/logout") // 	设置触发注销操作的URL (默认是/logout). 如果CSRF内启用(默认是启用的)的话这个请求的方式被限定为POST。
                .logoutSuccessHandler(new LogoutSuccessHandler() {
                    // 注销后的操作
                    @Override
                    public void onLogoutSuccess(HttpServletRequest req, HttpServletResponse resp, Authentication authentication) throws IOException, ServletException {
                        resp.setContentType("application/json;charset=utf-8");
                        PrintWriter out = resp.getWriter();
                        out.write("logout success");
                        out.flush();
                    }
                })
Web权限解决方案–自动登录
实现原理

<project xmlns="http://maven.apache.org/POM/4.0.0" xmlns:xsi="http://www.w3.org/2001/XMLSchema-instance"
         xsi:schemaLocation="http://maven.apache.org/POM/4.0.0 https://maven.apache.org/xsd/maven-4.0.0.xsd">
    <modelVersion>4.0.0modelVersion>
    <parent>
        <groupId>org.springframework.bootgroupId>
        <artifactId>spring-boot-starter-parentartifactId>
        <version>2.3.4.RELEASEversion>
        <relativePath/>
    parent>
    <groupId>com.kaysanshigroupId>
    <artifactId>demo4-securityartifactId>
    <version>0.0.1-SNAPSHOTversion>
    <name>demo4-securityname>
    <description>Demo project for Spring Bootdescription>

    <properties>
        <java.version>1.8java.version>
    properties>

    <dependencies>
        <dependency>
            <groupId>org.springframework.bootgroupId>
            <artifactId>spring-boot-starter-securityartifactId>
        dependency>
        <dependency>
            <groupId>org.springframework.bootgroupId>
            <artifactId>spring-boot-starter-thymeleafartifactId>
        dependency>
        <dependency>
            <groupId>org.springframework.bootgroupId>
            <artifactId>spring-boot-starter-webartifactId>
        dependency>
        <dependency>
            <groupId>org.thymeleaf.extrasgroupId>
            <artifactId>thymeleaf-extras-springsecurity5artifactId>
        dependency>
        <dependency>
            <groupId>org.projectlombokgroupId>
            <artifactId>lombokartifactId>
            <version>1.18.8version>
        dependency>
        <dependency>
            <groupId>org.springframework.bootgroupId>
            <artifactId>spring-boot-devtoolsartifactId>
            <scope>runtimescope>
            <optional>trueoptional>
        dependency>
        <dependency>
            <groupId>com.baomidougroupId>
            <artifactId>mybatis-plus-boot-starterartifactId>
            <version>3.0.5version>
        dependency>
        <dependency>
            <groupId>mysqlgroupId>
            <artifactId>mysql-connector-javaartifactId>
        dependency>
        <dependency>
            <groupId>org.springframework.bootgroupId>
            <artifactId>spring-boot-starter-testartifactId>
            <scope>testscope>
            <exclusions>
                <exclusion>
                    <groupId>org.junit.vintagegroupId>
                    <artifactId>junit-vintage-engineartifactId>
                exclusion>
            exclusions>
        dependency>
        <dependency>
            <groupId>org.springframework.securitygroupId>
            <artifactId>spring-security-testartifactId>
            <scope>testscope>
        dependency>
    dependencies>

    <build>
        <plugins>
            <plugin>
                <groupId>org.springframework.bootgroupId>
                <artifactId>spring-boot-maven-pluginartifactId>
            plugin>
        plugins>
    build>

project>
1.建表
CREATE TABLE persistent_logins (
	username VARCHAR (64) NOT NULL,
	series VARCHAR (64) PRIMARY KEY,
	token VARCHAR (64) NOT NULL,
	last_used TIMESTAMP NOT NULL
)
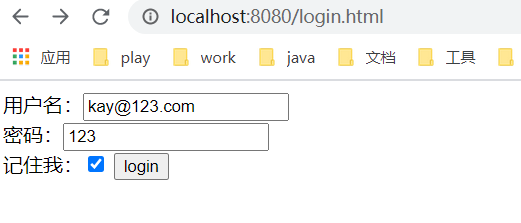
2.编写登录界面
 <form action="/user/login" method="post">
        用户名:<input type="text" name="username">
        <br/>
        密码:<input type="text" name="password">
        <br/>
        记住我:<input type="checkbox" name="remember-me">
        <input type="submit" value="login">
        <br/>
    form>
记住我的;name必须为remember-me 不可以为其他值
2.配置类逻辑进行书写,注入数据源,
 // 注入数据源对象
    @Autowired
    private DataSource dataSource;

    public PersistentTokenRepository  persistentTokenRepository(){
        JdbcTokenRepositoryImpl jdbcTokenRepository = new JdbcTokenRepositoryImpl();
        jdbcTokenRepository.setDataSource(dataSource);
        // 这里可以自己进行创建表
        // jdbcTokenRepository.setCreateTableOnStartup();
        return jdbcTokenRepository;
    }
3.配置类中配置自动登录
    @Override
    protected void configure(HttpSecurity http) throws Exception {
        http.authorizeRequests()//开启登录配置
                // 设置哪些访问路径不需要访问权限,可以直接访问
                .antMatchers("/resources/**", "/signup", "/about", "/home").permitAll()
                // 设置user对象的权限 只能设置一个权限
                .antMatchers("/test/index").hasAuthority("admin")
                // 当用户权限有其中一个就可以
                .antMatchers("/hello").hasAnyAuthority("admins,manager")
                // 必须有这个role 的,才可以访问 hasRole("sale")==>ROLE_sale
                //如果配置的hasRole("sale1") AuthorityUtils.commaSeparatedStringToAuthorityList("admins,ROLE_sale"); 为这个是则访问失败403
                // .antMatchers("/hello").hasRole("sale")
                // 配置多个
                // .antMatchers("/hello").hasAnyRole("sale1,admin")
                .anyRequest().authenticated()//表示剩余的其他接口,登录之后就能访问
                .and()
                .formLogin()
                //定义登录页面,未登录时,访问一个需要登录之后才能访问的接口,会自动跳转到该页面
                .loginPage("/login.html")
                .loginProcessingUrl("/user/login") // 登录访问路径
                .defaultSuccessUrl("/success.html").permitAll()
                .and().rememberMe().tokenRepository(persistentTokenRepository())
                .tokenValiditySeconds(60) //设置有效时长以秒为单位
                .userDetailsService(userDetailsServiceByDB)
                .and()
                .csrf().disable(); // 关闭CSrf的配置
        http.exceptionHandling().accessDeniedPage("/unauth.html");
        // 跳转到log
        http.logout().logoutUrl("/logout").logoutSuccessUrl("/log");
    }
controller层:
/**
 * @Author kay三石
 * @date:2020/10/25
 */
@Controller
public class TestController {

    @GetMapping("/hello")
    @ResponseBody
    public String hello(){
        return "hello";
    }
	/**
     * @ResponseBody返回Json串不走视图解析器
     * @return
     */
    @GetMapping("/log")
    @ResponseBody
    public String log(){
        return "login";
    }
}
访问后勾选记住我:
cookie中会有这样一条记录
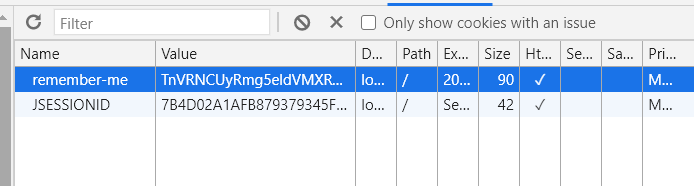
这个时候可以在数据库中看到有这样的一条记录,这个是spring自动给加入的数据
