前言
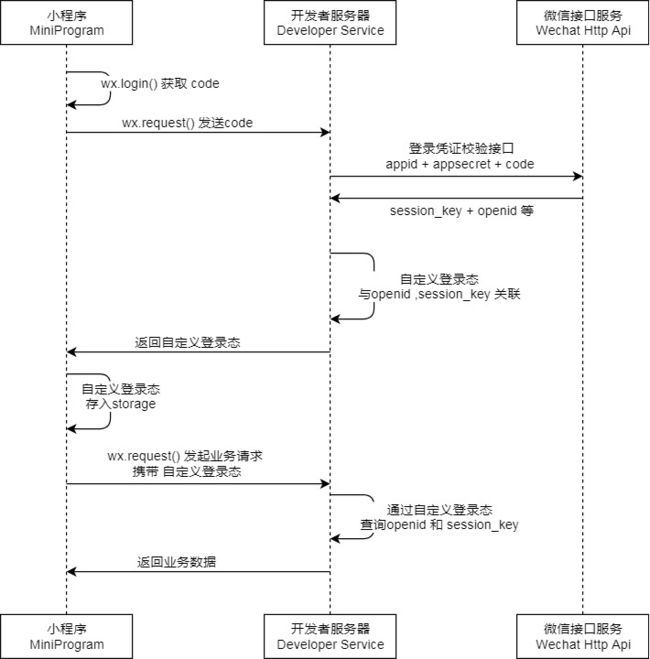
官方给了这么一张图:
原文:https://developers.weixin.qq.com/miniprogram/dev/framework/op...
微信登录和普通登录
普通登录的过程是:
- 用户提交username和password
- 后端查数据库,username和password是否正确
- 如果正确,设置用户登录状态,生成token,返回token
微信登录的过程:
- 用户提交微信生成的临时code
- 后端问一下微信服务器:这code是谁啊?微信会返回用户的openid
- 后端查数据库,这openid的用户注册了吗?
- 如果注册了,设置用户登录状态,生成token,返回token
这么一比不难发现,微信登录只不过是把提交密码和验证密码的过程,变成了查询用户身份和验证用户身份的过程。
至于后面怎么生成token,怎么返回,怎么设置失效时间,就和以前密码验证是一模一样的,本文不再赘述。
操作
一、前端:wx.login获取临时code
数据流:用户的小程序->微信服务器
官方接口文档:https://developers.weixin.qq.com/miniprogram/dev/api/open-api...
    /**
     * 生命周期函数--监听页面加载
     */
    onLoad() {
        wx.login().then((res) => {
            console.log(res);
        })
    },
二、后端:起个项目
这一步的作用是测试前后端连通,暂时不进行逻辑处理。
@RestController
@RequestMapping("wxLogin")
public class WxLoginController {
    @PostMapping()
    @CrossOrigin("*")
    public String Login(@RequestBody String code) {
        System.out.println(code);
        return "success";
    }
}
三、前端:拿着code请求后端的登录接口
数据流:用户的小程序->开发者服务器
    /**
     * 生命周期函数--监听页面加载
     */
    onLoad() {
    // 向微信服务器获取code
        wx.login().then((res) => {
        // 拿着code向开发者服务器登录
            wxLogin(res.code).then((res_1) => {
                console.log(res_1.data);
            })
        })
    },
此处WxLogin方法是自己写的请求方法,自己实现即可,给出一个参考:
/**
 * 登录
 * @param username 用户名
 * @param password 密码
 */
async function wxLogin(code: string) {
    const res = await httpPost({
        url: '/wxLogin',
        header: {
            'content-type': 'application/json' // 默认值
        },
        data: {
            code: code
        }
    })
    return res;
}

// 后端地址
const baseUrl="http://localhost:8080"

/**
 * Post方式的HTTP请求
 * @param requestOptions
 */
function httpPost(requestOptions: WechatMiniprogram.RequestOption) {
  wx.showLoading({ title: '加载中', })
  requestOptions.url = baseUrl + requestOptions.url
  requestOptions.header = {
    ...requestOptions.header,
    // "Authorization": getToken()
  }
  return new Promise((resolve, reject) => {
    wx.request({
      ...requestOptions,
      method: "POST",
      success(res: any) {
        wx.hideLoading()
        resolve(res)
      },
      fail(error) {
        wx.hideLoading()
        reject(error)
      }
    })
  })
}四、获取appId和Secret
五、后端:Apache Httpclient 和Fast JSON
maven依赖:
// pom.xml

    org.apache.httpcomponents
    httpclient


    com.alibaba
    fastjson
    2.0.33


// 更新
mvn install
六、后端:拿着code向小程序服务器索要token
数据流:开发者服务器->微信服务器
官方接口文档:https://developers.weixin.qq.com/miniprogram/dev/OpenApiDoc/u...
    // appid和secret
    private String appId = "你的appid";
    private String secret = "你的secret";
    // 这俩变量实际上应该存数据库,为了方便演示,写成变量
    private String sessionKey = "";
    private String openid = "";

    @PostMapping()
    @CrossOrigin("*")
    public String Login(@RequestBody String code) {
        // 创建httpClient对象
        CloseableHttpClient httpClient = HttpClientBuilder.create().build();
        // 拼接URL
        String url = "https://api.weixin.qq.com/sns/jscode2session?appid=" + appId +
                "&secret=" + secret +
                "&js_code=" + code.toString() +
                "&grant_type=authorization_code";
        // GET请求对象
        HttpGet httpPost = new HttpGet(url);
        // 设置http的请求头,发送json字符串,编码UTF-8
        httpPost.setHeader("Content-Type", "application/json;charset=utf8");
        // 响应模型
        CloseableHttpResponse response = null;
        try {
            // 由客户端执行(发送)Post请求
            response = httpClient.execute(httpPost);
            // 从响应模型中获取响应实体
            HttpEntity responseEntity = response.getEntity();
            // 响应实体转换为JSON
            JSONObject jsonObject = JSONObject.parseObject(EntityUtils.toString(responseEntity));
            // 存值,仅供演示,实际应该存数据库
            sessionKey = jsonObject.getString("session_key");
            openid = jsonObject.getString("openid");
            // 生成token,仅供演示,实际也应该存数据库,到这就和微信服务器没什么关系了,就是普通登录的流程
            String token = "Token";
            // 返回token
            return token;
        } catch (Exception e) {
            e.printStackTrace();
        } finally {
            try {
                // 释放资源
                if (httpClient != null) {
                    httpClient.close();
                }
                if (response != null) {
                    response.close();
                }
            } catch (Exception e) {
                e.printStackTrace();
            }
        }

        return "";
    }
简单来说就是:
- 拼接URL,发起请求
- 收到响应,解析响应,取出session_key和openid
- 查数据库,找到用户信息,设置用户登录状态,返回token(这步和微信没关系,就是普通登录,微信验证的过程代替了验证用户名密码的过程)
考虑到每个人的数据库不同,ORM层不同,第三步查数据库没有在代码中给出,而是简单的用几个变量表示。
Java发起HTTP请求的代码有点长,可以抽象出来,写成一个方法。
七、前端:收到token,存token
    /**
     * 生命周期函数--监听页面加载
     */
    onLoad() {
        wx.login().then((res) => {
            wxLogin(res.code).then((res1) => {
                wx.setStorageSync('token', res1.data);
            })
        })
    },
以后就可以随时取token了,每次请求时带上token即可:
wx.getStorageSync('token')八、后面的操作就和普通登录一样了
总结
如果做过公众号的微信登录,小程序微信登录也差不多,而且更简单。
另外,处理登录的这些方法,文中为了方便展示就写在一起了,实际应该写成MVC分离。
本文只发布于segmentfault,禁止转载,如在其他平台看到请举报。


