SpringBoot
文章目录
- 一、入门
-
- 1.1、第一个springboot程序
- 1.2、自动装配原理
- 1.3、YAMl
-
- 给实体类赋值
- JSR303校验
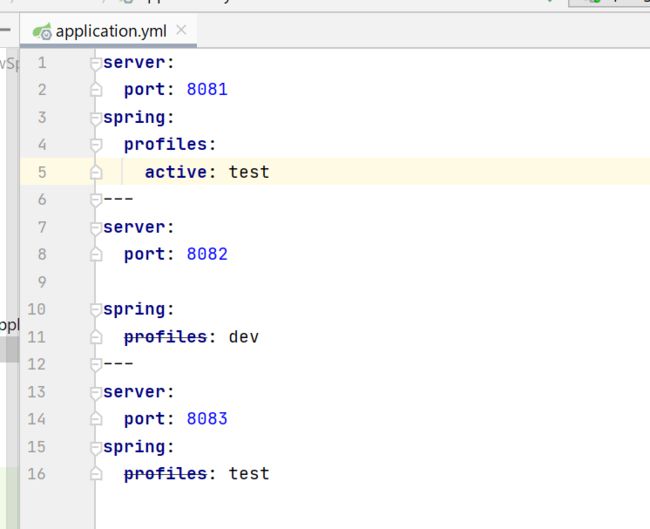
- 多环境配置
- 二、springboot web开发
-
- 2.1、静态资源
- 2.2、首页定制
- 2.3、Thymeleaf模板引擎
- 2.4、MVC配置原理
- 2.5、项目实战
-
- 准备工作
- 国际化
- 登录验证
- 拦截器
- 头部栏和侧边栏抽象
- 重定向后Model的数据被清空
- 性别转换
- 日期格式转换
- 添加员工
- 修改员工
- 修改员工
- 404处理
- 注销功能
- 2.6、前端页面
- 三、连接数据库
-
- 3.1、整合JDBC使用
- 3.2、Druid数据源
- 3.3、整合Mybatis框架
- 四、SrpingSecurity
-
- 4.1、授权和认证
- 4.2、注销及权限控制
- 4.3、记住我和首页定制
- 五、Shiro
-
- 5.1、简介
- 5.2、登录拦截
- 5.3、用户认证
- 5.4、连接数据库
- 5.5、请求授权实现
- 5.6、Shiro整合Thymeleaf
- 六、Swagger
-
- 6.1、简介
- 6.2、SpringBoot集成Swagger
- 6.3、配置swagger
- 6.4、Swagger配置扫描接口
- 6.5、配置是否启动Swagger
- 6.6、配置Swagger只在生产环境中使用
- 6.7、配置API分组
- 6.8、实体类配置
- 七、任务
-
- 7.1、异步任务
- 7.2、邮件发送
- 7.3、定时任务
- 八、SpringBoot整合Redis
-
- 8.1、整合测试
- 8.2、自定义RedisTemplate模板
- 8.3、自定义Redis工具类
- 九、分布式 Dubbo+Zookeeper+SpringBoot
-
- 9.1、什么是分布式系统?
- 9.2、RPC
- 9.3、Dubbo
- 9.4、Zookeeper
- 9.5、安装dubbo
- 9.6、实战
一、入门
1.1、第一个springboot程序
pom.xml
<project xmlns="http://maven.apache.org/POM/4.0.0" xmlns:xsi="http://www.w3.org/2001/XMLSchema-instance"
         xsi:schemaLocation="http://maven.apache.org/POM/4.0.0 https://maven.apache.org/xsd/maven-4.0.0.xsd">
    <modelVersion>4.0.0modelVersion>
    <parent>
        <groupId>org.springframework.bootgroupId>
        <artifactId>spring-boot-starter-parentartifactId>
        <version>2.6.4version>
        <relativePath/>
    parent>
    <groupId>com.ywbgroupId>
    <artifactId>springboot-01-helloworldartifactId>
    <version>0.0.1-SNAPSHOTversion>
    <name>springboot-01-helloworldname>
    <description>Demo project for Spring Bootdescription>
    <properties>
        <java.version>1.8java.version>
    properties>
    <dependencies>
        <dependency>
            <groupId>org.springframework.bootgroupId>
            <artifactId>spring-boot-starter-webartifactId>
        dependency>

        <dependency>
            <groupId>org.springframework.bootgroupId>
            <artifactId>spring-boot-starter-testartifactId>
            <scope>testscope>
        dependency>
    dependencies>

    <build>
        <plugins>
            <plugin>
                <groupId>org.springframework.bootgroupId>
                <artifactId>spring-boot-maven-pluginartifactId>
            plugin>
        plugins>
    build>

project>
controller
@RestController
@RequestMapping("/hello")
public class HelloController {

    @GetMapping("/hello")
    public String hello(){
        return "hello world";
    }

}
1.2、自动装配原理
自动配置
pom.xml
- spring-boot-dependencies:核心依赖在父工程中
- 我们在写或者引入一些springboot依赖的时候,不需要指定版本,就是因为有这些版本仓库
启动器:
<dependency>
    <groupId>org.springframework.bootgroupId>
    <artifactId>spring-boot-starter-webartifactId>
dependency>
说白了就是springboot的启动场景
比如spring-boot-starter-web,就会帮我们自动导入web环境所有的依赖
springboot会将所有的功能场景,都变成一个个的启动器
我们要使用什么功能,就只需要找到对应的启动器就可以了starter
主程序
//@SpringBootApplication:标注这个类是一个Springboot的应用
@SpringBootApplication
public class Springboot01HelloworldApplication {

    public static void main(String[] args) {
        SpringApplication.run(Springboot01HelloworldApplication.class, args);
    }

}
-
注解
-
@SpringBootConfiguration:springboot的配置
	@Configuration:spring配置类
	@Component:说明这也是一个spring的组件

@EnableAutoConfiguration:自动配置
	@AutoConfigurationPackage:自动配置包
	@Import(AutoConfigurationPackages.Registrar.class):自动配置 包注册
	@Import(AutoConfigurationImportSelector.class):自动导入选择
-
结论:springboot所有自动配置都是在启动的时候扫描并加载:spring.factories所有的自动配置类都在这里面,但是不一定生效,要判断条件是否成立,只要导入了对应的start,就有对应的启动器了,有了启动器,我们自动装配就会生效,然后就配置成功!
1、springboot在启动的时候,从类路径下/META_INF/spring.factories获取指定的值
2、将这些自动配置的类导入容器,自动配置类就会生效,帮我们进行自动配置
3、以前我们需要自动配置的东西,现在springboot帮我们做了
4、整合javaEE,解决方案和自动配置的东西都在spring-boot-autoconfigure-2.6.4.jar下
5、它会把所有需要导入的组件,以类名的方式返回,这些组件就会被添加到容器
6、容器中也会存在非常多的xxxAutoConfiguration的文件,就是这些类给容器中导入了这个场景需要的所有组件,并自动配置@Configuration
7、有了自动配置类,免去了我们手动编写配置文件的工作
全面接管SpringMVC的配置
1、springboot启动会加载大量的自动配置类
2、我们看我们需要的功能有没有在springboot默认写好的自动配置类当中
3、我们再来看这个自动配置类中到底配置了哪些组件;(只要我们要用的组件存在其中,我们就不需要再手动配置了)
4、给容器中自动配置类添加组件的时候,会从properties类中获取某些属性。我们只需要在配置文件中指定这些属性的值即可
xxxAutoConfiguration:自动配置类,给容器中添加组件
xxxProperties:封装配置文件中相关属性
1.3、YAMl
# 对象
student:
  name: xiaoming
  age: 3

# 行内写法
sutdent: {name: xiaohong,age: 3}

# 数组
pets:
  - cat
  - dog
  - pig

pets1: [cat,dog,pig]
给实体类赋值
@ConfigurationProperties(prefix = "xxxx")
实体类:
@Component
@NoArgsConstructor
@AllArgsConstructor
@Data
@ToString
public class Dog {

    private String name;
    private Integer age;

}

@Component
@NoArgsConstructor
@AllArgsConstructor
@Data
@ToString
@ConfigurationProperties(prefix = "person")
public class Person {

    private String name;
    private Integer age;
    private boolean happy;
    private Date birthday;
    private Map<String,Object> maps;
    private List<Object> lists;
    private Dog dog;
}
application.yml:
person:
  name: xiaoming
  age: 18
  #age: ${random.int}
  #age: ${random.uuid}
  happy: false
  birthday: 2022/03/22
  maps: {k1: v1,k2: v2}
  lists:
    - code
    - music
    - basketball
  dog:
    name: wangcai
    age: 3
JSR303校验
导入依赖
<dependency>
    <groupId>javax.validationgroupId>
    <artifactId>validation-apiartifactId>
dependency>
<dependency>
    <groupId>org.hibernategroupId>
    <artifactId>hibernate-validatorartifactId>
    <version>5.2.0.Finalversion>
dependency>
@Null 限制只能为null
@NotNull 限制必须不为null
@AssertFalse 限制必须为false
@AssertTrue 限制必须为true
@DecimalMax(value) 限制必须为一个不大于指定值的数字
@DecimalMin(value) 限制必须为一个不小于指定值的数字
@Digits(integer,fraction) 限制必须为一个小数,且整数部分的位数不能超过integer,小数部分的位数不能超过fraction
@Future 限制必须是一个将来的日期
@Max(value) 限制必须为一个不大于指定值的数字
@Min(value) 限制必须为一个不小于指定值的数字
@Past 限制必须是一个过去的日期
@Pattern(value) 限制必须符合指定的正则表达式
@Size(max,min) 限制字符长度必须在min到max之间
@Past 验证注解的元素值(日期类型)比当前时间早
@NotEmpty 验证注解的元素值不为null且不为空(字符串长度不为0、集合大小不为0)
@NotBlank 验证注解的元素值不为空(不为null、去除首位空格后长度为0),不同于@NotEmpty,@NotBlank只应用于字符串且在比较时会去除字符串的空格
@Email 验证注解的元素值是Email,也可以通过正则表达式和flag指定自定义的email格式
@Validated
public class Person {

    @Email(message = "报错提示信息")
    private String name;
    private Integer age;
    private boolean happy;
    private Date birthday;
    private Map<String,Object> maps;
    private List<Object> lists;
    private Dog dog;
}
多环境配置
方式一:
方式二:
二、springboot web开发
自动装配
springboot到底帮我们配置了什么,能不能进行修改,能修改哪些东西,能不能扩展
- xxxAutoConfiguration…向容器中自动配置组件
- xxxProperties:自动配置类,装配配置文件中自定义的一些内容
要解决的问题:
- 导入静态资源
- 首页
- jsp,模板引擎Thymeleaf
- 装配扩展springmvc
- CRUD
- 拦截器
- 国际化
2.1、静态资源
三个目录都可以放静态资源
优先级:resources > static > public
2.2、首页定制
将index.html放在static目录下
放在templates目录下的所有页面,只能通过controller来跳转,需要thymeleaf
2.3、Thymeleaf模板引擎
导入依赖
<dependency>
	<groupId>org.thymeleafgroupId>
	<artifactId>thymeleaf-spring5artifactId>
dependency>
<dependency>
	<groupId>org.thymeleaf.extrasgroupId>
	<artifactId>thymeleaf-extras-java8timeartifactId>
dependency>
结论:想要使用thymeleaf,只需要导入对应的依赖就可以了!我们将html放在我们的templates目录下
DOCTYPE html>
<html lang="en" xmlns:th="http://www.thymeleaf.org">
<head>
    <meta charset="UTF-8">
    <title>Titletitle>
head>
<body>

<div th:text="${msg}">div>
<div th:utext="${msg}">div>
<hr>

<div th:each="user:${users}" th:text="${user}">div>
<hr>

<div th:each="user:${users}">[[ ${user} ]]div>

body>
html>
2.4、MVC配置原理
@Configuration
public class MyMvcConfig implements WebMvcConfigurer {

    @Override
    public void addViewControllers(ViewControllerRegistry registry) {
        registry.addViewController("/yang").setViewName("test");
    }
}
在springboot中,有非常多的xxxxConfiguration会帮助我们进行扩展配置,只要看见了这个东西,我们就要注意了
2.5、项目实战
准备工作
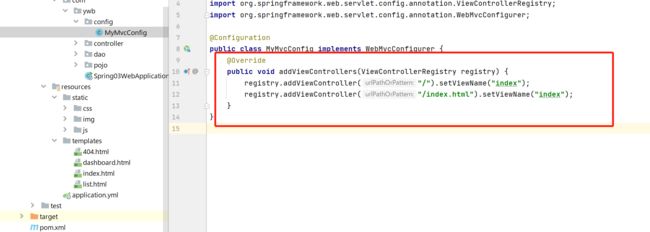
设置请求映射首页
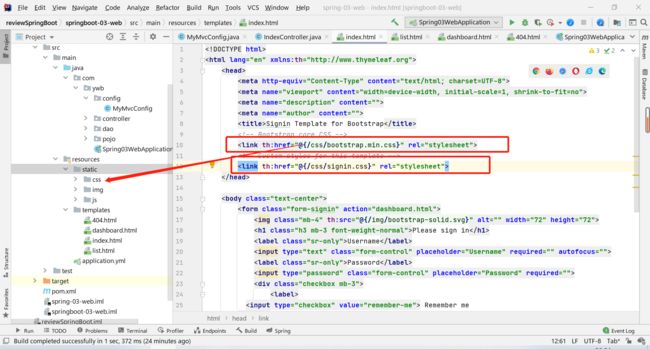
html中的路径需要用th标签,路径用@{}来取,且静态资源放在static下
国际化
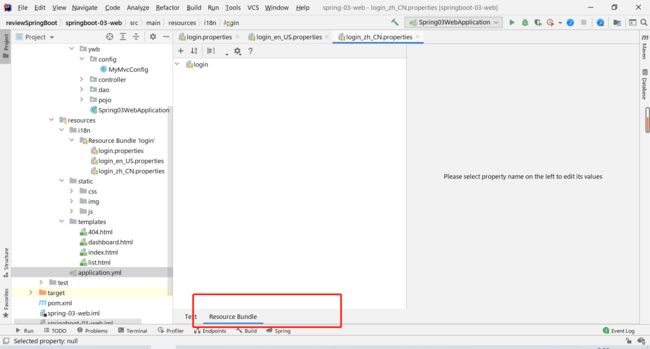
在resources目录下建目录i18n
新建login.properties,login_zh_CN.properties文件,会自动合并
在properties文件的下方可以选择可视化配置
[外链图片转存失败,源站可能有防盗链机制,建议将图片保存下来直接上传(img-7fGVtcY2-1648660959342)(C:/Users/杨维彬的电脑/AppData/Roaming/Typora/typora-user-images/image-20220324222227112.png)]
配置类:
/**
 * @author ywb
 * 国际化地区解析器
 */
public class MyLocaleResolver implements LocaleResolver {
    @Override
    public Locale resolveLocale(HttpServletRequest request) {
        //获取请求中的语言参数连接
        String lang = request.getParameter("lang");
        Locale locale = Locale.getDefault();
        if(!StringUtils.isEmpty(lang)){
            String[] split = lang.split("_");
            //国家,地区
            locale = new Locale(split[0], split[1]);
        }
        return locale;
    }

    @Override
    public void setLocale(HttpServletRequest request, HttpServletResponse response, Locale locale) {

    }
}
在配置中加入组件:
@Configuration
public class MyMvcConfig implements WebMvcConfigurer {
    @Override
    public void addViewControllers(ViewControllerRegistry registry) {
        registry.addViewController("/").setViewName("index");
        registry.addViewController("/templates/index.html").setViewName("index");
    }

    //自定义的国际化组件生效
    @Bean
    public LocaleResolver localeResolver(){
        return new MyLocaleResolver();
    }

}
带有国际化的主页界面:
在thymeleaf中使用#{}引用
正常文本用th:text
按钮用th:value
DOCTYPE html>
<html lang="en" xmlns:th="http://www.thymeleaf.org">
	<head>
		<meta http-equiv="Content-Type" content="text/html; charset=UTF-8">
		<meta name="viewport" content="width=device-width, initial-scale=1, shrink-to-fit=no">
		<meta name="description" content="">
		<meta name="author" content="">
		<title>Signin Template for Bootstraptitle>

		<link th:href="@{/css/bootstrap.min.css}" rel="stylesheet">

		<link th:href="@{/css/signin.css}" rel="stylesheet">
	head>

	<body class="text-center">
		<form class="form-signin" action="dashboard.html">
			<img class="mb-4" th:src="@{/img/bootstrap-solid.svg}" alt="" width="72" height="72">
			<h1 class="h3 mb-3 font-weight-normal" th:text="#{login.tip}">Please sign inh1>
			<input type="text" class="form-control" th:placeholder="#{login.username}" required="" autofocus="">
			<input type="password" class="form-control" th:placeholder="#{login.password}" required="">
			<div class="checkbox mb-3">
				<label>
          <input type="checkbox" value="remember-me"> [[#{login.remember}]]
        label>
			div>
			<button class="btn btn-lg btn-primary btn-block" type="submit" th:text="#{login.btn}">Sign inbutton>
			<p class="mt-5 mb-3 text-muted">© 2017-2018p>
			<a class="btn btn-sm" th:href="@{/index.html(lang='zh_CN')}">中文a>
			<a class="btn btn-sm" th:href="@{/index.html(lang='en_US')}">Englisha>
		form>

	body>

html>
登录验证
Controller:
@Controller
public class HelloController {

    @RequestMapping("/user/login")
    public String login(@RequestParam("username") String username, @RequestParam("password") String password, Model model){
        //具体的业务
        if (username!=null && "123456".equals(password)){
            //为了不显示真实的请求地址和暴露参数(用户名,密码)
            //注意加一个斜杆"/"
            return "redirect:/main.html";
        }else {
            model.addAttribute("msg","用户名或者密码错误");
            return "index";
        }
    }

}
设置映射路径:
@Configuration
public class MyMvcConfig implements WebMvcConfigurer {
    @Override
    public void addViewControllers(ViewControllerRegistry registry) {
        registry.addViewController("/").setViewName("index");
        registry.addViewController("/index.html").setViewName("index");
        registry.addViewController("/main.html").setViewName("dashboard");
    }

}
index的form表单中增加用户名密码错误提示信息
<form class="form-signin" th:action="@{/user/login}">
			<img class="mb-4" th:src="@{/img/bootstrap-solid.svg}" alt="" width="72" height="72">
			<h1 class="h3 mb-3 font-weight-normal" th:text="#{login.tip}">Please sign inh1>
			<p style="color: red" th:text="${msg}" th:if="${msg}!=null">p>
			<input type="text" name="username" class="form-control" th:placeholder="#{login.username}" required="" autofocus="">
			<input type="password" name="password" class="form-control" th:placeholder="#{login.password}" required="">
			<div class="checkbox mb-3">
				<label>
          <input type="checkbox" value="remember-me"> [[#{login.remember}]]
        label>
			div>
			<button class="btn btn-lg btn-primary btn-block" type="submit" th:text="#{login.btn}">Sign inbutton>
			<p class="mt-5 mb-3 text-muted">© 2017-2018p>
			<a class="btn btn-sm" th:href="@{/index.html(lang='zh_CN')}">中文a>
			<a class="btn btn-sm" th:href="@{/index.html(lang='en_US')}">Englisha>
		form>
拦截器
自定义拦截器类:
/**
 * @author ywb
 *  拦截器类
 */
public class LoginHandlerInterceptor implements HandlerInterceptor {

    @Override
    public boolean preHandle(HttpServletRequest request, HttpServletResponse response, Object handler) throws Exception {
        //登录成功之后应该有用户的session
        Object loginUser = request.getSession().getAttribute("loginUser");
        if (loginUser==null){
            //将在主页中显示
            request.setAttribute("msg","没有权限,请先登录");
            request.getRequestDispatcher("/index.html").forward(request,response);
            //不登陆,不放行
            return false;
        }
        return true;
    }

}
在webConfig中配置拦截器需要拦截哪些请求
@Configuration
public class MyMvcConfig implements WebMvcConfigurer {
    @Override
    public void addViewControllers(ViewControllerRegistry registry) {
        registry.addViewController("/").setViewName("index");
        registry.addViewController("/index.html").setViewName("index");
        registry.addViewController("/main.html").setViewName("dashboard");
    }

    @Override
    public void addInterceptors(InterceptorRegistry registry) {
        //     /** 是拦截所有的文件夹及里面的子文件夹
        registry.addInterceptor(new LoginHandlerInterceptor()).
                addPathPatterns("/**").
                excludePathPatterns("/","/index.html","/user/login","/css/*","/js/*","/img/**");
    }
}
在html中取用户名,从session中取得
<nav class="navbar navbar-dark sticky-top bg-dark flex-md-nowrap p-0">

    <a class="navbar-brand col-sm-3 col-md-2 mr-0" href="http://getbootstrap.com/docs/4.0/examples/dashboard/#">[[${session.loginUser}]]a>
    <input class="form-control form-control-dark w-100" type="text" placeholder="Search" aria-label="Search">
    <ul class="navbar-nav px-3">
        <li class="nav-item text-nowrap">
            <a class="nav-link" href="http://getbootstrap.com/docs/4.0/examples/dashboard/#">Sign outa>
        li>
    ul>
nav>
头部栏和侧边栏抽象
抽取:th:fragment="xxxx"
DOCTYPE html>
<html lang="en" xmlns:th="http://www.themeleaf.org">


<nav class="navbar navbar-dark sticky-top bg-dark flex-md-nowrap p-0" th:fragment="topbar">
    <a class="navbar-brand col-sm-3 col-md-2 mr-0" href="http://getbootstrap.com/docs/4.0/examples/dashboard/#">[[${session.loginUser}]]a>
    <input class="form-control form-control-dark w-100" type="text" placeholder="Search" aria-label="Search">
    <ul class="navbar-nav px-3">
        <li class="nav-item text-nowrap">
            <a class="nav-link" href="http://getbootstrap.com/docs/4.0/examples/dashboard/#">Sign outa>
        li>
    ul>
nav>


<nav class="col-md-2 d-none d-md-block bg-light sidebar" th:fragment="sidebar">
    <div class="sidebar-sticky">
        <ul class="nav flex-column">
            <li class="nav-item">
                <a th:class="${active}=='main.html'?'nav-link active':'nav-link'" th:href="@{/index.html}">
                    <svg xmlns="http://www.w3.org/2000/svg" width="24" height="24" viewBox="0 0 24 24" fill="none" stroke="currentColor" stroke-width="2" stroke-linecap="round" stroke-linejoin="round" class="feather feather-home">
                        <path d="M3 9l9-7 9 7v11a2 2 0 0 1-2 2H5a2 2 0 0 1-2-2z">path>
                        <polyline points="9 22 9 12 15 12 15 22">polyline>
                    svg>
                    Dashboard <span class="sr-only">(current)span>
                a>
            li>
            <li class="nav-item">
                <a class="nav-link" href="http://getbootstrap.com/docs/4.0/examples/dashboard/#">
                    <svg xmlns="http://www.w3.org/2000/svg" width="24" height="24" viewBox="0 0 24 24" fill="none" stroke="currentColor" stroke-width="2" stroke-linecap="round" stroke-linejoin="round" class="feather feather-file">
                        <path d="M13 2H6a2 2 0 0 0-2 2v16a2 2 0 0 0 2 2h12a2 2 0 0 0 2-2V9z">path>
                        <polyline points="13 2 13 9 20 9">polyline>
                    svg>
                    Orders
                a>
            li>
            <li class="nav-item">
                <a class="nav-link" href="http://getbootstrap.com/docs/4.0/examples/dashboard/#">
                    <svg xmlns="http://www.w3.org/2000/svg" width="24" height="24" viewBox="0 0 24 24" fill="none" stroke="currentColor" stroke-width="2" stroke-linecap="round" stroke-linejoin="round" class="feather feather-shopping-cart">
                        <circle cx="9" cy="21" r="1">circle>
                        <circle cx="20" cy="21" r="1">circle>
                        <path d="M1 1h4l2.68 13.39a2 2 0 0 0 2 1.61h9.72a2 2 0 0 0 2-1.61L23 6H6">path>
                    svg>
                    Products
                a>
            li>
            <li class="nav-item">
                <a th:class="${active}=='list.html'?'nav-link active':'nav-link'" th:href="@{/emp/list}">
                    <svg xmlns="http://www.w3.org/2000/svg" width="24" height="24" viewBox="0 0 24 24" fill="none" stroke="currentColor" stroke-width="2" stroke-linecap="round" stroke-linejoin="round" class="feather feather-users">
                        <path d="M17 21v-2a4 4 0 0 0-4-4H5a4 4 0 0 0-4 4v2">path>
                        <circle cx="9" cy="7" r="4">circle>
                        <path d="M23 21v-2a4 4 0 0 0-3-3.87">path>
                        <path d="M16 3.13a4 4 0 0 1 0 7.75">path>
                    svg>
                    Customers
                a>
            li>
            <li class="nav-item">
                <a class="nav-link" href="http://getbootstrap.com/docs/4.0/examples/dashboard/#">
                    <svg xmlns="http://www.w3.org/2000/svg" width="24" height="24" viewBox="0 0 24 24" fill="none" stroke="currentColor" stroke-width="2" stroke-linecap="round" stroke-linejoin="round" class="feather feather-bar-chart-2">
                        <line x1="18" y1="20" x2="18" y2="10">line>
                        <line x1="12" y1="20" x2="12" y2="4">line>
                        <line x1="6" y1="20" x2="6" y2="14">line>
                    svg>
                    Reports
                a>
            li>
            <li class="nav-item">
                <a class="nav-link" href="http://getbootstrap.com/docs/4.0/examples/dashboard/#">
                    <svg xmlns="http://www.w3.org/2000/svg" width="24" height="24" viewBox="0 0 24 24" fill="none" stroke="currentColor" stroke-width="2" stroke-linecap="round" stroke-linejoin="round" class="feather feather-layers">
                        <polygon points="12 2 2 7 12 12 22 7 12 2">polygon>
                        <polyline points="2 17 12 22 22 17">polyline>
                        <polyline points="2 12 12 17 22 12">polyline>
                    svg>
                    Integrations
                a>
            li>
        ul>

        <h6 class="sidebar-heading d-flex justify-content-between align-items-center px-3 mt-4 mb-1 text-muted">
            <span>Saved reportsspan>
            <a class="d-flex align-items-center text-muted" href="http://getbootstrap.com/docs/4.0/examples/dashboard/#">
                <svg xmlns="http://www.w3.org/2000/svg" width="24" height="24" viewBox="0 0 24 24" fill="none" stroke="currentColor" stroke-width="2" stroke-linecap="round" stroke-linejoin="round" class="feather feather-plus-circle"><circle cx="12" cy="12" r="10">circle><line x1="12" y1="8" x2="12" y2="16">line><line x1="8" y1="12" x2="16" y2="12">line>svg>
            a>
        h6>
        <ul class="nav flex-column mb-2">
            <li class="nav-item">
                <a class="nav-link" href="http://getbootstrap.com/docs/4.0/examples/dashboard/#">
                    <svg xmlns="http://www.w3.org/2000/svg" width="24" height="24" viewBox="0 0 24 24" fill="none" stroke="currentColor" stroke-width="2" stroke-linecap="round" stroke-linejoin="round" class="feather feather-file-text">
                        <path d="M14 2H6a2 2 0 0 0-2 2v16a2 2 0 0 0 2 2h12a2 2 0 0 0 2-2V8z">path>
                        <polyline points="14 2 14 8 20 8">polyline>
                        <line x1="16" y1="13" x2="8" y2="13">line>
                        <line x1="16" y1="17" x2="8" y2="17">line>
                        <polyline points="10 9 9 9 8 9">polyline>
                    svg>
                    Current month
                a>
            li>
            <li class="nav-item">
                <a class="nav-link" href="http://getbootstrap.com/docs/4.0/examples/dashboard/#">
                    <svg xmlns="http://www.w3.org/2000/svg" width="24" height="24" viewBox="0 0 24 24" fill="none" stroke="currentColor" stroke-width="2" stroke-linecap="round" stroke-linejoin="round" class="feather feather-file-text">
                        <path d="M14 2H6a2 2 0 0 0-2 2v16a2 2 0 0 0 2 2h12a2 2 0 0 0 2-2V8z">path>
                        <polyline points="14 2 14 8 20 8">polyline>
                        <line x1="16" y1="13" x2="8" y2="13">line>
                        <line x1="16" y1="17" x2="8" y2="17">line>
                        <polyline points="10 9 9 9 8 9">polyline>
                    svg>
                    Last quarter
                a>
            li>
            <li class="nav-item">
                <a class="nav-link" href="http://getbootstrap.com/docs/4.0/examples/dashboard/#">
                    <svg xmlns="http://www.w3.org/2000/svg" width="24" height="24" viewBox="0 0 24 24" fill="none" stroke="currentColor" stroke-width="2" stroke-linecap="round" stroke-linejoin="round" class="feather feather-file-text">
                        <path d="M14 2H6a2 2 0 0 0-2 2v16a2 2 0 0 0 2 2h12a2 2 0 0 0 2-2V8z">path>
                        <polyline points="14 2 14 8 20 8">polyline>
                        <line x1="16" y1="13" x2="8" y2="13">line>
                        <line x1="16" y1="17" x2="8" y2="17">line>
                        <polyline points="10 9 9 9 8 9">polyline>
                    svg>
                    Social engagement
                a>
            li>
            <li class="nav-item">
                <a class="nav-link" href="http://getbootstrap.com/docs/4.0/examples/dashboard/#">
                    <svg xmlns="http://www.w3.org/2000/svg" width="24" height="24" viewBox="0 0 24 24" fill="none" stroke="currentColor" stroke-width="2" stroke-linecap="round" stroke-linejoin="round" class="feather feather-file-text">
                        <path d="M14 2H6a2 2 0 0 0-2 2v16a2 2 0 0 0 2 2h12a2 2 0 0 0 2-2V8z">path>
                        <polyline points="14 2 14 8 20 8">polyline>
                        <line x1="16" y1="13" x2="8" y2="13">line>
                        <line x1="16" y1="17" x2="8" y2="17">line>
                        <polyline points="10 9 9 9 8 9">polyline>
                    svg>
                    Year-end sale
                a>
            li>
        ul>
    div>
nav>


html>
使用:
<div th:insert="~{commons/commons::topbar}">div>
<div th:insert="~{commons/commons::sidebar(active='list.html')}">div>
thymeleaf传参:(xxx='xxx')
三元运算符判断条件显示高亮
<div th:insert="~{commons/commons::sidebar(active='list.html')}">div>


<a th:class="${active}=='main.html'?'nav-link active':'nav-link'" th:href="@{/index.html}">
    <svg xmlns="http://www.w3.org/2000/svg" width="24" height="24" viewBox="0 0 24 24" fill="none" stroke="currentColor" stroke-width="2" stroke-linecap="round" stroke-linejoin="round" class="feather feather-home">
        <path d="M3 9l9-7 9 7v11a2 2 0 0 1-2 2H5a2 2 0 0 1-2-2z">path>
        <polyline points="9 22 9 12 15 12 15 22">polyline>
    svg>
    Dashboard <span class="sr-only">(current)span>
a>

<a th:class="${active}=='list.html'?'nav-link active':'nav-link'" th:href="@{/emp/list}">
    <svg xmlns="http://www.w3.org/2000/svg" width="24" height="24" viewBox="0 0 24 24" fill="none" stroke="currentColor" stroke-width="2" stroke-linecap="round" stroke-linejoin="round" class="feather feather-users">
        <path d="M17 21v-2a4 4 0 0 0-4-4H5a4 4 0 0 0-4 4v2">path>
        <circle cx="9" cy="7" r="4">circle>
        <path d="M23 21v-2a4 4 0 0 0-3-3.87">path>
        <path d="M16 3.13a4 4 0 0 1 0 7.75">path>
    svg>
    Customers
a>
可将公共部分抽出
重定向后Model的数据被清空
@Controller
public class EmployeeController {

    @Autowired
    EmployeeDao employeeDao;

    @RequestMapping("/emp/list")
    public String list(Model  model){
        Collection<Employee> employees = employeeDao.getEmployees();
        model.addAttribute("employees",employees);
        return "redirect:/list.html";
        //return "emp/list";
    }
}
/*
	使用redirect重定向之后,model的数据会被清空
*/
把Model改为RedirectAttributesModelMap,同时把addAttribute改成addFlashAttribute
@Controller
public class EmployeeController {

    @Autowired
    EmployeeDao employeeDao;

    @RequestMapping("/emp/list")
    public String list(RedirectAttributesModelMap  model){
        Collection<Employee> employees = employeeDao.getEmployees();
        model.addFlashAttribute("employees",employees);
        return "redirect:/list.html";
        //return "emp/list";
    }
}
若直接使用请求转发,则可以直接使用Model
但改成RedirectAttributesModelMap后,在html页面的代码依然会报红
<table class="table table-striped table-sm">
    <thead>
        <tr>
            <th>idth>
            <th>nameth>
            <th>emailth>
            <th>genderth>
            <th>departmentth>
            <th>birthth>
        tr>
    thead>
    <tbody>
        <tr th:each="emp:${employees}">
            <td th:text="${emp.getId()}">td>
            <td th:text="${emp.getName()}">td>
            <td th:text="${emp.getEmail()}">td>
            <td th:text="${emp.getGender()}">td>
            <td th:text="${emp.getDepartment().getDepartmentName()}">td>
            <td th:text="${emp.getBirth()}">td>
        tr>
    tbody>
table>
性别转换
<td th:text="${emp.getGender()==0 ? '女' : '男'}">td>
日期格式转换
<td th:text="${#dates.format(emp.getBirth(),'yyyy-MM-dd HH:mm:ss')}">td>
添加员工
html页面:
DOCTYPE html>

<html lang="en" xmlns:th="http://www.thymeleaf.org">

    <head>
        <meta http-equiv="Content-Type" content="text/html; charset=UTF-8">
        <meta name="viewport" content="width=device-width, initial-scale=1, shrink-to-fit=no">
        <meta name="description" content="">
        <meta name="author" content="">

        <title>Dashboard Template for Bootstraptitle>

        <link th:href="@{/css/bootstrap.min.css}" rel="stylesheet">


        <link th:href="@{/css/dashboard.css}" rel="stylesheet">
        <style type="text/css">
            /* Chart.js */

            @-webkit-keyframes chartjs-render-animation {
                from {
                    opacity: 0.99
                }
                to {
                    opacity: 1
                }
            }

            @keyframes chartjs-render-animation {
                from {
                    opacity: 0.99
                }
                to {
                    opacity: 1
                }
            }

            .chartjs-render-monitor {
                -webkit-animation: chartjs-render-animation 0.001s;
                animation: chartjs-render-animation 0.001s;
            }
        style>
    head>

    <body>
        <div th:insert="~{commons/commons::topbar}">div>

        <div class="container-fluid">
            <div class="row">
                <div th:insert="~{commons/commons::sidebar(active='list.html')}">div>

                <main role="main" class="col-md-9 ml-sm-auto col-lg-10 pt-3 px-4">
                    <form th:action="@{/emp}" method="post">
                        <div class="form-group">
                            <label>LastNamelabel>
                            <input type="text" name="name" class="form-control" placeholder="lastname:zsr">
                        div>
                        <div class="form-group">
                            <label>Emaillabel>
                            <input type="email" name="email" class="form-control" placeholder="email:[email protected]">
                        div>
                        <div class="form-group">
                            <label>Genderlabel><br/>
                            <div class="form-check form-check-inline">
                                <input class="form-check-input" type="radio" name="gender" value="1">
                                <label class="form-check-label">男label>
                            div>
                            <div class="form-check form-check-inline">
                                <input class="form-check-input" type="radio" name="gender" value="0">
                                <label class="form-check-label">女label>
                            div>
                        div>
                        <div class="form-group">
                            <label>departmentlabel>

                            <select class="form-control" name="department.id">
                                <option th:each="department:${departments}" th:text="${department.getDepartmentName()}"
                                        th:value="${department.getId()}">option>
                            select>
                        div>
                        <div class="form-group">
                            <label>Birthlabel>

                            <input type="text" name="birth" class="form-control" placeholder="birth:yyyy-MM-dd">
                        div>
                        <button type="submit" class="btn btn-primary">添加button>
                    form>
                main>
            div>
        div>


        <script type="text/javascript" th:src="@{/js/jquery-3.2.1.slim.min.js}">script>
        <script type="text/javascript" th:src="@{/js/popper.min.js}">script>
        <script type="text/javascript" th:src="@{/js/bootstrap.min.js}">script>


        <script type="text/javascript" th:src="@{/js/feather.min.js}">script>
        <script>
            feather.replace()
        script>


        <script type="text/javascript" th:src="@{/js/Chart.min.js}">script>
        <script>
            var ctx = document.getElementById("myChart");
            var myChart = new Chart(ctx, {
                type: 'line',
                data: {
                    labels: ["Sunday", "Monday", "Tuesday", "Wednesday", "Thursday", "Friday", "Saturday"],
                    datasets: [{
                        data: [15339, 21345, 18483, 24003, 23489, 24092, 12034],
                        lineTension: 0,
                        backgroundColor: 'transparent',
                        borderColor: '#007bff',
                        borderWidth: 4,
                        pointBackgroundColor: '#007bff'
                    }]
                },
                options: {
                    scales: {
                        yAxes: [{
                            ticks: {
                                beginAtZero: false
                            }
                        }]
                    },
                    legend: {
                        display: false,
                    }
                }
            });
        script>

    body>

html>
注意:
department的显示以及选法,传参的时候传的是id,因此字段的name是department.id,
Controller:
此处使用Restful风格,同一个请求路径,用不同的请求方法
@Controller
public class EmployeeController {

    @Autowired
    EmployeeDao employeeDao;

    @Autowired
    DepartmentDao departmentDao;

    @RequestMapping("/emp/list")
    public String list(Model  model){
        Collection<Employee> employees = employeeDao.getEmployees();
        model.addAttribute("employees",employees);
        //return "redirect:/list.html";
        return "emp/list";
    }

    @GetMapping("/emp")
    public String toAddPage(Model model){
        Collection<Department> departments = departmentDao.getDepartments();
        model.addAttribute("departments",departments);
        //直接使用return时,地址栏会直接变成请求路径
        return "emp/add";
    }

    @PostMapping("/emp")
    public String addEmployee(Employee employee){
        employeeDao.saveEmployee(employee);
        //使用redirect时,地址栏会变成路径,/emp/list
        return "redirect:/emp/list";
    }

}
日期格式配置:
spring:
  messages:
    basename: i18n.login
  thymeleaf:
    cache: false
  mvc:
    format:
      date: yyyy-MM-dd
修改员工
html页面
DOCTYPE html>

<html lang="en" xmlns:th="http://www.thymeleaf.org">

	<head>
		<meta http-equiv="Content-Type" content="text/html; charset=UTF-8">
		<meta name="viewport" content="width=device-width, initial-scale=1, shrink-to-fit=no">
		<meta name="description" content="">
		<meta name="author" content="">

		<title>Dashboard Template for Bootstraptitle>

		<link th:href="@{/css/bootstrap.min.css}" rel="stylesheet">


		<link th:href="@{/css/dashboard.css}" rel="stylesheet">
		<style type="text/css">
			/* Chart.js */

			@-webkit-keyframes chartjs-render-animation {
				from {
					opacity: 0.99
				}
				to {
					opacity: 1
				}
			}

			@keyframes chartjs-render-animation {
				from {
					opacity: 0.99
				}
				to {
					opacity: 1
				}
			}

			.chartjs-render-monitor {
				-webkit-animation: chartjs-render-animation 0.001s;
				animation: chartjs-render-animation 0.001s;
			}
		style>
	head>

	<body>
		<div th:insert="~{commons/commons::topbar}">div>

		<div class="container-fluid">
			<div class="row">
				<div th:insert="~{commons/commons::sidebar(active='list.html')}">div>

				<main role="main" class="col-md-9 ml-sm-auto col-lg-10 pt-3 px-4">
					<form th:action="@{/updateEmp}" method="post">
						<input type="hidden" name="id" th:value="${employee.getId()}">
						<div class="form-group">
							<label>LastNamelabel>
							<input th:value="${employee.getName()}" type="text" name="name" class="form-control" placeholder="lastname:zsr">
						div>
						<div class="form-group">
							<label>Emaillabel>
							<input th:value="${employee.getEmail()}" type="email" name="email" class="form-control" placeholder="email:[email protected]">
						div>
						<div class="form-group">
							<label>Genderlabel><br/>
							<div class="form-check form-check-inline">
								<input class="form-check-input" type="radio" name="gender" value="1" th:checked="${employee.getGender()}==1">
								<label class="form-check-label">男label>
							div>
							<div class="form-check form-check-inline">
								<input class="form-check-input" type="radio" name="gender" value="0" th:checked="${employee.getGender()}==0">
								<label class="form-check-label">女label>
							div>
						div>
						<div class="form-group">
							<label>departmentlabel>

							<select class="form-control" name="department.id">
								<option th:each="department:${departments}" th:text="${department.getDepartmentName()}"
										th:value="${department.getId()}" th:selected="${department.getId()==employee.getDepartment().getId()}">option>
							select>
						div>
						<div class="form-group">
							<label>Birthlabel>

							<input type="text" name="birth" class="form-control" placeholder="birth:yyyy-MM-dd" th:value="${#dates.format(employee.getBirth(),'yyyy-MM-dd HH:mm:ss')}">
						div>
						<button type="submit" class="btn btn-primary">修改button>
					form>
				main>
			div>
		div>


		<script type="text/javascript" th:src="@{/js/jquery-3.2.1.slim.min.js}">script>
		<script type="text/javascript" th:src="@{/js/popper.min.js}">script>
		<script type="text/javascript" th:src="@{/js/bootstrap.min.js}">script>


		<script type="text/javascript" th:src="@{/js/feather.min.js}">script>
		<script>
			feather.replace()
		script>


		<script type="text/javascript" th:src="@{/js/Chart.min.js}">script>
		<script>
			var ctx = document.getElementById("myChart");
			var myChart = new Chart(ctx, {
				type: 'line',
				data: {
					labels: ["Sunday", "Monday", "Tuesday", "Wednesday", "Thursday", "Friday", "Saturday"],
					datasets: [{
						data: [15339, 21345, 18483, 24003, 23489, 24092, 12034],
						lineTension: 0,
						backgroundColor: 'transparent',
						borderColor: '#007bff',
						borderWidth: 4,
						pointBackgroundColor: '#007bff'
					}]
				},
				options: {
					scales: {
						yAxes: [{
							ticks: {
								beginAtZero: false
							}
						}]
					},
					legend: {
						display: false,
					}
				}
			});
		script>

	body>

html>
注意:
需要带上id隐藏域
<input type="hidden" name="id" th:value="${employee.getId()}">显示修改前的值使用th:value标签
注意单选和下拉框的默认选择
th:checked和th:selected
传递需要修改的员工id
<td><a class="btn btn-sm btn-primary" th:href="@{/emp/{id}(id=${emp.getId()})}">编辑a>td>
Controller:
@GetMapping("/emp/{id}")
public String toUpdateEmp(@PathVariable("id") Integer id, Model model){
    //查出原来的数据
    Employee employeeById = employeeDao.getEmployeeById(id);
    model.addAttribute("employee",employeeById);
    Collection<Department> departments = departmentDao.getDepartments();
    model.addAttribute("departments",departments);
    return "emp/update";
}

@PostMapping("/updateEmp")
public String updateEmp(Employee employee){
    employeeDao.saveEmployee(employee);
    return "redirect:/emp/list";
}
修改员工
html页面:
<td><a class="btn btn-sm btn-danger" th:href="@{/deleteEmp/{id}(id=${emp.getId()})}">删除a>td>
Controller:
@GetMapping("/deleteEmp/{id}")
public String deleteEmp(@PathVariable("id") Integer id){
    employeeDao.delete(id);
    return "redirect:/emp/list";
}
404处理
在templates下建一个文件夹error,把404.html放在下面,就会自动找到该页面
注销功能
页面:
<nav class="navbar navbar-dark sticky-top bg-dark flex-md-nowrap p-0" th:fragment="topbar">
    <a class="navbar-brand col-sm-3 col-md-2 mr-0" href="http://getbootstrap.com/docs/4.0/examples/dashboard/#">[[${session.loginUser}]]a>
    <input class="form-control form-control-dark w-100" type="text" placeholder="Search" aria-label="Search">
    <ul class="navbar-nav px-3">
        <li class="nav-item text-nowrap">
            <a class="nav-link" th:href="@{/user/logout}">Sign outa>
        li>
    ul>
nav>
Controller:
@GetMapping("/user/logout")
public String logout(HttpSession session){
    session.invalidate();
    return "redirect:/";
}
2.6、前端页面
- Bootstrap
- Layui
- semantic-ui
- x-admin
三、连接数据库
3.1、整合JDBC使用
在yaml文件中配置数据库信息
spring:
  datasource:
    username: root
    password: 123456
    url: jdbc:mysql://localhost:3306/mybatis?serverTimezone=UTC&useUnicode=true&characterEncoding=utf-8
    driver-class-name: com.mysql.jdbc.Driver
服务时间、是否使用Unicode编码,characterEncoding编码
jdbc:mysql://localhost:3306/mybatis?serverTimezone=UTC&useUnicode=true&characterEncoding=utf-8
在配置数据库之后spring就会自动生成JdbcTemplate类
我们可以通过这个类的对象使用数据库的相关操作
@RestController
public class JdbcController {

    @Autowired
    JdbcTemplate jdbcTemplate;

    @GetMapping("/userList")
    public List<Map<String,Object>> userList(){
        String sql = "select * from user";
        List<Map<String, Object>> maps = jdbcTemplate.queryForList(sql);
        return maps;
    }

    @GetMapping("/addUser")
    public String addUser(){
        String sql = "insert into `user`(`id`,`name`,`pwd`) values(7,'xiaoming','123456')";
        jdbcTemplate.update(sql);
        return "add-ok";
    }

    @GetMapping("/updateUser/{id}")
    public String updateUser(@PathVariable("id") Integer id){
        String sql = "update user set name = ?, pwd = ? where id = "+id;
        Object[] objects = new Object[2];
        objects[0] = "xiaohong";
        objects[1] = "654321";
        jdbcTemplate.update(sql,objects);
        return "update-ok";
    }

    @GetMapping("/deleteUser/{id}")
    public String deleteUser(@PathVariable("id") Integer id){
        String sql = "delete from user where id = "+id;
        jdbcTemplate.update(sql);
        return "delete-ok";
    }
}
3.2、Druid数据源
1、导入依赖
<dependency>
    <groupId>com.alibabagroupId>
    <artifactId>druidartifactId>
    <version>1.2.8version>
dependency>
<dependency>
    <groupId>log4jgroupId>
    <artifactId>log4jartifactId>
    <version>1.2.17version>
dependency>
2、配置数据源
spring:
  datasource:
    username: root
    password: 123456
    url: jdbc:mysql://localhost:3306/mybatis?serverTimezone=UTC&useUnicode=true&characterEncoding=utf-8
    driver-class-name: com.mysql.jdbc.Driver
    type: com.alibaba.druid.pool.DruidDataSource

    #Spring Boot 默认是不注入这些属性值的,需要自己绑定
    #druid 数据源专有配置
    initialSize: 5
    minIdle: 5
    maxActive: 20
    maxWait: 60000
    timeBetweenEvictionRunsMillis: 60000
    minEvictableIdleTimeMillis: 300000
    validationQuery: SELECT 1 FROM DUAL
    testWhileIdle: true
    testOnBorrow: false
    testOnReturn: false
    poolPreparedStatements: true

    #配置监控统计拦截的filters,stat:监控统计、log4j:日志记录、wall:防御sql注入
    #如果允许时报错  java.lang.ClassNotFoundException: org.apache.log4j.Priority
    #则导入 log4j 依赖即可,Maven 地址:https://mvnrepository.com/artifact/log4j/log4j
    filters: stat,wall,log4j
    maxPoolPreparedStatementPerConnectionSize: 20
    useGlobalDataSourceStat: true
    connectionProperties: druid.stat.mergeSql=true;druid.stat.slowSqlMillis=500
3、编写配置类
@Configuration
public class DruidConfig {

    @ConfigurationProperties(prefix = "spring.datasource")
    @Bean
    public DataSource druidDataSource(){
        return new DruidDataSource();
    }

    /**
     * 后台监控:web.xml    ServletRegistrationBean
     * 因为springboot内置了servlet容器,所以没有web.xml,替代方法:ServletRegistrationBean
     * @return
     */
    @Bean
    public ServletRegistrationBean statViewServlet(){
        ServletRegistrationBean<StatViewServlet> bean = new ServletRegistrationBean<>(new StatViewServlet(),"/druid/*");
        //后台需要有人登录,账号密码配置
        HashMap<String, String> initParameters = new HashMap<>();
        //设置账号和密码,两个key是固定的
        initParameters.put("loginUser","admin");
        initParameters.put("loginPassword","1234567");
        //允许谁访问,如果value为空,就是允许所有人访问
        initParameters.put("allow","");

        //设置初始化参数
        bean.setInitParameters(initParameters);
        return bean;
    }

    /**
     * 过滤器
     * @return
     */
    @Bean
    public FilterRegistrationBean webStatFilter(){
        FilterRegistrationBean<Filter> bean = new FilterRegistrationBean<>();
        bean.setFilter(new WebStatFilter());
        HashMap<String, String> initParameters = new HashMap<>();
        //这些东西不进行统计
        initParameters.put("exclusions","*.js,*.css,/druid/*");
        //可以过滤哪些请求
        bean.setInitParameters(initParameters);
        return bean;
    }
}
访问监控页面:localhost:8080/druid
3.3、整合Mybatis框架
1、导入依赖
<dependency>
    <groupId>org.mybatis.spring.bootgroupId>
    <artifactId>mybatis-spring-boot-starterartifactId>
    <version>2.2.1version>
dependency>
2、配置数据源和整合mybatis
spring:
  datasource:
    username: root
    password: 123456
    url: jdbc:mysql://localhost:3306/mybatis?useUnicode=true&serverTimezone=UTC&characterEncoding=utf-8
    driver-class-name: com.mysql.cj.jdbc.Driver

mybatis:
  type-aliases-package: com.ywb.pojo
  mapper-locations: classpath:mybatis/mapper/*.xml
3、编写mapper接口
/**
 * @author ywb
 * 注解表示了这是一个mybatis的mapper类
 */
@Mapper
@Repository
public interface UserMapper {

    /**
     * 查找所有用户
     * @return
     */
    List<User> queryUserList();

    /**
     * 通过id查找用户
     * @param id 用户id
     * @return
     */
    User queryUserById(Integer id);

    /**
     * 添加用户
     * @param user
     * @return
     */
    Integer addUser(User user);

    /**
     * 更新用户
     * @param user
     * @return
     */
    Integer updateUser(User user);

    /**
     * 删除用户
     * @param id
     * @return
     */
    Integer deleteUser(Integer id);
}
4、编写mapper.xml文件
DOCTYPE mapper
        PUBLIC "-//mybatis.org//DTD Mapper 3.0//EN"
        "http://mybatis.org/dtd/mybatis-3-mapper.dtd">
<mapper namespace="com.ywb.mapper.UserMapper">

    <select id="queryUserList" resultType="com.ywb.pojo.User">
        select * from user
    select>

    <select id="queryUserById" resultType="com.ywb.pojo.User" parameterType="Integer">
        select  * from user where id = #{id}
    select>

    <insert id="addUser" parameterType="com.ywb.pojo.User">
        insert into `user`(id,`name`,pwd) values(#{id},#{name},#{pwd})
    insert>

    <update id="updateUser" parameterType="com.ywb.pojo.User">
        update user set name=#{name},pwd=#{pwd} where id = #{id}
    update>

    <delete id="deleteUser" parameterType="Integer">
        delete from user where id = #{id}
    delete>

mapper>
5、编写Controller
@RestController
public class UserController {

    @Autowired
    private UserMapper userMapper;

    @GetMapping("/queryUserList")
    public List<User> queryUserList(){
        List<User> users = userMapper.queryUserList();
        for (User user : users) {
            System.out.println(user);
        }
        return users;
    }

    @GetMapping("/queryUserById/{id}")
    public User queryUserById(@PathVariable("id") Integer id){
        return userMapper.queryUserById(id);
    }

    @GetMapping("/addUser")
    public String addUser(){
        userMapper.addUser(new User(7,"小明","123456"));
        return "ok";
    }

    @GetMapping("/updateUser")
    public String updateUser(){
        userMapper.updateUser(new User(7,"小明","989787"));
        return "ok";
    }

    @GetMapping("/deleteUser/{id}")
    public String deleteUser(@PathVariable("id") Integer id){
        userMapper.deleteUser(id);
        return "ok";
    }
}
四、SrpingSecurity
4.1、授权和认证
1、导入依赖
<dependency>
    <groupId>org.springframework.bootgroupId>
    <artifactId>spring-boot-starter-securityartifactId>
dependency>
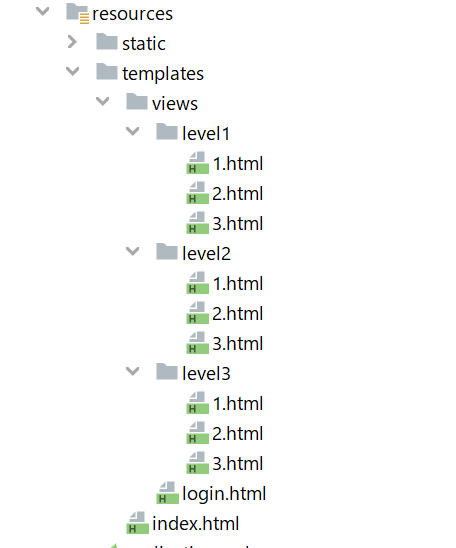
2、编写跳转路由
@Controller
public class RouterController {

    @GetMapping({"/","/index"})
    public String index(){
        return "index";
    }

    @GetMapping("/toLogin")
    public String toLogin(){
        return "views/login";
    }

    @GetMapping("/level1/{id}")
    public String level1(@PathVariable("id") Integer id){
        return "views/level1/"+id;
    }

    @GetMapping("/level2/{id}")
    public String level2(@PathVariable("id") Integer id){
        return "views/level2/"+id;
    }

    @GetMapping("/level3/{id}")
    public String level3(@PathVariable("id") Integer id){
        return "views/level3/"+id;
    }
}
3、编写配置类
@EnableWebSecurity
public class SecurityConfig extends WebSecurityConfigurerAdapter {

    /**
     * 授权
     * 链式编程
     * @param http
     * @throws Exception
     */
    @Override
    protected void configure(HttpSecurity http) throws Exception {
        //首页所有人都可以访问,功能页只有对应权限才可以访问
        http.authorizeRequests()
                .antMatchers("/").permitAll()
                .antMatchers("/level1/**").hasRole("vip1")
                .antMatchers("/level2/**").hasRole("vip2")
                .antMatchers("/level3/**").hasRole("vip3");

        //没有权限默认到登录页
        http.formLogin();
    }

    /**
     * 内存中的认证,密码需要编码,在Security5.0+新增了很多的加密方法
     * @param auth
     * @throws Exception
     */
    @Override
    protected void configure(AuthenticationManagerBuilder auth) throws Exception {
        auth.inMemoryAuthentication().passwordEncoder(new BCryptPasswordEncoder())
                .withUser("vip3").password(new BCryptPasswordEncoder().encode("123456")).roles("vip1","vip2","vip3")
                .and().withUser("vip1").password(new BCryptPasswordEncoder().encode("123456")).roles("vip1")
                .and().withUser("vip2").password(new BCryptPasswordEncoder().encode("123456")).roles("vip1","vip2");
    }
}
如果使用数据库查询,则按照下图
4.2、注销及权限控制
1、注销
@Override
protected void configure(HttpSecurity http) throws Exception {
    //首页所有人都可以访问,功能页只有对应权限才可以访问
    http.authorizeRequests()
        .antMatchers("/").permitAll()
        .antMatchers("/level1/**").hasRole("vip1")
        .antMatchers("/level2/**").hasRole("vip2")
        .antMatchers("/level3/**").hasRole("vip3");

    //没有权限默认到登录页
    http.formLogin();
    //开启注销功能
    //默认跳到登录页面
    http.logout();
    //指定跳到指定路径
    http.logout().logoutSuccessUrl("/");
    //关闭csrf功能,登出失败可能的原因
    http.csrf().disable();
}
2、权限控制,根据用户的不同权限动态显示不同的内容
导入依赖
<dependency>
    <groupId>org.thymeleaf.extrasgroupId>
    <artifactId>thymeleaf-extras-springsecurity6artifactId>
    <version>3.1.0.M1version>
dependency>
在html中导入命名空间
xmlns:sec="http://www.thymeleaf.org/extras/spring-security"
DOCTYPE html>
<html lang="en" xmlns:th="http://www.thymeleaf.org"
      xmlns:sec="http://www.thymeleaf.org/extras/spring-security">
    <head>
        <meta charset="UTF-8">
        <meta name="viewport" content="width=device-width, initial-scale=1, maximum-scale=1">
        <title>首页title>

        <link href="https://cdn.bootcss.com/semantic-ui/2.4.1/semantic.min.css" rel="stylesheet">
        <link th:href="@{/qinjiang/css/qinstyle.css}" rel="stylesheet">
    head>
    <body>


        <div class="ui container">

            <div class="ui segment" id="index-header-nav" th:fragment="nav-menu">
                <div class="ui secondary menu">
                    <a class="item"  th:href="@{/index}">首页a>


                    <div class="right menu">

                        <div sec:authorize="!isAuthenticated()">
                            <a class="item" th:href="@{/toLogin}">
                                <i class="address card icon">i> 登录
                            a>
                        div>

                        <div sec:authorize="isAuthenticated()">
                            <a class="item">
                                用户名:<span sec:authentication="name">span>
                                角色:<span sec:authentication="principal.authorities">span>
                            a>
                        div>

                        <div sec:authorize="isAuthenticated()">
                            <a class="item" th:href="@{/logout}">
                                <i class="sign-out icon">i> 注销
                            a>
                        div>


                    div>
                div>
            div>

            <div class="ui segment" style="text-align: center">
                <h3>Spring Security Study by meh3>
            div>

            <div>
                <br>
                <div class="ui three column stackable grid">

                    <div class="column" sec:authorize="hasRole('vip1')">
                        <div class="ui raised segment">
                            <div class="ui">
                                <div class="content">
                                    <h5 class="content">Level 1h5>
                                    <hr>
                                    <div><a th:href="@{/level1/1}"><i class="bullhorn icon">i> Level-1-1a>div>
                                    <div><a th:href="@{/level1/2}"><i class="bullhorn icon">i> Level-1-2a>div>
                                    <div><a th:href="@{/level1/3}"><i class="bullhorn icon">i> Level-1-3a>div>
                                div>
                            div>
                        div>
                    div>

                    <div class="column" sec:authorize="hasRole('vip2')">
                        <div class="ui raised segment">
                            <div class="ui">
                                <div class="content">
                                    <h5 class="content">Level 2h5>
                                    <hr>
                                    <div><a th:href="@{/level2/1}"><i class="bullhorn icon">i> Level-2-1a>div>
                                    <div><a th:href="@{/level2/2}"><i class="bullhorn icon">i> Level-2-2a>div>
                                    <div><a th:href="@{/level2/3}"><i class="bullhorn icon">i> Level-2-3a>div>
                                div>
                            div>
                        div>
                    div>

                    <div class="column" sec:authorize="hasRole('vip3')">
                        <div class="ui raised segment">
                            <div class="ui">
                                <div class="content">
                                    <h5 class="content">Level 3h5>
                                    <hr>
                                    <div><a th:href="@{/level3/1}"><i class="bullhorn icon">i> Level-3-1a>div>
                                    <div><a th:href="@{/level3/2}"><i class="bullhorn icon">i> Level-3-2a>div>
                                    <div><a th:href="@{/level3/3}"><i class="bullhorn icon">i> Level-3-3a>div>
                                div>
                            div>
                        div>
                    div>

                div>
            div>

        div>


        <script th:src="@{/qinjiang/js/jquery-3.1.1.min.js}">script>
        <script th:src="@{/qinjiang/js/semantic.min.js}">script>

    body>
html>
主要部分:
<div sec:authorize="!isAuthenticated()">
    <a class="item" th:href="@{/toLogin}">
        <i class="address card icon">i> 登录
    a>
div>

<div sec:authorize="isAuthenticated()">
    <a class="item">
        用户名:<span sec:authentication="name">span>
        角色:<span sec:authentication="principal.authorities">span>
    a>
div>

<div sec:authorize="isAuthenticated()">
    <a class="item" th:href="@{/logout}">
        <i class="sign-out icon">i> 注销
    a>
div>


<div class="column" sec:authorize="hasRole('vip1')">

div>

<div class="column" sec:authorize="hasRole('vip2')">

div>
但以上最多支持springboot2.0.9版本
4.3、记住我和首页定制
注意,自定义登录页面后,登录请求路径也要自定义
@Override
protected void configure(HttpSecurity http) throws Exception {
    //首页所有人都可以访问,功能页只有对应权限才可以访问
    http.authorizeRequests()
        .antMatchers("/").permitAll()
        .antMatchers("/level1/**").hasRole("vip1")
        .antMatchers("/level2/**").hasRole("vip2")
        .antMatchers("/level3/**").hasRole("vip3");

    //没有权限默认到登录页,设置登录页面的地址和登录请求的路径
    http.formLogin().loginPage("/toLogin").loginProcessingUrl("/usr/login");
    //开启注销功能
    //默认跳到登录页面
    http.logout();
    //指定跳到指定路径
    http.logout().logoutSuccessUrl("/");
    //关闭csrf功能,登出失败可能的原因
    http.csrf().disable();

    //开启记住我功能,设置了一个cookie,默认保存两周
    http.rememberMe().rememberMeParameter("remember");
}
登录页面:
DOCTYPE html>
<html lang="en" xmlns:th="http://www.thymeleaf.org">
    <head>
        <meta charset="UTF-8">
        <meta name="viewport" content="width=device-width, initial-scale=1, maximum-scale=1">
        <title>登录title>

        <link href="https://cdn.bootcss.com/semantic-ui/2.4.1/semantic.min.css" rel="stylesheet">
    head>
    <body>


        <div class="ui container">

            <div class="ui segment">

                <div style="text-align: center">
                    <h1 class="header">登录h1>
                div>

                <div class="ui placeholder segment">
                    <div class="ui column very relaxed stackable grid">
                        <div class="column">
                            <div class="ui form">
                                <form th:action="@{/usr/login}" method="post">
                                    <div class="field">
                                        <label>Usernamelabel>
                                        <div class="ui left icon input">
                                            <input type="text" placeholder="Username" name="username">
                                            <i class="user icon">i>
                                        div>
                                    div>
                                    <div class="field">
                                        <label>Passwordlabel>
                                        <div class="ui left icon input">
                                            <input type="password" name="password">
                                            <i class="lock icon">i>
                                        div>
                                    div>
                                    <div class="field">
                                        <input type="checkbox" name="remember">记住我
                                    div>
                                    <input type="submit" class="ui blue submit button"/>
                                form>
                            div>
                        div>
                    div>
                div>

                <div style="text-align: center">
                    <div class="ui label">
                        i>注册
                div>
                <br><br>
                <small>www.baidu.comsmall>
            div>
            <div class="ui segment" style="text-align: center">
                <h3>Spring Security Study by meh3>
            div>
        div>


        div>

    <script th:src="@{/qinjiang/js/jquery-3.1.1.min.js}">script>
    <script th:src="@{/qinjiang/js/semantic.min.js}">script>

    body>
html>
注意:使用自定义页面登录时,username,password,remember的name值需要和security中的参数对应
五、Shiro
5.1、简介
1、导入依赖
<dependency>
    <groupId>org.apache.shirogroupId>
    <artifactId>shiro-springartifactId>
    <version>1.6.0version>
dependency>
2、配置文件 *.ini
3、功能列举
Subject currentUser = SecurityUtils.getSubject();
Session session = currentUser.getSession();
currentUser.isAuthenticated()
currentUser.getPrincipal()
currentUser.hasRole("schwartz")
currentUser.isPermitted("lightsaber:wield")
currentUser.logout();
Shiro三大组件:
Subject 用户
SecurityManager 管理所有用户
Realm 连接数据
5.2、登录拦截
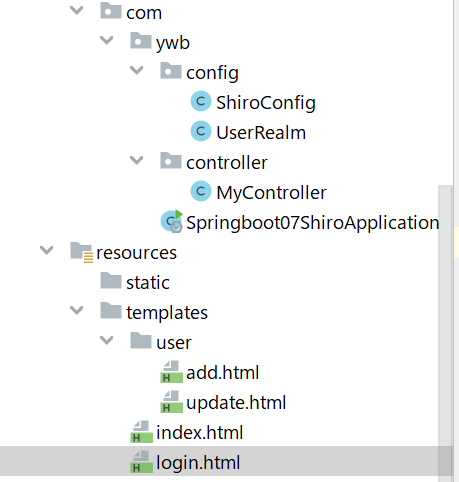
编写Realm类
public class UserRealm extends AuthorizingRealm {

    /**
     * 授权
     * @param principalCollection
     * @return
     */
    @Override
    protected AuthorizationInfo doGetAuthorizationInfo(PrincipalCollection principalCollection) {
        return null;
    }

    /**
     * 认证
     * @param authenticationToken
     * @return
     * @throws AuthenticationException
     */
    @Override
    protected AuthenticationInfo doGetAuthenticationInfo(AuthenticationToken authenticationToken) throws AuthenticationException {
        return null;
    }
}
配置类
@Configuration
public class ShiroConfig {

    /**
     * ShiroFilterFactoryBean,需要设置defaultWebSecurityManager
     * @param defaultWebSecurityManager
     * @return
     */
    @Bean
    public ShiroFilterFactoryBean shiroFilterFactoryBean(@Qualifier("defaultWebSecurityManager") DefaultWebSecurityManager defaultWebSecurityManager){
        ShiroFilterFactoryBean factoryBean = new ShiroFilterFactoryBean();
        //设置安全管理器
        factoryBean.setSecurityManager(defaultWebSecurityManager);
        //添加shiro的内置过滤器
        /*
            anno:无需认证就可以访问
            authc:必须认证了才能访问
            user:必须拥有 记住我 功能才能访问
            perms:拥有对某个资源的权限才能访问
            role:拥有某个角色权限才能访问
            filterMap.put("/user/add","authc");
            filterMap.put("/user/update","authc");
         */
        Map<String, String> filterMap = new LinkedHashMap<>();
        filterMap.put("/user/*","authc");
        factoryBean.setFilterChainDefinitionMap(filterMap);
        //设置登录的请求路径
        factoryBean.setLoginUrl("/toLogin");
        return factoryBean;
    }

    /**
     * DefaultWebSecurityManager,需要绑定Realm
     * @return
     */
    @Bean
    public DefaultWebSecurityManager defaultWebSecurityManager(@Qualifier("userRealm") UserRealm userRealm){
        DefaultWebSecurityManager securityManager = new DefaultWebSecurityManager();
        //关联userRealm
        securityManager.setRealm(userRealm);
        return securityManager;
    }

    /**
     * 创建Realm对象,需要自定义
     * @return
     */
    @Bean
    public UserRealm userRealm(){
        return new UserRealm();
    }

}
Controller:
@Controller
public class MyController {

    @GetMapping({"/","index","index.html"})
    public String toIndex(Model model){
        model.addAttribute("msg","hello shiro");
        return "index";
    }

    @GetMapping("/user/add")
    public String add(){
        return "user/add";
    }

    @GetMapping("/user/update")
    public String update(){
        return "user/update";
    }

    @GetMapping("/toLogin")
    public String toLogin(){
        return "login";
    }

}
5.3、用户认证
在UserRealm中添加认证
public class UserRealm extends AuthorizingRealm {

    /**
     * 授权
     * @param principalCollection
     * @return
     */
    @Override
    protected AuthorizationInfo doGetAuthorizationInfo(PrincipalCollection principalCollection) {
        System.out.println("授权==>doGetAuthorizationInfo");
        return null;
    }

    /**
     * 认证
     * @param authenticationToken
     * @return
     * @throws AuthenticationException
     */
    @Override
    protected AuthenticationInfo doGetAuthenticationInfo(AuthenticationToken authenticationToken) throws AuthenticationException {
        System.out.println("认证==>doGetAuthenticationInfo");
        //用户名,密码,数据库中取得
        String username = "admin",password = "123456";
        UsernamePasswordToken userToken = (UsernamePasswordToken)authenticationToken;
        //比对用户名
        if (!userToken.getUsername().equals(username)){
            //抛出异常UnknownAccountException
            return null;
        }
        //密码认证由shiro来做
        return new SimpleAuthenticationInfo("",password,"");
    }
}
Controller:
@PostMapping("/login")
public String login(String username, String password, Model model){
    System.out.println("Debug==>"+username);
    System.out.println("Debug==>"+password);
    //获取当前的用户
    Subject subject = SecurityUtils.getSubject();
    //封装用户的登录数据
    UsernamePasswordToken token = new UsernamePasswordToken(username, password);
    //执行登录方法,如果没有异常就ok了
    try {
        subject.login(token);
        return "index";
    }catch (UnknownAccountException e){
        model.addAttribute("msg","用户名不存在");
        return "login";
    }catch (IncorrectCredentialsException e){
        model.addAttribute("msg","密码错误");
        return "login";

    }
}
login.html:
DOCTYPE html>
<html lang="en" xmlns:th="http://www.themeleaf.org">
<head>
    <meta charset="UTF-8">
    <title>Titletitle>
head>
<body>

<h2>登录h2>
<p th:text="${msg}" style="color: red">p>
<form th:action="@{/login}" method="post">
    <p>用户名:<input type="text" name="username">p>
    <p>密码:<input type="text" name="password">p>
    <p><input type="submit">p>
form>

body>
html>
配置类:
@Configuration
public class ShiroConfig {

    /**
     * ShiroFilterFactoryBean,需要设置defaultWebSecurityManager
     * @param defaultWebSecurityManager
     * @return
     */
    @Bean
    public ShiroFilterFactoryBean shiroFilterFactoryBean(@Qualifier("defaultWebSecurityManager") DefaultWebSecurityManager defaultWebSecurityManager){
        ShiroFilterFactoryBean factoryBean = new ShiroFilterFactoryBean();
        //设置安全管理器
        factoryBean.setSecurityManager(defaultWebSecurityManager);
        //添加shiro的内置过滤器
        /*
            anno:无需认证就可以访问
            authc:必须认证了才能访问
            user:必须拥有 记住我 功能才能访问
            perms:拥有对某个资源的权限才能访问
            role:拥有某个角色权限才能访问
            filterMap.put("/user/add","authc");
            filterMap.put("/user/update","authc");
         */
        Map<String, String> filterMap = new LinkedHashMap<>();
        filterMap.put("/user/*","authc");
        factoryBean.setFilterChainDefinitionMap(filterMap);
        //设置登录的请求路径
        factoryBean.setLoginUrl("/toLogin");
        return factoryBean;
    }

    /**
     * DefaultWebSecurityManager,需要绑定Realm
     * @return
     */
    @Bean
    public DefaultWebSecurityManager defaultWebSecurityManager(@Qualifier("userRealm") UserRealm userRealm){
        DefaultWebSecurityManager securityManager = new DefaultWebSecurityManager();
        //关联userRealm
        securityManager.setRealm(userRealm);
        securityManager.setSessionManager(sessionManager());
        return securityManager;
    }

    /**
     * 会话管理
     * @return
     */
    @Bean
    public DefaultWebSessionManager sessionManager() {
        DefaultWebSessionManager sessionManager = new DefaultWebSessionManager();
        // 去掉shiro登录时url里的JSESSIONID
        sessionManager.setSessionIdUrlRewritingEnabled(false);
        return sessionManager;
    }

    /**
     * 创建Realm对象,需要自定义
     * @return
     */
    @Bean
    public UserRealm userRealm(){
        return new UserRealm();
    }
}
5.4、连接数据库
@Repository
@Mapper
public interface UserMapper {

    public User queryUserByName(String name);
}
public interface UserService {

    public User queryUserByName(String name);
}
@Service
public class UserServiceImpl implements UserService {

    @Autowired
    private UserMapper userMapper;

    @Override
    public User queryUserByName(String name) {
        return userMapper.queryUserByName(name);
    }
}
DOCTYPE mapper
        PUBLIC "-//mybatis.org//DTD Mapper 3.0//EN"
        "http://mybatis.org/dtd/mybatis-3-mapper.dtd">
<mapper namespace="com.ywb.mapper.UserMapper">
    <select id="queryUserByName" resultType="User" parameterType="String">
        select * from user where name = #{name}
    select>
mapper>
使用数据库中的数据认证登录,UserRealm中
/**
     * 认证
     * @param authenticationToken
     * @return
     * @throws AuthenticationException
     */
@Override
protected AuthenticationInfo doGetAuthenticationInfo(AuthenticationToken authenticationToken) throws AuthenticationException {
    System.out.println("认证==>doGetAuthenticationInfo");
    //用户名,密码,数据库中取得
    UsernamePasswordToken userToken = (UsernamePasswordToken)authenticationToken;
    User user = userService.queryUserByName(userToken.getUsername());
    //比对用户名
    if (user == null){
        //抛出异常UnknownAccountException
        return null;
    }
    //密码认证由shiro来做,加密,可以用MD5加密,MD5盐值加密
    return new SimpleAuthenticationInfo("",user.getPwd(),"");
}
5.5、请求授权实现
1、在数据库中增加权限字段
2、在拦截器添加拦截路径和权限判断
/**
     * ShiroFilterFactoryBean,需要设置defaultWebSecurityManager
     * @param defaultWebSecurityManager
     * @return
     */
@Bean
public ShiroFilterFactoryBean shiroFilterFactoryBean(@Qualifier("defaultWebSecurityManager") DefaultWebSecurityManager defaultWebSecurityManager){
    ShiroFilterFactoryBean factoryBean = new ShiroFilterFactoryBean();
    //设置安全管理器
    factoryBean.setSecurityManager(defaultWebSecurityManager);
    //添加shiro的内置过滤器
    /*
            anno:无需认证就可以访问
            authc:必须认证了才能访问
            user:必须拥有 记住我 功能才能访问
            perms:拥有对某个资源的权限才能访问
            role:拥有某个角色权限才能访问
            filterMap.put("/user/add","authc");
            filterMap.put("/user/update","authc");
         */
    Map<String, String> filterMap = new LinkedHashMap<>();

    //授权,正常情况下,未授权会跳转到一个授权页面
    filterMap.put("/user/add","perms[user:add]");
    filterMap.put("/user/update","perms[user:update]");
    filterMap.put("/user/*","authc");

    factoryBean.setFilterChainDefinitionMap(filterMap);
    //设置登录的请求路径
    factoryBean.setLoginUrl("/toLogin");
    //设置未授权页面
    factoryBean.setUnauthorizedUrl("/noauth");
    return factoryBean;
}
3、设置未授权跳转的页面
@RequestMapping("/noauth")
@ResponseBody
public String unauthorized(){
    return "未经授权无法访问此页面";
}
4、根据数据库字段给用户添加权限
public class UserRealm extends AuthorizingRealm {

    @Autowired
    private UserService userService;

    /**
     * 授权
     * @param principalCollection
     * @return
     */
    @Override
    protected AuthorizationInfo doGetAuthorizationInfo(PrincipalCollection principalCollection) {
        System.out.println("授权==>doGetAuthorizationInfo");
        SimpleAuthorizationInfo info = new SimpleAuthorizationInfo();
        //拿到当前登录的对象
        Subject subject = SecurityUtils.getSubject();
        User currentUser = (User) subject.getPrincipal();
        String perms = currentUser.getPerms();
        if (perms==null){
            return info;
        }
        String[] permsList = perms.split(",");
        for (String perm : permsList) {
            info.addStringPermission(perm);
        }
        return info;
    }

    /**
     * 认证
     * @param authenticationToken
     * @return
     * @throws AuthenticationException
     */
    @Override
    protected AuthenticationInfo doGetAuthenticationInfo(AuthenticationToken authenticationToken) throws AuthenticationException {
        System.out.println("认证==>doGetAuthenticationInfo");
        //用户名,密码,数据库中取得
        UsernamePasswordToken userToken = (UsernamePasswordToken)authenticationToken;
        User user = userService.queryUserByName(userToken.getUsername());
        //比对用户名
        if (user == null){
            //抛出异常UnknownAccountException
            return null;
        }
        //密码认证由shiro来做,加密,可以用MD5加密,MD5盐值加密
        return new SimpleAuthenticationInfo(user,user.getPwd(),"");
    }
}
重点:
在认证代码中将用户返回给principal
return new SimpleAuthenticationInfo(user,user.getPwd(),"");
授权代码
SimpleAuthorizationInfo info = new SimpleAuthorizationInfo();
//拿到当前登录的对象
Subject subject = SecurityUtils.getSubject();
User currentUser = (User) subject.getPrincipal();
String perms = currentUser.getPerms();
String[] permsList = perms.split(",");
for (String perm : permsList) {
    info.addStringPermission(perm);
}
5.6、Shiro整合Thymeleaf
1、导入依赖
<dependency>
    <groupId>com.github.theborakompanionigroupId>
    <artifactId>thymeleaf-extras-shiroartifactId>
    <version>2.0.0version>
dependency>
2、生成ShiroDialect类
//整合shiroDialect:用来整合shiro-thymeleaf
@Bean
public ShiroDialect shiroDialect(){
    return new ShiroDialect();
}
3、导入命名空间
<html lang="en" xmlns:th="http://www.thymeleaf.org"
      xmlns:shiro="http://www.pollix.at/thymeleaf/shiro">
4、使用shiro标签进行判断
DOCTYPE html>
<html lang="en" xmlns:th="http://www.thymeleaf.org"
      xmlns:shiro="http://www.pollix.at/thymeleaf/shiro">
<head>
    <meta charset="UTF-8">
    <title>Titletitle>
head>
<body>

<h2>首页h2>
<h3 th:text="${msg}">h3>

<p>
    <div shiro:notAuthenticated="">
        <a th:href="@{/toLogin}">登录a>
    div>
p>

<div shiro:hasPermission="user:add">
    <a th:href="@{/user/add}">adda>
div>

<div shiro:hasPermission="user:update">
    <a th:href="@{/user/update}">updatea>
div>


body>
html>
六、Swagger
6.1、简介
- RestFul Api 文档在线自动生成工具=> Api文档和Api定义同步更新
- 直接运行,可以在线测试api接口
- 支持多种语言
在项目使用Swagger需要springfox
- swagger2
- ui
6.2、SpringBoot集成Swagger
1、新建一个SpringBoot
2、导入依赖
<dependency>
    <groupId>io.springfoxgroupId>
    <artifactId>springfox-swagger2artifactId>
    <version>2.9.2version>
dependency>
<dependency>
    <groupId>io.springfoxgroupId>
    <artifactId>springfox-swagger-uiartifactId>
    <version>2.9.2version>
dependency>
3、编写一个Hello工程
4、配置Swagger
@Configuration
@EnableSwagger2
public class SwaggerConfig {

}
5、重点!在yml文件中配置接口文档
spring:
  mvc:
    pathmatch:
      matching-strategy: ant_path_matcher
6、测试运行
访问localhost:8080/swagger-ui.html
6.3、配置swagger
Swagger的bean实例 Docket
@Configuration
@EnableSwagger2   //开启Swagger2
public class SwaggerConfig {


    /**
     * 配置了swagger的Docket的bean实例
     * @return
     */
    @Bean
    public Docket docket(){
        return new Docket(DocumentationType.SWAGGER_2)
                .apiInfo(apiInfo());
    }

    /**
     * 配置swagger的信息
     */
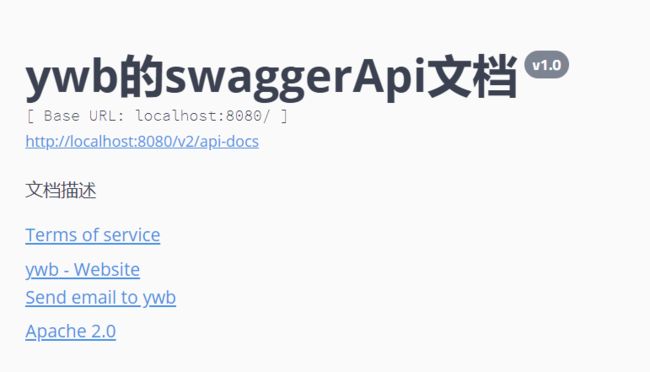
    private ApiInfo apiInfo(){

        //作者信息
        Contact contact = new Contact("ywb", "我的网站", "[email protected]");

        return new ApiInfo(
                "ywb的swaggerApi文档",
                "文档描述",
                "v1.0",
                "我的网站",
                contact,
                "Apache 2.0",
                "http://www.apache.org/licenses/LICENSE-2.0",
                new ArrayList());
    }
}
6.4、Swagger配置扫描接口
Docket.select()
指定扫描包
/**
     * 配置了swagger的Docket的bean实例
     * @return
     */
@Bean
public Docket docket(){
    return new Docket(DocumentationType.SWAGGER_2)
        .apiInfo(apiInfo())
        .select()
        //RequestHandlerSelectors配置要扫描的接口
        //basePackage指定要扫描的包
        .apis(RequestHandlerSelectors.basePackage("com.ywb.controller"))
        .build();
}
其他指定方法
/**
     * 配置了swagger的Docket的bean实例
     * @return
     */
@Bean
public Docket docket(){
    return new Docket(DocumentationType.SWAGGER_2)
        .apiInfo(apiInfo())
        .select()
        //RequestHandlerSelectors配置要扫描的接口
        //basePackage指定要扫描的包
        //any():扫描全部
        //none():都不扫描
        //withClassAnnotation():扫描类上的注解,参数是一个注解的反射对象
        //withMethodAnnotation():扫描方法上的注解
        .apis(RequestHandlerSelectors.withMethodAnnotation(GetMapping.class))
        .build();
}
通过路径扫描
/**
     * 配置了swagger的Docket的bean实例
     * @return
     */
@Bean
public Docket docket(){
    return new Docket(DocumentationType.SWAGGER_2)
        .apiInfo(apiInfo())
        .select()
        //过滤什么路径,只有/admin/**的路径才能被扫描
        .paths(PathSelectors.ant("/admin/**"))
        .build();
}
总结:
方法1:apis()
/**
     * 配置了swagger的Docket的bean实例
     * @return
     */
@Bean
public Docket docket(){
    return new Docket(DocumentationType.SWAGGER_2)
        .apiInfo(apiInfo())
        .select()
        //RequestHandlerSelectors配置要扫描的接口
        //basePackage指定要扫描的包
        .apis(RequestHandlerSelectors.xxxxxxxxxx)
        .build();
}
方法2:paths()
/**
     * 配置了swagger的Docket的bean实例
     * @return
     */
@Bean
public Docket docket(){
    return new Docket(DocumentationType.SWAGGER_2)
        .apiInfo(apiInfo())
        .select()
        //过滤什么路径,只有/admin/**的路径才能被扫描
        .paths(PathSelectors.ant("/admin/**"))
        .build();
}
6.5、配置是否启动Swagger
**enable(false) ** 关闭Swagger
/**
     * 配置了swagger的Docket的bean实例
     * @return
     */
@Bean
public Docket docket(){
    return new Docket(DocumentationType.SWAGGER_2)
        .apiInfo(apiInfo())
        .enable(false)
        .select()
        .paths(PathSelectors.ant("/admin/**"))
        .build();
}
6.6、配置Swagger只在生产环境中使用
- 判断是不是生产环境
- 注入enable()
/**
     * 配置了swagger的Docket的bean实例
     * @return
     */
@Bean
public Docket docket(Environment environment){

    //设置要显示的swagger环境
    Profiles profiles = Profiles.of("dev");

    //通过environment.acceptsProfiles判断是否处在自己设定的环境中
    boolean flag = environment.acceptsProfiles(profiles);
    System.out.println(flag);
    return new Docket(DocumentationType.SWAGGER_2)
        .apiInfo(apiInfo())
        .enable(flag)
        .select()
        .paths(PathSelectors.ant("/admin/**"))
        .build();
}
6.7、配置API分组
配置API分组
.gropuName("xxxx")
@Bean
public Docket docket(Environment environment){

    //设置要显示的swagger环境
    Profiles profiles = Profiles.of("dev");

    //通过environment.acceptsProfiles判断是否处在自己设定的环境中
    boolean flag = environment.acceptsProfiles(profiles);
    System.out.println(flag);
    return new Docket(DocumentationType.SWAGGER_2)
        .apiInfo(apiInfo())
        .enable(flag)
        .groupName("ywb")
        .select()
        .paths(PathSelectors.ant("/admin/**"))
        .build();
}
配置多个API分组,即配置多个Docket
各分组扫描的包会根据自己找个Docket里面的代码指定来扫描
@Bean
public Docket docket1(){
    return new Docket(DocumentationType.SWAGGER_2).groupName("A");
}

@Bean
public Docket docket2(){
    return new Docket(DocumentationType.SWAGGER_2).groupName("B");
}

@Bean
public Docket docket3(){
    return new Docket(DocumentationType.SWAGGER_2).groupName("C");
}
6.8、实体类配置
在controller接口中返回值有实体类的,能够在Swagger中扫描到该实体类
/**
 * @author ywb
 */
@Api(tags = "Hello控制类")
@RestController
public class HelloController {

    @ApiOperation("Hello控制方法")
    @GetMapping("/hello")
    public String hello(){
        return "hello";
    }

    //只要在我们的接口中,返回值存在实体类,就会被扫描到Swagger中
    @GetMapping("/user")
    public User user(){
        return new User();
    }

    @ApiOperation("hello2控制方法")
    @GetMapping("/hello2")
    public String hello2(@ApiParam("用户名") String username){
        return "hello2"+username;
    }
}
注解方法:@ApiOperation()
注解方法参数:@ApiParm()
注解Controller类:@Api(tag = “xxx”)
注解实体类:@ApiModel(“xxx”)
注解实体类的字段:@ApiModelProperty(“xxxx”)
@ApiModel("用户实体类")
public class User {

    @ApiModelProperty("用户名")
    public String name;

    @ApiModelProperty("密码")
    public String password;
}
七、任务
7.1、异步任务
程序需要开多一个线程去执行别的方法时,可以先执行后面的方法
1、在方法上加注解**@Async**
@Service
public class AsyncService {

    /**
     * 告诉spring这是一个异步任务
     */
    @Async
    public void hello(){
        try {
            Thread.sleep(3000);
        } catch (InterruptedException e) {
            e.printStackTrace();
        }
        System.out.println("数据正在处理。。。");
    }

}
2、在启动类上开启异步注解功能**@EnableAsync**
//开启异步注解功能
@EnableAsync
@SpringBootApplication
public class Springboot09TestApplication {

    public static void main(String[] args) {
        SpringApplication.run(Springboot09TestApplication.class, args);
    }

}
举例
@RestController
public class AsyncController {

    @Autowired
    private AsyncService asyncService;

    @GetMapping("/hello")
    public String hello(){
        asyncService.hello();
        return "ok";
    }

}
正常情况下:浏览器会转圈3秒然后再跳转视图
异步任务下:浏览器会直接跳转视图,同时3秒后输出”数据正在处理“
7.2、邮件发送
1、导入依赖
<dependency>
    <groupId>org.springframework.bootgroupId>
    <artifactId>spring-boot-starter-mailartifactId>
dependency>
2、打开邮箱POP3/SMTP服务并且生成授权码
3、配置文件
spring:
  mail:
    username: [email protected]
    password: xxxxxxxxxxx
    host: smtp.qq.com
4、编写代码
@SpringBootTest
class Springboot09TestApplicationTests {
@Autowired
JavaMailSenderImpl mailSender;
//发送一个剪简单的邮件
@Test
void contextLoads() {
SimpleMailMessage simpleMailMessage = new SimpleMailMessage();
simpleMailMessage.setSubject("主题");
simpleMailMessage.setText("文本");
simpleMailMessage.setTo("[email protected]");
simpleMailMessage.setFrom("[email protected]");
mailSender.send(simpleMailMessage);
}
//发送一个复杂的邮件
@Test
void contextLoads1() throws MessagingException {
MimeMessage mimeMessage = mailSender.createMimeMessage();
//组装
MimeMessageHelper helper = new MimeMessageHelper(mimeMessage,true);
//正文
helper.setSubject("主题");
helper.setText("文本
",true);
//附件
helper.addAttachment("1.jpg",new File("C:\\Users\\xxx的电脑\\Desktop\\1.jpg"));
helper.setTo("[email protected]");
helper.setFrom("[email protected]");
mailSender.send(mimeMessage);
}
}
7.3、定时任务
TaskScheduler		任务调度者
TaskExecutor		任务执行者

@EnableScheduling	开启定时功能的注解,加在启动类上
@Scheduled			什么时候执行

Cron表达式
/**
 * @author ywb
 */
@Service
public class ScheduledService {

    /**
     *  30 15 10 * * ?      每天10点15分30秒执行一次
     *  0/5 * * * * ?       每5秒执行一次
     *  30 0/5 10,18 * * ?  每天10点和18点,每隔5分钟执行一次
     *  cron表达式可以到网上直接生成
     */
    @Scheduled(cron = "0/5 * * * * ?")
    public void hello(){
        System.out.println("hello,你被执行了");
    }

}
八、SpringBoot整合Redis
springboot操作数据:Spring-Data jpa mongodb redis
SpringData也是和SpringBoot齐名的项目
8.1、整合测试
1、导入依赖
<dependency>
    <groupId>org.springframework.bootgroupId>
    <artifactId>spring-boot-starter-data-redisartifactId>
dependency>
说明:在springboot2.x之后,原来使用的jedis被替换为了lettuce
jedis:采用的是直连的方法,多个线程操作的话,是不安全的,如果想要避免不安全的,使用jedis pool 连接池,更像BIO模式
lettuce:采用netty,实例可以在多个线程中进行共享,不存在线程不安全的情况,可以减少线程数量,更像NIO模式
@Bean
@ConditionalOnMissingBean(
name = {"redisTemplate"}
) //我们需要自己定义一个redisTemplate来替换这个默认的
@ConditionalOnSingleCandidate(RedisConnectionFactory.class)
public RedisTemplate<Object, Object> redisTemplate(RedisConnectionFactory redisConnectionFactory) {
//默认的RedisTemplate没有过多的设置,redis对象都是需要序列化的
//默认的RedisTemplate,两个泛型都是Object,Object的类型,我们之后使用需要强制转换2、配置连接
spring:
  redis:
    host: xxxxxxxx
    port: 6379
    database: 0
    password: xxxxxxx
#    lettuce:
#      pool:
#        max-active:
注意:配置时一定要使用lettuce,不能用jedis
3、测试
@SpringBootTest
class Springboot10RedisApplicationTests {

    @Autowired
    private RedisTemplate redisTemplate;

    @Test
    void contextLoads() {
        //opsForValue   操作字符串   类似String
        //除了基本的操作,我们常用的方法都可以直接通过redisTemplate操作,比如事务,和基本的CRUD
        redisTemplate.opsForValue();
        //获取redis的连接对象
        RedisConnection connection = redisTemplate.getConnectionFactory().getConnection();
        connection.flushAll();
        connection.flushDb();
    }

}
举例
@SpringBootTest
class Springboot10RedisApplicationTests {

    @Autowired
    private RedisTemplate redisTemplate;

    @Test
    void contextLoads() {
        //opsForValue   操作字符串   类似String
        //除了基本的操作,我们常用的方法都可以直接通过redisTemplate操作,比如事务,和基本的CRUD
        redisTemplate.opsForValue().set("key1","测试值");
        System.out.println(redisTemplate.opsForValue().get("key1"));
    }
}
在redis客户端中出现乱码,redisTemplate需要序列化
关于对象的保存,所有的对象需要序列化,但是默认的序列化是djk序列化,我们需要自己更改
8.2、自定义RedisTemplate模板
import com.fasterxml.jackson.annotation.JsonAutoDetect;
import com.fasterxml.jackson.annotation.PropertyAccessor;
import com.fasterxml.jackson.databind.ObjectMapper;
import org.springframework.context.annotation.Bean;
import org.springframework.context.annotation.Configuration;
import org.springframework.data.redis.connection.RedisConnectionFactory;
import org.springframework.data.redis.core.RedisTemplate;
import org.springframework.data.redis.serializer.Jackson2JsonRedisSerializer;
import org.springframework.data.redis.serializer.StringRedisSerializer;

@Configuration
public class RedisConfig {

    /**
     * 自己定义的RedisTemplate,固定模板
     * @param redisConnectionFactory
     * @return
     */
    @Bean
    @SuppressWarnings("all")
    public RedisTemplate<String, Object> redisTemplate(RedisConnectionFactory redisConnectionFactory) {
        //我们为了自己开发方便,一般直接使用类型
        RedisTemplate<String, Object> template = new RedisTemplate<>();
        template.setConnectionFactory(redisConnectionFactory);

        //json序列化配置
        Jackson2JsonRedisSerializer jackson2JsonRedisSerializer = new Jackson2JsonRedisSerializer(Object.class);
        ObjectMapper om = new ObjectMapper();
        om.setVisibility(PropertyAccessor.ALL, JsonAutoDetect.Visibility.ANY);
        om.enableDefaultTyping(ObjectMapper.DefaultTyping.NON_FINAL);
        jackson2JsonRedisSerializer.setObjectMapper(om);
        //String序列化配置
        StringRedisSerializer stringRedisSerializer = new StringRedisSerializer();

        //key采用String的序列化方式
        template.setKeySerializer(stringRedisSerializer);
        //hash的key也采用String的序列化方式
        template.setHashKeySerializer(stringRedisSerializer);
        //value序列化采用jackson
        template.setValueSerializer(jackson2JsonRedisSerializer);
        //hash的value序列化也采用jackson
        template.setHashValueSerializer(jackson2JsonRedisSerializer);
        template.afterPropertiesSet();

        return template;
    }
}
8.3、自定义Redis工具类
使用RedisTemplate需要频繁调用.opForxxx然后才能进行对应的操作,这样使用起来代码效率低下,工作中一般不会这样使用,而是将这些常用的公共API抽取出来封装成为一个工具类,然后直接使用工具类来间接操作Redis,不但效率高并且易用。
import org.springframework.beans.factory.annotation.Autowired;
import org.springframework.data.redis.core.RedisTemplate;
import org.springframework.stereotype.Component;
import org.springframework.util.CollectionUtils;

import java.util.List;
import java.util.Map;
import java.util.Set;
import java.util.concurrent.TimeUnit;

@Component
public final class RedisUtil {

    @Autowired
    private RedisTemplate<String, Object> redisTemplate;

    // =============================common============================
    /**
     * 指定缓存失效时间
     * @param key  键
     * @param time 时间(秒)
     */
    public boolean expire(String key, long time) {
        try {
            if (time > 0) {
                redisTemplate.expire(key, time, TimeUnit.SECONDS);
            }
            return true;
        } catch (Exception e) {
            e.printStackTrace();
            return false;
        }
    }

    /**
     * 根据key 获取过期时间
     * @param key 键 不能为null
     * @return 时间(秒) 返回0代表为永久有效
     */
    public long getExpire(String key) {
        return redisTemplate.getExpire(key, TimeUnit.SECONDS);
    }


    /**
     * 判断key是否存在
     * @param key 键
     * @return true 存在 false不存在
     */
    public boolean hasKey(String key) {
        try {
            return redisTemplate.hasKey(key);
        } catch (Exception e) {
            e.printStackTrace();
            return false;
        }
    }


    /**
     * 删除缓存
     * @param key 可以传一个值 或多个
     */
    @SuppressWarnings("unchecked")
    public void del(String... key) {
        if (key != null && key.length > 0) {
            if (key.length == 1) {
                redisTemplate.delete(key[0]);
            } else {
                redisTemplate.delete(String.valueOf(CollectionUtils.arrayToList(key)));
            }
        }
    }


    // ============================String=============================

    /**
     * 普通缓存获取
     * @param key 键
     * @return 值
     */
    public Object get(String key) {
        return key == null ? null : redisTemplate.opsForValue().get(key);
    }

    /**
     * 普通缓存放入
     * @param key   键
     * @param value 值
     * @return true成功 false失败
     */

    public boolean set(String key, Object value) {
        try {
            redisTemplate.opsForValue().set(key, value);
            return true;
        } catch (Exception e) {
            e.printStackTrace();
            return false;
        }
    }


    /**
     * 普通缓存放入并设置时间
     * @param key   键
     * @param value 值
     * @param time  时间(秒) time要大于0 如果time小于等于0 将设置无限期
     * @return true成功 false 失败
     */

    public boolean set(String key, Object value, long time) {
        try {
            if (time > 0) {
                redisTemplate.opsForValue().set(key, value, time, TimeUnit.SECONDS);
            } else {
                set(key, value);
            }
            return true;
        } catch (Exception e) {
            e.printStackTrace();
            return false;
        }
    }


    /**
     * 递增
     * @param key   键
     * @param delta 要增加几(大于0)
     */
    public long incr(String key, long delta) {
        if (delta < 0) {
            throw new RuntimeException("递增因子必须大于0");
        }
        return redisTemplate.opsForValue().increment(key, delta);
    }


    /**
     * 递减
     * @param key   键
     * @param delta 要减少几(小于0)
     */
    public long decr(String key, long delta) {
        if (delta < 0) {
            throw new RuntimeException("递减因子必须大于0");
        }
        return redisTemplate.opsForValue().increment(key, -delta);
    }


    // ================================Map=================================

    /**
     * HashGet
     * @param key  键 不能为null
     * @param item 项 不能为null
     */
    public Object hget(String key, String item) {
        return redisTemplate.opsForHash().get(key, item);
    }

    /**
     * 获取hashKey对应的所有键值
     * @param key 键
     * @return 对应的多个键值
     */
    public Map<Object, Object> hmget(String key) {
        return redisTemplate.opsForHash().entries(key);
    }

    /**
     * HashSet
     * @param key 键
     * @param map 对应多个键值
     */
    public boolean hmset(String key, Map<String, Object> map) {
        try {
            redisTemplate.opsForHash().putAll(key, map);
            return true;
        } catch (Exception e) {
            e.printStackTrace();
            return false;
        }
    }


    /**
     * HashSet 并设置时间
     * @param key  键
     * @param map  对应多个键值
     * @param time 时间(秒)
     * @return true成功 false失败
     */
    public boolean hmset(String key, Map<String, Object> map, long time) {
        try {
            redisTemplate.opsForHash().putAll(key, map);
            if (time > 0) {
                expire(key, time);
            }
            return true;
        } catch (Exception e) {
            e.printStackTrace();
            return false;
        }
    }


    /**
     * 向一张hash表中放入数据,如果不存在将创建
     *
     * @param key   键
     * @param item  项
     * @param value 值
     * @return true 成功 false失败
     */
    public boolean hset(String key, String item, Object value) {
        try {
            redisTemplate.opsForHash().put(key, item, value);
            return true;
        } catch (Exception e) {
            e.printStackTrace();
            return false;
        }
    }

    /**
     * 向一张hash表中放入数据,如果不存在将创建
     *
     * @param key   键
     * @param item  项
     * @param value 值
     * @param time  时间(秒) 注意:如果已存在的hash表有时间,这里将会替换原有的时间
     * @return true 成功 false失败
     */
    public boolean hset(String key, String item, Object value, long time) {
        try {
            redisTemplate.opsForHash().put(key, item, value);
            if (time > 0) {
                expire(key, time);
            }
            return true;
        } catch (Exception e) {
            e.printStackTrace();
            return false;
        }
    }


    /**
     * 删除hash表中的值
     *
     * @param key  键 不能为null
     * @param item 项 可以使多个 不能为null
     */
    public void hdel(String key, Object... item) {
        redisTemplate.opsForHash().delete(key, item);
    }


    /**
     * 判断hash表中是否有该项的值
     *
     * @param key  键 不能为null
     * @param item 项 不能为null
     * @return true 存在 false不存在
     */
    public boolean hHasKey(String key, String item) {
        return redisTemplate.opsForHash().hasKey(key, item);
    }


    /**
     * hash递增 如果不存在,就会创建一个 并把新增后的值返回
     *
     * @param key  键
     * @param item 项
     * @param by   要增加几(大于0)
     */
    public double hincr(String key, String item, double by) {
        return redisTemplate.opsForHash().increment(key, item, by);
    }


    /**
     * hash递减
     *
     * @param key  键
     * @param item 项
     * @param by   要减少记(小于0)
     */
    public double hdecr(String key, String item, double by) {
        return redisTemplate.opsForHash().increment(key, item, -by);
    }


    // ============================set=============================

    /**
     * 根据key获取Set中的所有值
     * @param key 键
     */
    public Set<Object> sGet(String key) {
        try {
            return redisTemplate.opsForSet().members(key);
        } catch (Exception e) {
            e.printStackTrace();
            return null;
        }
    }


    /**
     * 根据value从一个set中查询,是否存在
     *
     * @param key   键
     * @param value 值
     * @return true 存在 false不存在
     */
    public boolean sHasKey(String key, Object value) {
        try {
            return redisTemplate.opsForSet().isMember(key, value);
        } catch (Exception e) {
            e.printStackTrace();
            return false;
        }
    }


    /**
     * 将数据放入set缓存
     *
     * @param key    键
     * @param values 值 可以是多个
     * @return 成功个数
     */
    public long sSet(String key, Object... values) {
        try {
            return redisTemplate.opsForSet().add(key, values);
        } catch (Exception e) {
            e.printStackTrace();
            return 0;
        }
    }


    /**
     * 将set数据放入缓存
     *
     * @param key    键
     * @param time   时间(秒)
     * @param values 值 可以是多个
     * @return 成功个数
     */
    public long sSetAndTime(String key, long time, Object... values) {
        try {
            Long count = redisTemplate.opsForSet().add(key, values);
            if (time > 0)
                expire(key, time);
            return count;
        } catch (Exception e) {
            e.printStackTrace();
            return 0;
        }
    }


    /**
     * 获取set缓存的长度
     *
     * @param key 键
     */
    public long sGetSetSize(String key) {
        try {
            return redisTemplate.opsForSet().size(key);
        } catch (Exception e) {
            e.printStackTrace();
            return 0;
        }
    }


    /**
     * 移除值为value的
     *
     * @param key    键
     * @param values 值 可以是多个
     * @return 移除的个数
     */

    public long setRemove(String key, Object... values) {
        try {
            Long count = redisTemplate.opsForSet().remove(key, values);
            return count;
        } catch (Exception e) {
            e.printStackTrace();
            return 0;
        }
    }

    // ===============================list=================================

    /**
     * 获取list缓存的内容
     *
     * @param key   键
     * @param start 开始
     * @param end   结束 0 到 -1代表所有值
     */
    public List<Object> lGet(String key, long start, long end) {
        try {
            return redisTemplate.opsForList().range(key, start, end);
        } catch (Exception e) {
            e.printStackTrace();
            return null;
        }
    }


    /**
     * 获取list缓存的长度
     *
     * @param key 键
     */
    public long lGetListSize(String key) {
        try {
            return redisTemplate.opsForList().size(key);
        } catch (Exception e) {
            e.printStackTrace();
            return 0;
        }
    }


    /**
     * 通过索引 获取list中的值
     *
     * @param key   键
     * @param index 索引 index>=0时, 0 表头,1 第二个元素,依次类推;index<0时,-1,表尾,-2倒数第二个元素,依次类推
     */
    public Object lGetIndex(String key, long index) {
        try {
            return redisTemplate.opsForList().index(key, index);
        } catch (Exception e) {
            e.printStackTrace();
            return null;
        }
    }


    /**
     * 将list放入缓存
     *
     * @param key   键
     * @param value 值
     */
    public boolean lSet(String key, Object value) {
        try {
            redisTemplate.opsForList().rightPush(key, value);
            return true;
        } catch (Exception e) {
            e.printStackTrace();
            return false;
        }
    }


    /**
     * 将list放入缓存
     * @param key   键
     * @param value 值
     * @param time  时间(秒)
     */
    public boolean lSet(String key, Object value, long time) {
        try {
            redisTemplate.opsForList().rightPush(key, value);
            if (time > 0)
                expire(key, time);
            return true;
        } catch (Exception e) {
            e.printStackTrace();
            return false;
        }

    }


    /**
     * 将list放入缓存
     *
     * @param key   键
     * @param value 值
     * @return
     */
    public boolean lSet(String key, List<Object> value) {
        try {
            redisTemplate.opsForList().rightPushAll(key, value);
            return true;
        } catch (Exception e) {
            e.printStackTrace();
            return false;
        }

    }


    /**
     * 将list放入缓存
     *
     * @param key   键
     * @param value 值
     * @param time  时间(秒)
     * @return
     */
    public boolean lSet(String key, List<Object> value, long time) {
        try {
            redisTemplate.opsForList().rightPushAll(key, value);
            if (time > 0)
                expire(key, time);
            return true;
        } catch (Exception e) {
            e.printStackTrace();
            return false;
        }
    }


    /**
     * 根据索引修改list中的某条数据
     *
     * @param key   键
     * @param index 索引
     * @param value 值
     * @return
     */

    public boolean lUpdateIndex(String key, long index, Object value) {
        try {
            redisTemplate.opsForList().set(key, index, value);
            return true;
        } catch (Exception e) {
            e.printStackTrace();
            return false;
        }
    }


    /**
     * 移除N个值为value
     *
     * @param key   键
     * @param count 移除多少个
     * @param value 值
     * @return 移除的个数
     */

    public long lRemove(String key, long count, Object value) {
        try {
            Long remove = redisTemplate.opsForList().remove(key, count, value);
            return remove;
        } catch (Exception e) {
            e.printStackTrace();
            return 0;
        }

    }

}
九、分布式 Dubbo+Zookeeper+SpringBoot
9.1、什么是分布式系统?
在《分布式系统原理与范型》一书中有如下定义:”分布式系统是若干独立计算机的集合,这些计算机对于用户来说就像单个相关系统“
分布式系统是一组通过网络进行通信,为了完成共同的任务而协调工作的计算机节点组成的系统。分布式系统的出现是为了用廉价的、普通的机器完成单个计算机无法完成的计算、存储任务。其目的是利用更多的机器,处理更多的数据。
分布式系统(distributed system)是建立在网络之上的软件系统
首先需要明确的是,只有当单个节点的处理能力无法满足日益增长的计算、存储任务的时候,且硬件的提升(加内存,加磁盘,使用更好的cpu)高昂到得不偿失的时候,应用程序也不能进一步优化的时候,我们才需要考虑分布式系统。因为,分布式系统要解决的问题本身就是和单机系统一样的,而由于分布式系统多节点、通过网络通信的拓扑结构,会引入很多单机系统没有的问题,为了解决这些问题又会引入更多的机制、协议,带来更多的问题
单一应用架构
当网站流量很小时,只需一个应用,将所有功能都部署在一起,以减少部署节点和成本。此时,用于简化增删改查工作量的数据访问框架(ORM)是关键
适用于小型网站,小型管理系统,将所有功能都部署到一个功能里,简单易用。
缺点:
1、性能扩展比较难
2、协同开发问题
3、不利于升级维护
垂直应用架构
当访问量逐渐增大,单一应用增加机器带来的加速度越来越小,将应用拆成互不相干的几个应用,以提升效率。此时,用于加速前端页面开发的Web框架(MVC)是关键
通过切分业务来实现各个模块独立部署,降低了维护和部署的难度,团队各司其职更易管理,性能扩展也更方便,更有针对性。
缺点:公用模块无法重复利用,开发性的浪费
分布式服务架构
当垂直应用越来越多,应用之间交互不可避免,将核心业务抽取出来,作为独立的服务,逐渐形成稳定的服务中心,使前端应用能更快速地响应多变的市场需求。此时,用于提高业务复用及整合的分布式服务框架(RPC)是关键
流动计算架构
当服务越来越多,容量的评估,小服务资源的浪费等问题逐渐显现,此时需增加一个调度中心基于访问压力实时管理集群容量,提高集群利用率。此时,用于提高机器利用率的资源调度和治理中心(SOA)[Service Oriented Architecture]是关键。
9.2、RPC
RPC是指远程过程调用,是一种进程间通信方式,他是一种技术的思想,而不是规范。它允许程序调用另一个地址空间(通常是共享网络的另一台机器上)的过程或函数,而不用程序员显式编码这个远程调用的细节。即程序员无论是调用本地的还是远程的函数,本质上编写的调用代码基本相同。
也就是说两台服务器A,B,一个应用部署在A服务器上,想要调用B服务器上应用提供的函数/方法,由于不在一个内存空间,不能直接调用,需要通过网络来表达调用的语义和传达调用的数据。为什么要用RPC呢?就是无法在一个进程内,甚至一个计算机内通过本地调用的方式完成的需求,比如不同的系统间的通讯,甚至不同的组织间的通讯,由于计算能力需要横向扩展,需要在多台机器组成的集群上部署应用。RPC就是要像调用本地的函数一样去调远程函数。
RPC基本原理
RPC两个核心模块:通讯、序列化(数据传输需要转换)
9.3、Dubbo
什么是dubbo
Apache Dubbo是一款高性能、轻量级的开源Java RPC框架,它提供了三大核心能力:面向接口的远程方法调用,智能容错和负载均衡,以及服务自动注册和发现
服务提供者(Provider):暴露服务的服务提供方,服务提供者在启动时,向注册中心注册自己提供的服务
服务消费者(Consumer):调用远程服务的服务消费方,服务消费者在启动时,向注册中心订阅自己所需的服务,服务消费者,从提供者地址列表中,基于软负载均衡算法,选一台提供者进行调用,如果调用失败,再选另一台调用。
注册中心(Registry):注册中心返回服务提供者地址列表给消费者,如果有变更,注册中心将基于长连接推送变更数据给消费者
监控中心(Monitor):服务消费者和提供者,在内存中累计调用次数和调用时间,定时每分钟发送一次统计数据到监控中心
9.4、Zookeeper
1、下载
Apache ZooKeeper
下载压缩包解压即可
2、运行/bin/zkServer.cmd,初次运行可能会报错
可能遇到的问题:闪退
解决方案:如下图,添加一个pause查看报错信息
3、修改zoo.cfg配置文件
将conf文件夹下的zoo_sample.cfg一份,命名为zoo.cfg
注意几个重要位置:
dataDir=./ 临时数据存储的目录(可写相对路径)
clientPort=2181 zookeeper的端口号
修改完成后再次启动zookeeper
4、使用zkCli.cmd测试
ls /:列出zookeeper根下保存的所有节点
[zk:127.0.0.1:2181(CONNECTED) 4] ls /
[zookeeper]
create -e /jiedian 123:创建一个jiedian节点,值为123
[zk:localhost:2181(CONNECTED) 0] create -e /jiedian 123
Created /jiedian
get /jiedian:获取/jiedian节点的值
[zk: localhost:2181(CONNECTED) 3] get /yang
123
9.5、安装dubbo
1、下载dubbo-admin
https://github.com/apache/dubbo-admin/tree/master
2、解压进入目录
修改 dubbo-admin\src\main\resources \application.properties 指定zookeeper地址
server.port=7001
spring.velocity.cache=false
spring.velocity.charset=UTF-8
spring.velocity.layout-url=/templates/default.vm
spring.messages.fallback-to-system-locale=false
spring.messages.basename=i18n/message
spring.root.password=root
spring.guest.password=guest

dubbo.registry.address=zookeeper://127.0.0.1:2181
3、在项目目录下打包dubbo-admin
mvn clean package -Dmaven.test.skip=true
第一次打包过程有点慢
4、执行 dubbo-admin\target下的dubbo-admin-0.0.1-SNAPSHOT.jar
java -jar dubbo-admin-0.0.1-SNAPSHOT.jar
同时需要打开zookeeper服务
执行完毕,访问localhost:7001,需要我们输入账号和密码,我们都是默认的root-root
登录成功后,查看界面
dubbo-admin:是一个监控管理后台,可以查看我们注册了哪些服务,哪些服务被消费了(不是必须的)
zookeeper:注册中心
Dubbo:jar包
9.6、实战
<dependency>
    <groupId>org.apache.dubbogroupId>
    <artifactId>dubbo-spring-boot-starterartifactId>
    <version>2.7.8version>
dependency>


<dependency>
    <groupId>com.github.sgroschupfgroupId>
    <artifactId>zkclientartifactId>
    <version>0.1version>
dependency>


<dependency>
    <groupId>org.apache.curatorgroupId>
    <artifactId>curator-frameworkartifactId>
    <version>2.12.0version>
dependency>
<dependency>
    <groupId>org.apache.curatorgroupId>
    <artifactId>curator-recipesartifactId>
    <version>2.12.0version>
dependency>
<dependency>
    <groupId>org.apache.zookeepergroupId>
    <artifactId>zookeeperartifactId>
    <version>3.4.14version>

    <exclusions>
        <exclusion>
            <groupId>org.slf4jgroupId>
            <artifactId>slf4j-log4j12artifactId>
        exclusion>
    exclusions>
dependency>
服务模块
1、编写服务模块和消费模块
服务模块
Service类:
提供服务的类上面一定要加一个**@DubboService**
@DubboService   //使用这个注解之后就可以被dubbo扫描到
@Component   //使用了Dubbo后不要用Service注解,容易导错包
public class TicketServiceImpl implements TicketService{
    @Override
    public String getTicket() {
        return "获取票";
    }
}
2、配置文件信息
server.port=8081

#服务应用名字
dubbo.application.name=provider-server
#注册中心地址
dubbo.registry.address=zookeeper://127.0.0.1:2181
#哪些服务要被注册
dubbo.scan.base-packages=com.ywb.service
3、启动zookeeper,即打开zkServer.cmd
4、启动服务模块项目
5、启动dubbo-admin,即jar包
java -jar dubbo-admin-0.0.1-SNAPSHOT.jar
6、可访问localhost:7001查看服务注册信息
消费模块
1、导入依赖
2、配置服务信息
server.port=8082

#消费者去哪里拿,同时需要暴露自己的名字
dubbo.application.name=consumer-server
#注册中心的地址
dubbo.registry.address=zookeeper://127.0.0.1:2181
3、编写服务
远程注入@DubboReference
import org.apache.dubbo.config.annotation.DubboReference;
import org.springframework.stereotype.Service;

@Service
public class UserService {

    //想拿到provider-server提供的票,要去注册中心拿到服务
    //引用,但是这边没有TicketService,可以使用pom坐标,也可以定义路径相同的接口名
    @DubboReference
    TicketService ticketService;

    public void buyTicket(){
        String ticket = ticketService.getTicket();
        System.out.println("在注册中心拿到一张票==>"+ticket);
    }

}
4、测试运行
@SpringBootTest
class ConsumerServerApplicationTests {

    @Autowired
    UserService userService;

    @Test
    void contextLoads() {
        userService.buyTicket();
    }

}

/*
结果:在注册中心拿到一张票==>获取票
*/

