Dadisi Data-Distribution-Simulator
README
requirements
Dadisi requires a working g++ compiler (4.1 or greater, earlier versions may work but haven’t been tested). Additionally, you will also need the following libraries:
* libxerces-c >= 3.1.1 (and the C++ bindings)
* libsqlite3  >= 3.7.3 (and the C++ bindings)
* libgmp3     >= 4.3.2 (and the C++ bindings)
* libboost    >= 1.39.0
* libgcrypt11 >= 1.4.5
查看已经安装库
yum list installed | grep <library-name>
yum install xerces-c xerces-c-devel
yum install sqlite sqlite-devel
yum install gmp gmp-devel
yum install boost-devel
sudo yum install libgcrypt-devel


git clone https://github.com/emperorlu/Data-Distribution-Simulator.git

```
ERROR: Could not find gcrypt headers.
Please provide a valid path for the headers and the library with
--with-gcrypt-include-path and --with-gcrypt-lib-path.
```

rpm -ql libgcrypt-devel | grep include
/usr/include/gcrypt-module.h
/usr/include/gcrypt.h


rpm -ql libgcrypt-devel | grep lib
/usr/bin/libgcrypt-config
/usr/lib64/libgcrypt.so
/usr/share/aclocal/libgcrypt.m4
/usr/share/doc/libgcrypt-devel-1.5.3
/usr/share/doc/libgcrypt-devel-1.5.3/COPYING

#程序autoconf用configure.ac创建configure
./autogen.sh --with-gcrypt-include-path=/usr/include/gcrypt.h --with-gcrypt-lib-path=/usr/lib64/libgcrypt.so

./configure
#configure.log

make > make.log 2>&1
make & make install
documentation
分发策略必须继承 [Distributor]的基本class和为所有标记[pure virtual]的方法提供特定的实现,可通过[doc/html/index.html]查看
每个策略都必须有一个构造函数,接受一个[int]和一个[char array],用于从命令行向策略传递参数。此外,每个策略都必须实现一个构造函数,该构造函数接受一个[DOMElement],用于从xml文件中load策略configuration(如果不需要,可以将构造函数留空)
一旦策略被实现,则需要添加它到[Distributor::createDistributor]方法,以便它可以实例化使用。
在[DistRoundRobin]类中可以看见一个简单的分发策略。还包含了几个可以检查获取的其他实现更好地理解API。在[dadisi]目录中可以找到,名为[Dist*.h]
您还可以在[perf_eval]目录中找到一些关于如何使用API来执行分发策略的示例。
目标:
- 查看Distributor类的实现
- DistRoundRobin
- Dist*.h
查看Distributor类的实现
namspace VDRIVE
- DistCRUSH:粉碎
- DistFast RedundantShare:
- DistNearestNeighbour:
- DistRedundantShare:
- DistRoundRobin:
- DistRUSHp
- DistShare
- ImprovedMap
- RSCache
- RSCacheLeaf
- RSCacheNode
- RSDisk:
- ShareDisk:
编译
#boost
7za x boost_x_xx_x.7z
cd boost_x_xx_x
./bootstrap.sh
./b2
./b2 install --prefix=/usr/local/boost
#/root/boost_1_53_0/
#/usr/local/boost/include/boost

#libgcrypt
[root@localhost ~]# yum search libgpg-error
已加载插件:fastestmirror, langpacks
Loading mirror speeds from cached hostfile
 * base: mirrors.huaweicloud.com
 * epel: ftp.iij.ad.jp
 * extras: mirrors.huaweicloud.com
 * updates: mirrors.huaweicloud.com
================================== N/S matched: libgpg-error ===================================
libgpg-error-devel.aarch64 : Development files for the libgpg-error package
mingw32-libgpg-error.noarch : MinGW Windows libgpg-error compression library for the win32
                            : target
mingw32-libgpg-error-static.noarch : Static library for mingw32-libgpg-error development
mingw64-libgpg-error.noarch : MinGW Windows libgpg-error compression library for the win64
                            : target
mingw64-libgpg-error-static.noarch : Static library for mingw64-libgpg-error development
libgpg-error.aarch64 : Library for error values used by GnuPG components

  名称和简介匹配 only,使用“search all”试试。
[root@localhost ~]# rpm -q libgpg-error
libgpg-error-1.12-3.el7.aarch64

#configure: error: cannot guess build type; you must specify one
[root@localhost libgcrypt-1.4.5]# ./configure --build=aarch64-unknown-linux-gnu --enable-maintainer-mode && make


[root@localhost Data-Distribution-Simulator]./autogen.sh --with-boost=/usr/local/boost --with-gcrypt-include-path=/root/libgcrypt-1.4.5/src --with-gcrypt-lib-path=/root/libgcrypt-1.4.5/src


[root@localhost Data-Distribution-Simulator]# ./configure --with-boost=/usr/local/boost --with-gcrypt-include-path=/root/libgcrypt-1.4.5/src --with-gcrypt-lib-path=/root/libgcrypt-1.4.5/src

#该程序为 aarch64-redhat-linux-gnu 编译
问题
- libgpg-error-devel和libgpg-error的区别
libgpg-error 是 GNU Privacy Guard (GnuPG) 中使用的库之一,提供了用于处理错误代码和消息的功能。这个库包含了一个公共头文件 gpg-error.h,以及一个共享库 libgpg-error.so。
libgpg-error-devel 包是为了开发使用 libgpg-error 库的软件包而提供的,它包含了 libgpg-error 的头文件和开发文档,以及一个名为 gpg-error-config 的工具,该工具可以帮助开发人员在编译和链接时使用正确的编译器和选项。如果您需要开发使用 libgpg-error 库的软件包,则需要安装 libgpg-error-devel 包。
因此,libgpg-error 库提供了处理错误的功能,而 libgpg-error-devel 则提供了开发使用 libgpg-error 库的软件包所需的头文件、文档和工具。
- 查看已安装库的路径和头文件路径
使用pkg-config命令查询库信息
pkg-config --cflags --libs libgpg-error

[root@localhost lib64]# rpm -ql libgpg-error-devel | grep include
/usr/include/gpg-error.h

[root@localhost lib64]# ldconfig -p | grep libgpg-error
	libgpg-error.so.0 (libc6,AArch64) => /lib64/libgpg-error.so.0
- 卸载make & make install的库
通常,可以通过运行 make uninstall 命令来卸载通过 make 和 make install 安装的库。但是,这需要在安装库时创建了一个 .install 文件来记录库的安装信息,以便 make uninstall 命令可以正确地卸载库。
如果您没有使用 .install 文件或者您安装的库没有提供 make uninstall 命令,那么您需要手动删除安装的库。以下是手动删除库的一般步骤:
[root@localhost libgpg-error-1.13]# rpm -ql libgpg-error-devel
/usr/bin/gpg-error-config
/usr/include/gpg-error.h
/usr/lib64/libgpg-error.so
/usr/share/aclocal/gpg-error.m4

[root@localhost libgpg-error-1.13]# ldconfig -p | grep libgpg-error
	libgpg-error.so.0 (libc6,AArch64) => /lib64/libgpg-error.so.0


[root@localhost libgpg-error-1.13]# rpm -ql libgpg-error
#系统自带的
/lib64/libgpg-error.so.0
/lib64/libgpg-error.so.0.10.0
/usr/bin/gpg-error
/usr/share/doc/libgpg-error-1.12
/usr/share/doc/libgpg-error-1.12/AUTHORS
/usr/share/doc/libgpg-error-1.12/COPYING
/usr/share/doc/libgpg-error-1.12/COPYING.LIB
/usr/share/doc/libgpg-error-1.12/ChangeLog
/usr/share/doc/libgpg-error-1.12/NEWS
/usr/share/doc/libgpg-error-1.12/README
/usr/share/locale/cs/LC_MESSAGES/libgpg-error.mo
/usr/share/locale/da/LC_MESSAGES/libgpg-error.mo
/usr/share/locale/de/LC_MESSAGES/libgpg-error.mo
/usr/share/locale/eo/LC_MESSAGES/libgpg-error.mo
/usr/share/locale/fr/LC_MESSAGES/libgpg-error.mo
/usr/share/locale/it/LC_MESSAGES/libgpg-error.mo
/usr/share/locale/ja/LC_MESSAGES/libgpg-error.mo
/usr/share/locale/nl/LC_MESSAGES/libgpg-error.mo
/usr/share/locale/pl/LC_MESSAGES/libgpg-error.mo
/usr/share/locale/ro/LC_MESSAGES/libgpg-error.mo
/usr/share/locale/sv/LC_MESSAGES/libgpg-error.mo
/usr/share/locale/uk/LC_MESSAGES/libgpg-error.mo
/usr/share/locale/vi/LC_MESSAGES/libgpg-error.mo
/usr/share/locale/zh_CN/LC_MESSAGES/libgpg-error.mo


[root@localhost libgpg-error-1.13]# locate libgpg-error
/usr/lib64/libgpg-error.so
/usr/lib64/libgpg-error.so.0
/usr/lib64/libgpg-error.so.0.10.0
/usr/share/doc/libgpg-error-1.12
/usr/share/doc/libgpg-error-1.12/AUTHORS
/usr/share/doc/libgpg-error-1.12/COPYING
/usr/share/doc/libgpg-error-1.12/COPYING.LIB
/usr/share/doc/libgpg-error-1.12/ChangeLog
/usr/share/doc/libgpg-error-1.12/NEWS
/usr/share/doc/libgpg-error-1.12/README
/usr/share/locale/cs/LC_MESSAGES/libgpg-error.mo
/usr/share/locale/da/LC_MESSAGES/libgpg-error.mo
/usr/share/locale/de/LC_MESSAGES/libgpg-error.mo
/usr/share/locale/eo/LC_MESSAGES/libgpg-error.mo
/usr/share/locale/fr/LC_MESSAGES/libgpg-error.mo
/usr/share/locale/it/LC_MESSAGES/libgpg-error.mo
/usr/share/locale/ja/LC_MESSAGES/libgpg-error.mo
/usr/share/locale/nl/LC_MESSAGES/libgpg-error.mo
/usr/share/locale/pl/LC_MESSAGES/libgpg-error.mo
/usr/share/locale/ro/LC_MESSAGES/libgpg-error.mo
/usr/share/locale/sv/LC_MESSAGES/libgpg-error.mo
/usr/share/locale/uk/LC_MESSAGES/libgpg-error.mo
/usr/share/locale/vi/LC_MESSAGES/libgpg-error.mo
/usr/share/locale/zh_CN/LC_MESSAGES/libgpg-error.mo
- 针对rpm的卸载
rpm -ql libgpg-error | xargs sudo rm -rf
- 该命令将列出所有与
libgpg-error相关的文件,包括库文件、头文件、配置文件等等。 - 将列出的文件传递给
xargs命令,并使用rm命令删除这些文件
- DNS
vim /etc/resolv.conf

nameserver 8.8.8.8
nameserver 8.8.4.4
- 如何确保安装了正确的C++编译器和预处理器
#编译器
g++ --version
#预处理器
cpp --version
yum install gcc-c++
yum install cpp
which g++
which cpp

[root@localhost ~]# which g++
/usr/bin/g++
[root@localhost ~]# which cpp
/usr/bin/cpp
- 安装解压7z的
wget https://dl.fedoraproject.org/pub/epel/epel-release-latest-7.noarch.rpm
sudo rpm -ivh epel-release-latest-7.noarch.rpm
yum install p7zip
- yum Install path
rpm -ql yum
论文内容
框架图
[外链图片转存失败,源站可能有防盗链机制,建议将图片保存下来直接上传(img-Q8E6ea1H-1686561964202)(/Users/baum/Library/Application Support/typora-user-images/image-20230506181602115.png)]
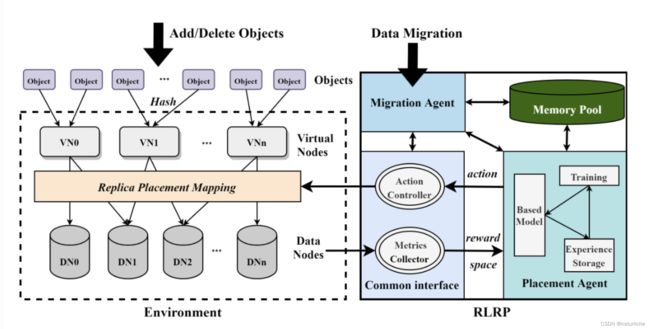
不直接分布objects到DNs,而是先映射对象到Virtual Nodes,这与Dynamo中的虚拟节点,Ceph中的归置组以及OpenStack-Swift中的分区具有相同的概念
虚拟节点是管理对象、数据迁移和管理的基本单位,它设定可以很好解决对象数量大导致难以管理的问题,从而降低数据分布的难度。
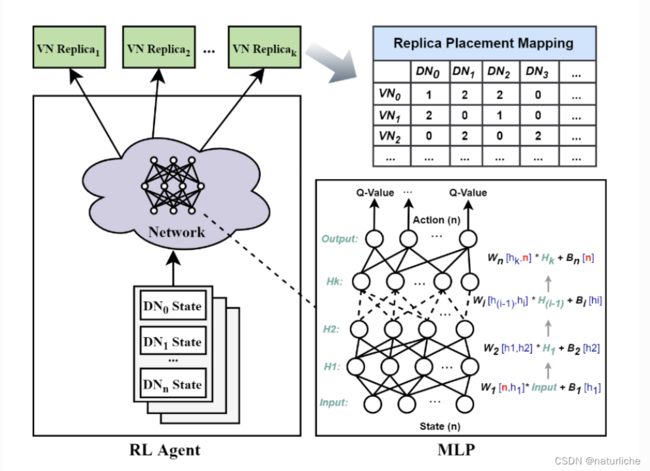
VNs映射到DNs通过RLRP来决策,一个虚拟节点会在不同数据节点上复制多份,副本数由上层应用决定。并且由标志来分辨主副本所在,主副本是首先写入的节点,在复制到别的副本,也是读操作访问的节点。如图中例子,副本数是2,VN1选择副本存放的数据节点是DN1和DN2。当每个virtual node被创建后,RLRP算法会考虑DNs节点的状态,通过Agent算法选出副本,并将映射关系加到RPM中。每个对象的读操作首先是通过hash函数找到虚拟节点,在通过查找RPM查找VN所在的数据节点。由于经过hash分组,映射表不会像集中式那样随着objects增长而线性增长。由一个映射表存储。每次读将通过查表找VN所在位置。由于经过hash分组,映射表不会像集中式那样随着objects增长而线性增长。
For distribution and migration, we use two kinds of agents to deal with the problem of distribution and migration. The two agents use the same model framework, but the defined elements are different.The framework of each Agent is a standard DQN model, which uses MLP as its neural network model by default and RNN+Attention model in heterogeneous environment.
-
**basic Placement Agent:**only considers DN capacity differences
-
**basic migration Agent:**数据迁移是指当存储规模发生变化时(数据节点增加或者减少),数据或副本调整以达到数据重新平衡。
Agents在异构和非异构的环境下DQN中神经网络模型有所区别。它默认使用的MLP作为其神经网络模型,在异构环境中使用RNN+Attention模型。在非异构环境中,基本的Placement Agent和迁移Agent只考虑DN的容量区别,而Heterogeneous环境下它会考虑各种影响性能的因素。为了加快RL训练,Agent可以并行生成经验(在内存池中存储经验),并在经验缓冲区达到批大小后进行经验重放,以进行训练和参数更新。
-
Metrics Collector负责从环境中获取系统性能和延迟,以及DNs节点的相关属性。DNs的相关属性将作为强化学习的样本特征,在不同环境可以有不同的选择,尤其是异构条件下,关键属性的选择是非常重要的。它们将作为RL Agent的状态和奖励信息送给Agent。
-
Action Controller负责实施Agent决定的action,它会通过更新映射表来决定选择的副本的数据节点或者迁移后的数据节点。
-
Memory Pool 存储训练相关权重参数,包括DQN的经验回放,模型参数等等
实验环境
仿真系统环境:DaDiSi:客户-服务器架构
客户端将实际工作负载数据分发到每个服务器(数据节点),集群为9个节点,配置其中一个为客户端,其余8个节点配置为服务器节点。
3台配备了英特尔Skylake Xeon处理器(2.40 GHz)、54 GB内存和英特尔DC NVMe SSD (P4510, 2 TB);其他的则是Intel Xeon处理器E5-2690 (2.60 GHz) 8核处理器,16 GB内存和三星SATA ssd (PM883, 3.84 TB)。所有节点的操作系统为Centos 7,内核为64位Linux 3.10.0。
在仿真同构环境中,所有数据节点在一个服务器上创建,数据节点除了容量上可以设置不同,其他配置完全相同。第一组的性能指标测试在这个环境中进行。仿真异构环境中,每个服务器作为不同的。
算法包括:Consistent Hashing,CRUSH,Random Slicing,
RLRP in park
[/root/anaconda3] >>>
PREFIX=/root/anaconda3
Unpacking payload ...
[30693] Error loading Python lib '/root/anaconda3/install_tmp/_MEInKl0GQ/libpython3.9.so.1.0': dlopen: /lib64/libc.so.6: version `GLIBC_2.25' not found (required by /root/anaconda3/install_tmp/_MEInKl0GQ/libpython3.9.so.1.0)

ln: failed to create symbolic link '/usr/local/glibc-2.25/lib/libresolv.so.new': No space left on device
make[2]: *** [../o-iterator.mk:9: /usr/local/glibc-2.25/lib/libresolv.so] Error 1
make[2]: Leaving directory '/root/glibc-2.25/resolv'
make[1]: *** [Makefile:215: resolv/subdir_install] Error 2
make[1]: Leaving directory '/root/glibc-2.25'
make: *** [Makefile:12: install] Error 2
规范评估
首先模拟同构环境,同构设置中
-
同构环境:
第一组:100个相同的data nodes(10 disks per node,10TB)
第二组:100 new data nodes,每个随机容量10TB-15TB
第三组:100 nodes with 10-20TB
。。。
一共五组,100 nodes to 500 nodes
object size=1MB
1 0 4 10^4 104 ~ 1 0 5 10^5 105 objects are distributed to data nodes
默认副本数是3
N d n , N o b j , N k N_{dn},N_{obj},N_{k} Ndn,Nobj,Nk分别表示data nodes,objects and replicas的数量
-
异构环境:
公平性
10%的超额预订意味着着对象的最大数量比平均价值高10%。库存越平衡,超额预订就越低。
适应性
时空效率
可以在perf_eval目录 中找到一些关于如何使用 API 来执行分发策略的示例
链接
https://github.com/emperorlu/RLRP
https://github.com/emperorlu/Replica-Placement
在Park上实现了RLRP
RLRP编译:
https://juejin.cn/s/yum%20%E6%9B%B4%E6%94%B9%E5%AE%89%E8%A3%85%E8%B7%AF%E5%BE%84
https://www.myfreax.com/how-to-install-pip-on-centos-7/
https://www.cnblogs.com/macroxu-1982/p/16284960.html
[root@localhost newdisk]# pip3 show pip
Name: pip
Version: 9.0.3
Summary: The PyPA recommended tool for installing Python packages.
Home-page: https://pip.pypa.io/
Author: The pip developers
Author-email: [email protected]
License: MIT
Location: /usr/lib/python3.6/site-packages
Requires:
修改centos7默认python为3
ln -fs /usr/bin/python3 /usr/bin/python
https://www.myfreax.com/how-to-install-tensorflow-on-centos-7/
sudo yum update
sudo yum install -y python3
mkdir /home/baum/rlrp/rlrp-rnv
cd /home/baum/rlrp/rlrp-rnv
python3 -m venv rlrp-rnv
source venv/bin/activate
#在虚拟环境中,可以使用命令pip代替pip3。python代替python3
#安装TensorFlow需要使用pip 19或者更高版本才能安装。我们需要首先运行以下pip命令将pip升级到最新版本:
pip install --upgrade pip
问题:
#官网安装tensorflow
https://www.tensorflow.org/install/source?hl=zh-cn


#Q1
(rlrp-rnv) [baum@localhost rlrp]$ pip install numpy
ERROR: Could not find a version that satisfies the requirement numpy (from versions: none)
ERROR: No matching distribution found for numpy
#解决办法
https://blog.csdn.net/m0_52122736/article/details/115903902
https://blog.csdn.net/u012897745/article/details/125898575

#Q2
yum install python3-devel
Loaded plugins: fastestmirror
Loading mirror speeds from cached hostfile
 * base: mirrors.coreix.net
 * epel: ftp.lysator.liu.se
 * extras: mirrors.coreix.net
 * updates: mirrors.coreix.net
No package python3-devel available.
#解决办法
#https://serverfault.com/questions/710354/repository-for-python3-devel-on-centos-7
yum search python3 | grep devel
sudo yum install -y python3-devel.aarch64
实验
Metrics Collector负责从环境中获取系统性能和延迟,以及DNs节点的相关属性。DNs的相关属性将作为强化学习的样本特征,在不同环境可以有不同的选择,尤其是异构条件下,关键属性的选择是非常重要的。它们将作为RL Agent的状态和奖励信息送给Agent。
Action Controller负责实施Agent决定的action,它会通过更新映射表来决定选择的副本的数据节点或者迁移后的数据节点。
Agent分为Placement Agent和Migration Agent,分别为分布和迁移做出决策。数据迁移是指当存储规模发生变化时(数据节点增加或者减少),数据或副本调整以达到数据重新平衡。两者Agent使用一样的模型框架,一个标准的DQN模型,只是定义的元素不同。另外,Agents在异构和非异构的环境下DQN中神经网络模型有所区别。它默认使用的MLP作为其神经网络模型,在异构环境中使用RNN+Attention模型(LSM+attention)。
Memory Pool 存储训练相关权重参数,包括DQN的经验回放,模型参数等等
先介绍非异构环境下1)basic Placement Agent and 2)Migration Agen,然后介绍3)模型的训练加速,以及4)异构条件下的模型构建,最后介绍5)实现.
非异构环境: