Doxygen + Sphinx 文档构建笔记(非流程教程,支持 C++ 和 Python代码文档生成)
主题:如何将Doxygen的文档注入到 Sphinx 中、
环境:Windows + CMake + Doxygen + Sphinx + Breathe
老样子,先把参考内容附上:
主要参考的文章,如何使用 Sphinx+Breathe+Doxygen+CMake 来生成 C++ 文档
Doxygen官方文档,富含详细的 Doxygen 的各种注释写法
Shpinx官方文档,如果需要通过Sphinx的语法向文档中注入更多内容,需要参考官网的语法
Breathe官方文档,Breathe是将 Doxygen 文档注入 sphinx 的插件,是 sphinx 工具的插件
相关代码已经上传到了github,可以直接将代码拖下来看
接下来进入正题
1. 文件夹结构
示例将以 github 的示例来进行说明
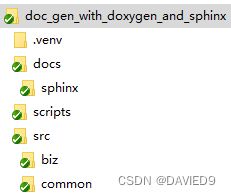
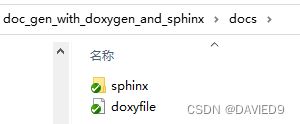
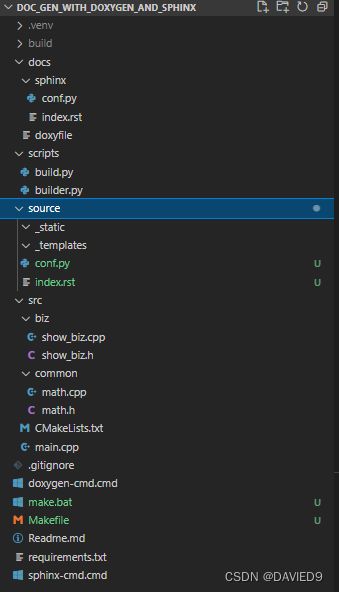
docs 文件夹中存放 Doxygen 和 Sphinx 生成文档的相关配置文件,doxyfile 为 Doxygen 生成文档的配置文件
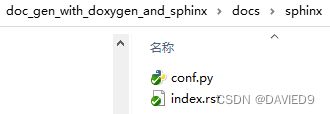
docs/sphinx 文件夹下存放 Sphinx 的配置文件 conf.py,和文档索引文件 index.rst
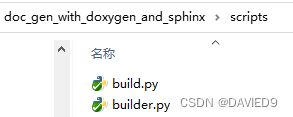
scripts 文件夹下为简单的 python 示例文件
src 文件夹下为示例 C++ 的源代码文件和 CMakeLists.txt 文件
完整的文件夹内容如下
2. Doxygen 生成 C++ 文档
2.1 Doxygen 简单标记说明
以 src/biz/show_biz.h 文件中的标记为例
#pragma once

#include
#include
#include "common/math.h"

//!
//! class Opera hhh
//!     a class to manipulate the procedure of Opera
//!
class Opera {
public:

    //! Create the opera (in .h)
    Opera();

    //! Destroy the opera (in .h)
    virtual ~Opera();

    //! Start the opera
    //! @brief Show info about starting of the opera
    //! @exception none
    //! @see SceneOperator::Start()
    void Start();

    //! Stop the opera
    //! @fn void Opera::Stop(aCondition)
    //! @brief ~~Show info about stopping of the opera~~
    //! @brief Those started with @ are [special commands](https://www.doxygen.nl/manual/commands.html)
    //! - [Markdown is supported](https://www.doxygen.nl/manual/markdown.html)
    //!   - a list is OK
    //!   - a list is supported
    void Stop();

private:
    std::shared_ptr __operator;   //!< Description after a member
};
我们这里采用了官方文档中所建议的其中一种写法: "//!" 开头的写法
比如说,下面这段代码,注释块都以 "//!",Doxygen会将这部分内容作为生成的文档的正文内容
//!
//! class Opera hhh
//!     a class to manipulate the procedure of Opera
//!
class Opera {
...
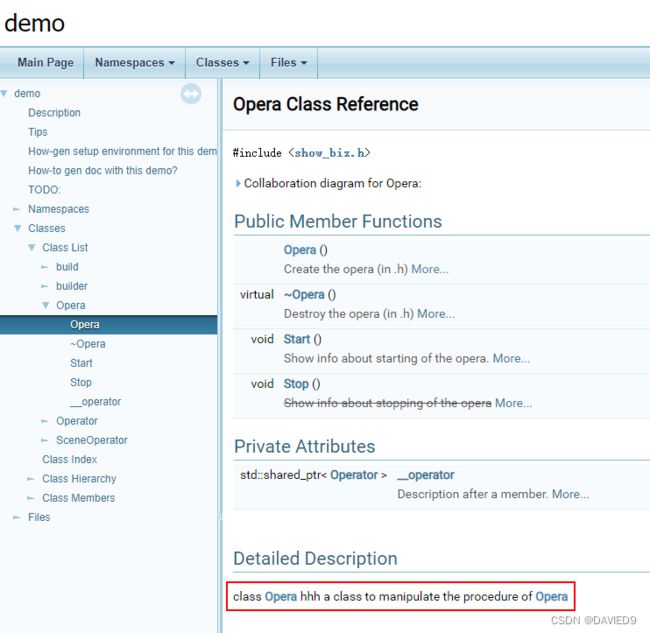
上面代码中注释,在最终生成的文档中,得到下图红框内的内容
可以注意到,生成的文档,并没有换行,是因为 Doxygen 的换行并不是按照代码注释的换行来的。
另外,"@ + <关键字>" 的方式来标记一些特殊字段,比如下面这段
    //! Start the opera
    //! @brief Show info about starting of the opera
    //! @exception none
    //! @see SceneOperator::Start()
    void Start();
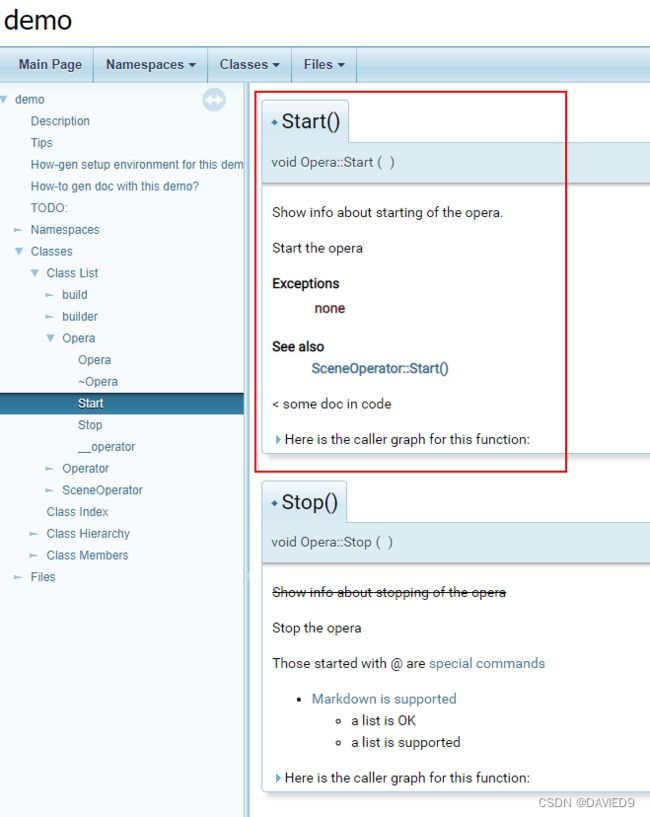
上面代码中注释,在最终生成的文档中,得到下图红框内的内容
上述代码中用了如下关键字
@brief - 简介
@exception - 该函数抛出异常(对应C++的异常声明语法)
@see - 引用内容,可以写HTTP连接,可以写文档中的其他函数(可以自动生成连接)
其他常用的关键字还有
@class - 指定注释块所注释的类
@param - 参数
@note - 注释
小结一下,Doxygen 添加文档的基本方式,通过 "//!" 标记注释块,通过 "@ + <关键字>" 添加文档内容。
2.2 Doxygen 配置文件生成和配置
Doxygen 安装好后,可以通过 doxygen -v 命令查看版本号来确认安装是否正常
V:\projects\water\doc_gen\doc_gen_with_doxygen_and_sphinx>doxygen -v
1.9.2 (caa4e3de211fbbef2c3adf58a6bd4c86d0eb7cb8)
对于一个新的项目,通过 doxygen -g 生成一个 doxyfile 文件的模板(使用 github 示例的不需要,可以在 docs/doxyfile 处找到 doxyfile )
doxyfile 模板非常长,里面包含了所有的可配置项以及其说明,大致长下面这样
#---------------------------------------------------------------------------
# Project related configuration options
#---------------------------------------------------------------------------

# The PROJECT_NAME tag is a single word (or a sequence of words surrounded by
# double-quotes, unless you are using Doxywizard) that should identify the
# project for which the documentation is generated. This name is used in the
# title of most generated pages and in a few other places.
# The default value is: My Project.

PROJECT_NAME           = "demo"

# The OUTPUT_DIRECTORY tag is used to specify the (relative or absolute) path
# into which the generated documentation will be written. If a relative path is
# entered, it will be relative to the location where doxygen was started. If
# left blank the current directory will be used.

OUTPUT_DIRECTORY       = .build/doxygen

# If the USE_MDFILE_AS_MAINPAGE tag refers to the name of a markdown file that
# is part of the input, its contents will be placed on the main page
# (index.html). This can be useful if you have a project on for instance GitHub
# and want to reuse the introduction page also for the doxygen output.

USE_MDFILE_AS_MAINPAGE = Readme.md

#---------------------------------------------------------------------------
# Configuration options related to the input files
#---------------------------------------------------------------------------

# The INPUT tag is used to specify the files and/or directories that contain
# documented source files. You may enter file names like myfile.cpp or
# directories like /usr/src/myproject. Separate the files or directories with
# spaces. See also FILE_PATTERNS and EXTENSION_MAPPING
# Note: If this tag is empty the current directory is searched.

INPUT                  = src/main.cpp \
    src/common/math.cpp \
    src/common/math.H \
    src/biz/show_biz.cpp \
    src/biz/show_biz.h \
    scripts/build.py \
    scripts/builder.py \
    Readme.md

#---------------------------------------------------------------------------
# Configuration options related to the XML output
#---------------------------------------------------------------------------

# If the GENERATE_XML tag is set to YES, doxygen will generate an XML file that
# captures the structure of the code including all documentation.
# The default value is: NO.

GENERATE_XML           = YES
那么我们示例中以最简修改来看,修改了 PROJECT_NAME,USE_MDFILE_AS_MAINPAGE,OUTPUT_DIRECTORY,INPUT,GENERATE_XML
PROJECT_NAME - 项目名称
USE_MDFILE_AS_MAINPAGE - 将置定的 markdown 文件作为主页
OUTPUT_DIRECTORY - 文档生成路径
INPUT - 文档输入文件[夹],即那些文件[夹]会被Doxygen解析
GENERATE_XML - 生成 XML 文件,用于 Sphinx/Breathe 输入
这里项目名称我们就写为 demo,输出放在 .build/doxygen(Sphinx 会依赖这个目录),INPUT 包含了 C++ 文件,python 文件和 Readme.md 的 markdown 文件,而添加的这个 Readme.md 文件将作为文档主页。
2.3 Doxygen 文档生成
生成 Doxygen 文档命令非常简单,直接调用 doxygen
注意 Doxygen 不会自动创建文件夹,所以我们需要手动保证输出文件夹 .build/doxygen 被创建
Doxygen 配置文件中所有的相对路径,都是基于调用 doxygen
综上,生成 Doxygen 文档的命令可以写为
mkdir .build\doxygen
doxygen docs/doxyfile
运行效果见下图
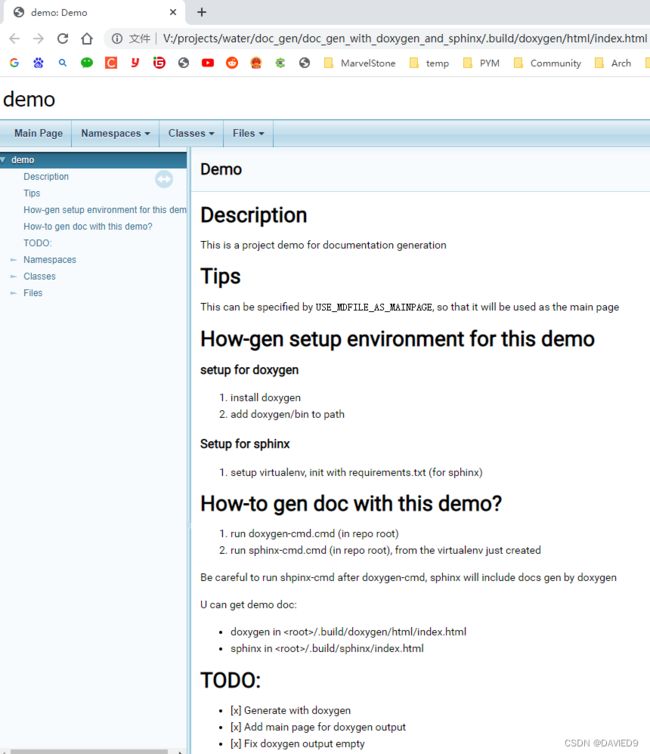
生成的文档,可以在 .build\doxygen\html 中看到,打开 .build\doxygen\html\index.html 即可看到主页如图所示
3. Sphinx 生成文档
sphinx 和 breathe 都可以通过 pip 直接安装,安装命令如下
pip install sphinx
pip install breathe
安装完成后,通过 sphinx-quickstart 命令,快速成成 conf.py 和 index.rst 文件模板,生成过程见下图(需要填写一些信息)
新生成的文件如下:
其中 make.bat 和 Makefile 是用来指导运行 sphinx-build 的,这里我们不需要,可以直接删除
conf.py
生成的 conf.py 文件如下
# Configuration file for the Sphinx documentation builder.
#
# This file only contains a selection of the most common options. For a full
# list see the documentation:
# https://www.sphinx-doc.org/en/master/usage/configuration.html

# -- Path setup --------------------------------------------------------------

# If extensions (or modules to document with autodoc) are in another directory,
# add these directories to sys.path here. If the directory is relative to the
# documentation root, use os.path.abspath to make it absolute, like shown here.
#
# import os
# import sys
# sys.path.insert(0, os.path.abspath('.'))


# -- Project information -----------------------------------------------------

project = 'demo'
copyright = '2022, dav'
author = 'dav'

# The full version, including alpha/beta/rc tags
release = 'v1'


# -- General configuration ---------------------------------------------------

# Add any Sphinx extension module names here, as strings. They can be
# extensions coming with Sphinx (named 'sphinx.ext.*') or your custom
# ones.
extensions = [
]

# Add any paths that contain templates here, relative to this directory.
templates_path = ['_templates']

# List of patterns, relative to source directory, that match files and
# directories to ignore when looking for source files.
# This pattern also affects html_static_path and html_extra_path.
exclude_patterns = []


# -- Options for HTML output -------------------------------------------------

# The theme to use for HTML and HTML Help pages.  See the documentation for
# a list of builtin themes.
#
html_theme = 'alabaster'

# Add any paths that contain custom static files (such as style sheets) here,
# relative to this directory. They are copied after the builtin static files,
# so a file named "default.css" will overwrite the builtin "default.css".
html_static_path = ['_static']
修改 conf.py 如下,相应的修改位置在 github 示例文件中增加了中文注释。修改内容主要就3点:
- 添加 python 搜索路径:确保 sphinx-build 可以正常引入我们的 python 脚本内容
- 增加插件指定:确保文档生成的相关功能所需的插件被添加(包含breathe)
- 添加 breathe 的基本配置:确保 breathe 可以在指定路径下找到 doxygen 生成的 xml 结果
# Configuration file for the Sphinx documentation builder.
#
# This file only contains a selection of the most common options. For a full
# list see the documentation:
# https://www.sphinx-doc.org/en/master/usage/configuration.html

# -- Path setup --------------------------------------------------------------

# If extensions (or modules to document with autodoc) are in another directory,
# add these directories to sys.path here. If the directory is relative to the
# documentation root, use os.path.abspath to make it absolute, like shown here.

import os
import sys

repoRoot = os.path.abspath(os.path.join(__file__, '..', '..', '..'))

# @@@ if build.py and builder.py cannot be imported,
# @@@ then the doc for them will not be included
# 在系统路径中添加 scripts 文件夹,以便 sphinx 能够正常 import scripts 文件夹下的 .py 文件
# 如果 build.py 和 builder.py 文件不能被 import,sphinx 不会报错,但是对应部分的文档会留空
scriptsRoot = os.path.abspath(os.path.join(repoRoot, 'scripts'))
sys.path.insert(0, scriptsRoot) # 可以手动注释掉此行看没有正常 import 的时候文档表现如何

# -- Project information -----------------------------------------------------
project = 'demo'
copyright = '2022, dav'
author = 'dav'

# -- General configuration ---------------------------------------------------

# Add any Sphinx extension module names here, as strings. They can be
# extensions coming with Sphinx (named 'sphinx.ext.*') or your custom
# ones.
# 添加 breathe 以及我们要使用到的 sphinx 的插件,附各个插件文档链接
#   breathe: https://breathe.readthedocs.io/en/latest/
#   autodoc: https://www.sphinx-doc.org/zh_CN/master/usage/extensions/autodoc.html
#   imgmath: https://www.sphinx-doc.org/zh_CN/master/usage/extensions/math.html
#   todo   : https://www.sphinx-doc.org/en/master/usage/extensions/todo.html
extensions = [
    'breathe',            # 用于支持 doxygen
    'sphinx.ext.autodoc', # sphinx 基础组件,用于引入文档字符串
    'sphinx.ext.imgmath', # sphinx 基础组件,用于数学支持
    'sphinx.ext.todo',    # sphinx 基础组件,用于支持TODO
]

# Breathe Configuration
breathe_default_project = 'demo' # breathe 默认项目
breathe_projects = {
    'demo': os.path.join(repoRoot, '.build/doxygen/xml') # 配置 demo 项目的 doxygen xml 路径
}
index.rst
生成的 index.rst 文件如下
.. demo documentation master file, created by
   sphinx-quickstart on Mon May 30 12:31:55 2022.
   You can adapt this file completely to your liking, but it should at least
   contain the root `toctree` directive.

Welcome to demo's documentation!
================================

.. toctree::
   :maxdepth: 2
   :caption: Contents:


Indices and tables
==================

* :ref:`genindex`
* :ref:`modindex`
* :ref:`search`
如果我们直接生成文档,将会得到如下结果,这是因为 index.rst 中未添加 doxygen 的引用
翻阅 breathe 的 quickstart 文档,我们可以看到有下面命令可以使用
.. doxygenindex::           索引
.. doxygenfunction::        函数
.. doxygenstruct::          结构体
.. doxygenenum::            枚举类型
.. doxygentypedef::         typedef 类型定义
.. doxygenclass::           类
那么按照 sphinx 语法,我们添加如下内容到 index.rst
.. demo documentation master file, created by
   sphinx-quickstart on Sun Nov 21 00:45:39 2021.
   You can adapt this file completely to your liking, but it should at least
   contain the root `toctree` directive.

Welcome to demo's documentation!
================================

.. toctree::
   :maxdepth: 2
   :caption: Contents:


Indices and tables
==================

* :ref:`genindex`
* :ref:`modindex`
* :ref:`search`


Demos
==================

.. doxygenclass:: Opera
   :project: demo

.. doxygenfunction:: Opera::Start
   :project: demo
通过 sphinx-build 生成文档
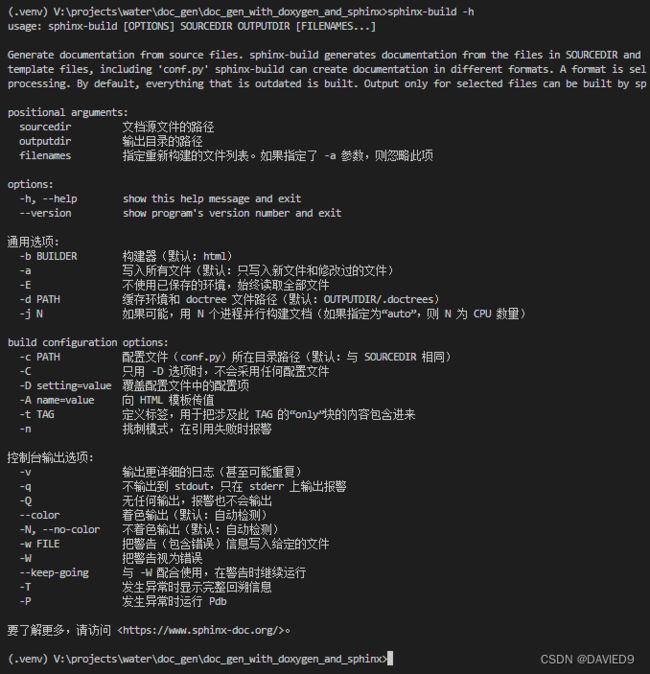
那么接下来我们调用 sphinx-build 来生成文档。sphinx-build 命令格式如下
执行以下命令,即可得到生成的文档。注意这里源文件夹指的就是 conf.py 和 index.rst 文件所在的目录。
# sphinx-build -b <构建类型,默认html> <源文件夹> <构建输出目录>
sphinx-build -b html %cd%\docs\sphinx %cd%\.build\sphinx
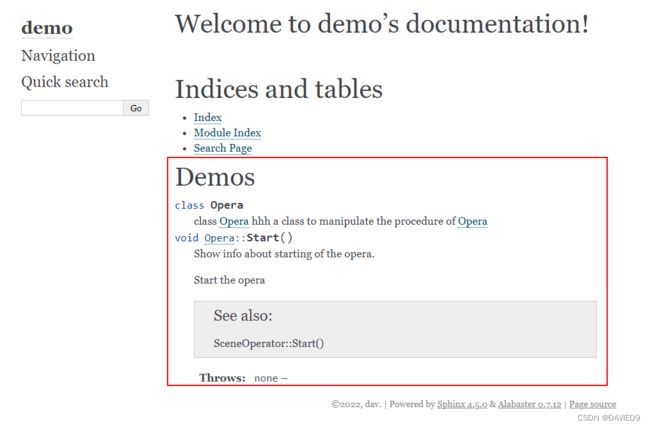
生成的文档如下,红框内的部分,就是 index.rst 中添加的内容生成的,可以看到
4. 要点小结
最主要的核心,就是 doxygen 生成 xml,然后 sphinx 中配置使用 breathe,将 doxygen 生成的 xml 引入到 sphinx 中来。至于具体的文档内容,通过 index.rst 按照 sphinx 和 breathe 的语法进行添加
