vue3 + ts + vite + element-plus项目搭建
前言
基于Vue3已经成为默认版本,目前的项目暂时还没有使用过vue3开发和最近有一个全新的新项目的基础下,使用vue3开发项目,必然是未来的一个趋势
下面记录一下怎么使用Vue3 + ts + vite 从0开始搭建一个项目
环境准备
Nodejs 版本>=12 使用node -v 查看 node版本
使用Vite快捷搭建
使用npm
npm init @vitejs/app
使用yarn
yarn create @vitejs/app
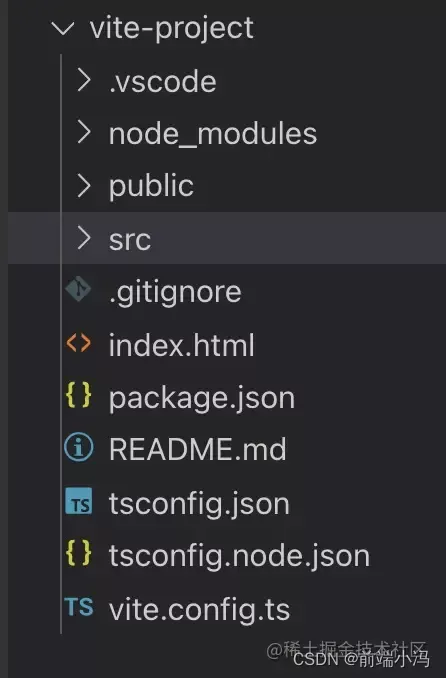
按照提示完成项目初始化即可
初始化项目以后可以看到项目的结构如上图
安装依赖
npm install
yarn install
启动项目
npm run dev
yarn dev
修改vite配置文件
找到根目录vite.config.ts文件打开
1.添加别名,配置@指向src
 import { defineConfig } from 'vite';
 import vue from '@vitejs/plugin-vue';
 import { resolve } from "path";
 const pathResolve = (dir: string) => resolve(__dirname, dir);

 export default defineConfig({
    plugins:[
      vue()
    ],
    resolve: {
      alias: {
        "@": pathResolve("./src"),   // 别名
      }
    }
 })
2.按需导入element ui
首先需要安装unplugin-vue-components 和 unplugin-auto-import这两款插件
npm install -D unplugin-vue-components unplugin-auto-import
然后在vite.config.ts中添加以下配置
  import AutoImport from 'unplugin-auto-import/vite';
  import Components from 'unplugin-vue-components/vite';
  import { ElementPlusResolver } from 'unplugin-vue-components/resolvers';

  export default defineConfig({
    plugins:[
      AutoImport({
        resolvers: [ElementPlusResolver()]
      }),
      Components({
        resolvers: [ElementPlusResolver()]
      })
    ]
  })
3.打包配置
export default defineConfig({
    build: {
      target: 'es2015',  //主要用于兼容低版本浏览器 可以解决chrome65版本打包发布到服务器上页面空白的问题(主要是65版本不兼容 try catch )
      cssTarget:'chrome65', // 兼容低版本浏览器上样式问题
      assetsDir: './assets',  // 打包配置路径
      rollupOptions: {
        input: {    // 主要用于配置多页面
          platForm: resolve(__dirname, 'platform.html'),
          merchant: resolve(__dirname, 'merchant.html')
        }
      }
    }
})
集成路由
1.安装vue-router
npm i vue-router@4
2.在src目录下面添加router文件夹 然后在文件夹下添加index.ts文件
import { createRouter, createWebHashHistory, RouteRecordRaw } from 'vue-router'

const routes: Array<RouteRecordRaw> = [
  {
    path: '/home',
    name: 'Home',
    component: () => import('@/views/home.vue')
  },
  { path: '/', redirect: { name: 'Home' } }
]

const router = createRouter({
  history: createWebHashHistory(),
  routes
})

export default router
当然在配置路由的时候也可以提取侧边栏组件作为公共的组件,配置方法跟vue2 集成路由方法一致,添加children属性
3.在main.ts中挂载
import { createApp } from 'vue'
import App from '@/App.vue'
import router from '@/router/index'

const app = createApp(App)

app.use(router).mount('#app')
集成Vuex
1.安装 vuex@next
npm i vuex@next
2.在src文件夹下面添加store文件夹,然后在文件夹下面添加index.ts 文件
import { createStore } from "vuex"

export default createStore({
	state:{
           count:0
	},
	mutations:{
            setCount(state,count){
                state.count = count
            }
	},
	actions:{
            getCount({ commit }){
                commit('setCount',xxx)
            }
	}
})
3.在main.ts 中挂载
import { createApp } from 'vue'
import App from '@/App.vue'
import router from '@/router/index'
import store from '@/store/index'

const app = createApp(App)

app.use(router).use(store).mount('#app')
添加element ui
上面讲解vite 配置文件的时候已经提到怎么按需引入element了
现在只需要在main.ts文件中挂载element 即可
因为element plus 默认是英语 所以如果在项目中需要使用的是中文的话,可参加以下配置
在 main.ts 文件中添加
import { createApp } from 'vue'
import App from '@/App.vue'
import ElementPlus from "element-plus"

import zhCn from 'element-plus/es/locale/lang/zh-cn';
import router from '@/router/index'
import store from '@/store/index'

const app = createApp(App)

app.use(ElementPlus,{locale:zhCn})

app.use(router).use(store).mount('#app')
还有一点需要注意的是,如果您使用 unplugin-element-plus 并且只使用组件 API,您需要手动导入样式
如果系统中会经常用到ElMessage、ElMessageBox 等api,可以main.ts 文件中添加以下样式,不然会导致样式问题import 'element-plus/es/components/message/style/css' import 'element-plus/es/components/message-box/style/css'
集成axios
1.安装axios
npm i axios
2.添加全局的请求工具 在src下新建一个utils文件夹,文件夹下面添加一个http.ts文件
import Axios from "axios"
import { ElMessage } from "element-plus"

const BASE_URL = ''; //请求接口url 如果不配置 则默认访问链接地址
const TIME_OUT = ''; // 接口超时时间
const instance = Axios.create({
	baseURL:BASE_URL,
	TIME_OUT:TIME_OUT
})

// 可以添加一个axios的全局配置
instance.defaults.headers.post = {
	"Content-Type":'application/x-www-form-urlencoded'
}

// 添加请求拦截器
instance.interceptors.request.use((config) => {
        // 可以在此处添加一些共有的请求拦截
        ...
	return config
},(error) => {
	return Promise.reject(error);
})

// 添加响应拦截器
instance.interceptors.response.use((response)=>{
	const res = response.data;
	// 在此处添加一些响应拦截
	 ...
},(error)=>{
	return Promise.reject(error);
})

export default instance;
3.使用axios 在src下新建一个API的文件夹,在文件夹下添加user.ts 文件
import $http from '@/utils/http';

// 添加用户登录请求 data如果约定好可以添加ts 接口类型
export const userLogin = (data:any) => {
	return $http({
       url:'xxx',
       method:'post',
       data
	})
}
在需要使用这个接口的页面进行引入即可 例如在login.vue中
<script lang="ts">
	import { userLogin } from "@/api/user"
</script>
集成Sass
1.安装sass
npm i sass -D
2.使用 在.vue 文件中
<style lang="scss">
	...  // 此处可以用sass语法编写
</style>
Vue3 使用
在vue3中去除了filters用法,如果需要用到,可以自行实现
1.生命周期函数
<script lang="ts">
	 import {
	 	onMounted,
	 	defineComponent
	 } from "vue";

	 export default defineComponent({
	 	setup(){
           // 添加一个方法
            const getList = () => {
                ...
            }
            onMounted(getList)

            return {
                getList  // 如果在template中使用到这个方法,需要返回
            }
        }
	 })
</script>
2.响应式数据
在vue3中可以通过ref 和 reactive来创建一个响应式数据,如下:
通常使用 ref 来将一个原始数据类型转换成带有响应式特性的数据类型(也可以用来初始化对象类型)
通常使用reactive来赋予对象响应性特性
<template>
	<div>
        <p> hello,{{ name }} </p>
        <el-button @click='handleClick'></el-button>
	</div>
</template>
<script lang='ts'>
	import { ref , reactive,defineComponent} from "vue";

	const name = ref(''); // 初始化name为一个空的字符串

	const handleClick = () => {
		name.value = 'lemon' // 需要注意的是修改值时,不适用this
	}
	export default defineComponent({
        setup(){
           return {
               name  // 返回name
           }
        }
	 })
</script>
用ref创建响应式数据时 不需要使用this ,但是要使用name.value 表示数据的值
3.初始化数据
在vue2中可以使用options 来初始化数据,vue3没有这个属性
// 首先可以定义一个方法 返回初始化数据
const formData = () => {
	return {
        userName:'',
        password:''
	}
}

// 初始化页面展示数据
const form = reactive(formData())

// 重置数据为初始化状态
Object.assign(form,formData())
4.路由使用
// vue 中有以下两个方法
import { useRoute, useRouter} from "vue";

const route = userRoute(); // route 表示的是当前路由

export default defineComponent({
	 setup(){
        const router = useRouter() // 用于路由跳转
        return {}
	 }
})
useRouter() 一定要放在setup方法里面最上方位置 不然数值为undefined
5.引入组件 - 引入组件的方式跟vue2 一致
import layout from "@/layout/index"

export default defineComponent({
	components:{
		layout
	}
})
6.使用vuex
import { useStore } from "vue";

export default defineComponent({
	 setup(){
          const store = useStore() //
          return {}
	 }
})
7.computed 和 props用法
     // 基本用法
    import { computed } from 'vue';
    export default defineComponent({
    	setup(){
            const name = computed({
                  return XXX;
            })
            return {
    			name
            }
        }
   })
computed 还可用于使用一个v-model 双向数据绑定的功能(例如: 页面弹框显示与关闭)
需要跟props , emit 一起使用
    import { computed } from 'vue';
    export default defineComponent({
    	props:{
            modelValue:{
	    		type:Boolean,
	    		default:false
            }
    	}
    	emits: ['update:modelValue'],
    	setup(props,{ emit }){
    		const dialogVisible = computed({
                get:() => props.modelValue, // setup 函数第一个参数是props
                set:(newVal) => {
    				emit("update:modelValue",newVal)
                }
    		})
    		return {
               dialogVisible
    		}
    	}
    })
8.watch 监听使用
import { watch, ref } from "vue"

const name = ref('')
export default defineComponent({
	setup(props){
        // name 处也可以添加一个方法 () => props.name
        watch(name,()=>{
            // 可添加异步请求
        })
	}
})
总结
基于以上,一个基于Vue3 + element + vite 的基本后台管理系统,大致是可以成型的,另外还有一些比如配置eslint 代码规范, 可以自己自行添加,还有vue3 其他一些进阶的用法,会用其他的文章来进行讲述。