Vue3.0----综合案例(第七章)
一、vue-cli
1. 什么是 vue-cli
vue-cli(俗称:vue 脚手架)是 vue 官方提供的、快速生成 vue 工程化项目的工具。
特点:
①开箱即用
②基于 webpack
③功能丰富且易于扩展
④支持创建 vue2 和 vue3 的项目
vue-cli 的中文官网首页:https://cli.vuejs.org/zh/
2. 安装 vue-cli
vue-cli 是基于 Node.js 开发出来的工具,因此需要使用npm 将它安装为全局可用的工具:
#全局安装vue-cli
npm install -g @vue/cli

#查看vue-cli 的版本,检验vue-cli 是否安装成功
vue --version
2.1 解决 Windows PowerShell 不识别 vue命令的问题
默认情况下,在PowerShell 中执行vue --version 命令会提示如下的错误消息:
解决方案如下:
①以管理员身份运行 PowerShell
②执行set-ExecutionPolicy RemoteSigned 命令
③输入字符Y,回车即可
3. 创建项目
vue-cli 提供了创建项目的两种方式:
#基于【命令行】的方式创建vue项目
vue create 项目名称

#OR

#基于【可视化面板】创建vue项目
vue ui
4. 基于 vue ui 创建 vue 项目
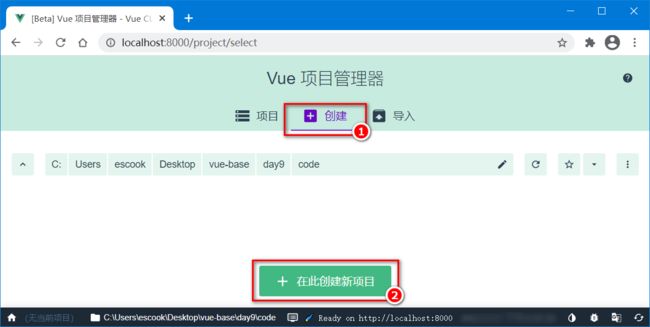
步骤1:在终端下运行vue ui 命令,自动在浏览器中打开创建项目的可视化面板:
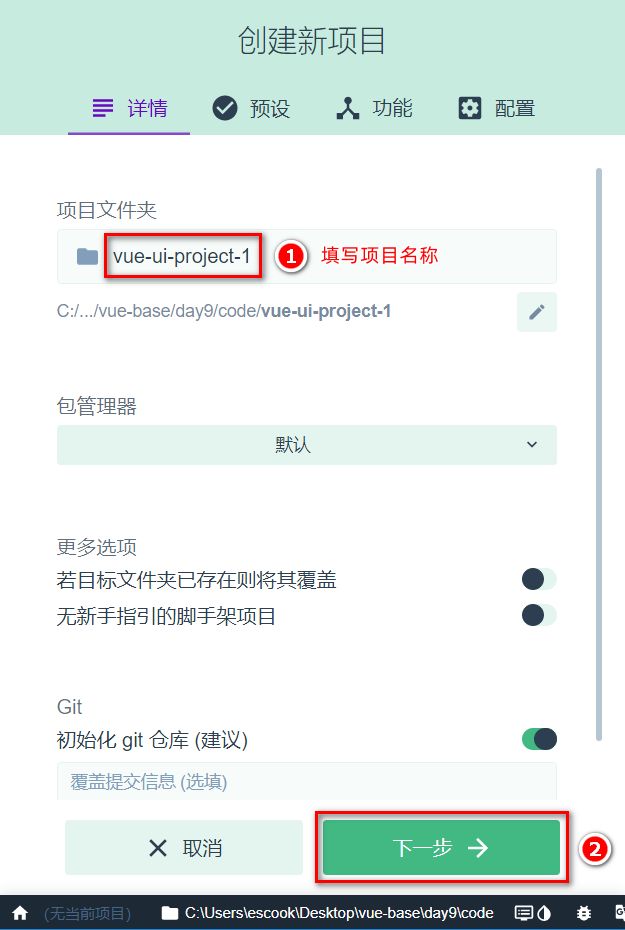
步骤2:在详情页面填写项目名称:
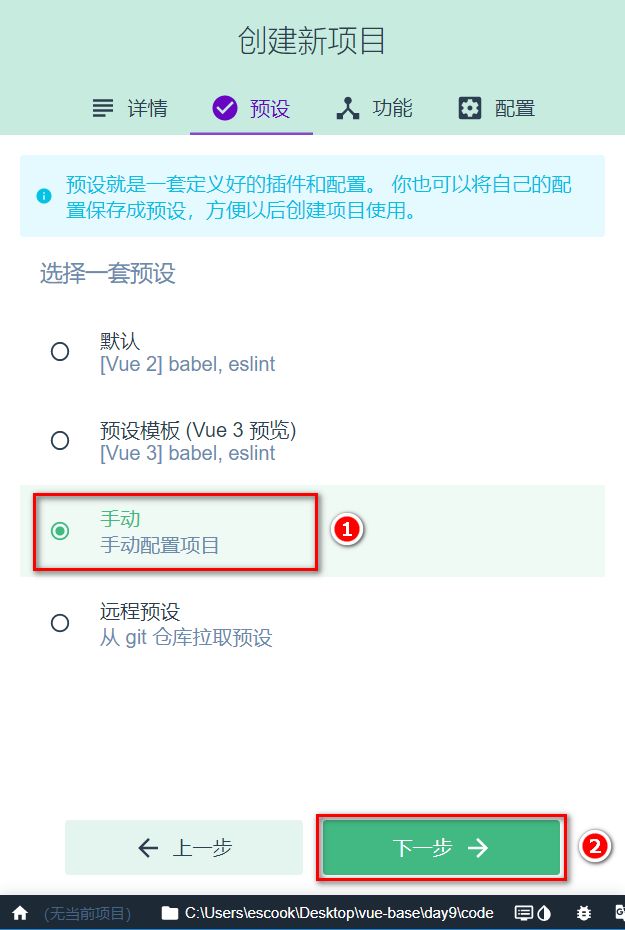
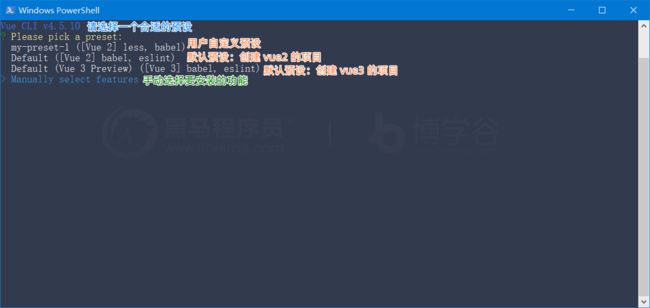
步骤3:在预设页面选择手动配置项目:
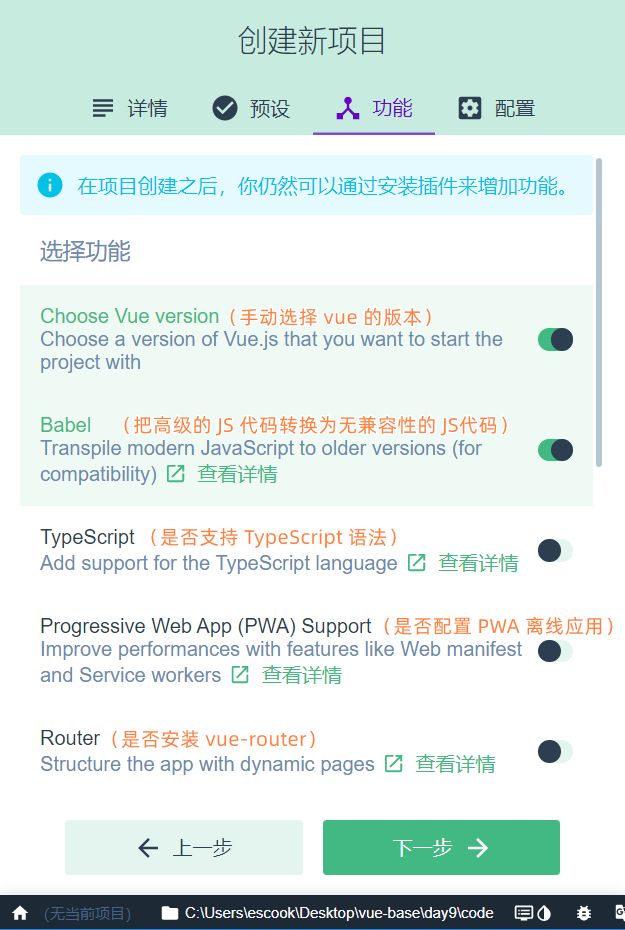
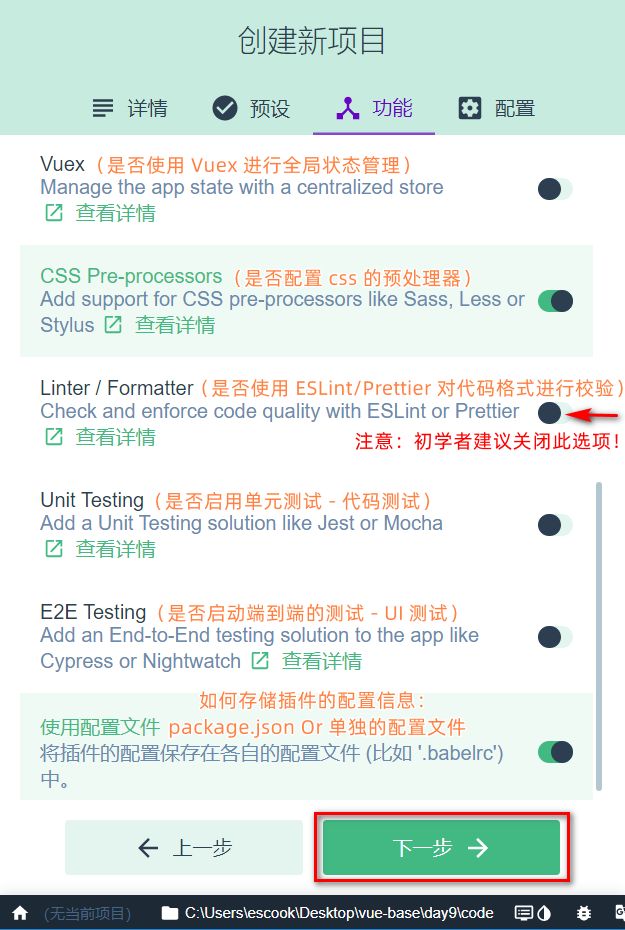
步骤4:在功能页面勾选需要安装的功能(Choose Vue Version、Babel、CSS 预处理器、使用配置文件):
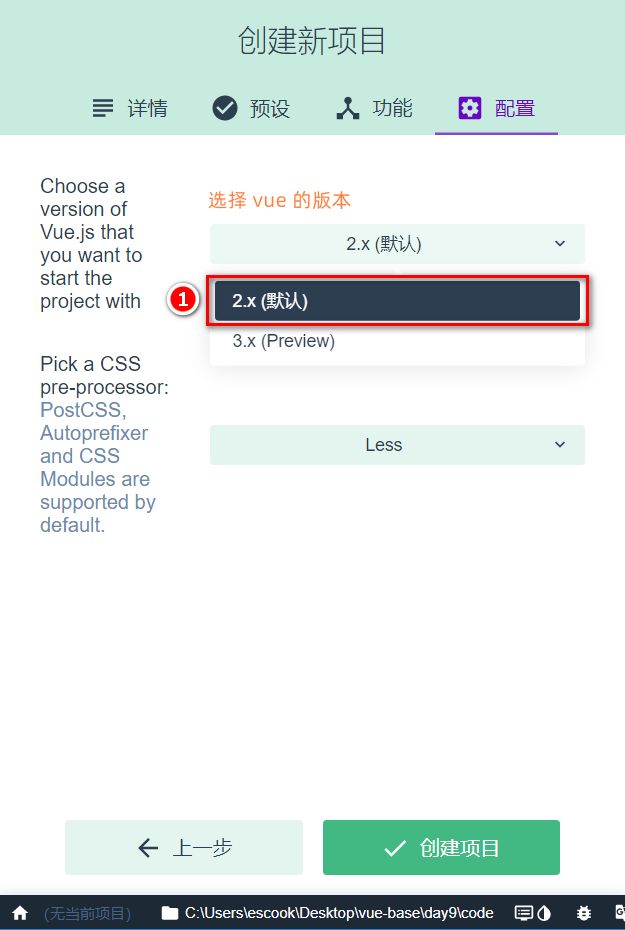
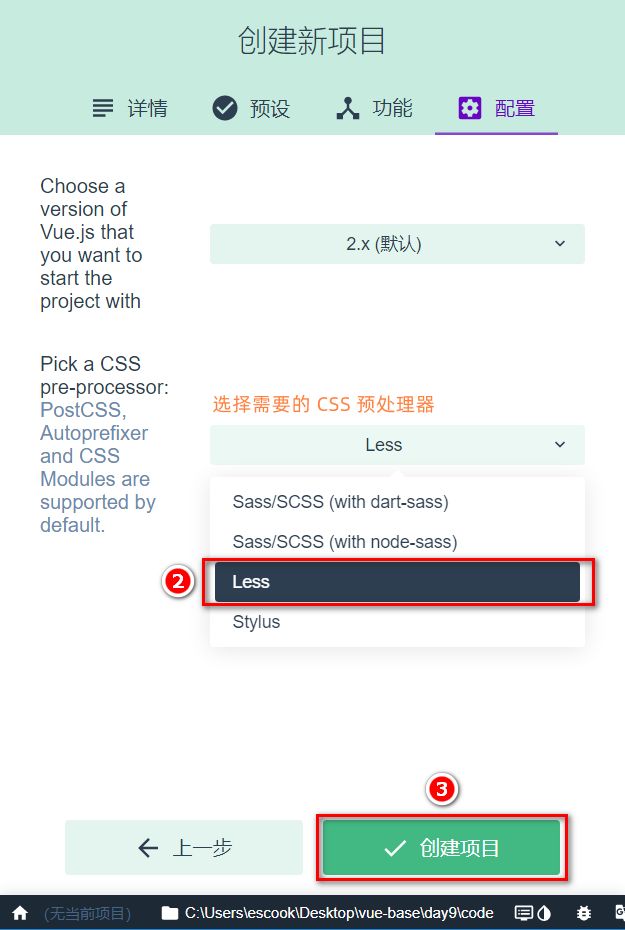
步骤5:在配置页面勾选vue 的版本和需要的预处理器:
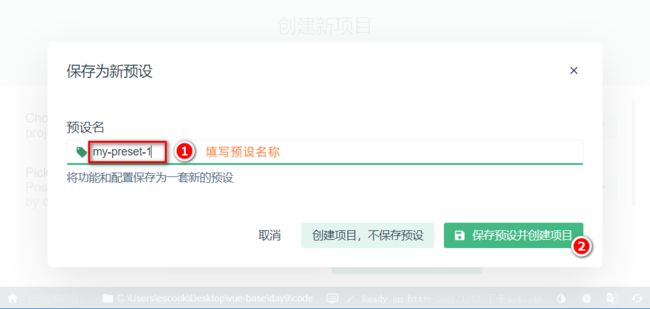
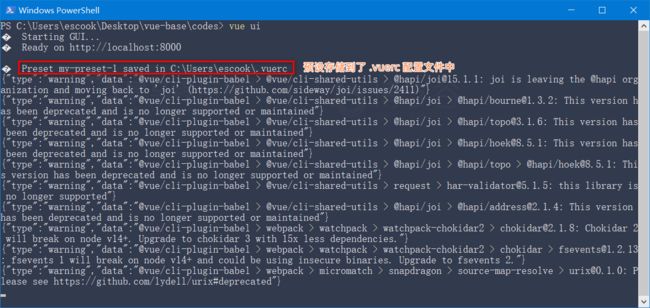
步骤6:将刚才所有的配置保存为预设(模板),方便下一次创建项目时直接复用之前的配置:
步骤7:创建项目并自动安装依赖包:
vue ui 的本质:通过可视化的面板采集到用户的配置信息后,在后台基于命令行的方式自动初始化项目:
项目创建完成后,自动进入项目仪表盘:
5. 基于命令行创建 vue 项目
步骤1:在终端下运行vue create demo2命令,基于交互式的命令行创建 vue 的项目:
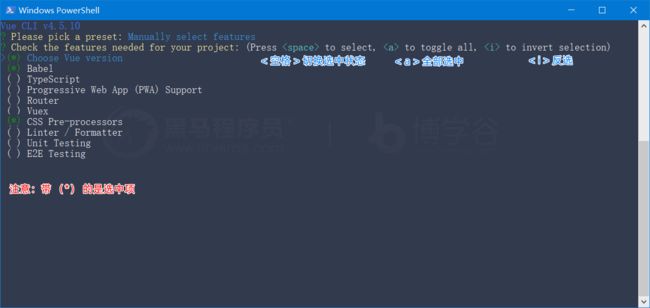
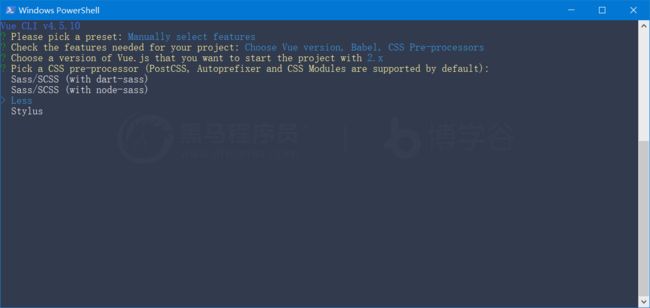
步骤2:选择要安装的功能:
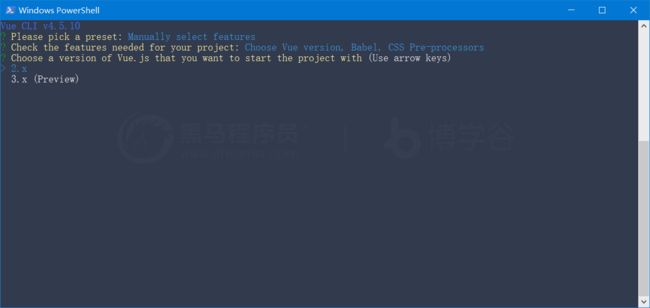
步骤3:使用上下箭头选择 vue 的版本,并使用回车键确认选择:
步骤4:使用上下箭头选择要使用的 css 预处理器,并使用回车键确认选择:
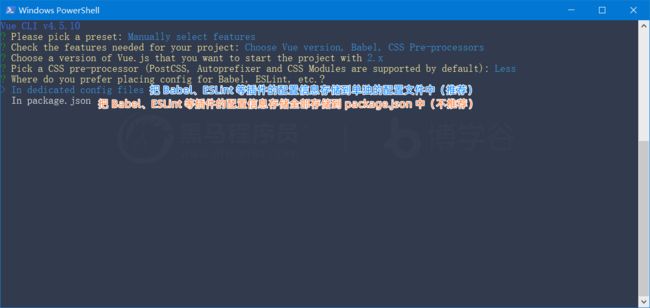
步骤5:使用上下箭头选择如何存储插件的配置信息,并使用回车键确认选择:
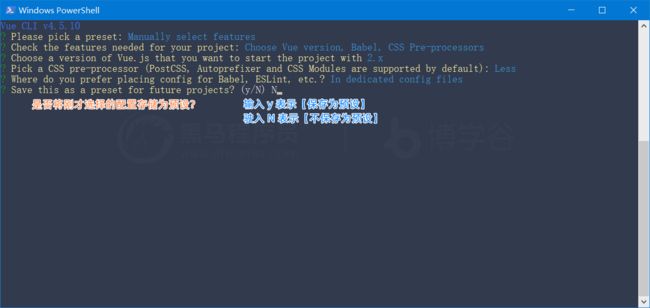
步骤6:是否将刚才的配置保存为预设:
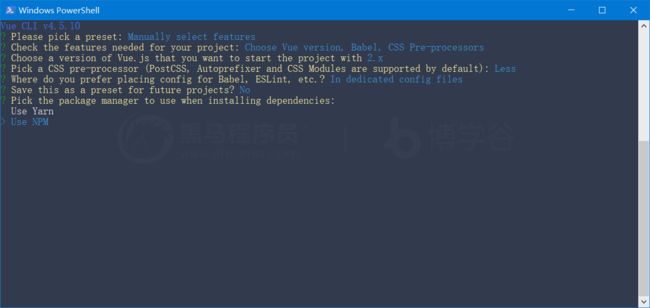
步骤7:选择如何安装项目中的依赖包:
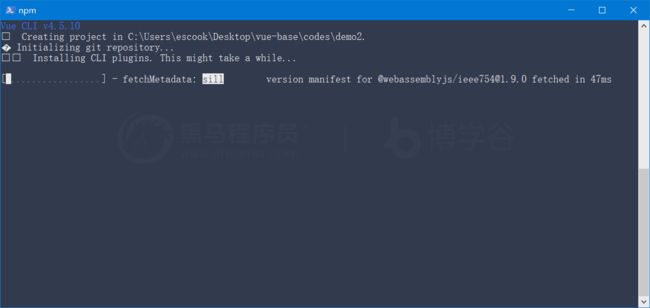
步骤8:开始创建项目并自动安装依赖包:
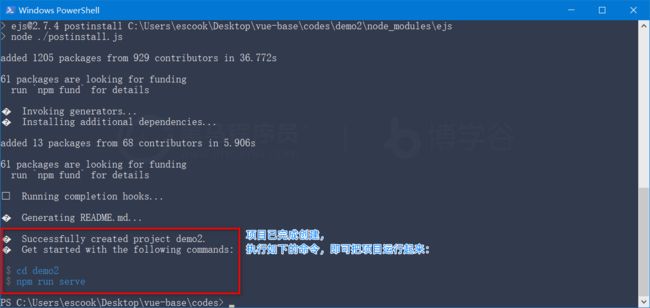
步骤9:项目创建完成:
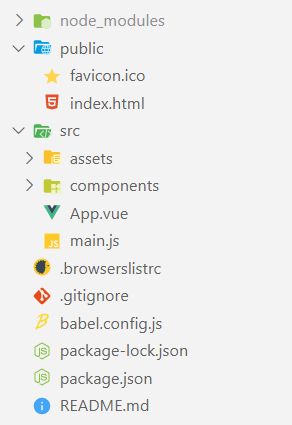
6. 梳理 vue2 项目的基本结构
主要的文件:
src -> App.vue
src -> main.js
//1.导入 Vue的构造函数
import Vue from 'vue '
// 2.导入 App 根组件
import App from '.lApp. vue'

//屏蔽浏览器console面板的提示消息
Vue.config.productionTip = false

// 3.创建vue实例对象
new Vue( {
  render: h => h(App),    // 3.1使用render函数渲染App根组件
}).$mount( ' #app')     // 3.2把 App 根组件渲染到$mount函数指定的el 区域中
8. 在 vue2 的项目中使用路由
在 vue2 的项目中,只能安装并使用3.x版本的 vue-router。
版本 3 和版本 4 的路由最主要的区别:创建路由模块的方式不同!
8.1 回顾:4.x 版本的路由如何创建路由模块
import { createRouter , createWebHashHistory } from 'vue-router'     // 1.按需导入需要的方法
import MyHome from ' . /Home . vue
//2.导入需要使用路由进行切换的组件
  import MyMovie from ' . /Movie . vue
  const router = createRouter ({
// 3.创建路由对象
   history: createWebHashHistory(), // 3.1指定通过hash管理路由的切换
   routes: [
// 3.2创建路由规则
      { path: ' /home',component: MyHome },
      { path: ' /movie ',component: MyMovie },
     ],
 })
export default router        //4.向外共享路由对象
8.2 学习:3.x 版本的路由如何创建路由模块
npm i vue- [email protected] -S
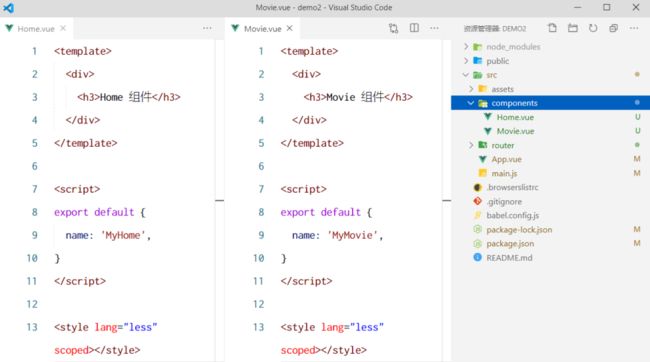
步骤3:在src 目录下创建router -> index.js 路由模块:
import Vue from 'vue '
// 1.导入Vue2的构造函数
import VueRouter from 'vue- router '
//2.导入3.x路由的构造函数
import Home from '@/ components/Home.vue'      // 3.导入需要使用路由切换的组件
import Movie from ' @/ components/Movie . vue
Vue .use(VueRouter)
1/ 4.调用Vue.use() 函数,把路由配置为Vue的插件
const router = new VueRouter({
//5.创建路由对象
routes: [
//5.1声明路由规则
{ path: '/', redirect: ' /home' },
{ path: '/home', component: Home },
{ path: ' /movie', component: Movie }
],
})
export default router     //6.向外共享路由对象
步骤4:在main.js 中导入路由模块,并通过router属性进行挂载:
import Vue from 'vue'
import App from ' . /App. vue'
// 1.导入路由模块
import router from ' ./router
Vue . config. productionTip = false
new
Vue({
render: h => h(App),
// 2.挂载路由模块
// router: router,
router,
}).$mount('#app' )
步骤5:在App.vue 根组件中,使用
App根组件
二、组件库
1. 什么是vue 组件库
在实际开发中,前端开发者可以把自己封装的.vue 组件整理、打包、并发布为npm 的包,从而供其他人下载和使用。这种可以直接下载并在项目中使用的现成组件,就叫做vue 组件库。
2. vue 组件库和bootstrap的区别
二者之间存在本质的区别:
- bootstrap 只提供了纯粹的原材料(css 样式、HTML 结构以及JS 特效),需要由开发者做进一步的组装和改造
- vue 组件库是遵循vue 语法、高度定制的现成组件,开箱即用
3. 最常用的vue 组件库
①PC 端
- Element UI(https://element.eleme.cn/#/zh-CN)
- View UI(http://v1.iviewui.com/)
②移动端
- Mint UI(http://mint-ui.github.io/#!/zh-cn)
- Vant(https://vant-contrib.gitee.io/vant/#/zh-CN/)
4. Element UI
Element UI 是饿了么前端团队开源的一套PC 端vue 组件库。支持在vue2 和vue3 的项目中使用:
- vue2的项目使用旧版的Element UI(https://element.eleme.cn/#/zh-CN)
- vue3的项目使用新版的Element Plus(https://element-plus.gitee.io/#/zh-CN)
4.1 在vue2 的项目中安装element-ui
运行如下的终端命令:
npm i element-ui -S
4.2 引入element-ui
开发者可以一次性完整引入所有的element-ui 组件,或是根据需求,只按需引入用到的element-ui 组件:
- 完整引入:操作简单,但是会额外引入一些用不到的组件,导致项目体积过大
- 按需引入:操作相对复杂一些,但是只会引入用到的组件,能起到优化项目体积的目的
4.3 完整引入
在main.js 中写入以下内容:
import Vue from 'vue
import App from ' . /App. vue
// 1.完整引入element ui的组件
import El ementUI from ' element-ui'
// 2.导入element ui组件的样式
import ' e lement-ui/ lib/ theme-chalk/ index.css'
// 3.把ElementUI 注册为vue的插件[注册之后,即可在每个组件中直接使用每一个element ui的组件]
Vue . use( ElementUI)
new Vue({
render: h => h(App),
}).$mount('#app')
4.4 按需引入
借助babel-plugin-component,我们可以只引入需要的组件,以达到减小项目体积的目的。
步骤1,安装babel-plugin-component:
npm install babel-plugin-component -D
步骤2,修改根目录下的babel.config.js 配置文件,新增plugins节点如下:
module.exports = {
presets: [ ' @vue/cli-plugin-babel/preset'],
//↓↓↓
plugins: [
component
libr aryName: ' element-ui',
styleL ibraryName: ' theme-chalk' ,
},
],
],
//↑↑↑
}
步骤3,如果你只希望引入部分组件,比如Button,那么需要在main.js 中写入以下内容:
import Vue from'vue'
import App from'./App. vue'
// 1.按需导入element ui的组件
import { Button } from ' element-ui '
//2.注册需要的组件
Vue . component( Button . name,But ton)
/*或写为
* Vue. use(Button)
*/
new Vue( {
render: h => h(App),
}). $mount( ' #app' )
4.5 把组件的导入和注册封装为独立的模块
在src 目录下新建element-ui/index.js 模块,并声明如下的代码:
//→模块路径/src/element-ui/ index. js
import Vue from ' vue
//按需导入element ui的组件
import { Button, Input } from ' e lement -ui '
//注册需要的组件
Vue . use(Button)
Vue . use( Input )
//→在main.js中导入
import ' ./element-ui '
三、axios 拦截器
1. 回顾:在vue3 的项目中全局配置axios
import { createApp } from 'vue
import App from ' . /App. vue
// 1.导入axios
import axios from ' axios '
const app = createApp(App )
// 2.配置请求根路径
ax ios . defaults. baseURL = ' https: / /www. escook. cn'
// 3.全局配置axios
app . config. globalProperties.$http = axios
app . mount(,#app' )
2. 在vue2 的项目中全局配置axios
需要在main.js入口文件中,通过Vue 构造函数的prototype 原型对象全局配置axios:
import Vue from 'vue "
import App from ' ./App . vue '
// 1.导入axios
import axios from ' axios'
// 2.配置请求根路径
axios . defaults.baseURL = 'https:/ /www. escook. cn'
// 3.通过Vue构造函数的原型对象,全局配置axios
Vue . prototype . $http =
axios
new Vue( {
render: h => h(App),
}). $mount( ' #app' )
3. 什么是拦截器
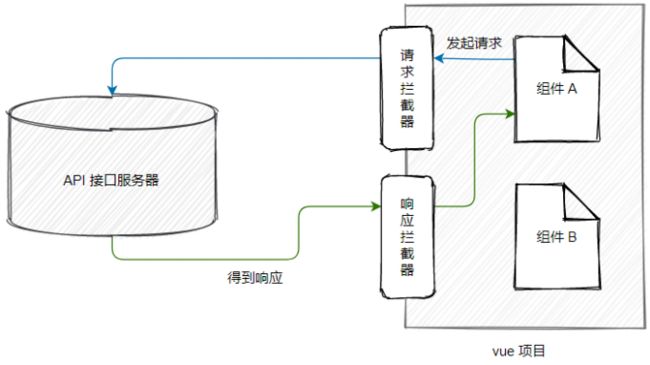
拦截器(英文:Interceptors)会在每次发起ajax 请求和得到响应的时候自动被触发。
应用场景:
①Token 身份认证
②Loading 效果
③etc…
4. 配置请求拦截器
通过axios.interceptors.request.use(成功的回调, 失败的回调) 可以配置请求拦截器。示例代码如下:
axios . interceptors . request . use( function (config) {
// DO something before request is sent
return config;
}, function (error) {
// DO something with request error
return Promise. reject(error );
})
注意:失败的回调函数可以被省略!
4.1 请求拦截器–Token 认证
import axios from ' axios'
ax ios . defaults. baseURL = 'https://www.escook.cn'
//配置请求的拦截器
axios . interceptors. request .use(config => {
//为当前请求配置Token 认证字段
config . headers . Authorization = 'Bearer xXX '
return config
})
Vue . prototype . $http = axios
4.2 请求拦截器–展示Loading 效果
借助于element ui 提供的Loading 效果组件(https://element.eleme.cn/#/zh-CN/component/loading)可以方便的实现Loading 效果的展示:
// 1.按需导入Loading 效果组件
import { Loading } from'element-ui'
// 2.声明变量,用来存储Loading组件的实例对象
let loadingInstance = null
//配置请求的拦截器
axios . interceptors . request . use(config => {
// 3.调用Loading 组件的service() 方法,创建Loading 组件的实例,并全屏展示loading 效果
loadingInstance = Loading. service({ fullscreen: true })
return config
})
5. 配置响应拦截器
通过axios.interceptors.response.use(成功的回调, 失败的回调) 可以配置响应拦截器。示例代码如下:
// Add a response interceptor
axios . interceptors. response . use( function (response) {
// Any status code that lie within the range of 2xx cause this function to tr igger
// DO something with response data
return response;
}, function (error) {
// Any status codes that falls outside the range of 2xx cause this function to trigger
// DO something with response error
return Promise . reject(error );
});
注意:失败的回调函数可以被省略!
5.1 响应拦截器–关闭Loading 效果
调用Loading 实例提供的close() 方法即可关闭Loading 效果,示例代码如下:
//响应拦截器
axios.interceptors.response.use( response => {
//调用Loading 实例的close方法即可关闭loading效果
loadingInstance.close( )
return response
})
四、proxy 跨域代理
1. 回顾:接口的跨域问题
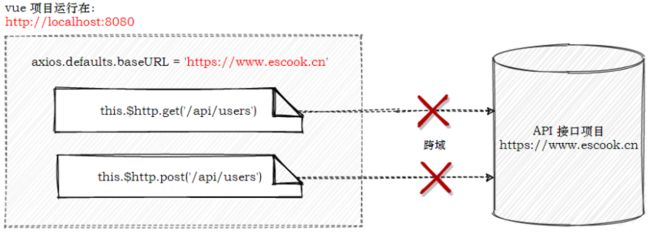
vue 项目运行的地址:http://localhost:8080/
API 接口运行的地址:https://www.escook.cn/api/users
由于当前的API 接口没有开启CORS 跨域资源共享,因此默认情况下,上面的接口无法请求成功!
2. 通过代理解决接口的跨域问题
通过vue-cli 创建的项目在遇到接口跨域问题时,可以通过代理的方式来解决:
①把axios 的请求根路径设置为vue 项目的运行地址(接口请求不再跨域)
②vue 项目发现请求的接口不存在,把请求转交给proxy 代理
③代理把请求根路径替换为devServer.proxy 属性的值,发起真正的数据请求
④代理把请求到的数据,转发给axios
3. 在项目中配置proxy 代理
步骤1,在main.js 入口文件中,把axios 的请求根路径改造为当前web 项目的根路径:
// axios.defaults.baseURL = 'https://www.escook.cn'
//配置请求根路径
axios.defaults.baseURL = 'http://localhost:8080'
步骤2,在项目根目录下创建vue.config.js 的配置文件,并声明如下的配置:
module.exports = {
devServer: {
//当前项目在开发调试阶段,
//会将任何未知请求(没有匹配到静态文件的请求)代理到https: / /www. escook. cn
proxy: 'https://www.escook.cn'
    },
}
注意:
①devServer.proxy 提供的代理功能,仅在开发调试阶段生效
②项目上线发布时,依旧需要API 接口服务器开启CORS 跨域资源共享
视频:
黑马程序员Vue全套视频教程,从vue2.0到vue3.0一套全覆盖,前端学习核心框架教程_哔哩哔哩_bilibili
此文章是本人学习视频自我总结,如有侵犯还望原谅。侵权必删。


