服务容错保护Sentinel &服务网关Gateway
目录
- 主要内容
- 1.服务保护Sentinel
-
- 1.1.高并发带来的问题
-
- 1.1.1.创建工程
-
- 1.1.1.1.创建服务提供者
-
- 1.1.1.1.1.创建工程
- 1.1.1.1.2.application.yml
- 1.1.1.1.3.service
- 1.1.1.2.创建feign接口
-
- 1.1.1.2.1.创建工程
- 1.1.1.2.2.feign
- 1.1.1.3.创建服务消费者
-
- 1.1.1.3.1.创建工程
- 1.1.1.3.2.pom.xml
- 1.1.1.3.3.application.yml
- 1.1.1.3.4.controller
- 1.1.2.测试
- 1.1.3.雪崩效应
- 1.1.4.常见容错组件
- 1.2.Sentinel介绍
-
- 1.2.1.Sentinel 是什么
- 1.2.2.Sentinel的基本概念
- 1.2.2.Sentinel的主要功能
- 1.2.2.Sentinel 的历史
- 1.2.3.Sentinel入门
-
- 1.2.3.1.抛异常方式
-
- 1.2.3.1.1.sentinel_consumer
-
- 1.2.3.1.1.1.pom.xml
- 1.2.3.1.1.2.controller
- 1.2.3.1.2.测试
- 1.2.2.2.注解方式
-
- 1.2.3.1.1.sentinel_consumer
-
- 1.2.3.1.1.1.pom.xml
- 1.2.3.1.1.2.controller
- 1.2.3.1.1.3.app
- 1.2.3.1.2.测试
- 1.2.3.Sentinel的安装和启动
- 1.2.4.Sentinel接入控制台
-
- 1.2.4.1.sentinel_consumer
-
- 1.2.4.1.1.pom.xml
- 1.2.4.1.2.application.yml
- 1.2.4.1.3.controller
- 1.2.4.2.测试
- 1.3.Sentinel规则
-
- 1.3.1.流控规则
-
- 1.3.1.1.阈值类型
-
- 1.3.1.1.1.QPS
- 1.3.1.1.2.线程数
- 1.3.1.2.流控模式
-
- 1.3.1.2.1.直接
- 1.3.1.2.2.关联
- 1.3.2.2.3.链路
- 1.3.1.3.流控效果
-
- 1.3.1.3.1.快速失败
- 1.3.1.3.2.warm up
- 1.3.2.3.3.排队等待
- 1.3.2.热点规则
-
- 1.3.2.1.什么是热点参数流控
- 1.3.2.2.案例
- 1.3.3.3.参数例外项
- 1.3.3.系统规则
-
- 1.3.3.1.什么是系统规则
- 1.3.3.2.系统限流的 5 中预置类型
- 1.3.3.3.案例
- 1.3.4.授权规则
-
- 1.3.4.1.什么是授权规则
- 1.3.4.2.案例
- 1.3.5.降级规则
-
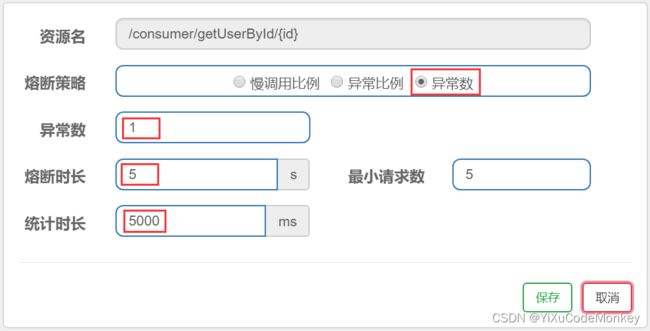
- 1.3.5.1.慢调用比例
- 1.3.5.2.异常比例
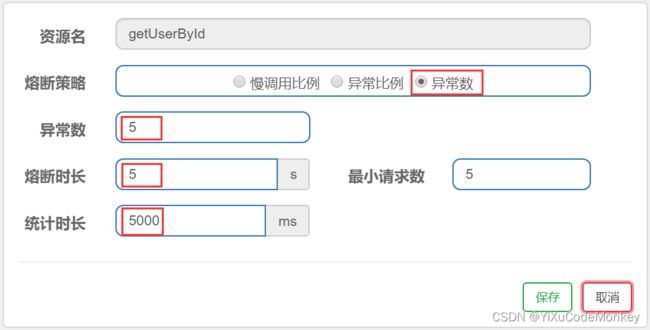
- 1.3.5.3.异常数
- 1.4.Sentinel的blockHandler
-
- 1.4.1.blockHandler
- 1.4.2.@SentinelResource注解说明
- 1.4.3.同一个类中定义
- 1.4.4.外置类中定义
- 1.4.5.测试
- 1.5.Sentinel全局异常处理
-
- 1.5.1.BlockExceptionHandler接口
- 1.5.2.BlockException接口
- 1.5.3.实现BlockExceptionHandler
- 1.5.4.测试
- 1.6.Sentinel整合Feign
-
- 1.6.1.为什么整合Feign
- 1.6.2.sentinel_consumer
-
- 1.6.2.1.application.yml
- 1.6.3.sentinel_feign
-
- 1.6.3.1.FallbackFactory
- 1.6.3.2.feign
- 1.6.4.sentinel
-
- 1.6.4.1.新增熔断规则
- 1.6.5.测试
- 1.7.Sentinel持久化
-
- 1.7.1.为什么要持久化?
- 1.7.2.sentinel_consumer
-
- 1.7.2.1.pom.xml
- 1.7.2.2.application.yml
- 1.7.3.sentinel
-
- 1.7.3.1.改造Sentinel 源代码
- 1.7.3.2.新增规则
- 1.7.4.nacos
-
- 1.7.4.1.新建命名空间
- 1.7.5.测试
- 2.服务网关Gateway
-
- 2.1.为什么要使用Gateway?
- 2.2.Gateway介绍
-
- 2.2.1.Gateway是什么
- 2.2.3.Gateway执行流程
- 2.2.创建gateway工程
-
- 2.2.1.创建工程
- 2.2.1.pom.xml
- 2.2.1.application.yml
- 2.2.1.App
- 2.3.路由
-
- 2.3.1.通过断言条件路由
-
- 2.3.1.1.application.yml
- 2.3.1.2. 测试
- 2.3.2.通过服务名路由
-
- 2.3.2.1.application.yml
- 2.3.2.2. 测试
- 2.4.断言
-
- 2.4.1.内置断言工厂
-
- 2.4.1.1.基于Datetime类型的断言工厂
- 2.4.1.2.基于RemoteAddr的断言工厂
- 2.4.1.3.基于Cookie的断言工厂
- 2.4.1.4.基于Header的断言工厂
- 2.4.1.3.基于Host的断言工厂
- 2.4.1.5.基于Method请求方法的断言工厂
- 2.4.1.6.基于Path请求路径的断言工厂
- 2.4.1.7.基于Query请求参数的断言工厂
- 说明
- 2.4.2.自定义路由断言工厂
-
- 2.4.2.1.内置断言工厂的实现原理
- 2.4.2.2.创建断言工厂
- 2.4.2.3.配置断言
- 2.4.2.4.测试
- 2.5.过滤
-
- 2.5.1.内置过滤器工厂
- 2.5.2.自定义过滤器工厂
-
- 2.5.2.1.创建过滤器工厂
- 2.5.2.2.配置过滤器
- 2.5.2.3.测试
- 2.5.3.自定义全局过滤器
-
- 2.5.2.1.创建过滤器
- 2.5.2.2.测试
- 2.5.限流
-
- 2.5.1.api_gateway
-
- 2.5.1.1.pom.xml
- 2.5.1.2.application.yml
- 2.5.1.3.自定义异常处理
- 2.5.2.测试
主要内容
- 服务保护Sentinel
- 服务网关Gateway
1.服务保护Sentinel
1.1.高并发带来的问题
在微服务架构中,我们将业务拆分成一个个的服务,服务与服务之间可以相互调用,但是由于网络原因或者自身的原因,服务并不能保证服务的100%可用,如果单个服务出现问题,消费者调用这个服务就会出现问题,此时若有大量的网络涌入,会形成任务堆积,最终导致服务瘫痪,接下来,我们来模拟一个高并发的场景。
1.1.1.创建工程
1.1.1.1.创建服务提供者
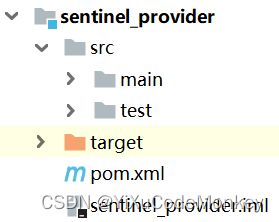
1.1.1.1.1.创建工程
1.1.1.1.2.application.yml
server:
  port: 9090
spring:
  cloud:
    nacos:
      discovery:
        server-addr: 192.168.209.129:8848
  application:
    name: sentinel-provider
1.1.1.1.3.service
package com.bjpowernode.service;

import com.bjpowernode.pojo.User;
import org.springframework.stereotype.Service;

@Service
public class UserServiceImpl implements UserService {

	@Override
	public User getUserById(Integer id) {
		//模拟一次网络延时
		try {
			Thread.sleep(2000);
		} catch (InterruptedException e) {
			e.printStackTrace();
		}
		return new User(id,"王粪堆-provider",18);
	}
}
1.1.1.2.创建feign接口
1.1.1.2.1.创建工程
拷贝feign_interface工程:
![]()
1.1.1.2.2.feign
package com.bjpowernode.feign;

import com.bjpowernode.pojo.User;
import org.springframework.cloud.openfeign.FeignClient;
import org.springframework.web.bind.annotation.PathVariable;
import org.springframework.web.bind.annotation.RequestMapping;

@FeignClient("sentinel-provider")
public interface UserFeign {
    @RequestMapping(value = "/provider/getUserById/{id}")
    public User getUserById(@PathVariable Integer id);
}
1.1.1.3.创建服务消费者
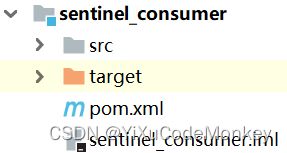
1.1.1.3.1.创建工程
1.1.1.3.2.pom.xml
<project xmlns="http://maven.apache.org/POM/4.0.0"
         xmlns:xsi="http://www.w3.org/2001/XMLSchema-instance"
         xsi:schemaLocation="http://maven.apache.org/POM/4.0.0 http://maven.apache.org/xsd/maven-4.0.0.xsd">
    <parent>
        <artifactId>springcloud_parentartifactId>
        <groupId>com.bjpowernodegroupId>
        <version>1.0-SNAPSHOTversion>
    parent>
    <modelVersion>4.0.0modelVersion>

    <artifactId>sentinel_consumerartifactId>

    <dependencies>
        <dependency>
            <groupId>org.springframework.bootgroupId>
            <artifactId>spring-boot-starter-webartifactId>
        dependency>
        <dependency>
            <groupId>com.bjpowernodegroupId>
            <artifactId>springcloud_commonartifactId>
            <version>1.0-SNAPSHOTversion>
        dependency>
        <dependency>
            <groupId>com.alibaba.cloudgroupId>
            <artifactId>spring-cloud-starter-alibaba-nacos-discoveryartifactId>
        dependency>

        <dependency>
            <groupId>com.bjpowernodegroupId>
            <artifactId>sentinel_feignartifactId>
            <version>1.0-SNAPSHOTversion>
        dependency>
    dependencies>
project>
1.1.1.3.3.application.yml
server:
  tomcat:
    max-threads: 10 #tomcat的最大并发值修改为10,默认是200
1.1.1.3.4.controller
@RequestMapping(value = "/hello")
public String hello() {
    return "Hello Sentienl!!!";
}
1.1.2.测试
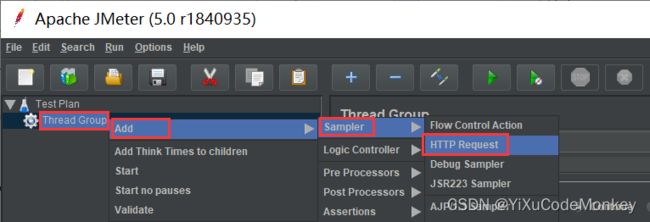
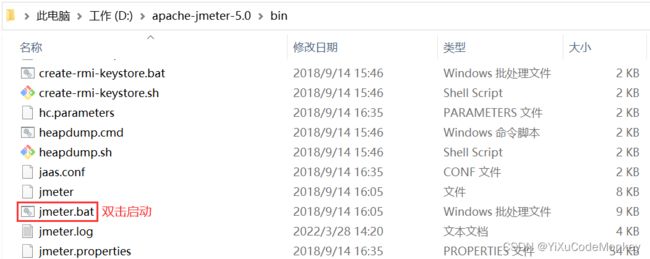
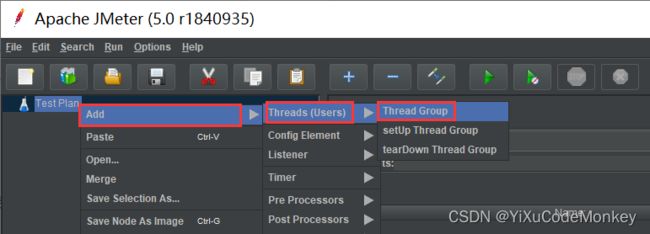
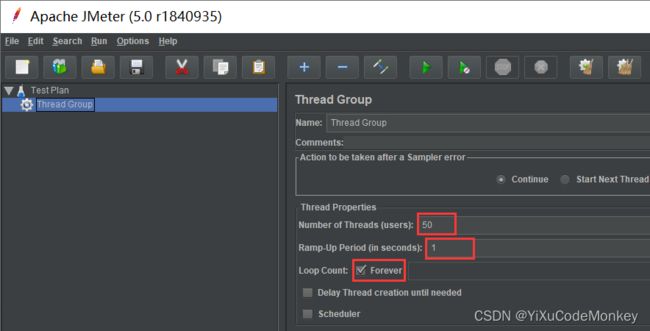
5. 配置http请求并启动线程:http://127.0.0.1:8080/consumer/getUserById/1

6. 访问:http://127.0.0.1:8080/consumer/hello
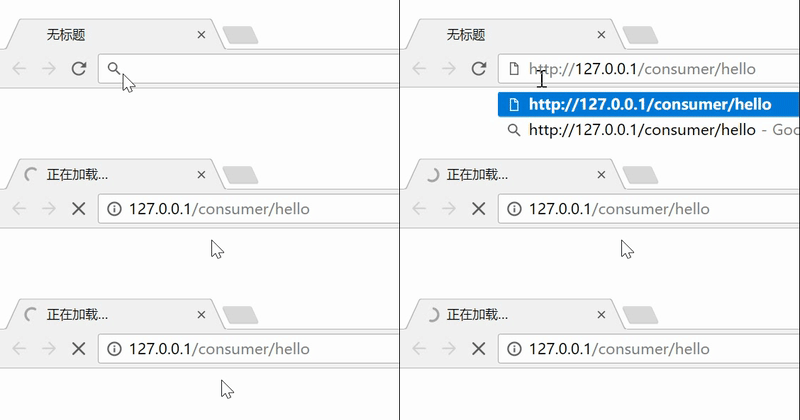
结论:
此时会发现, 由于sentinel_consumer囤积了大量请求, 导致msg方法的访问出现了线程阻塞等待问题,这就是服务雪崩的雏形。
1.1.3.雪崩效应
雪崩效应:微服务调用链路中的某个服务故障,引起整个链路中的所有微服务都不可用,这就是雪崩。
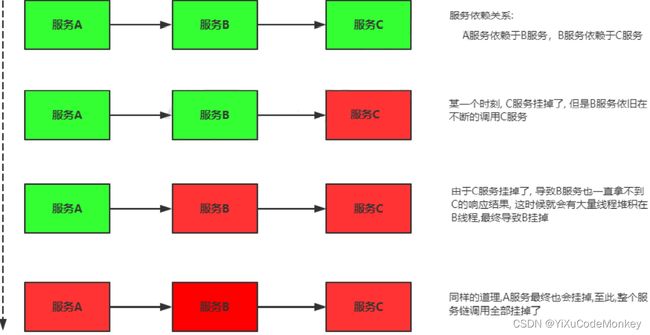
雪要防止雪崩的扩散,我们就要做好服务的容错,容错说白了就是保护自己不被猪队友拖垮的一些措施。我们无法完全杜绝雪崩源头的发生,只有做好足够的容错,保证在一个服务发生问题,不会影响到其它服务的正常运行。也就是"雪落而不雪崩"。
1.1.4.常见容错组件
-
Hystrix
Hystrix是由Netflix开源的一个延迟和容错库,用于隔离访问远程系统、服务或者第三方库,防止级联失败,从而提升系统的可用性与容错性。
-
Resilience4J
Resilicence4J一款非常轻量、简单,并且文档非常清晰、丰富的熔断工具,这也是Hystrix官方推荐的替代产品。不仅如此,Resilicence4j还原生支持Spring Boot 1.x/2.x,而且监控也支持和prometheus等多款主流产品进行整合。
-
Sentinel
Sentinel 是阿里巴巴开源的一款断路器实现,本身在阿里内部已经被大规模采用,非常稳定。
1.2.Sentinel介绍
1.2.1.Sentinel 是什么
Sentinel (分布式系统的流量防卫兵) 是阿里开源的一套用于服务容错的流量控制框架。它以流量为切入点, 从流量控制、熔断降级等多个维度来保护服务的稳定性。
1.2.2.Sentinel的基本概念
-
资源
资源就是Sentinel要保护的东西,它可以是Java应用程序中的任何内容,可以是一个服务,也可以是一个方法;我们入门案例中的hello()方法就可以认为是一个资源。
-
规则
规则就是用来定义如何进行保护资源的,主要包括流量控制规则、熔断降级规等。
1.2.2.Sentinel的主要功能
Sentinel的主要功能就是容错,主要体现为下面这两个方面:
-
流量控制(保证应用不被上游服务压垮)
任意时间到来的请求往往是随机不可控的,而系统的处理能力是有限的。我们需要根据系统的处理能力对流量进行控制。Sentinel作为一个调配器,可以根据需要把随机的请求调整成合适的形状。

-
熔断降级(保证应用不被下游服务拖垮)
当检测到调用链路中某个资源某个资源出现慢调用比例或异常比例超出阈值的时候,则暂时切断对下游服务的调用,避免级联故障
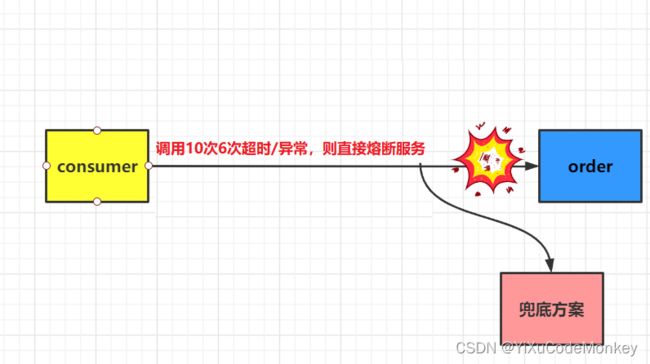
总之一句话,我们需要做的事情,就是在Sentinel的资源上配置各种各样的规则,来实现各种容错的功能:
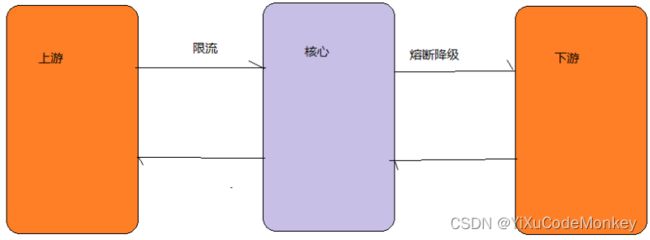
1.2.2.Sentinel 的历史
- 2012 年,Sentinel 诞生,主要功能为入口流量控制。
- 2013-2017 年,Sentinel 在阿里巴巴集团内部迅速发展,成为基础技术模块,覆盖了所有的核心场景。Sentinel 也因此积累了大量的流量归整场景以及生产实践。
- 2018 年,Sentinel 开源,并持续演进。
- 2019 年,Sentinel 朝着多语言扩展的方向不断探索,推出 C++ 原生版本。
- 2020 年,推出 Sentinel Go 版本,继续朝着云原生方向演进。
1.2.3.Sentinel入门
1.2.3.1.抛异常方式
1.2.3.1.1.sentinel_consumer
1.2.3.1.1.1.pom.xml
<dependency>
	<groupId>com.alibaba.cspgroupId>
	<artifactId>sentinel-coreartifactId>
dependency>
1.2.3.1.1.2.controller
    @RequestMapping(value = "/hello")
    public String hello() {
        Entry entry = null;
        try {
            //SphU:执行规则检查,获取资源失败时会抛BlockException异常
            entry = SphU.entry("/consumer/hello");
            return "Hello Sentienl!!!";//被保护的逻辑
        } catch (BlockException e) {
            //资源访问被阻止
            e.printStackTrace();
            return "接口被限流了, exception: " + e;
        }finally {
            // SphU.entry(xxx) 需要与 entry.exit() 成对出现,否则会导致调用链记录异常
            if (entry != null) {
                entry.exit();
            }
        }
    }

    /**
     * 定义限流/流控规则
     */
    @PostConstruct//当前类的构造函数执行之后执行
    public void initFlowQpsRule() {
        //1.创建存放限流规则的集合
        List<FlowRule> rules = new ArrayList<FlowRule>();
        //2.创建限流规则
        FlowRule rule1 = new FlowRule();
        rule1.setResource("/consumer/hello");//定义资源,名称唯一
        rule1.setGrade(RuleConstant.FLOW_GRADE_QPS);//定义限流规则类型
        rule1.setCount(2); // QPS控制在2以内
        //3.将限流规则存放到集合中
        rules.add(rule1);
        //4.加载限流规则
        FlowRuleManager.loadRules(rules);
    }
1.2.3.1.2.测试
1.2.2.2.注解方式
上述通过try-catch风格的API可以实现限流,但是对代码侵入性太高,推荐使用注解的方式来实现。
1.2.3.1.1.sentinel_consumer
1.2.3.1.1.1.pom.xml
<dependency>
    <groupId>com.alibaba.cspgroupId>
    <artifactId>sentinel-annotation-aspectjartifactId>
dependency>
1.2.3.1.1.2.controller
    @RequestMapping(value = "/hello2")
    @SentinelResource(value="/consumer/hello2",blockHandler = "blockHandlerMethod")
    public String hello2() {
        return "Hello Sentienl2!!!";//被保护的逻辑
    }

    /**
     *资源访问被阻止的兜底方法
     */
    public String blockHandlerMethod(BlockException e){
        return "接口被限流了, exception: " + e;
    }

    @PostConstruct
    public void initFlowQpsRule() {
        List<FlowRule> rules = new ArrayList<FlowRule>();
        FlowRule rule1 = new FlowRule();
        rule1.setResource("/consumer/hello2");//注意修改资源名称
        rule1.setGrade(RuleConstant.FLOW_GRADE_QPS);
        rule1.setCount(2);
        rules.add(rule1);
        FlowRuleManager.loadRules(rules);
    }
1.2.3.1.1.3.app
    //开启sentinel注解扫描
    @Bean
    public SentinelResourceAspect sentinelResourceAspect(){
        return new SentinelResourceAspect();
    }
1.2.3.1.2.测试
1.2.3.Sentinel的安装和启动
Sentinel 提供一个轻量级的控制台, 它提供资源实时监控以及规则管理等功能。
- 下载地址:https://github.com/alibaba/Sentinel/releases

- 执行命令:
java -jar sentinel-dashboard-1.8.1.jar

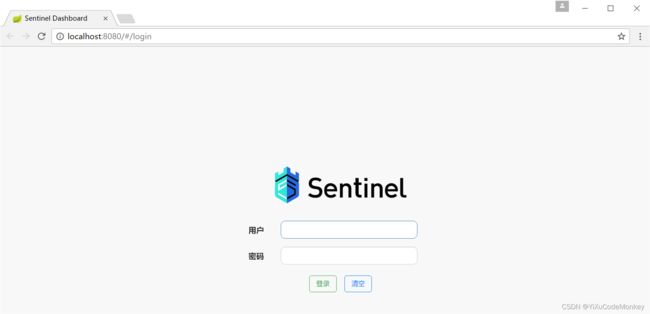
- 浏览器访问:http://localhost:8080,默认账号密码:sentinel/sentinel
1.2.4.Sentinel接入控制台
1.2.4.1.sentinel_consumer
1.2.4.1.1.pom.xml
        <dependency>
            <groupId>com.alibaba.cloudgroupId>
            <artifactId>spring-cloud-starter-alibaba-sentinelartifactId>
        dependency>
1.2.4.1.2.application.yml
spring:
  cloud:
    sentinel:
      transport:
        dashboard: 127.0.0.1:8080 #指定sentinel的地址
1.2.4.1.3.controller
/**
 *被保护的逻辑
 */
@RequestMapping(value = "/hello3")
public String hello3() {
    return "Hello Sentienl3!!!";
}
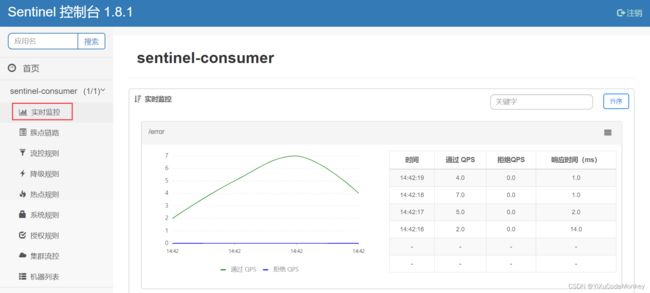
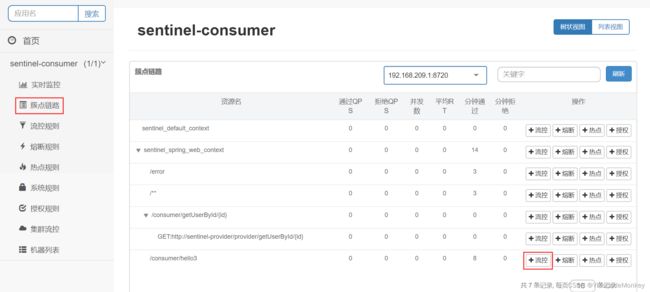
1.2.4.2.测试
1.3.Sentinel规则
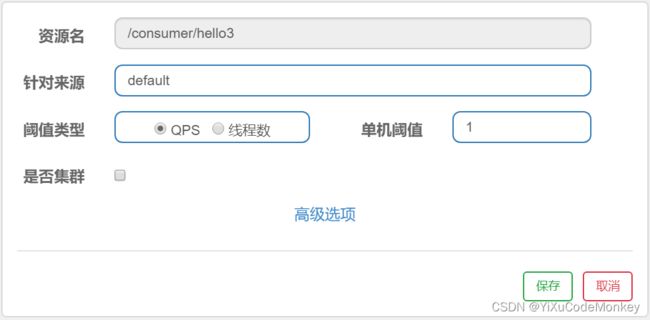
流控规则说明:
-
资源名:唯一名称,默认请求路径
-
针对来源:Sentinel可以针对调用者进行限流,填写微服务名,指定对哪个微服务进行限流 ,默认default(不区分来源,全部限制)
-
阈值类型:
-
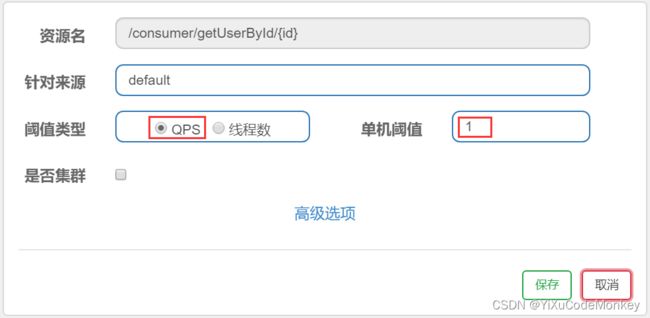
QPS:当调用该接口的QPS达到了阈值的时候,进行限流;
-
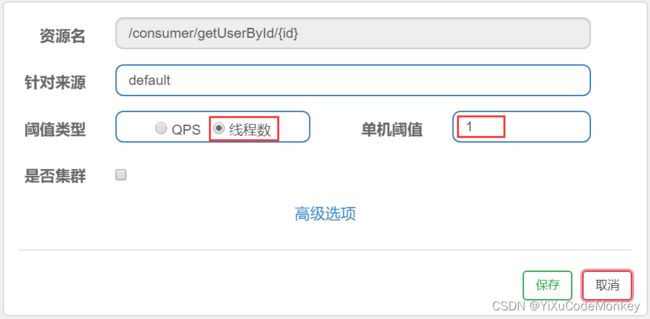
线程数:当调用该接口的线程数达到阈值时,进行限流
-
-
单机阈值:次数
-
是否集群:不需要集群
-
流控模式:
-
直接:接口达到限流条件时,直接限流
-
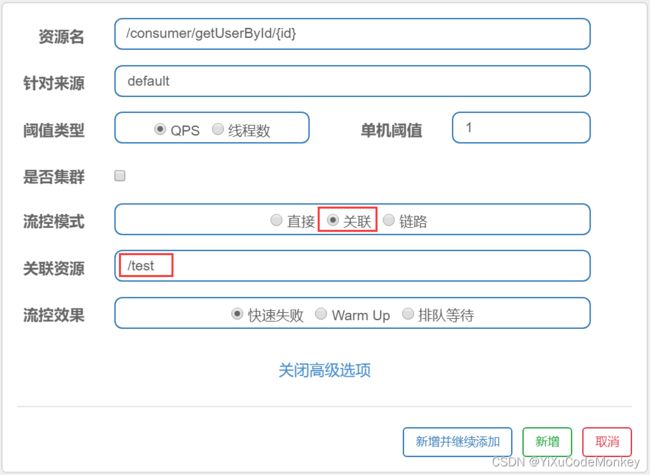
关联:当关联的资源达到阈值时限流自己[适合做应用让步]
-
链路:当从某个接口过来的资源达到限流条件时,开启限流
-
-
流控效果
- 快速失败:直接失败
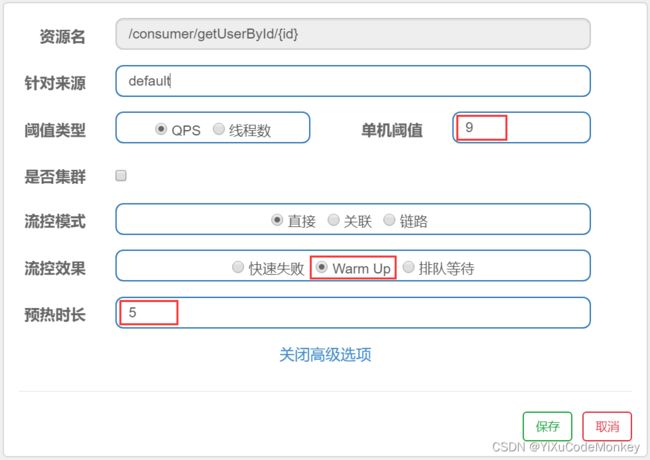
- Warm Up:即请求 QPS 从 threshold / 3 开始,经预热时长逐渐升至设定的 QPS 阈值
- 排队等待:让请求以均匀的速度通过,单机阈值为每秒通过数量,其余的排队等待;当请求超过超指定时间还未处理,则会被丢弃。
1.3.1.流控规则
1.3.1.1.阈值类型
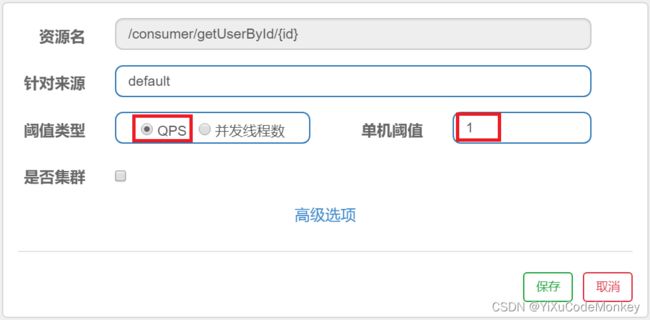
1.3.1.1.1.QPS
-
说明
QPS:代表每秒的访问次数,只要访问次数到达一定的阈值,则进行限流操作
-
案例
1.3.1.1.2.线程数
-
说明
线程数:代表的是每秒内访问该api接口的线程数,如果该接口的操作比较长,当排队的线程数到达阈值的时候,进行限流操作
-
案例


3.浏览器访问:http://127.0.0.1/consumer/getUserById/1

1.3.1.2.流控模式
1.3.1.2.1.直接
-
说明
对当前资源的流量控制
1.3.1.2.2.关联
-
说明
当关联的资源达到阈值时,限流自己。如支付接口达到阈值时限流订单接口。
-
案例
- 新增关联资源
@RequestMapping(value="/test")
public String test(){
    return "test";
}
1.3.2.2.3.链路
-
说明
链路流控模式指的是,当从某个接口过来的资源达到限流条件时,开启限流。它的功能有点类似于针对 来源配置项,区别在于:针对来源是针对上级微服务,而链路流控是针对上级接口,也就是说它的粒度更细。
-
案例
略…
1.3.1.3.流控效果
1.3.1.3.1.快速失败
-
说明
限流的时候直接提示
-
案例
略…
1.3.1.3.2.warm up
-
说明
它从开始阈值到最大QPS阈值会有一个缓冲阶段,一开始的阈值是最大QPS阈值的 1/3,然后慢慢增长,直到最大阈值,适用于将突然增大的流量转换为缓步增长的场景。
-
案例
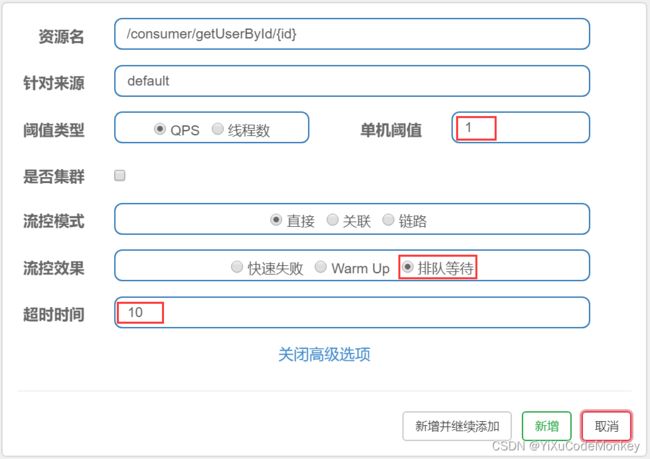
1.3.2.3.3.排队等待
-
说明
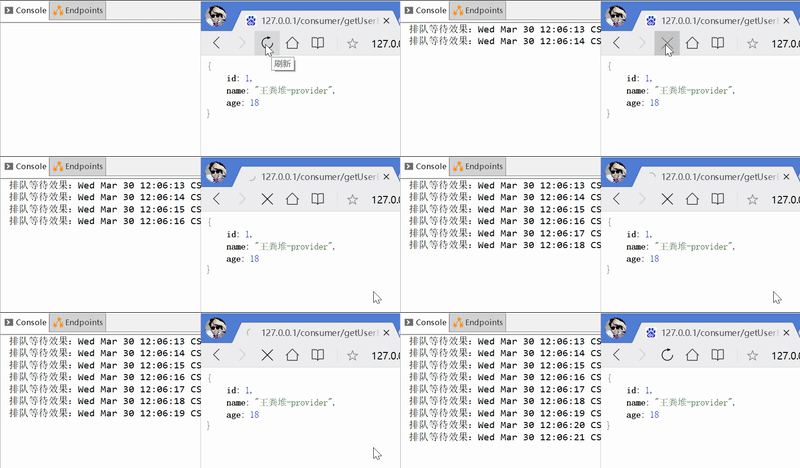
即/consumer/getUserById/1每秒1次请求,超过的话就排队等待,等待的超时时间为10ms,目的是为了匀速处理请求,保证服务的均匀性,而不是一会处理大量的请求,一会有没有请求可处理。
-
案例
@RequestMapping(value = "/getUserById/{id}")
public User getUserById(@PathVariable Integer id) {
    //打印请求时间
    System.out.println("排队等待效果:"+new Date());
    return userFeign.getUserById(id);
}
1.3.2.热点规则
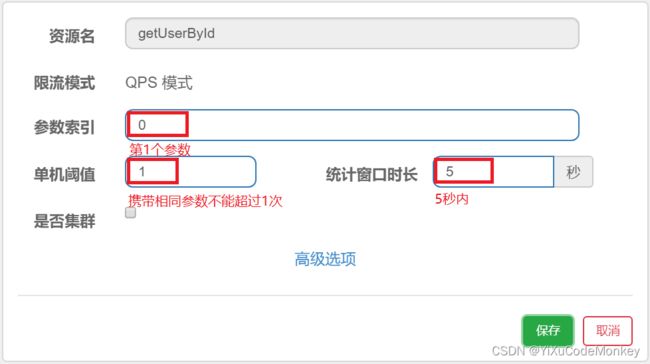
1.3.2.1.什么是热点参数流控
-
热点即经常访问的数据,比如:
- 商品 ID 为参数,统计一段时间内最常购买的商品 ID 并进行限制
- 用户 ID 为参数,针对一段时间内频繁访问的用户 ID 进行限制
-
热点参数流控规则是一种更细粒度的流控规则, 它允许将规则具体到参数上。
1.3.2.2.案例
- 添加参数
    @RequestMapping(value = "/getUserById/{id}")
	//不加@SentinelResource注解注解则不会触发热点参数流控
    @SentinelResource(value = "getUserById", blockHandler = "blockHandlerMethod")
    public User getUserById(@PathVariable Integer id) {
        return userFeign.getUserById(id);
    }
	//资源访问被阻止的备选逻辑
    public User blockHandlerMethod(Integer id, BlockException e){
        return new User(id,"this is blockHandlerMethod",0);
    }
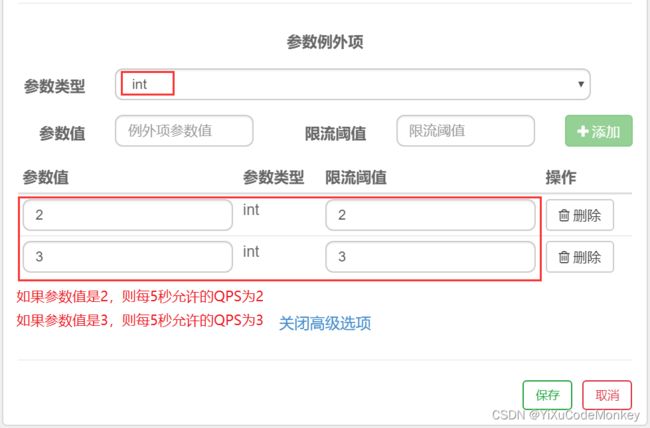
1.3.3.3.参数例外项
1.3.3.系统规则
1.3.3.1.什么是系统规则
系统规则和流控规则不一样,流控规则是针对方法设定的,系统规则是针对一个应用设定的;发生系统规则中配置的情况的时候,会把整个应用都断掉,所有的接口对不能对外提供服务了,这个设计很少用,因为粒度太大了,用 Sentinel 一般都是做细粒度的维护,如果设置了系统规则,可能自己都不知道怎么回事,系统就用不了了;
1.3.3.2.系统限流的 5 中预置类型
- LOAD:只有在 Linux 系统的机器上才会生效,可以根据当前操作系统的负载,来决定是否触发保护;
- RT:这个应用上,所有请求的平均响应时间,如果超过某个值,就停止新的请求;
- 线程数:这个应用上,所有的请求消耗的线程数加起来,如果超过某个值,就停止新的请求;
- 入口 QPS:这个应用上,所有接口的 QPS 加起来,如果超过某个值,就停止新的请求;
- CPU 使用率:CPU 的使用率,如果超过一个百分比,就停止新的请求;
1.3.3.3.案例
1.3.4.授权规则
1.3.4.1.什么是授权规则
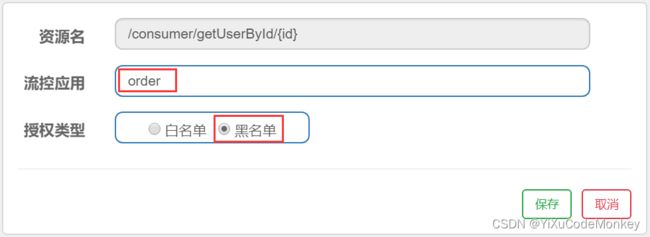
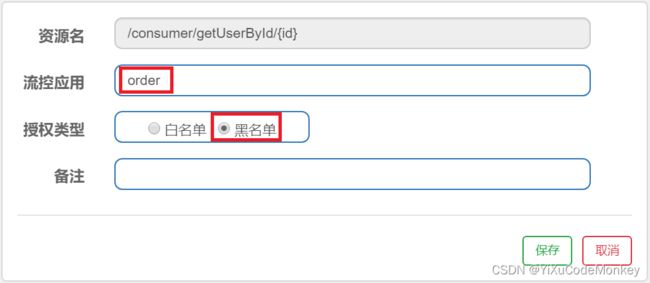
很多时候,我们需要根据调用来源来判断该次请求是否允许放行,这时候可以使用 Sentinel的来源访问控制的功能。来源访问控制根据资源的请求来源(origin)限制资源是否通过:
-
若配置白名单,则只有请求来源位于白名单内时才可通过;
-
若配置黑名单,则请求来源位于黑名单时不通过,其余的请求通过。
1.3.4.2.案例
- 获取来源标识
package com.bjpowernode.config;

import com.alibaba.csp.sentinel.adapter.spring.webmvc.callback.RequestOriginParser;
import org.springframework.stereotype.Component;

import javax.servlet.http.HttpServletRequest;
//sentinel是通过RequestOriginParser这个接口的parseOrigin来获取请求头资源的
@Component
public class RequestOriginParserDefinition implements RequestOriginParser {

    /**
     * Sentinel保护的接口资源被访问,Sentinel就会调用 RequestOriginParser 的实现类去解析访问来源。
     * @param request
     * @return
     */
    @Override
    public String parseOrigin(HttpServletRequest request) {
        //当前 来源标识 放在了请求参数里面,可以放到的地方有很多,比如参数/请求头/session/等等
        String origin = request.getParameter("origin");
        System.out.println("origin:"+origin);
        return origin;
    }
}
1.3.5.降级规则
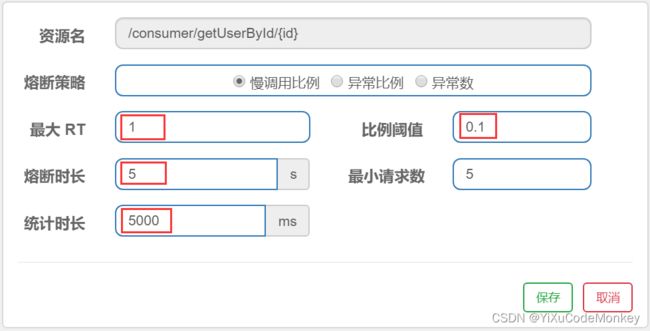
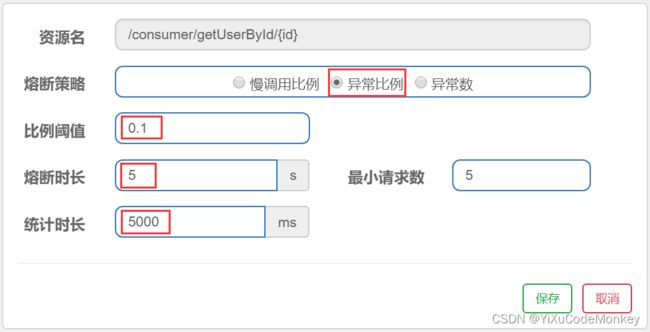
熔断规则就是设置当满足什么条件的时候,暂时切断对下游服务的调用。那么怎么去判断资源是否处于稳定状态呢?
- Sentinel提供了三个衡量条件:
- 慢调用比例
| 属性 | 说明 |
|---|---|
| 最大RT | 需要设置的阈值,超过该值则为慢调用 |
| 比例阈值 | 慢调用占所有的调用的比率,范围:[0~1] |
| 熔断时长 | 在这段时间内发生熔断、拒绝所有请求 |
| 最小请求数 | 即允许通过的最小请求数,在该数量内不发生熔断 |
- 异常比例
| 属性 | 说明 |
|---|---|
| 异常比例阈值 | 异常比例=发生异常的请求数÷请求总数取值范围:[0~1] |
| 熔断时长 | 在这段时间内发生熔断、拒绝所有请求 |
| 最小请求数 | 即允许通过的最小请求数,在该数量内不发生熔断 |
- 异常数
| 属性 | 说明 |
|---|---|
| 异常数 | 请求发生异常的数量 |
| 熔断时长 | 在这段时间内发生熔断、拒绝所有请求 |
| 最小请求数 | 即允许通过的最小请求数,在该数量内不发生熔断 |
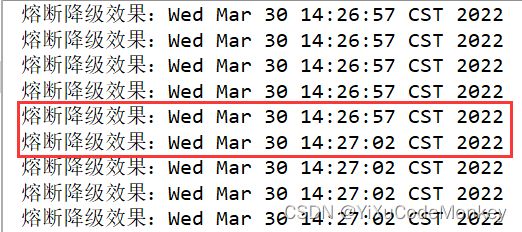
- 服务熔断状态切换:

1.3.5.1.慢调用比例
    @RequestMapping(value = "/getUserById/{id}")
    public User getUserById(@PathVariable Integer id) {
        System.out.println("熔断降级效果:"+new Date());
        //控制请求时间
        try {
            Thread.sleep(300);
        } catch (InterruptedException e) {
            e.printStackTrace();
        }
        return userFeign.getUserById(id);
    }
1.3.5.2.异常比例
@RequestMapping(value = "/getUserById/{id}")
public User getUserById(@PathVariable Integer id) {
    System.out.println("熔断降级效果:"+new Date());
    //请求报异常
    int a = 6/0;
    return userFeign.getUserById(id);
}
1.3.5.3.异常数
@RequestMapping(value = "/getUserById/{id}")
public User getUserById(@PathVariable Integer id) {
    System.out.println("熔断降级效果:"+new Date());
    //请求报异常
    int a = 6/0;
    return userFeign.getUserById(id);
}
1.4.Sentinel的blockHandler
1.4.1.blockHandler
当服务经过sentinel流控或熔断的时候,使用的是Sentinel默认的兜底方法,但是系统默认的方法并没有体现我们的业务要求。
所以Sentinel的@SentinelResource提供了blockHandler属性,让我们可以另外定义一个方法来替服务被限制时的返回数据。
1.4.2.@SentinelResource注解说明
- 其主要属性如下::
| 属性 | 作用 |
|---|---|
| value | 资源名称 |
| blockHandler | 处理BlockException(Sentinel的配置)的兜底方法,要求: 1.返回类型与原方法一致 2.参数类型与原方法一致,并在最后加BlockException类型的参数 |
| blockHandlerClass | 存放blockHandler方法的类,要求: 1.对应的方法必须static修饰 |
1.4.3.同一个类中定义
@RestController
@RequestMapping(value = "/consumer")
public class ConsumerController {

    @Autowired
    private UserFeign userFeign;

    @RequestMapping(value = "/getUserById/{id}")
    @SentinelResource(value ="getUserById",
            blockHandler="blockHandlerMethod")
    public User getUserById(@PathVariable Integer id) {
        int a = 6/0;
        return userFeign.getUserById(id);
    }

    //BlockException异常时调用
    public static User blockHandlerMethod(Integer id, BlockException e) {
        return new User(0, "接口被流控或者熔断了:"+e, 0);
    }
}
1.4.4.外置类中定义
- 创建存放blockHandler方法的类
package com.bjpowernode.exception;

import com.alibaba.csp.sentinel.slots.block.BlockException;
import com.bjpowernode.pojo.User;

public class BlockHandlerClass {

    //BlockException异常时调用
    public static User blockHandlerMethod(Integer id, BlockException e) {
        return new User(0, "接口被流控或者熔断了:"+e, 0);
    }
}
- 使用外置类中定义的方法
@RestController
@RequestMapping(value = "/consumer")
public class ConsumerController {

    @Autowired
    private UserFeign userFeign;

    @RequestMapping(value = "/getUserById/{id}")
    @SentinelResource(value ="getUserById",
           blockHandler="blockHandlerMethod",blockHandlerClass = BlockHandlerClass.class)
    public User getUserById(@PathVariable Integer id) {
        int a = 6/0;
        return userFeign.getUserById(id);
    }

    //BlockException异常时调用
    //public static User blockHandlerMethod(Integer id, BlockException e) {
    //    return new User(0, "接口被流控或者熔断了:"+e, 0);
    //}
}
1.4.5.测试
1.5.Sentinel全局异常处理
1.5.1.BlockExceptionHandler接口
默认情况下,BlockExceptionHandler 有一个默认的 DefaultBlockExceptionHandler 实现类,返回 Block 字符串提示。这个类是默认处理异常阻塞的,代码如下:

我们可以实现该接口对返回数据进行重写, 从而符合我们的业务要求
1.5.2.BlockException接口
BlockException 是一个异常抽象基类,其有 5 个实现类,刚好对应 Sentinel 的 5 种流量控制异常,如下图所示:

1.5.3.实现BlockExceptionHandler
package com.bjpowernode.exception;

import com.alibaba.csp.sentinel.adapter.spring.webmvc.callback.BlockExceptionHandler;
import com.alibaba.csp.sentinel.slots.block.BlockException;
import com.alibaba.csp.sentinel.slots.block.authority.AuthorityException;
import com.alibaba.csp.sentinel.slots.block.degrade.DegradeException;
import com.alibaba.csp.sentinel.slots.block.flow.FlowException;
import com.alibaba.csp.sentinel.slots.block.flow.param.ParamFlowException;
import com.alibaba.csp.sentinel.slots.system.SystemBlockException;
import com.alibaba.fastjson.JSON;
import org.springframework.stereotype.Component;

import javax.servlet.http.HttpServletRequest;
import javax.servlet.http.HttpServletResponse;
@Component
public class GloabBlockExceptionHandler implements BlockExceptionHandler {
    @Override
    public void handle(HttpServletRequest request, HttpServletResponse response, BlockException e) throws Exception {
        response.setContentType("application/json;charset=utf-8");
        BaseResult data = null;
        if (e instanceof FlowException) {
            data = new BaseResult(-1, "限流异常...");
        } else if (e instanceof DegradeException) {
            data = new BaseResult(-2, "降级异常...");
        }else if (e instanceof ParamFlowException) {
            data = new BaseResult(-3, "参数限流异常...");
        }else if (e instanceof AuthorityException) {
            data = new BaseResult(-4, "授权异常...");
        }else if (e instanceof SystemBlockException) {
            data = new BaseResult(-5, "系统负载异常...");
        }
        response.getWriter().write(JSON.toJSONString(data));
    }
}

class BaseResult {
    private int status;
    private String msg;
    private Object data;

    public BaseResult() {
    }

    public BaseResult(int status, String msg) {
        this.status = status;
        this.msg = msg;
    }

    public BaseResult(int status, String msg, Object data) {
        this.status = status;
        this.msg = msg;
        this.data = data;
    }

    public int getStatus() {
        return status;
    }

    public void setStatus(int status) {
        this.status = status;
    }

    public String getMsg() {
        return msg;
    }

    public void setMsg(String msg) {
        this.msg = msg;
    }

    public Object getData() {
        return data;
    }

    public void setData(Object data) {
        this.data = data;
    }
}
1.5.4.测试
1.6.Sentinel整合Feign
1.6.1.为什么整合Feign
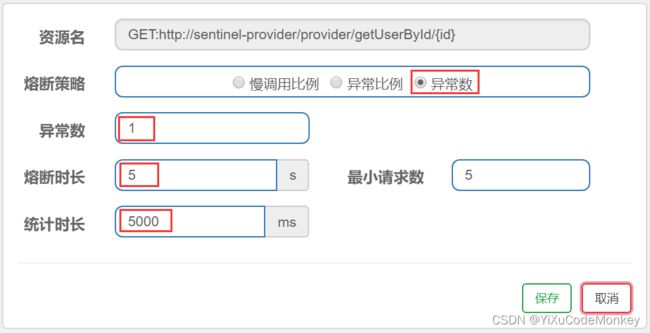
前文的熔断降级是对客户端(调用方)的保护,而我们的微服务远程调用都是基于Feign来完成的,因此我们可以将Feign与Sentinel整合,在Feign里面实现服务熔断。
1.6.2.sentinel_consumer
1.6.2.1.application.yml
feign:
  sentinel:
    enabled: true #开启Feign对Sentinel的支持
1.6.3.sentinel_feign
1.6.3.1.FallbackFactory
- 创建异常处理逻辑
package com.bjpowernode.exception;

import com.bjpowernode.feign.UserFeign;
import com.bjpowernode.pojo.User;
import feign.hystrix.FallbackFactory;
import org.slf4j.Logger;
import org.slf4j.LoggerFactory;
import org.springframework.stereotype.Component;
/**
 *一旦Feign远程调用服务失败,就会进入当前类同名方法,执行容错逻辑
 */
@Component
public class UserFeignFallback implements FallbackFactory<UserFeign> {

    @Override
    public UserFeign create(Throwable t) {
        return new UserFeign() {
            @Override
            public User getUserById(Integer id) {
                return new User(id,"feign调用失败:"+t,0);
            }
        };
    }
}
1.6.3.2.feign
- 为feign接口指定异常处理逻辑
package com.bjpowernode.feign;

import com.bjpowernode.exception.UserFeignFallback;
import com.bjpowernode.pojo.User;
import org.springframework.cloud.openfeign.FeignClient;
import org.springframework.web.bind.annotation.PathVariable;
import org.springframework.web.bind.annotation.RequestMapping;
@FeignClient(value="sentinel-provider",fallbackFactory = UserFeignFallback.class)
@RequestMapping(value = "/provider")
public interface UserFeign {
    @RequestMapping(value = "/getUserById/{id}")
    public User getUserById(@PathVariable("id") Integer id);
}
1.6.4.sentinel
1.6.4.1.新增熔断规则
1.6.5.测试
1.7.Sentinel持久化
1.7.1.为什么要持久化?
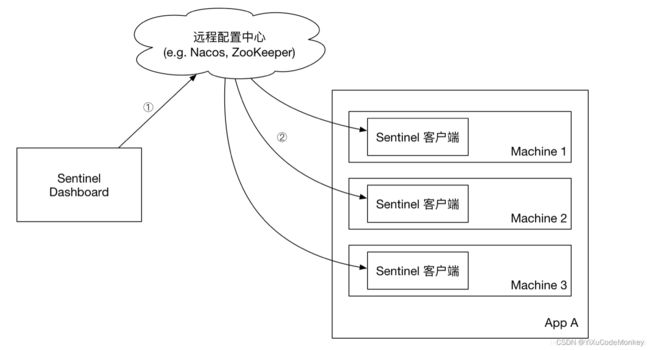
在上一篇,我们讲解了Sentinel的整合与使用,但是有个很明显的问题,就是一旦服务重启,当前配置的针对某个接口的规则就丢掉了,然后就需要重新再配一遍,这就很坑爹了,如果开发中需要配置的接口太多,这样岂不是让人疯掉。

因此需要一个地方来保存dashboard中配置的规则,Sentinel提供了多种持久化的方案,可以集成redis、mysql、nacos等。
1.7.2.sentinel_consumer
1.7.2.1.pom.xml
<dependency>
    <groupId>com.alibaba.cspgroupId>
    <artifactId>sentinel-datasource-nacosartifactId>
dependency>
1.7.2.2.application.yml
spring:
  application:
    name: sentinel-consumer
  cloud:
    sentinel:
      datasource:
        ds1:
          nacos:
            server-addr: ${spring.cloud.nacos.discovery.server-addr} #nacos连接地址
            namespace: sentinel
            groupId: SENTINEL_GROUP #nacos连接的分组名称
            dataId: ${spring.application.name}-flow-rules #读取配置文件的名称
            rule-type: flow #配置文件内容为flow
        ds2:
          nacos:
            server-addr: ${spring.cloud.nacos.discovery.server-addr} #nacos连接地址
            namespace: sentinel
            groupId: SENTINEL_GROUP #nacos连接的分组名称
            dataId: ${spring.application.name}-degrade-rules #读取配置文件的名称
            rule-type: degrade #配置文件内容为degrade
1.7.3.sentinel
1.7.3.1.改造Sentinel 源代码
- 下载
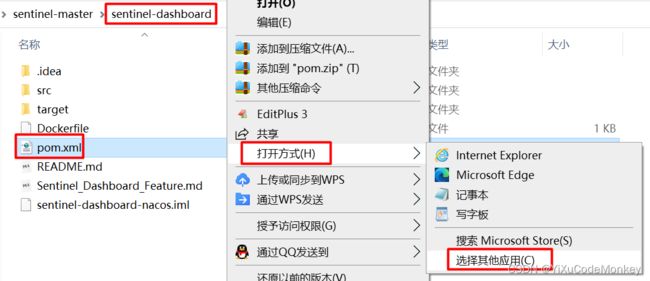
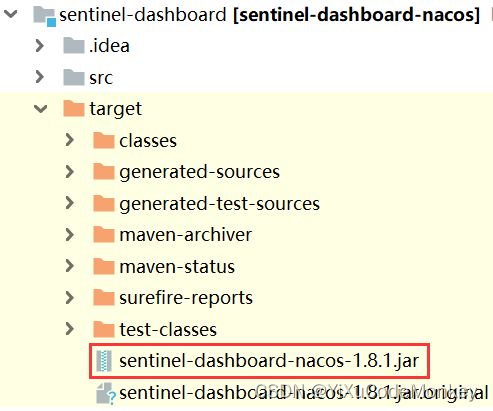
下载地址:https://github.com/alibaba/Sentinel/tree/master/sentinel-dashboard
nacos.address=192.168.209.129:8848
1.7.3.2.新增规则
1.7.4.nacos
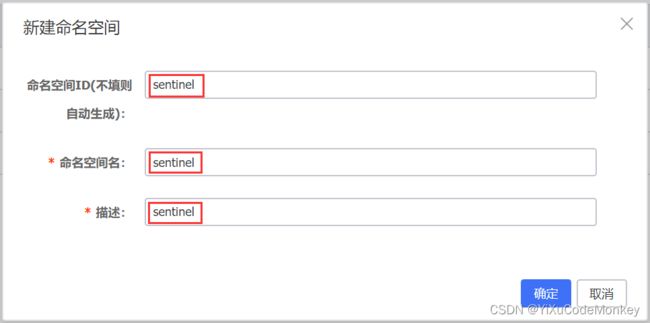
1.7.4.1.新建命名空间
1.7.5.测试
2.服务网关Gateway
2.1.为什么要使用Gateway?
大家都都知道在微服务架构中,一个系统会被拆分为很多个微服务。那么作为客户端要如何去调用这么多的微服务呢?如果没有网关的存在,我们只能在客户端记录每个微服务的地址,然后分别去调用。这样的架构,会存在着诸多的问题:
-
客户端请求不同的微服务,就要维护不同的ip
-
客户端无法实现负载均衡
上面的这些问题可以借助API网关来解决:
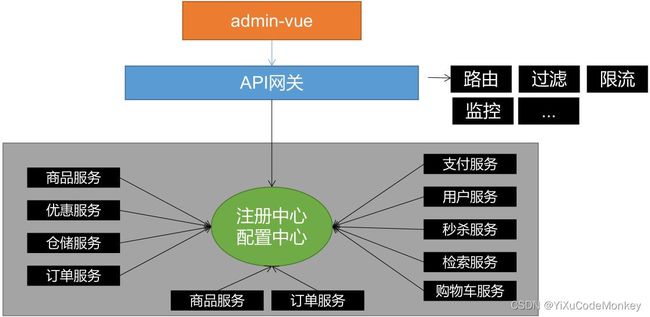
在业界比较流行的网关,有下面这些:
-
Ngnix+lua
使用nginx的反向代理和负载均衡可实现对api服务器的负载均衡及高可用 lua是一种脚本语言,可以来编写一些简单的逻辑,nginx支持lua脚本
-
Spring Cloud Gateway
Spring公司为了替换Zuul而开发的网关服务,将在下面具体介绍。
注意:SpringCloud alibaba技术栈中并没有提供自己的网关,我们可以采用Spring Cloud Gateway来做网关。
2.2.Gateway介绍
2.2.1.Gateway是什么
Spring Cloud Gateway是Spring公司基于Spring 5.0,Spring Boot 2.0 和 WebFlux等技术开发的网关,目标是替代 Netflflix ZUUL,并且基于 Filter 链的方式提供了路由,过滤,和限流等功能。
| 组件 | RPS(request per second) |
|---|---|
| Spring Cloud Gateway | Requests/sec: 32213.38 |
| Zuul1X | Requests/sec: 20800.13 |
上表为Spring Cloud Gateway与Zuul的性能对比,从结果可知,Spring Cloud Gateway的RPS是Zuul的1.6倍
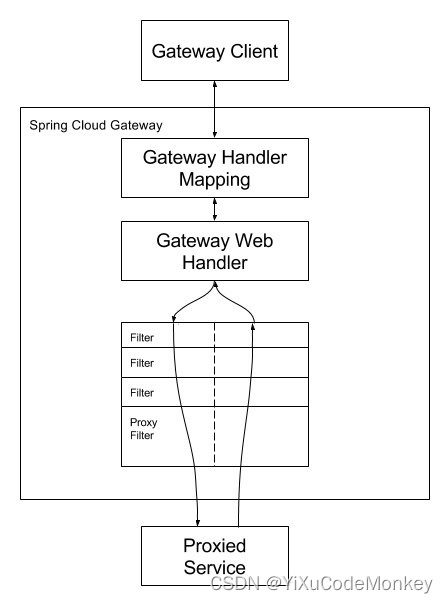
2.2.3.Gateway执行流程
-
Gateway Client向Gateway Server发送请求
-
HandlerMapping负责路由查找,并根据路由断言判断路由是否可用
-
WebHandler创建过滤器链并调用
2.2.创建gateway工程
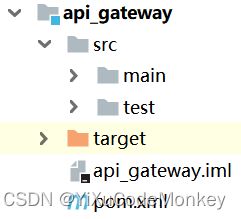
2.2.1.创建工程
2.2.1.pom.xml
<project xmlns="http://maven.apache.org/POM/4.0.0"
         xmlns:xsi="http://www.w3.org/2001/XMLSchema-instance"
         xsi:schemaLocation="http://maven.apache.org/POM/4.0.0 http://maven.apache.org/xsd/maven-4.0.0.xsd">
    <parent>
        <artifactId>springcloud_parentartifactId>
        <groupId>com.bjpowernodegroupId>
        <version>1.0-SNAPSHOTversion>
    parent>
    <modelVersion>4.0.0modelVersion>

    <artifactId>api_gatewayartifactId>

    <dependencies>

        <dependency>
            <groupId>com.alibaba.cloudgroupId>
            <artifactId>spring-cloud-starter-alibaba-nacos-discoveryartifactId>
        dependency>

        <dependency>
            <groupId>org.springframework.cloudgroupId>
            <artifactId>spring-cloud-starter-gatewayartifactId>
        dependency>
    dependencies>
project>
注意:不要添加spring-boot-starter-web启动器
        <dependency>
            <groupId>org.springframework.bootgroupId>
            <artifactId>spring-boot-starter-webartifactId>
        dependency>
2.2.1.application.yml
spring:
  application:
    name: api-gateway
  cloud:
    nacos:
      discovery:
        server-addr: 192.168.209.129:8848
server:
  port: 9527
2.2.1.App
package com.bjpowernode;

import org.springframework.boot.SpringApplication;
import org.springframework.boot.autoconfigure.SpringBootApplication;

@SpringBootApplication
public class GatewayApp {
    public static void main(String[] args) {
        SpringApplication.run(GatewayApp.class, args);
    }
}
2.3.路由
2.3.1.通过断言条件路由
2.3.1.1.application.yml
spring:
  cloud:
    gateway:
      routes:
        - id: sentinel-consumer #自定义的路由ID,保持唯一
          uri: http://localhost:80 # 请求要转发到的地址
          predicates: #断言
            - Path=/consumer/** #只有断言条件返回true(请求路径包含“/consumer”)时,才进行路由转发
2.3.1.2. 测试
1.开启服务和网关:
- api_gateway
- sentinel_consumer
- sentinel_provider
2.浏览器访问:http://127.0.0.1:9527/consumer/getUserById/1

2.3.2.通过服务名路由
2.3.2.1.application.yml
spring:
  cloud:
    gateway:
      routes:
        - id: sentinel-consumer #自定义的路由ID,保持唯一
          uri: lb://sentinel-consumer #lb代表从注册中心获取服务
          predicates: #断言
            - Path=/consumer/** #只有断言条件返回true(请求路径包含“/consumer”)时,才进行路由转发
2.3.2.2. 测试
- 重启网关:
- api_gateway
2.4.断言
2.4.1.内置断言工厂
Spring Cloud Gateway 的功能很强大,前面我们只是使用了 predicates 进行了简单的条件匹配,其实Spring Cloud Gataway 帮我们内置了很多 Predicates 功能。
可参考spring官网:https://docs.spring.io/spring-cloud-gateway/docs/current/reference/html/#gateway-request-predicates-factories
2.4.1.1.基于Datetime类型的断言工厂
- 说明
此类型的断言根据时间做判断,主要有三个:
AfterRoutePredicateFactory:接收一个日期参数,判断请求日期是否晚于指定日期。
BeforeRoutePredicateFactory:接收一个日期参数,判断请求日期是否早于指定日期。
BetweenRoutePredicateFactory:接收两个日期参数,判断请求日期是否在指定时间段内。
- 案例
- After=2022-04-09T17:20:54.957+08:00[Asia/Shanghai]
2.4.1.2.基于RemoteAddr的断言工厂
- 说明
RemoteAddrRoutePredicateFactory:接收一个IP地址段,判断请求主机地址是否在地址段中。
- 案例
- RemoteAddr=192.168.1.1/24
2.4.1.3.基于Cookie的断言工厂
- 说明
CookieRoutePredicateFactory:接收两个参数,cookie名字和一个正则表达式。判断请求cookie是否具有给定名称且值与正则表达式匹配。
- 案例
- Cookie=chocolate, ch.
2.4.1.4.基于Header的断言工厂
- 说明
HeaderRoutePredicateFactory:接收两个参数,标题名称和正则表达式。 判断请求Header是否 具有给定名称且值与正则表达式匹配。
- 案例
- Header=X-Request-Id, \d+
2.4.1.3.基于Host的断言工厂
- 说明
HostRoutePredicateFactory:接收一个参数,主机名模式。判断请求的Host是否满足匹配规则。
- 案例
- Host=**.testhost.org
2.4.1.5.基于Method请求方法的断言工厂
- 说明
MethodRoutePredicateFactory:接收一个参数,判断请求类型是否跟指定的类型匹配。
- 案例
- Method=GET
2.4.1.6.基于Path请求路径的断言工厂
- 说明
PathRoutePredicateFactory:接收一个参数,判断请求的URI部分是否满足路径规则。
- 案例
- Path=/foo/{segment}
2.4.1.7.基于Query请求参数的断言工厂
-
说明
QueryRoutePredicateFactory :接收两个参数,请求param和正则表达式, 判断请求参数是否具有给定名称且值与正则表达式匹配。
- 案例
- Query=baz, ba.
2.4.2.自定义路由断言工厂
2.4.2.1.内置断言工厂的实现原理
我们来设定一个场景: 假设我们的应用仅仅让age>18的人来访问,在自定义断言工厂之前,我们先看内置断言工厂的实现原理,打开AfterRoutePredicateFactory这个内置断言工厂:
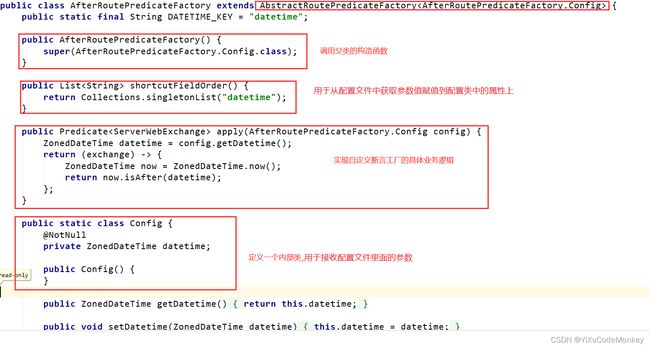
2.4.2.2.创建断言工厂
package com.bjpowernode.PredicateFactory;

import lombok.Data;
import lombok.NoArgsConstructor;
import org.apache.commons.lang.StringUtils;
import org.springframework.cloud.gateway.handler.predicate.AbstractRoutePredicateFactory;
import org.springframework.stereotype.Component;
import org.springframework.web.server.ServerWebExchange;

import java.util.Arrays;
import java.util.List;
import java.util.function.Consumer;
import java.util.function.Predicate;

/**
 * 自定义断言工厂
 * Config 是一个类  需要我们自己去定义
 */
@Component
public class AgeRoutePredicateFactory extends AbstractRoutePredicateFactory<AgeRoutePredicateFactory.Config> {

    public AgeRoutePredicateFactory() {
        super(AgeRoutePredicateFactory.Config.class);
    }

    //读取配置文件的中参数值 给他赋值到配置类中的属性上
    @Override
    public List<String> shortcutFieldOrder() {
        //这里的顺序要跟配置文件中的参数顺序一致
        return Arrays.asList("minAge", "maxAge");
    }

    //断言逻辑
    @Override
    public Predicate<ServerWebExchange> apply(AgeRoutePredicateFactory.Config config) {
        return new Predicate<ServerWebExchange>() {
            @Override
            public boolean test(ServerWebExchange serverWebExchange) {
                //1 接收前台传入的age参数
                String ageStr =
                    serverWebExchange.getRequest().getQueryParams().getFirst("age");
                //2 先判断是否为空
                if (StringUtils.isNotEmpty(ageStr)) {
                    //3 如果不为空,再进行路由逻辑判断
                    int age = Integer.parseInt(ageStr);
                    if (age < config.getMaxAge() && age > config.getMinAge()) {
                        return true;
                    } else {
                        return false;
                    }
                }
                return false;
            }
        };
    }

    //自定义一个配置类, 用于接收配置文件中的参数
    @Data
    @NoArgsConstructor
    public static class Config {
        private int minAge;//18
        private int maxAge;//60
    }
}
2.4.2.3.配置断言
spring:
  cloud:
    gateway:
      routes:
        - id: sentinel-consumer
          uri: lb://sentinel-consumer
          predicates:
            - Path=/consumer/**
            - Age=18,60 #配置断言必须使用断言工厂类名的前缀
2.4.2.4.测试
- 浏览器访问:http://127.0.0.1:9527/consumer/getUserById/1?age=17

- 浏览器访问:http://127.0.0.1:9527/consumer/getUserById/1?age=19

2.5.过滤
Spring Cloud Gateway提供了过滤器的功能,可以对进入网关的请求和响应做处理:
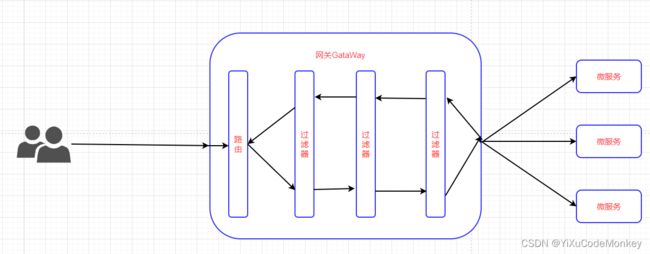
Spring Cloud Gateway 的 Filter 从作用范围可分为另外两种GatewayFilter 与 GlobalFilter。
-
GatewayFilter:应用到单个路由或者一个分组的路由上。
-
GlobalFilter:应用到所有的路由上。
2.5.1.内置过滤器工厂
Spring Cloud Gateway中通过GatewayFilter的形式内置了很多不同类型的局部过滤器,可参考spring官网:https://docs.spring.io/spring-cloud-gateway/docs/current/reference/html/#gatewayfilter-factories
| 过滤器工厂 | 作用 |
|---|---|
| AddRequestHeader | 给当前请求添加一个请求头 |
| AddRequestParameter | 为原始请求添加请求参数 |
| AddResponseHeader | 给响应结果中添加一个响应头 |
| DedupeResponseHeader | 去掉重复请求头 |
| Spring Cloud CircuitBreaker | 断路器 |
| FallbackHeaders | 添加熔断后的异常信息到请求头 |
| MapRequestHeader | 将上游请求头的值赋值到下游请求头 |
| PrefixPath | 匹配的路由添加前缀 |
| PreserveHostHeader | 保留原请求头 |
| RequestRateLimiter | 限制请求的流量 |
| RedirectTo | 重定向 |
| RemoveRequestHeader | 移除请求中的一个请求头 |
| RemoveResponseHeader | 从响应结果中移除有一个响应头 |
| RemoveRequestParameter | 移除请求参数 |
| RewritePath | 重写路径 |
| RewriteLocationResponseHeader | 重写响应头中Location的值 |
| RewriteResponseHeader | 重写响应头 |
| SaveSession | 向下游转发请求前前置执行WebSession::save的操作 |
| SecureHeaders | 禁用默认值 |
| SetPath | 设置路径 |
| SetRequestHeader | 重置请求头 |
| SetResponseHeader | 修改响应头 |
| SetStatus | 修改响应的状态码 |
| StripPrefix | 对指定数量的路径前缀进行去除 |
| Retry | 重试 |
| RequestSize | 请求大小大于限制时,限制请求到达下游服务 |
| SetRequestHostHeader | 重置请求头值 |
| Modify a Request Body | 修改请求体内容 |
| Modify a Response Body | 修改响应体内容 |
| Relay | 将 OAuth2 访问令牌向下游转发到它所代理的服务 |
| CacheRequestBody | 在请求正文发送到下游之前缓存请求正文并从 exchagne 属性获取正文 |
2.5.2.自定义过滤器工厂
需求:记录调用远程服务所需要的时间
2.5.2.1.创建过滤器工厂
package com.bjpowernode.FilterFactory;

import lombok.Data;
import lombok.NoArgsConstructor;
import org.springframework.cloud.gateway.filter.GatewayFilter;
import org.springframework.cloud.gateway.filter.GatewayFilterChain;
import org.springframework.cloud.gateway.filter.factory.AbstractGatewayFilterFactory;
import org.springframework.stereotype.Component;
import org.springframework.web.server.ServerWebExchange;
import reactor.core.publisher.Mono;

import java.util.Arrays;
import java.util.Date;
import java.util.List;

@Component
public class LogGatewayFilterFactory
        extends AbstractGatewayFilterFactory<LogGatewayFilterFactory.Config> {

    public LogGatewayFilterFactory() {
        super(Config.class);
    }

    @Override
    public GatewayFilter apply(Config config) {
        return new GatewayFilter() {
            @Override
            public Mono<Void> filter(ServerWebExchange exchange,
                                     GatewayFilterChain chain) {
                if (config.paramValue) {
                    long beginTime = System.currentTimeMillis();
                    return chain.filter(exchange).then(Mono.fromRunnable(new Runnable() {
                        @Override
                        public void run() {
                            long endTime = System.currentTimeMillis();
                            System.out.println("time of call service :" +
                                               			(endTime - beginTime));
                        }
                    }));
                }
                return chain.filter(exchange);
            }
        };
    }

    //读取配置文件中的参数 赋值到配置类中
    @Override
    public List<String> shortcutFieldOrder() {
        //这里的顺序要跟配置文件中的参数顺序一致
        return Arrays.asList("paramValue");
    }

    //自定义一个配置类, 用于接收配置文件中的参数
    @Data
    @NoArgsConstructor
    public static class Config {
        private boolean paramValue;
    }
}
2.5.2.2.配置过滤器
spring:
  cloud:
      routes:
        - id: sentinel-consumer
          uri: lb://sentinel-consumer
          predicates:
            - Path=/consumer/**
          filters: #过滤
            - Log=true
2.5.2.3.测试
2.5.3.自定义全局过滤器
- 需求:
在网关过滤器中通过Token 判断用户是否登录
- 全局过滤器(GlobalFilter):
作用于所有路由,Spring Cloud Gateway 定义了Global Filter接口,用户可以自定义实现自己的Global Filter。通过全局过滤器可以实现对权限的统一校验,安全性验证等功能,并且全局过滤器也是程序员使用比较多的过滤器。Spring Cloud Gateway内部也是通过一系列的内置全局过滤器对整个路由转发进行处理如下:
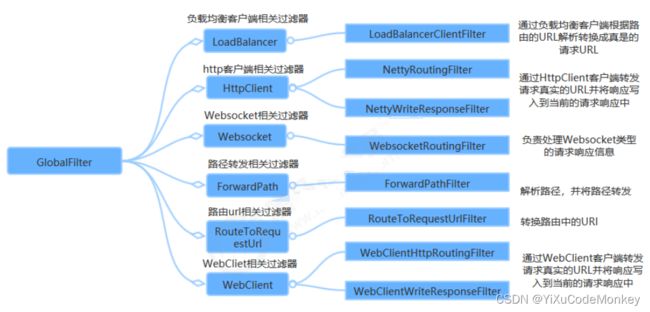
2.5.2.1.创建过滤器
在服务网关中定义过滤器只需要实现 GlobalFilter, Ordered接口就可对请求进行拦截与过滤。
package com.bjpowernode.FilterFactory;

import com.fasterxml.jackson.core.JsonProcessingException;
import com.fasterxml.jackson.databind.ObjectMapper;
import org.springframework.cloud.gateway.filter.GatewayFilterChain;
import org.springframework.cloud.gateway.filter.GlobalFilter;
import org.springframework.core.Ordered;
import org.springframework.core.io.buffer.DataBuffer;
import org.springframework.http.server.reactive.ServerHttpRequest;
import org.springframework.http.server.reactive.ServerHttpResponse;
import org.springframework.stereotype.Component;
import org.springframework.web.server.ServerWebExchange;
import reactor.core.publisher.Mono;

import java.nio.charset.StandardCharsets;

@Component
public class LoginFilter implements GlobalFilter, Ordered {

    @Override
    public Mono<Void> filter(ServerWebExchange exchange, GatewayFilterChain chain) {
        ServerHttpRequest request = exchange.getRequest();
        ServerHttpResponse response = exchange.getResponse();
        String token = request.getQueryParams().getFirst("token");
        if (token == null) {
            BaseResult data = new BaseResult(401, "未登录");
            return response(response,data);
        }
        //放行
        return chain.filter(exchange);
    }

    private Mono<Void> response(ServerHttpResponse response, BaseResult data) {
        String jsonData = null;
        try {
            jsonData = new ObjectMapper().writeValueAsString(data);
        } catch (JsonProcessingException e) {
            e.printStackTrace();
        }
        DataBuffer buffer =
            response.bufferFactory().wrap(jsonData.getBytes(StandardCharsets.UTF_8));
        response.getHeaders().add("Content-Type", "application/json;charset=UTF-8");
        return response.writeWith(Mono.just(buffer));
    }

    /**
     * 过滤器的执行顺序:通过整数表示顺序,数值越小,优先级越高
     * @return
     */
    @Override
    public int getOrder() {
        return 0;
    }
}
class BaseResult {
    private int status;
    private String msg;
    private Object data;

    public BaseResult() {
    }

    public BaseResult(int status, String msg) {
        this.status = status;
        this.msg = msg;
    }

    public BaseResult(int status, String msg, Object data) {
        this.status = status;
        this.msg = msg;
        this.data = data;
    }

    public int getStatus() {
        return status;
    }

    public void setStatus(int status) {
        this.status = status;
    }

    public String getMsg() {
        return msg;
    }

    public void setMsg(String msg) {
        this.msg = msg;
    }

    public Object getData() {
        return data;
    }

    public void setData(Object data) {
        this.data = data;
    }
}
2.5.2.2.测试
- 不加token:http://127.0.0.1:9527/gateway/consumer/getUserById?id=1&nam=zs

- 加token:http://127.0.0.1:9527/consumer/getUserById/1?token=123

2.5.限流
网关是所有请求的公共入口,所以可以在网关进行限流,而且限流的方式也很多,我们本次采用前 面学过的Sentinel组件来实现网关的限流。
2.5.1.api_gateway
2.5.1.1.pom.xml
        <dependency>
            <groupId>com.alibaba.cloudgroupId>
            <artifactId>spring-cloud-starter-alibaba-sentinelartifactId>
        dependency>

        <dependency>
            <groupId>com.alibaba.cloudgroupId>
            <artifactId>spring-cloud-alibaba-sentinel-gatewayartifactId>
        dependency>
2.5.1.2.application.yml
spring:
  cloud:
    sentinel:
      transport:
        dashboard: 127.0.0.1:8080 #指定sentinel的地址
2.5.1.3.自定义异常处理
package com.bjpowernode.exception;

import com.alibaba.csp.sentinel.adapter.gateway.sc.callback.BlockRequestHandler;
import com.alibaba.csp.sentinel.adapter.gateway.sc.callback.GatewayCallbackManager;
import com.alibaba.csp.sentinel.slots.block.authority.AuthorityException;
import com.alibaba.csp.sentinel.slots.block.degrade.DegradeException;
import com.alibaba.csp.sentinel.slots.block.flow.FlowException;
import com.alibaba.csp.sentinel.slots.block.flow.param.ParamFlowException;
import com.alibaba.csp.sentinel.slots.system.SystemBlockException;
import com.alibaba.fastjson.JSON;
import org.springframework.context.annotation.Configuration;
import org.springframework.http.HttpStatus;
import org.springframework.http.MediaType;
import org.springframework.web.reactive.function.BodyInserters;
import org.springframework.web.reactive.function.server.ServerResponse;
import org.springframework.web.server.ServerWebExchange;
import reactor.core.publisher.Mono;

import javax.annotation.PostConstruct;
import java.util.HashMap;
import java.util.Map;

@Configuration
public class GatewayConfig {

    @PostConstruct
    public void init() {
        BlockRequestHandler blockRequestHandler = new BlockRequestHandler() {
            @Override
            public Mono<ServerResponse> handleRequest(ServerWebExchange exchange,
                                                      				Throwable t) {
                // 自定义异常信息
                Map map = new HashMap<>();
                map.put("status", 200);
                map.put("msg", "接口被限流了");
                return ServerResponse.status(HttpStatus.OK)
                        .contentType(MediaType.APPLICATION_JSON)
                        .body(BodyInserters.fromValue(map));
            }
        };
        //自定义异常处理
        GatewayCallbackManager.setBlockHandler(blockRequestHandler);
    }
}
