Spring,注解开发
Spring是一个轻量级的控制反转(IOC)和面向切面编程(AOP)的框架
1、组成
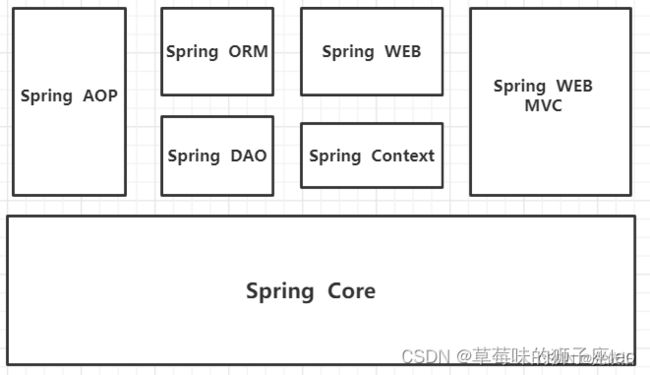
spring七大模块详解
2、IOC理论推导
传统的开发 (pojo层、DAO层和业务层)
(1)UserDao
(2) UserDaoImpl
(3) UserService 业务接口
(4) UserServiceImpl 业务实现类
【用户实际调用service层,不需要接触dao层】
UserServiceImpl:
// 先new一个dao对象
public class UserServiceImpl implements UserService{
	// 方法1:
	private UserDao userdao =new UserDaoImple();

	// 方法2:利用接口的思想set注入
	// 优点:
	private UserDao userdao;
	public void setUserDao(UserDao userdao){
		this.userDao = userDao;


	// 业务实现
	public void getUser(){
	  userdao.getUser();


测试类:
public class Test{

	// 实例化service对象
	UserService userService = new UserServiceImpl()
	// 利用set动态实现值的注入
	(UserService )userService.setUserDao(new UserDaoImpl)
	userService .getUser();
3、HelloSpring
- 配置文件applicationconfig.xml
使用Spring创建对象Bean
// Hello hello =new Hello()
// 相当于new了一个id的实例化变量
    <!-- id:唯一标识符
    class:包名+类型
    name:别名,可同时取多个别名 -->

<bean id="变量名" class="类的权限定名" name="name1,name2...">
	<property name=" 属性"  value="属性值"/>
</bean>
基于XML文件的注解配置
<?xml version="1.0" encoding="UTF-8"?>
<beans xmlns="http://www.springframework.org/schema/beans"
    xmlns:xsi="http://www.w3.org/2001/XMLSchema-instance"
    xsi:schemaLocation="http://www.springframework.org/schema/beans
        https://www.springframework.org/schema/beans/spring-beans.xsd">

    <!-- services -->

    <bean id="petStore" class="org.springframework.samples.jpetstore.services.PetStoreServiceImpl">
    // ref:spring容器中的对象  value:具体的值
        <property name="accountDao" ref="accountDao"/>
        <property name="itemDao" ref="itemDao"/>

    </bean>


</beans>

// 注解的context名称空间

<!--告知spring在创建容器时要扫描的包,配置所需要的标签不是在beans的约束中,而是一个名称为
    context名称空间和约束中-->
    <context:component-scan base-package="com.itheima"></context:component-scan>


测试类:
// 获取ApplicationContext:拿到spring容器
4、 IOC创建对象的方式
- 使用无参构造创建对象,默认实现
- 使用有参构造
<!--方式1:通过类型创建:不建议使用>
<bean id="exampleBean" class="examples.ExampleBean">
    <constructor-arg type="int" value="7500000"/>
    <constructor-arg type="java.lang.String" value="42"/>
</bean>
<!--方式2:通过下标,从0开始>
<bean id="exampleBean" class="examples.ExampleBean">
    <constructor-arg index="0" value="7500000"/>
    <constructor-arg index="1" value="42"/>
</bean>
<!--方式3:参数名>
<bean id="exampleBean" class="examples.ExampleBean">
    <constructor-arg name="years" value="7500000"/>
    <constructor-arg name="ultimateAnswer" value="42"/>
</bean>
5、Spring配置
6、依赖注入
- 6.1 构造器注入
package x.y;

public class ThingOne {

    public ThingOne(ThingTwo thingTwo, ThingThree thingThree) {
        // ...
    }
}

<beans>
    <bean id="beanOne" class="x.y.ThingOne">
        <constructor-arg ref="beanTwo"/>
        <constructor-arg ref="beanThree"/>
    </bean>

    <bean id="beanTwo" class="x.y.ThingTwo"/>

    <bean id="beanThree" class="x.y.ThingThree"/>
</beans>
- 6.2 set方式注入
基于 Setter 的 DI 是通过容器在调用无参数的构造函数或无参数的 static 工厂方法来实例化你的 bean 之后调用 Setter 方法来实现的。
依赖:bean对象的创建依赖于容器
注入:bean对象中的所有属性,由容器注入
【集合】
<bean id="moreComplexObject" class="example.ComplexObject">
    <!-- results in a setAdminEmails(java.util.Properties) call -->
    <property name="adminEmails">
        <props>
            <prop key="name">administrator</prop>
            <prop key="support">support@example.org</prop>
            <prop key="development">development@example.org</prop>
        </props>
    </property>

    <!-- List注入:results in a setSomeList(java.util.List) call -->
    <property name="someList">
        <list>
            <value>list1</value>
            <value>list2</value>
            <value>list3</value>
            <ref bean="myDataSource" />
        </list>
    </property>

    <!-- results in a setSomeMap(java.util.Map) call -->
    <property name="someMap">
        <map>
            <entry key="an entry" value="just some string"/>
            <entry key="a ref" value-ref="myDataSource"/>
        </map>
    </property>

    <!-- results in a setSomeSet(java.util.Set) call -->
    <property name="someSet">
        <set>
            <value>string1</value>
            <value>string2</value>
            <ref bean="myDataSource" />
        </set>
    </property>
</bean>
c命名和p命名空间注入
p命名空间注入:可以直接注入属性的值property
<bean name="classic" class="com.example.ExampleBean">
        <property name="email" value="[email protected]"/>
    </bean>

    <bean name="p-namespace" class="com.example.ExampleBean"
        p:email="[email protected]"/>


c命名空间注入:通过构造器注入
<!-- traditional declaration with optional argument names -->
    <bean id="beanOne" class="x.y.ThingOne">
        <constructor-arg name="thingTwo" ref="beanTwo"/>
        <constructor-arg name="thingThree" ref="beanThree"/>
        <constructor-arg name="email" value="[email protected]"/>
    </bean>

    <!-- c-namespace declaration with argument names -->
    <bean id="beanOne" class="x.y.ThingOne"
    c:thingTwo-ref="beanTwo"
    c:thingThree-ref="beanThree"
    c:email="[email protected]"/>
注意:p命名和c命名需要导入xml约束
xmlns:c="http://www.springframework.org/schema/c"
xmlns:p="http://www.springframework.org/schema/p"
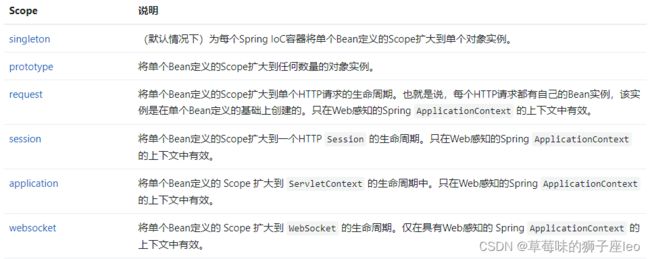
bean的作用域
7、Bean自动装配
- 自动装配是spring满足bean依赖一种方式
- Spring在上下文中自动寻找,
- spring中有三种装配方式
1、在xml中显示配置
2、在java中显示配置
3、隐式的自动装配bean重要!!!
<!--
byName:会自动在容器上下本中查找,和自己对象set方法后面的值对应的beanid
如setDog 中的dog对应的beanid
-->
<bean id="people" class="com.gt.pojo.People" autowire="byName">
<property name="name" value="hello"/>
</bean>
//1、byName:保证所有bean的id唯一,并且这个bean需要和自动注入的属性的set方法值一致
2、byType:保证所有bean的class唯一,并且这个bean需要和自动注入的属性类型一致
8、使用注解实现自动装配
(1)导入约束,context约束
(2)配置注解的配置(开启注解)context:annotation-config/
<?xml version="1.0" encoding="UTF-8"?>
<beans xmlns="http://www.springframework.org/schema/beans"
    xmlns:xsi="http://www.w3.org/2001/XMLSchema-instance"
    xmlns:context="http://www.springframework.org/schema/context"
    xsi:schemaLocation="http://www.springframework.org/schema/beans
        https://www.springframework.org/schema/beans/spring-beans.xsd
        http://www.springframework.org/schema/context
        https://www.springframework.org/schema/context/spring-context.xsd">

<!--  开启注解的支持-->
    <context:annotation-config/>


   <bean id="cat" class="com.gt.pojo.Cat"/>
    <bean id="dog" class="com.gt.pojo.Dog"/>
    <bean id="people" class="com.gt.pojo.People"/>
</beans>
使用@Autowired
1、@Autowired 应用于字段
@Autowired
    private MovieCatalog movieCatalog;
2、应用于传统的setter方法
  private MovieFinder movieFinder;
    @Autowired
    public void setMovieFinder(MovieFinder movieFinder) {
        this.movieFinder = movieFinder;
    }
3、使用@Autowired可以不写set(),前提是自动装配的属性在IOC容器中存在,且符合byName
【扩展:】
@Nullable
public class SimpleMovieLister {
// Nullable 可以为null值

    @Autowired
    public void setMovieFinder(@Nullable MovieFinder movieFinder) {
        ...
    }
}
@Primary
当多个Bean自动注入到一个单值依赖的候选者时,优先考虑一个特定的Bean
例子:
@Configuration
public class MovieConfiguration {

    @Bean
    @Primary
    public MovieCatalog firstMovieCatalog() { ... }

    @Bean
    public MovieCatalog secondMovieCatalog() { ... }

    // ...
}

下面的 MovieRecommender 被自动注入到 firstMovieCatalog
public class MovieRecommender {

    @Autowired
    private MovieCatalog movieCatalog;

    // ...
}
@Qualifier
如果@Autowired自动装配环境较复杂,使用
- @Qualifier(value=“”)去配置@Autowired使用,指定一个唯一的bean对象注入
    <bean id="cat1" class="com.gt.pojo.Cat"/>
    <bean id="cat2" class="com.gt.pojo.Cat"/>
    <bean id="dog1" class="com.gt.pojo.Dog"/>
    <bean id="dog2" class="com.gt.pojo.Dog"/>
    <bean id="people" class="com.gt.pojo.People"/>
public class People {
    private String name;
    /**
     * 如果显式定义了Autowired的required属性为false,说明这个对象可以为null,否则不允许为空
     * @Autowired是根据类型自动装配的,加上@Qualifier则可以根据byName的方式自动装配
     * @Qualifier不能单独使,与@Autowired配合
     */
    @Autowired(required = false)
    @Qualifier(value = "dog1")
    private Dog dog;
    @Autowired
    @Qualifier(value = "cat1")
    private Cat cat;
}
@Resource 注入
通过在字段或Bean属性设置方法上使用@Resource注解进行注入
public class People {
    private String name;

    @Resource(name = "dog1")
    private Dog dog;

    @Resource(name = "cat")
    private Cat cat;
}

<bean id="cat" class="...Cat"/>
<bean id="dog" class="...Dog"/>
<bean id="person" class="...Perple"/>

// 或者名字不一样,但是class类型唯一
<bean id="cat111" class="...Cat"/>
<bean id="dog222" class="...Dog"/>
@Resource默认通过byName方式实现,如果找不到名字,则通过byType实现,如果两者都找不到就报错~
@Autowired通过byType实现
9、使用注解开发
@Component
// 等价于@Value
@Value("xiexie")
private String name;
2、属性如何注入
@Component
public class User {
private String name;
// 等价于 3、衍生注解,MVC三层架构
@Component
- dao 【@Repository】
- sevice 【@service】
- controller 【@Controller】
这四个注解都表示将某个类注册到Spring中,装配Bean
为了自动检测这些类并注册相应的Bean,你需要在你的 @Configuration 类中添加 @ComponentScan,其中 basePackages 属性是这两个类的共同父包

指定要扫描的包,包下的注解就会生效
 <context:component-scan base-package="org.example"/>

// 注解
使用注解的 value 属性(即 @ComponentScan("org.example"))
9、基于java的容器配置(springboot常见)
在java代码中使用注解来配置Spring容器
Spring的Java配置支持的核心工件是 @Configuration 注解的类和 @Bean 注解的方法。
建立一个config目录,
@Configuration
@ComponentScan(basePackages = "com.example") // 启用组件扫描
@import(AppConfig2.class)// 导入其他的config文件
public class AppConfig {
// 注册一个bean,相当于** 通过使用 AnnotationConfigApplicationContext实例化Spring容器**
测试类:
public static void main(String[] args) {
    ApplicationContext ctx = new AnnotationConfigApplicationContext(AppConfig.class);
    MyService myService = ctx.getBean(MyService.class);
    myService.doStuff();
}

