012、数据库管理之cluster部署
cluster部署
-
- 硬件要求
- 操作系统要求
- 依赖包要求
- 部署的组件
- 部署集群
-
- 前置检查
- 安装TiUP组件
- 初始化集群拓扑文件
- 执行部署命令
- 查看集群情况
- 查看已部署的集群情况
- 启动集群
- 验证集群运行状态
- 启动与停止
-
- 启动
- 停止
- 案例讲解
- 测试环境
-
- 准备环境
- 实施部署
硬件要求
| 组件 | CPU | 内存 | 本地存储 | 网络 | 实例数量(最低要求) |
|---|---|---|---|---|---|
| TiDB | 8 核+ | 16 GB+ | 无特殊要求 | 千兆网卡 | 1(可与 PD 同机器) |
| PD | 4 核+ | 8 GB+ | SAS, 200 GB+ | 千兆网卡 | 1(可与 TiDB 同机器) |
| TiKV | 8 核+ | 32 GB+ | SSD, 200 GB+ | 千兆网卡 | 3 |
| TiFlash | 32 核+ | 64 GB+ | SSD, 200 GB+ | 千兆网卡 | 1 |
| TiCDC | 8 核+ | 16 GB+ | SAS, 200 GB+ | 千兆网卡 | 1 |
操作系统要求
| 操作系统 | 支持的 CPU 架构 |
|---|---|
| Red Hat Enterprise Linux 8.4 及以上的 8.x 版本 | x86_64 ARM 64 |
| Red Hat Enterprise Linux 7.3 及以上的 7.x 版本 CentOS 7.3 及以上的 7.x 版本 |
x86_64 ARM 64 |
依赖包要求
- 中控机软件配置
| 软件 | 版本 |
|---|---|
| sshpass | 1.06 及以上 |
| TiUP | 1.5.0 及以上 |
- 目标主机建议配置软件
| 软件 | 版本 |
|---|---|
| sshpass | 1.06 及以上 |
| numa | 2.0.12 及以上 |
| tar | 任意 |
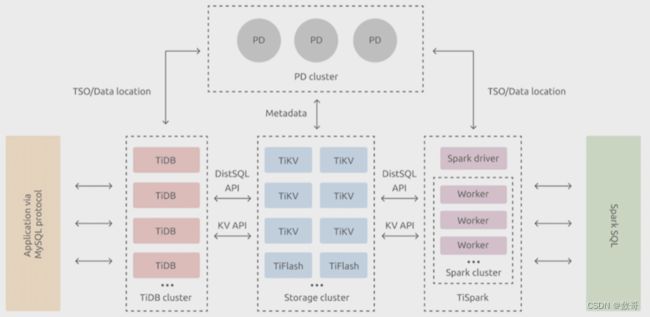
部署的组件
部署集群
前置检查
- 存储参数配置
- 关闭SWAP
- 关闭防火墙设置
- 安装NTP服务
- 操作系统优化参数
- SSH互信与sudo免密码配置
- numactl 工具安装
安装TiUP组件
- 下载并安装TiUP
curl --proto '=https' --tlsv1.2 -sSf https://tiupmirrors.pingcap.com/install.sh | sh
- 声明全局环境变量
source <profile 文件绝对路径>
- 安装TiUP cluster组件
tiup cluster
- 更新组件
tiup update --self && tiup update cluster
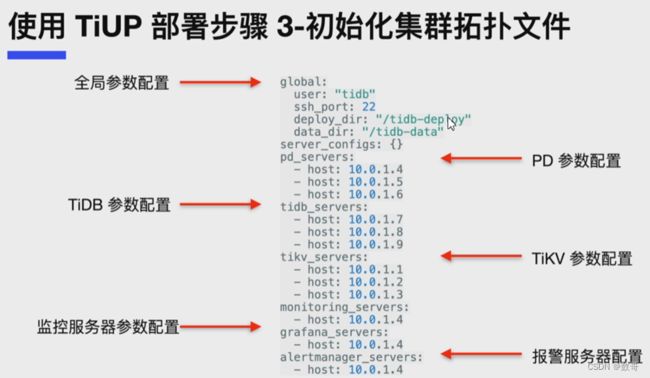
初始化集群拓扑文件
执行部署命令
- 检查集群存在的潜在风险
tiup cluster check ./topology.yaml --user root [-p] [-t /home/root/.ssh/gcp_rsa]
- 自动修复集群存在的潜在风险
tiup cluster check ./topology.yaml --apply --user root [-p] [-t /home/root/.ssh/gcp_rsa]
- 执行deploy 命令部署TiDB集群
tiup cluster deploy ${cluster-name} v5.0.0 ./topology.yaml --user root [-p] [-t /home/root/.ssh/gcp_rsa]
查看集群情况
查看TiUP管理的集群情况
tiup cluster list
查看已部署的集群情况
查看指定的集群状态
tiup cluster display ${cluster-name}
启动集群
启动集群
tiup cluster start ${cluster-name}
验证集群运行状态
- TiUP检查集群状态
tiup cluster display ${cluster-name}
启动与停止
启动
- 启动顺序
pd->TiKV->TiDB ->TiFlash
- 启动命令
tiup cluster start ${cluster-name}
停止
- 停止顺序
TiFlash -> TiDB -> TiKV -> PD
- 集群关闭
tiup cluster stop ${cluster-name}
案例讲解
1、下载TiUP 工具:
curl --proto '=https' --tlsv1.2 -sSf https://tiupmirrors.pingcap.com/install.sh | sh
2、声明全局环境变量
source ~/.bash_profile
3、安装TiUP cluster组件
tiup cluster
4、更新组件
tiup update --self && tiup update cluster
5、 验证当前TiUP cluster 版本信息,查看TiUP cluster组件版本
tiup --binary cluster
6、生成临时配置文件
tiup cluster template > topology.yaml
7、编辑拓扑文件
# # Global variables are applied to all deployments and used as the default value of
# # the deployments if a specific deployment value is missing.
global:
  user: "tidb"
  ssh_port: 22
  deploy_dir: "/tidb-deploy"
  data_dir: "/tidb-data"

pd_servers:
  - host: 10.0.1.4
  - host: 10.0.1.5
  - host: 10.0.1.6

tidb_servers:
  - host: 10.0.1.1
  - host: 10.0.1.2

tikv_servers:
  - host: 10.0.1.7
  - host: 10.0.1.8
  - host: 10.0.1.9

monitoring_servers:
  - host: 10.0.1.10

grafana_servers:
  - host: 10.0.1.10

alertmanager_servers:
  - host: 10.0.1.10
8、检查和自动修复集群存在的潜在风险
tiup cluster check ./topology.yaml --apply --user root -p
9、部署TiDB集群
tiup cluster deploy tidb-test v5.0.0 ./topology.yaml --user root -p
10、查看TiUP管理的集群情况
tiup cluster list
tiup cluster display tidb-test
11、启动集群
tiup cluster start tidb-test
12、连接集群
mysql -uroot -P4000 -h12.13.15.16
测试环境
准备环境
TiDB 是⼀个分布式系统。最基础的 TiDB 测试集群通常由 2 个 TiDB 实例、3 个 TiKV实例、3 个 PD 实例和可选的 TiFlash 实例构成。通过 TiUP Playground,可以快速搭建出上述的⼀套基础测试集群。使⽤TiUP部署的测试集群,仅适⽤于快速上⼿体验,不适⽤于⽣产环境。
![]()
- TiUP⼯具介绍
TiUP是TiDB4.0版本引⼊的集群运维⼯具,通过TiUP可以进⾏TiDB的⽇常运维⼯作,包括部署、启动、关闭、销毁、弹性扩缩容和升级TiDB集群,以及管理TiDB集群参数。 - playground组件
TiUP的playground组件可以在本地环境中模拟出⼀个TiDB集群。也就是说,使⽤playground的命令可以⼀键搭建出⼀个TiDB集群,这个集群可供测试使⽤,但不适⽤于⽣产环境。 - 适⽤场景
利⽤本地 macOS 或者单机 Linux 环境快速部署 TiDB 测试集群,体验 TiDB 集群的基本架构,以及 TiDB、TiKV、PD、监控等基础组件的运⾏。教程中使⽤的是虚拟机
实施部署
- 下载并安装TiUP
curl --proto '=https' --tlsv1.2 -sSf https://tiupmirrors.pingcap.com/install.sh | sh
安装完成后会提示如下信息:
  % Total    % Received % Xferd  Average Speed   Time    Time     Time  Current
                                 Dload  Upload   Total   Spent    Left  Speed
100 7322k  100 7322k    0     0  4813k      0  0:00:01  0:00:01 --:--:-- 4811k
Successfully set mirror to https://tiup-mirrors.pingcap.com
Detected shell: bash
Shell profile:  /root/.bash_profile
/root/.bash_profile has been modified to add tiup to PATH
open a new terminal or source /root/.bash_profile to use it
Installed path: /root/.tiup/bin/tiup
===============================================
Have a try:     tiup playground
===============================================
- 声明全局环境变量
TiUP 安装完成后会提示 Shell profile ⽂件的绝对路径。在执⾏以下 source 命令前,需要将 ${your_shell_profile} 修改为 Shell profile ⽂件的实际位置。
source ${your_shell_profile}
[root@tidb ~]#  source /root/.bash_profile
-
启动集群:使⽤ tiup playground 启动集群,有两种⽅式。
- 直接执⾏ tiup playground 命令会运⾏最新版本的 TiDB 集群,其中TiDB、TiKV、PD 和 TiFlash 实例各 1 个:
tiup playground
- 也可以指定 TiDB 版本以及各组件实例个数,命令类似于:
tiup playground v6.1.0 --db 2 --pd 3 --kv 3 --host 192.168.16.12

--host : 对外的IP,默认是127.0.0.1 ,这个IP肯定要改成公网IP
上述命令会在本地下载并启动某个版本的集群(例如 v6.1.0)。其中host是
虚拟机的IP,可以通过虚拟机IP来访问到TiDB的实例。最新版本可以通过执
⾏ tiup list tidb 来查看。运⾏结果将显示集群的访问⽅式:
 TiDB Cluster is started, enjoy!
Connect TiDB:   mysql --host 192.168.16.12 --port 4000 -u root
Connect TiDB:   mysql --host 192.168.16.12 --port 4001 -u root
TiDB Dashboard: http://192.168.16.12:2379/dashboard
Grafana:        http://192.168.16.12:3000
初始的root是没有密码的
- 注意事项
- 如果提示找不到tiflash⽂件:
TiFlash 172.16.253.104:3930 failed to start: fork/exec
/root/.tiup/components/tiflash/v6.1.0/tiflash/tiflash: no
such file or directory
需要进⼊到 /root/.tiup/components/tiflash/v6.1.0/ 路径下解压
缩tiflash的压缩包即可:
tar -zxvf tiflash-v6.1.0-linux-amd64.tar.gz
- 关闭集群
tiup playground启动的集群,在命令会话终端如果关闭会话,或者⽤ Control+C 键终⽌当前会话,tidb集群将被关闭
- 清理集群
测试完成之后,可以通过执⾏以下步骤来清理集群:
按下 Control+C 键停掉上述启⽤的 TiDB 服务。
等待服务退出操作完成后,执⾏以下命令:
tiup clean --all
这是关闭所有集群,当然也可以关闭指定集群
例如我在创建集群的时候,指定集群名
tiup playground v6.1.0 --tag batch-example --db 2 --pd 3 --kv 3 --host 192.168.16.12
tiup clean  batch-example
![]()
- 管理界面
通过 http://192.168.16.12:9090 访问 TiDB 的 Prometheus 管理界⾯。
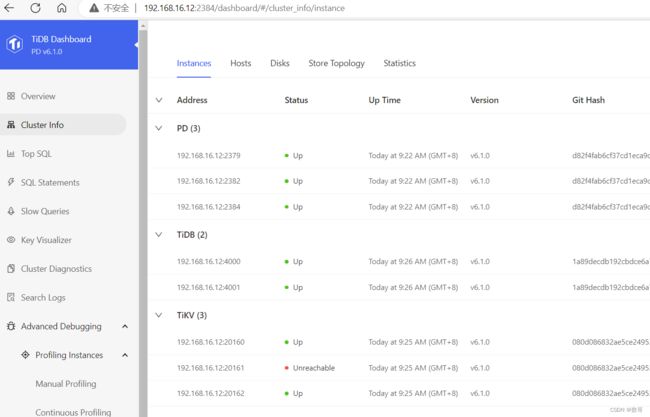
通过 http://192.168.16.12:2379/dashboard 访问TiDB Dashboard⻚⾯,
默认⽤户名为 root ,密码为空。
通过 http://192.168.16.12:3000 访问 TiDB 的 Grafana 界⾯,
默认⽤户名和密码都为 admin 。
- 连接TiDB
新开启⼀个 session 以访问 TiDB 数据库。
使⽤ TiUP client 连接 TiDB:
tiup client

Starting component `client`: /root/.tiup/components/client/v1.12.1/tiup-client
Connected with driver mysql (5.7.25-TiDB-v6.1.0)
Type "help" for help.

my:root@192.168.16.12:4000=> show databases;
      Database
--------------------
 INFORMATION_SCHEMA
 METRICS_SCHEMA
 PERFORMANCE_SCHEMA
 mysql
 test
(5 rows)
也可使⽤ MySQL 客户端连接 TiDB:
mysql --host 192.168.16.12 --port 4000 -u root
[root@tidb ~]# mysql --host 192.168.16.12 --port 4000 -u root
Welcome to the MySQL monitor.  Commands end with ; or \g.
Your MySQL connection id is 409
Server version: 5.7.25-TiDB-v6.1.0 TiDB Server (Apache License 2.0) Community Edition, MySQL 5.7 compatible

Copyright (c) 2000, 2023, Oracle and/or its affiliates.

Oracle is a registered trademark of Oracle Corporation and/or its
affiliates. Other names may be trademarks of their respective
owners.

Type 'help;' or '\h' for help. Type '\c' to clear the current input statement.

mysql>
也可以使用navicat 进行连接
