系列目录
- 序篇
- 准备工作
- BIOS 启动到实模式
- GDT 与保护模式
- 虚拟内存初探
- 加载并进入 kernel
- 显示与打印
- 全局描述符表 GDT
- 中断处理
- 虚拟内存完善
- 实现堆和 malloc
- 第一个内核线程
- 多线程切换
- 锁与多线程同步
- 进入用户态
- 进程的实现
- 系统调用
- 简单的文件系统
- 加载可执行程序
- 键盘驱动
- 运行 shell
准备
接上一篇,我们启动了第一个 thread,好像只是让一个普通的函数在一个全新的 stack 上运行起来而已。作为一个真正的操作系统,需要能运行调度多个 threads。创建多个 threads 的过程很简单,问题是如何让它们交替切换运行起来。回到上一篇提到的关于 thread 的两个核心构成要素:
- 代码
- stack
本篇将进入多线程的世界。在这里会展示,两个 thread 如何完成 stack 的转换,并且在 stack 转换的同时,代码的执行流也自动发生了切换。并且基于 multi-threads 的切换能力,我们将初步构建出一个调度器 scheduler。
线程切换
首先回顾上一篇,thread 启动后的 stack 状况,程序运行在图中浅蓝色部分的 stack 区域内:

如果没有外界触发,程序将一直在这里运行下去,不可能发生 thread 切换,即使在别的地方另外有一个 thread,拥有它自己独立的 stack;因此这里需要一个触发者,这就是时钟 interrupt,在中断处理一篇的最后,我们尝试打开了时钟 interrupt,那里的 handler 只是简单的打印函数。现在我们需要在里面实现 threads 切换。
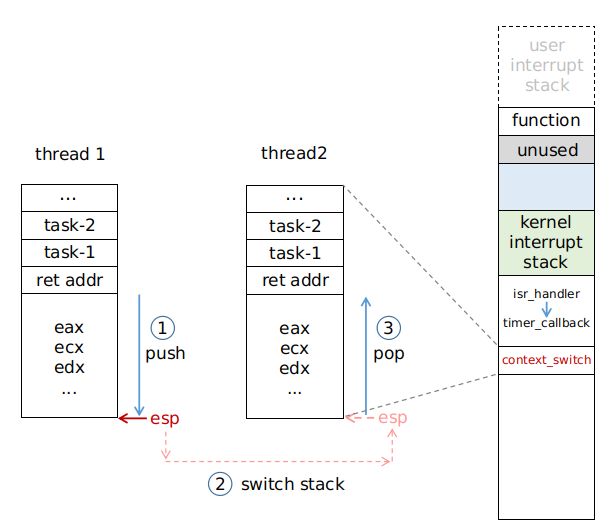
设想程序正在上图的 stack 运行,这时发生了时钟 interrupt,CPU 将自动进入中断处理,回顾一下中断处理一篇的内容,此时 stack 会变成这样:

经过 CPU 和 kernel 的一系列压栈操作,程序执行流程大概是这样:
isr32 (32 是时钟 interrupt 中断号)
  --> isr_common_stub
    --> isr_handler
      --> timer_callback
最终来到 timer_callback 函数:
struct task_struct* crt_thread;
struct task_struct* next_thread;

static void timer_callback(isr_params_t regs) {
  // For only 2 threads switch.
  struct task_struct* old_thread = crt_thread;
  struct task_struct* new_thread = next_thread;

  // swap, for next time switch.
  crt_thread = new_thread;
  next_thread = old_thread;

  context_switch(old_thread, new_thread);
}
如果你不记得 task_struct 定义了,它就是 thread 的描述结构,这里再贴一下:
struct task_struct {
  uint32 kernel_esp;
  uint32 kernel_stack;

  uint32 id;
  // ...
};
上面的示例代码应该不难理解,假定我们只有 2 个 threads,那么在 timer_callback 里就是实现它们两者的互相切换。
关键部分是最后一行 context_switch 函数,它完成了两个 thread 的切换,它其实分了上下两半部分:
上半部分完成对当前 thread 的 context 保存:
context_switch:
  push eax
  push ecx
  push edx
  push ebx
  push ebp
  push esi
  push edi

  mov eax, [esp + 32]
  mov [eax], esp
下半部分,完成对下一个待运行 thread 的恢复:
  ; jump to next thread's kernel stack
  ; and recover its execution
  mov eax, [esp + 36]
  mov esp, [eax]

resume_thread:
  pop edi
  pop esi
  pop ebp
  pop ebx
  pop edx
  pop ecx
  pop eax

  sti
  ret
注意 esp + 32 和 esp + 36 是拿到 context_switch 函数的两个参数,即待切换的新老两个 thread:
void context_switch(old_thread, new_thread);参数是指向 task_struct 的指针,而 task_struct 的第一个字段就是 kernel_esp,也就是说这里将 threads 发生切换时的 esp,保存在了 kernel_esp 这个字段里;待下一次 thread 恢复运行时,再读出 kernel_esp 找到它被切走前的 最后一瞬间的 esp,继续运行。

而且经过 stack 转换后,代码的执行流也自动恢复到了下一个 thread 原来的执行流上,事实上它们本来就是同一个流。因为待切换的 thread,之前被切走时,也是经过 context_switch 函数,push 了所有通用寄存器,保存 esp,然后被切走,现在则是在相同的指令位置原地恢复,继续执行。
所以这里需要理解的最关键的一点是,context_switch 函数的上下两半部分的执行,是分属于新老两个 thread 的,在新老两个不同的 stack 上执行,这其中的关键连接点就是 esp 寄存器的切换。老 thread 执行完前半段,就被切走挂起,esp 值保存在 thread 内存对象中;它要等到下次再被调度时,再恢复 esp,继续运行后半段,拼成一个完整的 context_switch 执行流;然后向上层层 return,最终回到时钟 interrupt 之前打断它的那个地方继续运行。
切换到新创建的 thread 上
上面讨论的情况中,待运行的 next thread 是一个之前运行过,被切走挂起的 thread,所以它的 stack 布局是和当前运行的 thread 是一样的,都是来到 context_switch 函数的运行 stack。但如果待运行的 thread 是一个新创建的呢?如果回顾上一章的内容,就会发现这里在设计上是无缝衔接的。

上图是新创建的 thread 的 stack,它恰好初始化了一个 switch stack,并且将 kernel_esp 字段指向了该 stack,因此从 context_switch 函数的下半部分开始运行,它就能立刻正确初始化 esp,并且 pop 所有通用寄存器,这和第一个 thread 启动的方式是一致的。
也就是说,第一个 thread,是从 resume_thread 开始启动;而后面的所有 thread,都是通过 context_swith 以相同的方式完美启动。
线程调度器
有了 2 个 threads 的切换能力,我们实际上可以创建更多的 threads,并且开始构建一个调度器 scheduler。最简单调度模式就是所有 threads 依次运行,循环往复,所以这首先需要一个链表来保存所有的 threads。
我在 src/utils/linked_list.c 实现了一个链表结构,它是一个通用链表,每个节点保存的是指向实际对象的指针,在我们这里就是 task_struct*,具体的实现可以参考代码,比较简单。
struct linked_list_node {
  type_t ptr;
  struct linked_list_node* prev;
  struct linked_list_node* next;
};
typedef struct linked_list_node linked_list_node_t;

struct linked_list {
  linked_list_node_t* head;
  linked_list_node_t* tail;
  uint32 size;
};
typedef struct linked_list linked_list_t;
因此我们可以定义所有待运行 threads 的链表,即 ready_tasks,这里面所有的 thread 状态都是 TASK_READY,也就是就绪态,它们是可以被下一次调度运行的 task:
static linked_list_t ready_tasks;因此 scheduler 的逻辑很简单,这里以伪代码展示:
next_thread = Fetch head from ready_tasks queue;
set next_thread.status = TASK_RUNNING;
set crt_thread.status = TASK_READY;
Enqueue crt_thread to tail of ready_tasks queue;

context_switch(crt_thread, next_thread);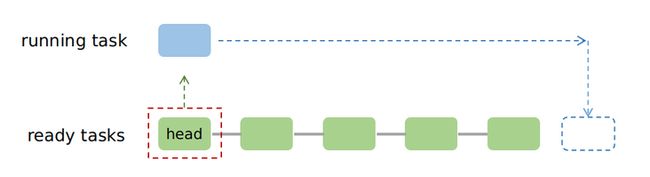
task 时间片
上面有个细节没有提到,就是 threads 切换并非是在每个时钟 interrupt 里都会发生,而是在这个 task 的 CPU 时间片消耗完时才会被切走,所以每个 task 的结构里都会记录当前消耗的时间片:
struct task_struct {
  // ...
  uint32 ticks;
  // ...
};
我们将 schedule 逻辑整理到一个单独函数 maybe_context_switch 里,每次时钟 interrupt 都会将字段 ticks + 1,当 ticks 数量达到设定的上限时,即 thread 时间片消耗完,触发 do_context_switch,那里面会真正执行 thread 切换操作。
static void timer_callback(isr_params_t regs) {
  maybe_context_switch();
}
void maybe_context_switch() {
disable_interrupt();
merge_ready_tasks();
bool need_context_switch = false;
if (ready_tasks.size > 0) {
tcb_t* crt_thread = get_crt_thread();
crt_thread->ticks++;
// Current thread has run out of time slice.
if (crt_thread->ticks >= crt_thread->priority) {
crt_thread->ticks = 0;
need_context_switch = true;
}
}
if (need_context_switch) {
do_context_switch();
}
}thread yield
在某些情况下,thread 还会主动让出 CPU,提前结束自己这一轮的运行,将 CPU 交给下一个 thread,这被称为 yield,例如在锁竞争失败,thread 结束时等情况。注意这里的 yield,并不是 block,当前 thread 不会阻塞睡眠,只是让出了 CPU,把自己重新放回了 ready_tasks 队列,过一段时间它会被重新调度运行。
所以 yield 的实现很简单,直接调用 do_context_switch 就可以了:
void schedule_thread_yield() {
  disable_interrupt();
  merge_ready_tasks();
  // ...
  if (ready_tasks.size > 0) {
    do_context_switch();
  }
}
总结
本篇实现了多线程运行和 scheduler 的基本框架,实际上到此为止,这个 kernel 已经可以称得上是一个真正的 OS 了,它已经具备了一个最简单的操作系统应有的基本骨架:
- 内存管理
- 中断处理
- 任务管理
后面的工作,我们将继续丰富这个 kernel,使之更多的功能和更好的用户交互能力。