关于Android的帧动画,补间动画,属性动画的使用和总结。(附源码)
说明:内容有点多,可以分块阅读,后续可能会拆分为三讲
一. Android的动画总结
一 . 帧动画
帧动画其实就是通过连续播放图片来模拟动画效果
以下是俩种实现方式:
1. xml文件的方式
首先在drawable下建立animation_lufi.xml
<animation-list xmlns:android="http://schemas.android.com/apk/res/android"
    android:oneshot="false">
    <item android:drawable="@drawable/image7"
        android:duration="200"/>
    <item android:drawable="@drawable/image8"
        android:duration="200"/>
    <item android:drawable="@drawable/image9"
        android:duration="200"/>
    <item android:drawable="@drawable/image10"
        android:duration="200"/>

animation-list>
可以预览效果:
在layout文件中的view中把animation_lufi.xml添加为背景
<androidx.constraintlayout.widget.ConstraintLayout xmlns:android="http://schemas.android.com/apk/res/android"
    xmlns:app="http://schemas.android.com/apk/res-auto"
    xmlns:tools="http://schemas.android.com/tools"
    android:layout_width="match_parent"
    android:layout_height="match_parent"
    tools:context=".MainActivity">
    <View
        android:id="@+id/image"
        android:layout_width="300dp"
        android:layout_height="300dp"
        android:background="@drawable/animation_lufi"
        app:layout_constraintBottom_toBottomOf="parent"
        app:layout_constraintLeft_toLeftOf="parent"
        app:layout_constraintRight_toRightOf="parent"
        app:layout_constraintTop_toBottomOf="@+id/end" />
androidx.constraintlayout.widget.ConstraintLayout>
在java代码中获取到该动画
animationDrawable = (AnimationDrawable) img.getBackground();使用该动画
animationDrawable.start(); //开启动画animationDrawable.stop(); //停止动画2. java代码方式
在java代码中:
        animationDrawable = new AnimationDrawable();
        animationDrawable.addFrame(getResources().getDrawable(R.drawable.image7),250);
        animationDrawable.addFrame(getResources().getDrawable(R.drawable.image8),250);
        animationDrawable.addFrame(getResources().getDrawable(R.drawable.image9),250);
        animationDrawable.addFrame(getResources().getDrawable(R.drawable.image10),250);
        img.setBackground(animationDrawable);
- 其他使用不变。 仅仅是获取到实例的方式,和添加帧Frame的方式不一样而已
二. 补间动画
补间动画开发者只需指定动画开始,以及动画结束"关键帧", 而动画变化的"中间帧"则由系统计算并补齐。
1. 补间动画的种类
AlphaAnimation:: 透明度渐变效果,创建时许指定开始以及结束透明度,还有动画的持续 时间,透明度的变化范围(0,1),0是完全透明,1是完全不透明;对应标签!
ScaleAnimation:缩放渐变效果,创建时需指定开始以及结束的缩放比,以及缩放参考点, 还有动画的持续时间;对应标签!
TranslateAnimation:位移渐变效果,创建时指定起始以及结束位置,并指定动画的持续 时间即可;对应标签!
RotateAnimation:旋转渐变效果,创建时指定动画起始以及结束的旋转角度,以及动画 持续时间和旋转的轴心;对应标签
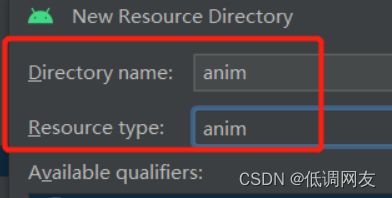
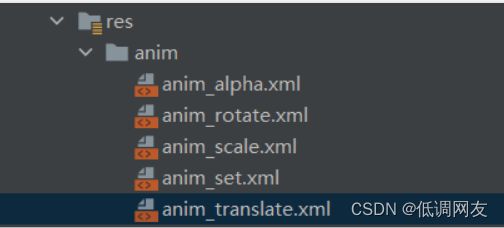
AnimationSet: 组合渐变,就是前面多种渐变的组合,对应标签2.xml代码和属性说明: (在res下创建anim目录,在anim中new xml文件)
AlphaAnimation:: anim_alpha.xml<alpha xmlns:android="http://schemas.android.com/apk/res/android" android:interpolator="@android:anim/accelerate_decelerate_interpolator" android:fromAlpha="1.0" android:toAlpha="0.1" android:duration = "3000" />fromAlpha : 起始透明度 toAlpha : 结束透明度 透明度的范围为:0-1,完全透明-完全不透明
ScaleAnimation:anim_scale.xml<scale xmlns:android="http://schemas.android.com/apk/res/android" android:interpolator="@android:anim/accelerate_interpolator" android:fromXScale="0.2" android:toXScale="1.5" android:fromYScale="0.2" android:toYScale="1.5" android:pivotX="50%" android:pivotY="50%" android:duration="2000"/>fromXScale/fromYScale:沿着X轴/Y轴缩放的起始比例 toXScale/toYScale:沿着X轴/Y轴缩放的结束比例 pivotX/pivotY:缩放的中轴点X/Y坐标,即距离自身左边缘的位置,比如50%就是以图像的 中心为中轴点
TranslateAnimation: anim_translate.xml<translate xmlns:android="http://schemas.android.com/apk/res/android" android:interpolator="@android:anim/accelerate_decelerate_interpolator" android:fromXDelta="0" android:toXDelta="320" android:fromYDelta="0" android:toYDelta="-320" android:duration="2000"/>fromXDelta/fromYDelta:动画起始位置的X/Y坐标 toXDelta/toYDelta:动画结束位置的X/Y坐标
RotateAnimation:anim_rotate.xml<rotate xmlns:android="http://schemas.android.com/apk/res/android" android:interpolator="@android:anim/accelerate_decelerate_interpolator" android:fromDegrees="0" android:toDegrees="129" android:duration="1000" android:repeatCount="1" android:repeatMode="reverse"/>fromDegrees/toDegrees:旋转的起始/结束角度 repeatCount:旋转的次数,默认值为0,代表一次,假如是其他值,比如3,则旋转4次 另外,值为-1或者infinite时,表示动画永不停止 repeatMode:设置重复模式,默认restart,但只有当repeatCount大于0或者infinite或-1时 才有效。还可以设置成reverse,表示偶数次显示动画时会做方向相反的运动!
AnimationSet: 其实就是集中了几种动画,(且几种动画是同一时刻开始播放的)anim_set.xml
<set xmlns:android="http://schemas.android.com/apk/res/android"
    android:interpolator="@android:anim/decelerate_interpolator"
    android:shareInterpolator="true" >
    <scale
        android:duration="2000"
        android:fromXScale="0.2"
        android:fromYScale="0.2"
        android:pivotX="50%"
        android:pivotY="50%"
        android:toXScale="1.5"
        android:toYScale="1.5" />
    <rotate
        android:duration="1000"
        android:fromDegrees="0"
        android:repeatCount="1"
        android:repeatMode="reverse"
        android:toDegrees="360" />
    <translate
        android:duration="2000"
        android:fromXDelta="0"
        android:fromYDelta="0"
        android:toXDelta="320"
        android:toYDelta="0" />
    <alpha
        android:duration="2000"
        android:fromAlpha="1.0"
        android:toAlpha="0.1" />
set>
android:shareInterpolator="true" : 为true时,set中的所有动画都共享同一插值器。 为false时,需要为set中每个动画都设置单独的插值器 (Interpolator)3.java代码加载xml的动画去获取动画实例并开启
                //利用AnimationUtils从xml中加载获取Animation实例
               Animation animation = AnimationUtils.loadAnimation(MainActivity.this,R.anim.anim_alpha);
               //调用view去开启动画
               mImageView.startAnimation(animation);
上述是加载anim_alpha.xml动画的java代码。 其他的同理
4. java直接创建动画实例
RotateAnimationRotateAnimation rotateAnimation = new RotateAnimation(0, 360); rotateAnimation.setRepeatCount(1); rotateAnimation.setRepeatMode(Animation.REVERSE); rotateAnimation.setDuration(2000); mImageView.startAnimation(rotateAnimation);
AnimationSetAnimation rotateAnimation = new RotateAnimation(0, -720, RotateAnimation.RELATIVE_TO_SELF, 0.5f, RotateAnimation.RELATIVE_TO_SELF, 0.5f); rotateAnimation.setDuration(2000); Animation translateAnimation = new TranslateAnimation(TranslateAnimation.RELATIVE_TO_PARENT, 0, TranslateAnimation.RELATIVE_TO_PARENT, 0.5f, TranslateAnimation.RELATIVE_TO_PARENT, 0, TranslateAnimation.RELATIVE_TO_PARENT, 0.5f); translateAnimation.setDuration(2000); Animation scaleAnimation = new ScaleAnimation(0, 1.4f, 0, 1.4f, ScaleAnimation.RELATIVE_TO_SELF, 0.5f, ScaleAnimation.RELATIVE_TO_SELF, 0.5f); scaleAnimation.setDuration(2000); Animation alphaAnimation = new AlphaAnimation(0, 1); alphaAnimation.setDuration(2000); AnimationSet animationSet = new AnimationSet(true); animationSet.addAnimation(rotateAnimation); animationSet.addAnimation(translateAnimation); animationSet.addAnimation(scaleAnimation); animationSet.addAnimation(alphaAnimation); animationSet.setDuration(4000); animationSet.setFillAfter(false); mImageView.startAnimation(animationSet);其他animation同理
5. 补间动画监听
调用动画对象的setAnimationListener(AnimationListener listener) 即可设置监听
scaleAnimation.setAnimationListener(new Animation.AnimationListener() { @Override public void onAnimationStart(Animation animation) { Log.d(TAG, "onAnimationStart: 开始" ); } @Override public void onAnimationEnd(Animation animation) { Log.d(TAG, "onAnimationEnd: 结束"); } @Override public void onAnimationRepeat(Animation animation) { Log.d(TAG, "onAnimationRepeat: 重复"); } }); onAnimationStart():动画开始时被调用
onAnimtaionRepeat():动画重复播放时开调用
onAnimationEnd():动画结束时调用
若是一次动画,重复了2次,那么 onAnimtaionRepeat 会被调用2次,而start和end只会调用一次
三.属性动画
1. ViewPropertyAnimator
1. 使用
使用比较简单:
View.animate()后跟translationX()等方法,动画会自动执行。 例如:imageView.animate().translationYBy(-100).translationXBy(100).setDuration(3000) .setInterpolator(new AccelerateDecelerateInterpolator()).start();具体可以跟的方法以及方法所对应的
View中的实际操作的方法如下图所示:从图中可以看到,
View的每个方法都对应了ViewPropertyAnimator的两个方法,其中一个是带有-By后缀的,例如,View.setTranslationX()对应了ViewPropertyAnimator.translationX()和ViewPropertyAnimator.translationXBy()这两个方法。其中带有-By()后缀的是增量版本的方法,例如,translationX(100)表示用动画把View的translationX值渐变为100,而translationXBy(100)则表示用动画把View的translationX值渐变地增加100。形象理解: 如果不用
-By这种方法的话,点击一次播放动画后,当动画播放结束后(即改变值已经达到end值时),再次点击播放动画的时候 动画也不会播放了(因为已经达到end值,不会再改变了)。 但是,如果用了-By这类方法的话,你再次点击就还是会播放动画,因为每点击一次,那么对应方法的属性就会增加,就会"动起来"比如:
imageView.animate().translationYBy(-100).translationX(100).start();当第一次点击的时候,x和y都会移动。 之后每次点击只有y会移动。 因为X已经在第一次播放后达到end值了,而Y是每次都-100;
2. 监听
setListener(new Animator.AnimatorListener() {
                     @Override
                     public void onAnimationStart(@NonNull Animator animation) {
                             Log.d(TAG, "onAnimationStart: 开始");
                     }

                     @Override
                     public void onAnimationEnd(@NonNull Animator animation) {
                             Log.d(TAG, "onAnimationEnd:   结束");
                     }

                     @Override
                     public void onAnimationCancel(@NonNull Animator animation) {
                             Log.d(TAG, "onAnimationCancel:  取消");
                     }

                     @Override
                     public void onAnimationRepeat(@NonNull Animator animation) {
                              Log.d(TAG, "onAnimationRepeat:  重复");
                         }
                     })
上述方法后面总结
2.ObjectAnimator
使用方式 :java代码
- 如果是自定义控件,需要添加
setter/getter方法;- 用
ObjectAnimator.ofXXX()创建ObjectAnimator对象; (一定要有对应的setter和getter方法)- 用
start()方法执行动画。animator =ObjectAnimator.ofFloat(imageView,"alpha",1f,0f,1f); animator.setDuration(5000); //过渡时间 //动画延迟500ms执行 animator.setStartDelay(500); //执行重复次数 +1 animator.setRepeatCount(1); // 设置动画重复播放模式 RESTART -执行完一遍后重新执行 // REVERSE -执行完一遍后 从末位置往前执行 animator.setRepeatMode(ValueAnimator.REVERSE); animator.start();插值器
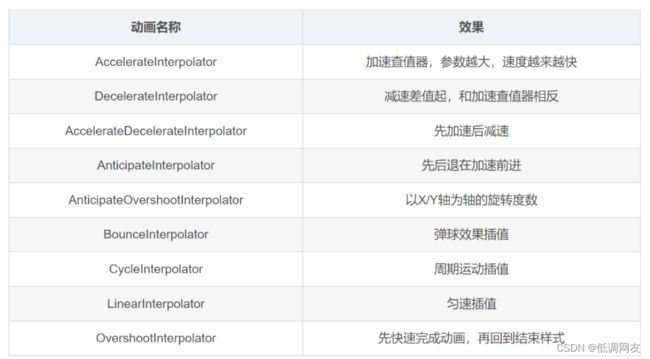
Interpolator:调用setInterpolator(Interpolator interpolator)设置系统我们提供了九种默认的差值器分别如下:
AccelerateDecelerateInterpolator:这是默认的
Interpolator3.设置监听器:
设置监听器的方法,
ViewPropertyAnimator和ObjectAnimator略微不一样:ViewPropertyAnimator用的是setListener()和setUpdateListener()方法,可以设置一个监听器,要移除监听器时通过setUpdate]Listener(null)填 null 值来移除;而ObjectAnimator则是用addListener()和addUpdateListener()来添加一个或多个监听器,移除监听器则是通过removeUpdateListener()来指定移除对象。另外,由于
ObjectAnimator支持使用pause()方法暂停,所以它还多了一个addPauseListener()/removePauseListener()的支持;而ViewPropertyAnimator则独有withStartAction(Runnable)和withEndAction(Runnable)方法,可以设置一次性的动画开始或结束的监听。3.1 ViewPropertyAnimator.setListener() / ObjectAnimator.addListener()
这两个方法的名称不一样,可以设置的监听器数量也不一样,但它们的参数类型都是
AnimatorListener,所以本质上其实都是一样的。AnimatorListener共有 4 个回调方法:3.1.1 onAnimationStart(Animator animation)
当动画开始执行时,这个方法被调用。
3.1.2 onAnimationEnd(Animator animation)
当动画结束时,这个方法被调用。
3.1.3 onAnimationCancel(Animator animation)
当动画被通过
cancel()方法取消时,这个方法被调用。需要说明一下的是,就算动画被取消,
onAnimationEnd()也会被调用。所以当动画被取消时,如果设置了AnimatorListener,那么onAnimationCancel()和onAnimationEnd()都会被调用。onAnimationCancel()会先于onAnimationEnd()被调用。3.1.4 onAnimationRepeat(Animator animation)
当动画通过
setRepeatMode()/setRepeatCount()或repeat()方法重复执行时,这个方法被调用。由于
ViewPropertyAnimator不支持重复,所以这个方法对ViewPropertyAnimator相当于无效。animator.addUpdateListener(new ValueAnimator.AnimatorUpdateListener() { @Override public void onAnimationUpdate(@NonNull ValueAnimator animation) { Log.d(TAG, "onAnimationUpdate: " + animation.getAnimatedValue()); } }); animator.addPauseListener(new Animator.AnimatorPauseListener() { @Override public void onAnimationPause(@NonNull Animator animation) { Log.d(TAG, "onAnimationPause: "); } @Override public void onAnimationResume(@NonNull Animator animation) { Log.d(TAG, "onAnimationResume: "); } }); animator.addListener(new Animator.AnimatorListener() { @Override public void onAnimationStart(@NonNull Animator animation) { Log.d(TAG, "onAnimationStart: "); } @Override public void onAnimationEnd(@NonNull Animator animation) { Log.d(TAG, "onAnimationEnd: "); } @Override public void onAnimationCancel(@NonNull Animator animation) { Log.d(TAG, "onAnimationCancel: "); } @Override public void onAnimationRepeat(@NonNull Animator animation) { Log.d(TAG, "onAnimationRepeat: "); } });3.2 ViewPropertyAnimator.setUpdateListener() / ObjectAnimator.addUpdateListener()
和上面 3.1 的两个方法一样,这两个方法虽然名称和可设置的监听器数量不一样,但本质其实都一样的,它们的参数都是
AnimatorUpdateListener。它只有一个回调方法:onAnimationUpdate(ValueAnimator animation)。3.2.1 onAnimationUpdate(ValueAnimator animation)
当动画的属性更新时,这个方法被调用。
方法的参数是一个
ValueAnimator,ValueAnimator是ObjectAnimator的父类,也是ViewPropertyAnimator的内部实现,所以这个参数其实就是ViewPropertyAnimator内部的那个ValueAnimator(与ViewPropertyAnimator实例不一致),或者对于ObjectAnimator来说就是它自己本身(也就是说监听方法的参数实例跟调用它的实例一样)。3.3 ObjectAnimator.addPauseListener()
3.4 ViewPropertyAnimator.withStartAction/EndAction(Runnable)
这两个方法是
ViewPropertyAnimator的独有方法。它们和set/addListener()中回调的onAnimationStart()/onAnimationEnd()相比起来的不同主要有两点:
withStartAction(Runnable)/withEndAction(Runnable)是一次性的,在动画执行结束后就自动弃掉了,就算之后再重用ViewPropertyAnimator来做别的动画,用它们设置的回调也不会再被调用。而set/addListener()所设置的AnimatorListener是持续有效的,当动画重复执行时,回调总会被调用。withEndAction(Runnable)设置的回调只有在动画正常结束时才会被调用,而在动画被取消时不会被执行。这点和AnimatorListener.onAnimationEnd()的行为是不一致的。4.xml方式获取ObjectAnimator
需要在res下创建一个animator,接着在animator下再创建xml文件:
<objectAnimator xmlns:android="http://schemas.android.com/apk/res/android"
    android:propertyName="alpha"
    android:valueFrom="1"
    android:valueTo="0"
    android:valueType="floatType" />
java代码获取:
animator = (ObjectAnimator) AnimatorInflater.loadAnimator(MainActivity.this,R.animator.animator_alpha); //xml方式标签代码 objectAnimator animator.setTarget(imageView); //xml方式,需要加个Target复习一下:补间动画是用AnimationUtils.loadAnimation来加载
Animation animation = AnimationUtils.loadAnimation(MainActivity.this,R.anim.anim_alpha);
3.ValueAnimator
ValueAnimator(值动画)通过控制值的变化,之后 手动赋值给对象的属性,从而实现动画。
ValueAnimator的java代码核心方法如下:
ValueAnimator ofFloat(float... values) // 浮点型数值
ValueAnimator  ofInt(int... values) // 整型数值
ValueAnimator  ofObject(TypeEvaluator evaluator, Object... values) // 自定义对象类型
使用java代码获取ValueAnimator:
             anim = ValueAnimator.ofFloat(0f, 1f);
             anim.setDuration(5000);
             anim.addUpdateListener(new ValueAnimator.AnimatorUpdateListener() {
                 @Override
                 public void onAnimationUpdate(ValueAnimator animation) {
                     float currentValue = (float) animation.getAnimatedValue();
                     Log.d("MainActivity", "cuurent value is " + currentValue);
                     imageView.setAlpha(currentValue);
                 }
             });
             anim.start();
使用xml方式获取ValueAnimator:
<animator xmlns:android="http://schemas.android.com/apk/res/android"
 android:valueFrom="0f"
 android:valueTo="1f"
 android:valueType="floatType"
 />
2.在java代码中获取ValueAnimator实例:
anim =(ValueAnimator) AnimatorInflater.loadAnimator(this,R.animator.animator_value); //xml方式标签代表 ValueAnimator
4.PropertyValuesHolder
PropertyValuesHolder 同一个动画中改变多个属性,也可以理解成让多个动画同时启动。
使用:
              PropertyValuesHolder alphaProper =  PropertyValuesHolder.ofFloat("alpha", 0.5f, 1f);
              PropertyValuesHolder scaleXProper = PropertyValuesHolder.ofFloat("scaleX", 0f, 1f);
              PropertyValuesHolder scaleYProper = PropertyValuesHolder.ofFloat("scaleY", 0f, 1f);
              PropertyValuesHolder translationXProper = PropertyValuesHolder.ofFloat("translationX", -100, 0);
              PropertyValuesHolder translationYProper = PropertyValuesHolder.ofFloat("translationY", -100, 0);
              PropertyValuesHolder rotationProper = PropertyValuesHolder.ofFloat("rotation", 0, 360);
              ValueAnimator animator = ObjectAnimator.ofPropertyValuesHolder(imageView, alphaProper,
                      scaleXProper, scaleYProper,translationXProper,translationYProper,rotationProper);
              animator.setDuration(5000);
              animator.setRepeatCount(2);
              animator.setRepeatMode(ValueAnimator.REVERSE);
              animator.start();
public static ObjectAnimator ofPropertyValuesHolder(Object target, PropertyValuesHolder... values) //方法进阶使用:PropertyValuesHolders.ofKeyframe() 把同一个属性拆分
             Keyframe keyframe1 = Keyframe.ofFloat(0f, 0);    //动画完成0,到达0
             Keyframe keyframe2 = Keyframe.ofFloat(1f, 100);  //动画完成100%到达100
             Keyframe keyframe = Keyframe.ofFloat(0.5f, 200); //动画完成50%到达200
             PropertyValuesHolder holder = PropertyValuesHolder.ofKeyframe("translationX", keyframe1, keyframe, keyframe2);
             ObjectAnimator animator2 = ObjectAnimator.ofPropertyValuesHolder(imageView, holder);
             animator2.setDuration(2000);
             animator2.start();
5.AnimatorSet
AnimatorSet 多个动画配合执行
有的时候,你不止需要在一个动画中改变多个属性,还会需要多个动画配合工作,比如,在内容的大小从 0 放大到 100% 大小后开始移动。这种情况使用
PropertyValuesHolder是不行的,因为这些属性如果放在同一个动画中,需要共享动画的开始时间、结束时间、Interpolator等等一系列的设定,这样就不能有先后次序地执行动画了。所以需要AnimatorSet
               ObjectAnimator rotate = ObjectAnimator.ofFloat(imageView, "rotation", 0f, 360f);
               ObjectAnimator translationX = ObjectAnimator.ofFloat(imageView, "translationX", -100, 0);
               ObjectAnimator translationY = ObjectAnimator.ofFloat(imageView, "translationY", 0, -100);
               ObjectAnimator scaleX = ObjectAnimator.ofFloat(imageView, "scaleX", 0, 1f);
               ObjectAnimator scaleY = ObjectAnimator.ofFloat(imageView, "scaleY", 1, 0.5f);
               ObjectAnimator alpha = ObjectAnimator.ofFloat(imageView, "alpha", 1f, 0f, 1f);
               animSet = new AnimatorSet();
               animSet.play(rotate)
                       .with(alpha)
                       .before(scaleX)
                       .after(scaleY)
                       .with(translationX)
                       .before(translationY);
               animSet.setDuration(2000);
               animSet.start();
注意: 同一级的都会同时一起播放。 比如设置了俩个with,那么不管俩个with放的地方在哪,他们都会跟play传进来的那个动画同时播放,类似after,before也是
6.TypeEvaluator 估值器
关于 ObjectAnimator,可以用
ofInt()来做整数的属性动画和用ofFloat()来做小数的属性动画。这两种属性类型是属性动画最常用的两种,不过在实际的开发中,可以做属性动画的类型还是有其他的一些类型。当需要对其他类型来做属性动画的时候,就需要用到TypeEvaluator了。 比如改变颜色等使用:借助于
TypeEvaluator,属性动画就可以通过ofObject()来对不限定类型的属性做动画了。方式很简单:
- 为目标属性写一个自定义的
TypeEvaluator- 使用
ofObject()来创建Animator,并把自定义的TypeEvaluator作为参数填入ValueAnimator ofObject(TypeEvaluator evaluator, Object... values) ObjectAnimator ofObject(Object target, String propertyName,TypeEvaluator evaluator, Object... values)从TypeEvaluator估值器的源码可以看出该类的作用就是告诉动画,如何从起始值过度到结束值。
Android源码中有好几个类实现来该接口,也就是系统提供的一些默认估值器, 我们以FloatEvaluator为例看下其实现代码。public class FloatEvaluator implements TypeEvaluator<Number> { public Float evaluate(float fraction, Number startValue, Number endValue) { float startFloat = startValue.floatValue(); return startFloat + fraction * (endValue.floatValue() - startFloat); } }从FloatEvaluator 的实现可以看出在evaluate方法中用结束值减去初始值,算出它们之间的差值,然后乘以fraction这个系数,再加上初始值,那么就得到当前动画的值了。
PS:fraction是完成度,它会从0增长到1的不断变化
自定义TypeEvaluator: 实现 TypeEvaluator然后写自定义的算法就可以了
例如:写一个改变颜色的估值器
public class MyTypeEvaluator implements TypeEvaluator<String> {
    private int mCurrentRed = -1;
    private int mCurrentGreen = -1;
    private int mCurrentBlue = -1;
    @Override
    public String evaluate(float fraction, String startValue, String endValue) {
        Log.d("text", "evaluate: " + fraction);
        int startRed = Integer.parseInt(startValue.substring(1, 3), 16);
        int startGreen = Integer.parseInt(startValue.substring(3, 5), 16);
        int startBlue = Integer.parseInt(startValue.substring(5, 7), 16);
        int endRed = Integer.parseInt(endValue.substring(1, 3), 16);
        int endGreen = Integer.parseInt(endValue.substring(3, 5), 16);
        int endBlue = Integer.parseInt(endValue.substring(5, 7), 16);
        Log.d("TAG", "evaluate: " + startRed + "   " + startGreen + "    " + startBlue + "    "
         + endRed + "    " + endGreen + "   " +endBlue);
        // 初始化颜色的值
        if (mCurrentRed == -1) {
            mCurrentRed = startRed;
        }
        if (mCurrentGreen == -1) {
            mCurrentGreen = startGreen;
        }
        if (mCurrentBlue == -1) {
            mCurrentBlue = startBlue;
        }
        // 计算初始颜色和结束颜色之间的差值
        int redDiff = Math.abs(startRed - endRed);
        int greenDiff = Math.abs(startGreen - endGreen);
        int blueDiff = Math.abs(startBlue - endBlue);

        if (mCurrentRed != endRed) {
            mCurrentRed = getCurrentColor(startRed, endRed, redDiff, fraction);

        }
        if (mCurrentGreen != endGreen) {
            mCurrentGreen = getCurrentColor(startGreen, endGreen, greenDiff, fraction);

        }
        if (mCurrentBlue != endBlue) {
            mCurrentBlue = getCurrentColor(startBlue, endBlue,blueDiff, fraction);


        }
        Log.d("test", "evaluate: " + mCurrentRed + "    " + mCurrentGreen + "   "+mCurrentBlue);
        // 将计算出的当前颜色的值组装返回
        String currentColor = "#" + getHexString(mCurrentRed)
                + getHexString(mCurrentGreen) + getHexString(mCurrentBlue);
        return currentColor;
    }
    /**
     * 根据fraction值来计算当前的颜色。
     */
    private int getCurrentColor(int startColor, int endColor, int colorDiff, float fraction) {
        int currentColor;
        if (startColor > endColor) {
            currentColor = (int) (startColor - (fraction * colorDiff));
            if (currentColor <= endColor) {
                currentColor = endColor;
            }
        } else {
            currentColor = (int) (startColor + (fraction * colorDiff));
            if (currentColor >= endColor) {
                currentColor = endColor;
            }
        }
        return currentColor;
    }
    /**
     * 将10进制颜色值转换成16进制。
     */
    private String getHexString(int value) {
        String hexString = Integer.toHexString(value);
        if (hexString.length() == 1) {
            hexString = "0" + hexString;
        }
        return hexString;
    }
}
使用:
 ValueAnimator animator1 = ValueAnimator.ofObject( new MyTypeEvaluator(), "#123456", "#ABCDEF");
 animator1.setDuration(3000);
 animator1.start();
属性动画Demo演示视频:不公开
补间动画和属性动画的区别总结:
- 作用对象局限: View 补间动画 只能够作用在视图View上,即只可以对一个Button、TextView、甚至是LinearLayout、或者其它继承自View的组件进行动画操作,但无法对非View的对象进行动画操。有些情况下的动画效果只是视图的某个属性 & 对象而不是整个视图;如,现需要实现视图的颜色动态变化,那么就需要操作视图的颜色属性从而实现动画效果,而不是针对整个视图进行动画操作
- 没有改变View的属性只是改变视觉效果: 补间动画只是改变了View的视觉效果,而不会真正去改变View的属性。如,将屏幕左上角的按钮 通过补间动画 移动到屏幕的右下角点击当前按钮位置(屏幕右下角)是没有效果的,因为实际上按钮还是停留在屏幕左上角,补间动画只是将这个按钮绘制到屏幕右下角,改变了视觉效果而已。
- 动画效果单一 : 补间动画只能实现平移、旋转、缩放 & 透明度这些简单的动画需求。 而属性动画可以利用估值器用自定义算法来改变其他属性(比如颜色等)

![[外链图片转存失败,源站可能有防盗链机制,建议将图片保存下来直接上传(img-4q5lhTok-1686710312405)(C:\Users\SW\AppData\Roaming\Typora\typora-user-images\image-20230526154902325.png)]](http://img.e-com-net.com/image/info8/8f8d7b3985f54a66a087a1751e3eb84c.jpg)


