Docker实战
Docker实战
1.基础篇
1.1安装虚拟机(centos7.9)
#工具软件
VisualBox
Vagrant
镜像包:centos7 box
配置文件:Vagrantfile

1.2.升级内核
# 更新所有已安装的rpm包
yum -y update

#更新完 可以清理一下缓存
yum clean all
yum makecache

#导入仓库源
rpm --import https://www.elrepo.org/RPM-GPG-KEY-elrepo.org
rpm -Uvh http://www.elrepo.org/elrepo-release-7.0-3.el7.elrepo.noarch.rpm

#查看可安装的软件包
yum --disablerepo="*" --enablerepo="elrepo-kernel" list available

#选择 ML 或 LT 版本安装
yum -y --enablerepo=elrepo-kernel install kernel-ml
yum -y --enablerepo=elrepo-kernel install kernel-lt

#查看现有内核启动顺序
sudo awk -F\' '$1=="menuentry " {print i++ " : " $2}' /etc/grub2.cfg

#修改默认启动项(要依据上面的显示结果)
grub2-set-default 0

# 重新创建内核配置
grub2-mkconfig -o /boot/grub2/grub.cfg

# 重启
reboot

# 检查内核版本
uname -r

#清理旧内核(减小系统体积,选作)
#查看内核信息
rpm -qa | grep kernel
#清理旧内核
yum remove kernel-3.10.0-1160.el7.x86_64 \
kernel-3.10.0-1160.71.1.el7.x86_64 \
kernel-tools-3.10.0-1160.71.1.el7.x86_64 \
kernel-tools-libs-3.10.0-1160.71.1.el7.x86_64

# 建议重启
reboot
1.3.安装docker
# 卸载旧版本
yum remove docker \
docker-client \
docker-client-latest \
docker-common \
docker-latest \
docker-latest-logrotate \
docker-logrotate \
docker-engine

# 设置存储库
yum install -y yum-utils
yum-config-manager \
--add-repo \
https://download.docker.com/linux/centos/docker-ce.repo

# 安装Docker引擎
yum install -y docker-ce docker-ce-cli containerd.io

# 启动docker
systemctl start docker
systemctl enable docker

# 验证docker
[root@k8s01 harbor]# systemctl status docker
● docker.service - Docker Application Container Engine
   Loaded: loaded (/usr/lib/systemd/system/docker.service; enabled; vendor preset: disabled)
   Active: active (running) since Thu 2023-06-15 00:01:54 UTC; 1h 45min ago
     Docs: https://docs.docker.com
 Main PID: 802 (dockerd)
    Tasks: 77
   Memory: 452.1M
   CGroup: /system.slice/docker.service
           ├─  802 /usr/bin/dockerd -H tcp://0.0.0.0:2375 -H fd:// --insecure-registry 192.168.56.11 --containerd=/run/containerd/containerd.sock
           ├─ 4710 /usr/bin/docker-proxy -proto tcp -host-ip 0.0.0.0 -host-port 80 -container-ip 172.18.0.5 -container-port 8080
           ├─ 4716 /usr/bin/docker-proxy -proto tcp -host-ip :: -host-port 80 -container-ip 172.18.0.5 -container-port 8080
           ├─ 5677 /usr/bin/docker-proxy -proto tcp -host-ip 127.0.0.1 -host-port 1514 -container-ip 172.18.0.2 -container-port 10514
           ├─ 5797 /usr/bin/docker-proxy -proto tcp -host-ip 0.0.0.0 -host-port 13306 -container-ip 172.17.0.3 -container-port 3306
           ├─ 5802 /usr/bin/docker-proxy -proto tcp -host-ip :: -host-port 13306 -container-ip 172.17.0.3 -container-port 3306
           ├─ 6005 /usr/bin/docker-proxy -proto tcp -host-ip 0.0.0.0 -host-port 9090 -container-ip 172.17.0.6 -container-port 9090
           ├─ 6011 /usr/bin/docker-proxy -proto tcp -host-ip :: -host-port 9090 -container-ip 172.17.0.6 -container-port 9090
           ├─29453 /usr/bin/docker-proxy -proto tcp -host-ip 0.0.0.0 -host-port 18080 -container-ip 172.17.0.2 -container-port 8080
           └─29459 /usr/bin/docker-proxy -proto tcp -host-ip :: -host-port 18080 -container-ip 172.17.0.2 -container-port 8080

Jun 15 00:55:45 k8s01 dockerd[802]: time="2023-06-15T00:55:45.511075093Z" level=info msg="Layer sha256:5f70bf18a086007016e948b04aed3b82103a36bea41755b6cddfaf10ace3c6ef cleaned up"
Jun 15 00:55:45 k8s01 dockerd[802]: time="2023-06-15T00:55:45.730170536Z" level=info msg="Layer sha256:317ee8bbcae1ae21b7359ef946f2364764807ec3e070cddcdd2d813e2fee1360 cleaned up"
Jun 15 00:55:45 k8s01 dockerd[802]: time="2023-06-15T00:55:45.769383718Z" level=info msg="Layer sha256:317ee8bbcae1ae21b7359ef946f2364764807ec3e070cddcdd2d813e2fee1360 cleaned up"
Jun 15 00:57:44 k8s01 dockerd[802]: time="2023-06-15T00:57:44.905027822Z" level=info msg="ignoring event" container=f9efdac4c08245ef7bce042425571cdde8e71736b648c39807391805056d8b8d module=...ts.TaskDelete"
Jun 15 00:58:20 k8s01 dockerd[802]: time="2023-06-15T00:58:20.520511409Z" level=info msg="Layer sha256:d9742035b0810da9f35a631b3330fc31ab066abeba2ec8218dd19ddb8ef2531d cleaned up"
Jun 15 00:58:20 k8s01 dockerd[802]: time="2023-06-15T00:58:20.560036314Z" level=info msg="Layer sha256:d9742035b0810da9f35a631b3330fc31ab066abeba2ec8218dd19ddb8ef2531d cleaned up"
Jun 15 00:58:44 k8s01 dockerd[802]: time="2023-06-15T00:58:44.956130582Z" level=info msg="ignoring event" container=27e97eb46480191abe51337aad5df6c875d9f65f93a04a6b3759dad8c62dc925 module=...ts.TaskDelete"
Jun 15 00:58:46 k8s01 dockerd[802]: time="2023-06-15T00:58:46.801759955Z" level=info msg="Layer sha256:5f70bf18a086007016e948b04aed3b82103a36bea41755b6cddfaf10ace3c6ef cleaned up"
Jun 15 00:58:47 k8s01 dockerd[802]: time="2023-06-15T00:58:47.014330558Z" level=info msg="Layer sha256:7eb1cdb88717344c85f31b68dd5512f66add1a0c3ee206859c61bbe5cbf9ea60 cleaned up"
Jun 15 00:58:47 k8s01 dockerd[802]: time="2023-06-15T00:58:47.041374496Z" level=info msg="Layer sha256:7eb1cdb88717344c85f31b68dd5512f66add1a0c3ee206859c61bbe5cbf9ea60 cleaned up"
Hint: Some lines were ellipsized, use -l to show in full.
1.4.配置远程访问
# 在我们开发测试过程中,需要频繁的更新docker镜像,然而默认情况下,docker的2375端口是关闭的,下面介绍如何打开端口。
# 在docker机器上修改

vi /usr/lib/systemd/system/docker.service
修改如下内容:
ExecStart=/usr/bin/dockerd -H fd:// --containerd=/run/containerd/containerd.sock
增加 -H tcp://0.0.0.0:2375
ExecStart=/usr/bin/dockerd -H tcp://0.0.0.0:2375 -H fd:// --containerd=/run/containerd/containerd.sock

#保存后,刷新配置文件,重启docker
systemctl daemon-reload
systemctl restart docker
1.5.配置镜像加速
# 配置阿里云镜像加速
sudo mkdir -p /etc/docker
sudo tee /etc/docker/daemon.json <<-'EOF'
{
  "registry-mirrors": ["https://qbd2mtyh.mirror.aliyuncs.com"]
}
EOF

# 重启docker
sudo systemctl daemon-reload
sudo systemctl restart docker
1.6常用命令
参考:https://www.runoob.com/docker/docker-command-manual.html
| 容器生命周期管理 | ||
|---|---|---|
| 序号 | 命令 | 描述 |
| 1 | run | 创建一个新的容器并运行一个命令 |
| 2 | start/stop/restart | 启动/停止/重启 容器 |
| 3 | kill | 杀掉一个运行中的容器 |
| 4 | rm | 删除一个或多个容器 |
| 5 | pause/unpause | 暂停/恢复容器中所有的进程 |
| 6 | create | 创建一个新的容器但不启动它 |
| 7 | exec | 在运行的容器中执行命令 |
| 容器操作 | ||
|---|---|---|
| 序号 | 命令 | 描述 |
| 1 | ps | 列出容器 |
| 2 | inspect |
获取容器/镜像的元数据 |
| 3 | top | 查看容器中运行的进程信息,支持 ps 命令参数 |
| 4 | attach | 连接到正在运行中的容器 |
| 5 | events | 从服务器获取实时事件 |
| 6 | logs | 获取容器的日志 |
| 7 | wait | 阻塞运行直到容器停止,然后打印出它的退出代码 |
| 8 | export | 将文件系统作为一个tar归档文件导出到STDOUT |
| 9 | port | 用于列出指定的容器的端口映射,或者查找将 PRIVATE_PORT NAT 到面向公众的端口 |
| 10 | stats | 显示容器资源的使用情况,包括:CPU、内存、网络 I/O 等 |
| 容器rootfs命令 | ||
|---|---|---|
| 序号 | 命令 | 描述 |
| 1 | commit | 从容器创建一个新的镜像 |
| 2 | cp | 用于容器与主机之间的数据拷贝 |
| 3 | diff | 检查容器里文件结构的更改 |
| 镜像仓库 | ||
|---|---|---|
| 序号 | 命令 | 描述 |
| 1 | login/logout |
登陆/登出一个Docker镜像仓库,如果未指定镜像仓库地址,默认为官方仓库 Docker Hub |
| 2 | pull | 从镜像仓库中拉取或者更新指定镜像 |
| 3 | push | 将本地的镜像上传到镜像仓库,要先登陆到镜像仓库 |
| 4 | search | 从Docker Hub查找镜像 |
| 本地镜像管理 | ||
|---|---|---|
| 序号 | 命令 | 描述 |
| 1 | images | 列出本地镜像 |
| 2 | rmi | 删除本地一个或多个镜像 |
| 3 | tag | 标记本地镜像,将其归入某一仓库 |
| 4 | build | 使用 Dockerfile 创建镜像 |
| 5 | history | 查看指定镜像的创建历史 |
| 6 | save | 将指定镜像保存成 tar 归档文件 |
| 7 | load | 导入使用 docker save 命令导出的镜像 |
| 8 | import | 从归档文件中创建镜像 |
| 其它 | ||
|---|---|---|
| 序号 | 命令 | 描述 |
| 1 | info | 显示 Docker 系统信息,包括镜像和容器数 |
| 2 | version | 显示 Docker 版本信息 |
2.进阶篇
2.1.安装Harbor
#安装docker-compose

#下载(两种方式)

#方式一:直接下载
curl -L https://github.com/docker/compose/releases/download/2.18.0/docker-compose-`uname -s`-`uname -m` -o /usr/local/bin/docker-compose
或
curl -L https://get.daocloud.io/docker/compose/releases/download/2.18.0/docker-compose-`uname -s`-`uname -m` -o /usr/local/bin/docker-compose
#给他一个执行权限
chmod +x /usr/local/bin/docker-compose

# 方式二:自行下载,然后上传
cp docker-compose-linux-x86_64 /usr/local/bin/docker-compose
chmod +x /usr/local/bin/docker-compose
docker-compose -v
Docker Compose version v2.18.0


#安装harbor

#下载harbor离线安装包

cd /opt
wget https://ghproxy.com/https://github.com/goharbor/harbor/releases/download/v2.8.2/harbor-offline-installer-v2.8.2.tgz

#解压软件包
[root@k8s01 opt]# tar -xvf harbor-offline-installer-v2.8.2.tgz -C /usr/local/
harbor/harbor.v2.8.2.tar.gz
harbor/prepare
harbor/LICENSE
harbor/install.sh
harbor/common.sh
harbor/harbor.yml.tmpl

#修改配置文件 harbor.cfg
[root@k8s01 harbor]# cp /usr/local/harbor/harbor.yml.tmpl /usr/local/harbor/harbor.yml
[root@k8s01 harbor]# vi /usr/local/harbor/harbor.yml
hostname = 192.168.56.11    ##第5行,修改为本地地址,注释https
harbor_admin_password = Harbor12345  ##第59行,设置harbor登录密码,默认为Harbor12345

#执行脚本安装并查看容器
sh /usr/local/harbor/install.sh   ##执行安装
docker ps -a    ##查看容器

#访问web页面http://192.168.56.11
#harbor默认账户和密码(admin\Harbor12345)

2.2.编写测试服务
package main

import (
	"fmt"
	_ "github.com/go-sql-driver/mysql"
	"github.com/prometheus/client_golang/prometheus"
	"github.com/prometheus/client_golang/prometheus/promhttp"
	"log"
	"math/rand"
	"net/http"
	"time"
)

var (
	counter = prometheus.NewCounter(
		prometheus.CounterOpts{
			Namespace: "golang",
			Name:      "my_counter",
			Help:      "This is my counter",
		})

	gauge = prometheus.NewGauge(
		prometheus.GaugeOpts{
			Namespace: "golang",
			Name:      "my_gauge",
			Help:      "This is my gauge",
			ConstLabels: map[string]string{
				"path": "/api/test",
			},
		})
	gauge2 = prometheus.NewGauge(
		prometheus.GaugeOpts{
			Namespace: "golang",
			Name:      "my_gauge",
			Help:      "This is my gauge",
			ConstLabels: map[string]string{
				"path": "/api/test1",
			},
		})
	gauge3 = prometheus.NewGauge(
		prometheus.GaugeOpts{
			Namespace: "golang",
			Name:      "my_gauge",
			Help:      "This is my gauge",
			ConstLabels: map[string]string{
				"path": "/api/test2",
			},
		})
	gauge4 = prometheus.NewGauge(
		prometheus.GaugeOpts{
			Namespace: "golang",
			Name:      "my_gauge",
			Help:      "This is my gauge",
			ConstLabels: map[string]string{
				"path": "/api/test3",
			},
		})
	histogram = prometheus.NewHistogram(
		prometheus.HistogramOpts{
			Namespace: "golang",
			Name:      "my_histogram",
			Help:      "This is my histogram",
		})

	summary = prometheus.NewSummary(
		prometheus.SummaryOpts{
			Namespace: "golang",
			Name:      "my_summary",
			Help:      "This is my summary",
		})
)

func prometheusServer() {
	rand.Seed(time.Now().Unix())

	http.Handle("/metrics", promhttp.Handler())

	prometheus.MustRegister(counter)
	prometheus.MustRegister(gauge)
	prometheus.MustRegister(gauge2)
	prometheus.MustRegister(gauge3)
	prometheus.MustRegister(gauge4)
	prometheus.MustRegister(histogram)
	prometheus.MustRegister(summary)

	go func() {
		for {
			counter.Add(rand.Float64() * 5)
			gauge.Set(rand.Float64() * 15)
			gauge2.Set(rand.Float64() * 15)
			gauge3.Set(rand.Float64() * 15)
			gauge4.Set(rand.Float64() * 15)
			histogram.Observe(rand.Float64() * 10)
			summary.Observe(rand.Float64() * 10)

			time.Sleep(time.Second)
		}
	}()

	fmt.Println("Starting.....")
	log.Fatal(http.ListenAndServe(":8080", nil))
}

func main() {
	prometheusServer()
}
编译运行后的效果

2.3.编写Dockerfile
# 构建:使用golang:latest版本
FROM golang:latest as build
#构建作者信息
MAINTAINER UserName "Nokings"
# 容器环境变量添加
ENV GO111MODULE=on \
    CGO_ENABLED=0 \
    GOOS=linux \
    GOARCH=amd64 \
    GOPROXY=https://mirrors.aliyun.com/goproxy/,direct
# 设置当前工作区
WORKDIR /zjs/go/exporter
# 把全部文件添加到/zjs/go/exporter目录
ADD . .
# 编译: 把main.go编译为可执行的二进制文件, 并命名为app
RUN GOOS=linux CGO_ENABLED=0 GOARCH=amd64 go build -ldflags="-s -w" -installsuffix cgo -o app Hello.go
#暴漏端口
EXPOSE 8080
# 启动服务
ENTRYPOINT ["./app"]

2.4.制作镜像
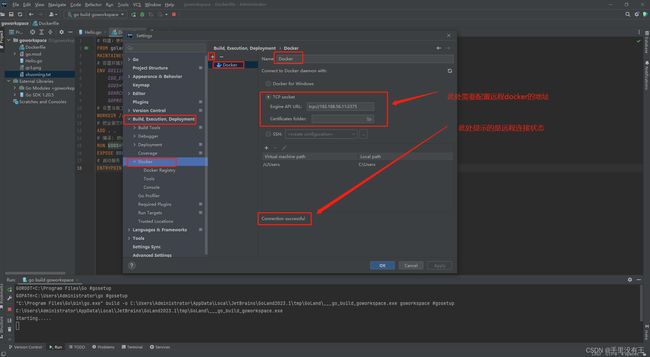
2.4.1连接远程docker
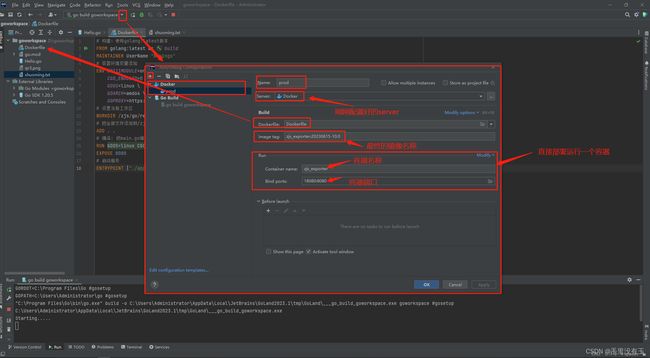
2.4.2编辑构建配置
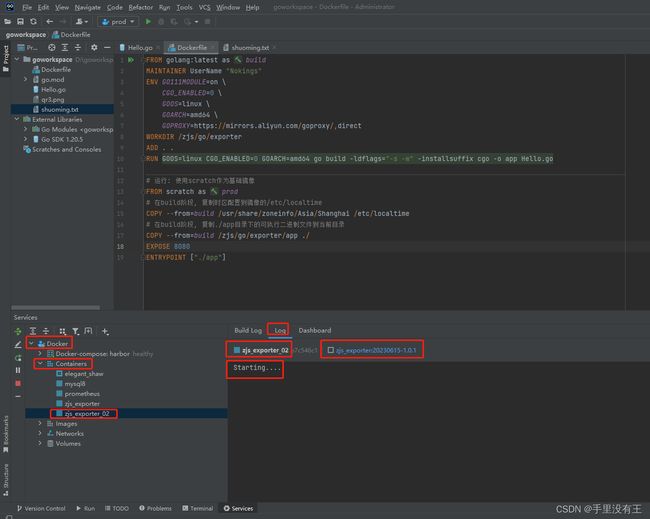
2.4.3开始构建
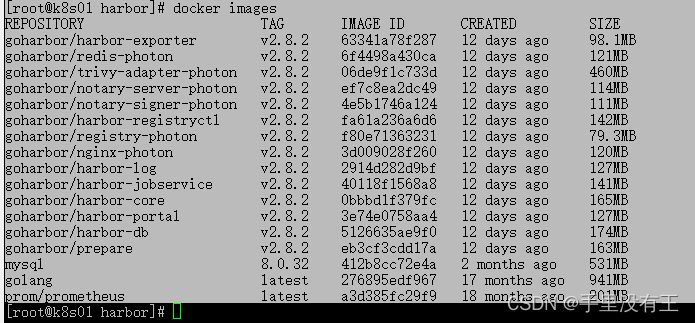
开始构建前,我们看一下远程dockers的当前镜像列表
开始构建

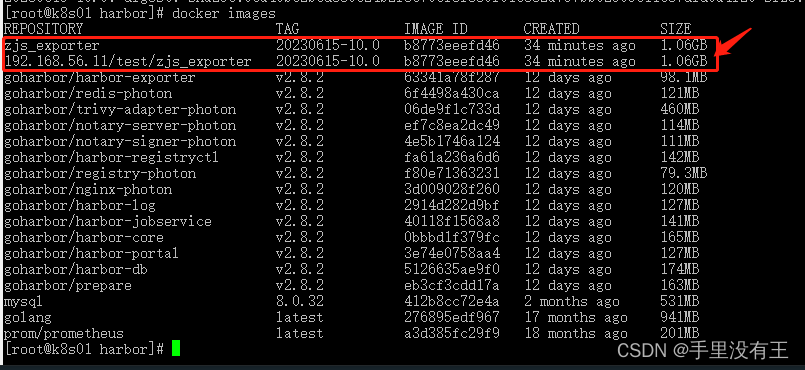
构建完成后

这是IDEA工具上显示的信息,是不是真的是这样呢?我们到远程docker服务器上验证一下
登录远程docker服务器后,我们先验证一下images

再来验证一下运行的容器

验明真身后,我们再访问一下

至此,我们通过Dockerfile文件的方式,成功构建了一个镜像,并运行了一个容器,一切都是预期的效果。
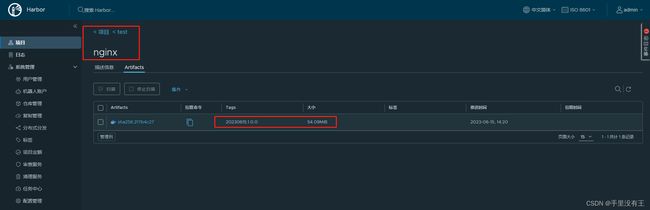
2.5上传镜像
这个镜像目前是在本地,为了方便使用,我们把镜像传到harbor私有镜像库中。
上传之前,我们来查看一下私有镜像库当前的信息

2.5.1打tag
需要将镜像包打一下tag,也就是标明一下镜像的属地,查看一下属地的标识

开始tag
[root@k8s01 harbor]# docker tag zjs_exporter:20230615-10.0 192.168.56.11/test/zjs_exporter:20230615-10.0
[root@k8s01 harbor]# docker images
REPOSITORY                        TAG             IMAGE ID       CREATED          SIZE
192.168.56.11/test/zjs_exporter   20230615-10.0   b8773eeefd46   16 minutes ago   1.06GB
zjs_exporter                      20230615-10.0   b8773eeefd46   16 minutes ago   1.06GB
goharbor/harbor-exporter          v2.8.2          63341a78f287   12 days ago      98.1MB
goharbor/redis-photon             v2.8.2          6f4498a430ca   12 days ago      121MB
goharbor/trivy-adapter-photon     v2.8.2          06de9f1c733d   12 days ago      460MB
goharbor/notary-server-photon     v2.8.2          ef7c8ea2dc49   12 days ago      114MB
goharbor/notary-signer-photon     v2.8.2          4e5b1746a124   12 days ago      111MB
goharbor/harbor-registryctl       v2.8.2          fa61a236a6d6   12 days ago      142MB
goharbor/registry-photon          v2.8.2          f80e71363231   12 days ago      79.3MB
goharbor/nginx-photon             v2.8.2          3d009028f260   12 days ago      120MB
goharbor/harbor-log               v2.8.2          2914d282d9bf   12 days ago      127MB
goharbor/harbor-jobservice        v2.8.2          40118f1568a8   12 days ago      141MB
goharbor/harbor-core              v2.8.2          0bbbd1f379fc   12 days ago      165MB
goharbor/harbor-portal            v2.8.2          3e74e0758aa4   12 days ago      127MB
goharbor/harbor-db                v2.8.2          5126635ae9f0   12 days ago      174MB
goharbor/prepare                  v2.8.2          eb3cf3cdd17a   12 days ago      163MB
mysql                             8.0.32          412b8cc72e4a   2 months ago     531MB
golang                            latest          276895edf967   17 months ago    941MB
prom/prometheus                   latest          a3d385fc29f9   18 months ago    201MB

2.5.2登录镜像仓库
[root@k8s01 harbor]#  docker login -u admin -p 'Harbor12345' http://192.168.56.11
WARNING! Using --password via the CLI is insecure. Use --password-stdin.
WARNING! Your password will be stored unencrypted in /root/.docker/config.json.
Configure a credential helper to remove this warning. See
https://docs.docker.com/engine/reference/commandline/login/#credentials-store

Login Succeeded

2.5.3上传镜像
docker push 192.168.56.11/test/zjs_exporter:20230615-10.0

在harbor中查看是否有刚刚上传成功的镜像包

3.高阶篇
3.1减少镜像体积
仔细观察我们刚才构建的镜像,体积是不是非常大
常见的镜像瘦身方法:
1)尽可能将多个命令合并成一个单独的RUN指令
# 不推荐的写法
RUN dpkg -i rocketmq-client-cpp-2.0.0.amd64.deb
RUN pip install -i https://mirrors.aliyun.com/pypi/simple/ --no-cache-dir -r requirements.txt
RUN  ln -sf /usr/share/zoneinfo/Asia/Shanghai /etc/localtime && echo 'Asia/Shanghai' >/etc/timezone

#推荐的写法
RUN sed -i -E 's/(deb|security).debian.org/mirrors.aliyun.com/g' /etc/apt/sources.list \
  && dpkg -i rocketmq-client-cpp-2.0.0.amd64.deb \
  && apt update -y \
  && apt install -y python3-dev default-libmysqlclient-dev build-essential \
  && pip install -i https://pypi.mirrors.ustc.edu.cn/simple/  --no-cache-dir -r requirements_base.txt \
  && apt clean -y \
  && rm rocketmq-client-cpp-2.0.0.amd64.deb \
  && rm -rf /var/cache/debconf/* \
    /var/lib/apt/lists/* \
    /var/log/* \
    /var/tmp/* \
  && rm -rf /tmp/* \
  && ln -sf /usr/share/zoneinfo/Asia/Shanghai /etc/localtime 、
  && echo 'Asia/Shanghai' >/etc/timezone

#说明:docker构建是基于层的概念,没运行一条命令,会构建一层文件,层数多了,体积就大。
2)多阶段构建
首先,我们修改一下Dockerfile的构建步骤
FROM golang:latest as build
MAINTAINER UserName "Nokings"
ENV GO111MODULE=on \
    CGO_ENABLED=0 \
    GOOS=linux \
    GOARCH=amd64 \
    GOPROXY=https://mirrors.aliyun.com/goproxy/,direct
WORKDIR /zjs/go/exporter
ADD . .
RUN GOOS=linux CGO_ENABLED=0 GOARCH=amd64 go build -ldflags="-s -w" -installsuffix cgo -o app Hello.go
#------------------------------------
# 运行: 使用scratch作为基础镜像(第二次构建,基于第一次的构建成果之上,只拿成功,不关心过程)
FROM scratch as prod
WORKDIR /zjs/go/release
# 在build阶段, 复制时区配置到镜像的/etc/localtime
COPY --from=build /usr/share/zoneinfo/Asia/Shanghai /etc/localtime
# 在build阶段, 复制./app目录下的可执行二进制文件到当前目录
COPY --from=build /zjs/go/exporter/app ./
EXPOSE 8080
ENTRYPOINT ["./app"]
为了进行对比,我们修改构建运行的参数

然后再次进行构建运行
IDEA显示成功构建并运行了容器,我们到远程docker核实一遍,对比一下镜像包的大小,是不是很喜人?

推送到harbor,
[root@k8s01 harbor]# docker tag zjs_exporter:20230615-1.0.1 192.168.56.11/test/zjs_exporter:20230615-1.0.1
[root@k8s01 harbor]# docker push 192.168.56.11/test/zjs_exporter:20230615-1.0.1
The push refers to repository [192.168.56.11/test/zjs_exporter]
17bd9eed5383: Pushed
e7d298a3a47c: Pushed
20230615-1.0.1: digest: sha256:d319421fb3aed5105fea8b1b38529820d0f59348b5375192e3bfe52f5204890d size: 735
再对比一下体积,瘦身的目的达到了。

3.2文件自由穿梭
3.2.1运行nginx容器
# 查找nginx镜像
[root@k8s01 ~]# docker search nginx
NAME                                              		DESCRIPTION                                     						STARS     OFFICIAL   AUTOMATED
nginx                                             			Official build of Nginx.                        						18633     [OK]
unit                                              			Official build of NGINX Unit: Universal Web …   			6         	[OK]
nginxproxy/nginx-proxy                             Automated Nginx reverse proxy for docker con…   		90
nginxproxy/acme-companion                   Automated ACME SSL certificate generation fo…   		116
bitnami/nginx                                     		Bitnami nginx Docker Image                      				165         [OK]
bitnami/nginx-ingress-controller               Bitnami Docker Image for NGINX Ingress Contr…   		29           [OK]
... ...

#拉取nginx镜像
[root@k8s01 ~]# docker pull nginx
Using default tag: latest
latest: Pulling from library/nginx
a2abf6c4d29d: Pull complete
a9edb18cadd1: Pull complete
589b7251471a: Pull complete
186b1aaa4aa6: Pull complete
b4df32aa5a72: Pull complete
a0bcbecc962e: Pull complete
Digest: sha256:0d17b565c37bcbd895e9d92315a05c1c3c9a29f762b011a10c54a66cd53c9b31
Status: Downloaded newer image for nginx:latest
docker.io/library/nginx:latest

#查看本地镜像
[root@k8s01 ~]# docker images |grep nginx
nginx                           latest    605c77e624dd   17 months ago       141MB

#运行容器
[root@k8s01 ~]# docker run --name nginx001 -d -p 8888:80 nginx
bfeb8da8ad0e770f2b92d39f96c59077f6b8e91bbb3558d88ba0b23f2c906747

#查看运行容器nginx001
[root@k8s01 ~]# docker ps -a|grep nginx001
bfeb8da8ad0e   nginx                                "/docker-entrypoint.…"   10 seconds ago      Up 9 seconds           0.0.0.0:8888->80/tcp, :::8888->80/tcp                    nginx001

3.2.2拷贝文件
# 创建挂载目录
mkdir -p /opt/nginx/{conf,log,html}

#验证当前文件夹
[root@k8s01 ~]# mkdir -p /opt/nginx/{conf,log,html}
[root@k8s01 ~]# ls /opt/nginx/conf/
[root@k8s01 ~]# ls /opt/nginx/log/
[root@k8s01 ~]# ls /opt/nginx/html/

#进入到运行的nginx容器内部
[root@k8s01 ~]# docker exec -it nginx001 /bin/sh
# cat /etc/nginx/nginx.conf

user  nginx;
worker_processes  auto;

error_log  /var/log/nginx/error.log notice;
pid        /var/run/nginx.pid;


events {
    worker_connections  1024;
}


http {
    include       /etc/nginx/mime.types;
    default_type  application/octet-stream;

    log_format  main  '$remote_addr - $remote_user [$time_local] "$request" '
                      '$status $body_bytes_sent "$http_referer" '
                      '"$http_user_agent" "$http_x_forwarded_for"';

    access_log  /var/log/nginx/access.log  main;

    sendfile        on;
    #tcp_nopush     on;

    keepalive_timeout  65;

    #gzip  on;

    include /etc/nginx/conf.d/*.conf;
}

1)拷贝容器文件至宿主机
# 将容器nginx.conf文件复制到宿主机
[root@k8s01 ~]# docker cp nginx001:/etc/nginx/nginx.conf /opt/nginx/conf/nginx.conf
Successfully copied 2.56kB to /opt/nginx/conf/nginx.conf

# 将容器conf.d文件夹下内容复制到宿主机
[root@k8s01 ~]# docker cp nginx001:/etc/nginx/conf.d /opt/nginx/conf/conf.d
Successfully copied 3.58kB to /opt/nginx/conf/conf.d

# 将容器中的html文件夹复制到宿主机
[root@k8s01 ~]# docker cp nginx001:/usr/share/nginx/html /opt/nginx/
Successfully copied 4.1kB to /opt/nginx/

#查看拷贝出来的文件列表
[root@k8s01 ~]# ls -l /opt/nginx/conf/
total 4
drwxr-xr-x. 2 root root  26 Jun 15 05:21 conf.d
-rw-r--r--. 1 root root 648 Dec 28  2021 nginx.conf

#查看拷贝出来的文件列表
[root@k8s01 ~]# ls -l /opt/nginx/html
total 8
-rw-r--r--. 1 root root 497 Dec 28  2021 50x.html
-rw-r--r--. 1 root root 615 Dec 28  2021 index.html
2)拷贝宿主机文件至容器
#为了方便观看效果,我们做一些改动
[root@k8s01 ~]# vi /opt/nginx/html/index.html

<!DOCTYPE html>
<html>
<head>
<title>Welcome to nginx!</title>
<style>
html { color-scheme: light dark; }
body { width: 35em; margin: 0 auto;
font-family: Tahoma, Verdana, Arial, sans-serif; }
</style>
</head>
<body>
<h1>Welcome to nginx! 20230615_001</h1>
<p>If you see this page, the nginx web server is successfully installed and
working. Further configuration is required.</p>

<p>For online documentation and support please refer to
<a href="http://nginx.org/">nginx.org</a>.<br/>
Commercial support is available at
<a href="http://nginx.com/">nginx.com</a>.</p>

<p><em>Thank you for using nginx. Modified at 13:00</em></p>
</body>
</html>

#拷贝宿主机文件至容器
[root@k8s01 ~]# docker cp /opt/nginx/html/index.html nginx001:/usr/share/nginx/html
Successfully copied 2.56kB to nginx001:/usr/share/nginx/html

#访问浏览器,刷新之后的内容即呈现出来

3.3重建消失的镜像
# 假如有下面的情况,改如何应对呢?
# 容器正常运行,但是容器对应的镜像被删除了。
# 是不是很恼火?是不是不敢重启容器?

#下面的方法可能会解救您。
3.3.1以私有镜像仓库运行容器
#查看本地镜像列表
[root@k8s01 ~]# docker images
REPOSITORY                      TAG       IMAGE ID       CREATED         SIZE
... ...
nginx                           latest    605c77e624dd   17 months ago   141MB

#打tag
[root@k8s01 ~]# docker tag nginx:latest 192.168.56.11/test/nginx:20230615.1.0.0

#上传至harbor
[root@k8s01 ~]# docker push 192.168.56.11/test/nginx:20230615.1.0.0
The push refers to repository [192.168.56.11/test/nginx]
d874fd2bc83b: Pushed
32ce5f6a5106: Pushed
f1db227348d0: Pushed
b8d6e692a25e: Pushed
e379e8aedd4d: Pushed
2edcec3590a4: Pushed
20230615.1.0.0: digest: sha256:ee89b00528ff4f02f2405e4ee221743ebc3f8e8dd0bfd5c4c20a2fa2aaa7ede3 size: 1570

运行容器
#以harbor上的nginx镜像运行一个容器
[root@k8s01 ~]# docker run --name demonginx -d -p 8888:80 192.168.56.11/test/nginx:20230615.1.0.0
c0802447d4e091fe1d27f8dd554b8fa1fc6feecf3acde957d0deb55aea8ae71b

3.3.2模拟破坏镜像包
#删除本地镜像(192.168.56.11/test/nginx:20230615.1.0.0)
[root@k8s01 ~]# docker rmi 192.168.56.11/test/nginx:20230615.1.0.0
Untagged: 192.168.56.11/test/nginx:20230615.1.0.0
Untagged: 192.168.56.11/test/nginx@sha256:ee89b00528ff4f02f2405e4ee221743ebc3f8e8dd0bfd5c4c20a2fa2aaa7ede3

#查看本地镜像列表
[root@k8s01 ~]# docker images |grep 192.168.56.11/test/nginx
在harbor内删除镜像

再次查看运行的容器,容器demonginx还在运行
[root@k8s01 ~]# docker ps -a |grep demonginx
c0802447d4e0   605c77e624dd                         "/docker-entrypoint.…"   10 minutes ago   Up 10 minutes          0.0.0.0:8888->80/tcp, :::8888->80/tcp                    demonginx
3.3.2重建镜像
#此时,harbor上的镜像(192.168.56.11/test/nginx:20230615.1.0.0)已经逃离地球了。
#不死心?那我们尝试启动另外一个容器demonginx002 ,验证一下呗!

[root@k8s01 ~]# docker run --name demonginx002 -d -p 9999:80 192.168.56.11/test/nginx:20230615.1.0.0
Unable to find image '192.168.56.11/test/nginx:20230615.1.0.0' locally
docker: Error response from daemon: unknown: repository test/nginx not found.
See 'docker run --help'.

#此时,是不是报错了?
#报错的原因是:harbor仓库没有这个镜像,本地也没有这个镜像,种子没有了。
#咋办?
#非常庆幸,有一个正在运行的容器demonginx,它使用的镜像是harbor上的。
#尝试一下呗!


#再次确认容器demonginx是正常运行的(一定是要正常运行状态的,否则恢复出来有啥意义呢?)
[root@k8s01 ~]# docker ps -a |grep demonginx
c0802447d4e0   605c77e624dd                         "/docker-entrypoint.…"   18 minutes ago   Up 18 minutes          0.0.0.0:8888->80/tcp, :::8888->80/tcp                    demonginx

#(敲黑板了,这是重点内容)
#从容器(demonginx)创建一个新的镜像(192.168.56.11/test/nginx:20230615.1.0.0)
[root@k8s01 ~]# docker  commit -m="恢复harbor镜像" -a="测试"  demonginx  192.168.56.11/test/nginx:20230615.1.0.0
sha256:61e12793b5a2868cfb343979c3a9adaa337ffbdc899d37574fa0ab8895f99829

#查看新镜像
[root@k8s01 ~]# docker images |grep 192.168.56.11/test/nginx
192.168.56.11/test/nginx        20230615.1.0.0   61e12793b5a2   19 seconds ago   141MB

#将镜像上传至harbor
[root@k8s01 ~]# docker push 192.168.56.11/test/nginx:20230615.1.0.0
The push refers to repository [192.168.56.11/test/nginx]
c002bd5261a2: Pushed
d874fd2bc83b: Layer already exists
32ce5f6a5106: Layer already exists
f1db227348d0: Layer already exists
b8d6e692a25e: Layer already exists
e379e8aedd4d: Layer already exists
2edcec3590a4: Layer already exists
20230615.1.0.0: digest: sha256:217b4c27354af3ce21b0adc449e2716daf00d4810f466f7288ce498b9dc5f6b1 size: 1777

#再次删除本地镜像
[root@k8s01 ~]# docker rmi 192.168.56.11/test/nginx:20230615.1.0.0
Untagged: 192.168.56.11/test/nginx:20230615.1.0.0
Untagged: 192.168.56.11/test/nginx@sha256:217b4c27354af3ce21b0adc449e2716daf00d4810f466f7288ce498b9dc5f6b1
Deleted: sha256:61e12793b5a2868cfb343979c3a9adaa337ffbdc899d37574fa0ab8895f99829
Deleted: sha256:e63a16f272fcd4629c2b135eda1be16e9c8ec8370ef5113d4bf289e8885897c8

#确认本地镜像已被删除
[root@k8s01 ~]# docker images |grep 192.168.56.11/test/nginx:20230615.1.0.0
查看harbor镜像仓库
重新运行容器
#运行容器demonginx002
[root@k8s01 ~]# docker run --name demonginx002 -d -p 9999:80 192.168.56.11/test/nginx:20230615.1.0.0
Unable to find image '192.168.56.11/test/nginx:20230615.1.0.0' locally
20230615.1.0.0: Pulling from test/nginx
a2abf6c4d29d: Already exists
a9edb18cadd1: Already exists
589b7251471a: Already exists
186b1aaa4aa6: Already exists
b4df32aa5a72: Already exists
a0bcbecc962e: Already exists
b9d46ab70fe0: Pull complete
Digest: sha256:217b4c27354af3ce21b0adc449e2716daf00d4810f466f7288ce498b9dc5f6b1
Status: Downloaded newer image for 192.168.56.11/test/nginx:20230615.1.0.0
7c039d920a7f58f5892cbafa54a6f5b146d5761fc53e8bc6eee8d7872ee85e6d

#查看运行容器列表
[root@k8s01 ~]# docker ps -a|grep demonginx
7c039d920a7f   192.168.56.11/test/nginx:20230615.1.0.0   "/docker-entrypoint.…"   About a minute ago   Up About a minute      0.0.0.0:9999->80/tcp, :::9999->80/tcp                    demonginx002
c0802447d4e0   605c77e624dd                              "/docker-entrypoint.…"   28 minutes ago       Up 28 minutes          0.0.0.0:8888->80/tcp, :::8888->80/tcp                    demonginx
访问浏览器,http://192.168.56.9999

至此,消失的镜像通过这种方式,神奇地出现了。
为了防止类似的情况出现,可以安排一下备份。
3.3.3备份还原机制
#1)备份还原出来的镜像至文件
[root@k8s01 ~]# docker save -o /opt/nginx.20230615.1.0.0.tar 192.168.56.11/test/nginx:20230615.1.0.0

#查看备份文件
[root@k8s01 ~]# ls -l /opt/
total 788920
drwx--x--x. 4 root root        28 Jun  5 23:48 containerd
-rw-r--r--. 1 root root  54537935 Jun 14 08:07 docker-compose-linux-x86_64
drwxr-xr-x. 3 root root        18 Jun  5 23:55 excalidraw
-rw-r--r--. 1 root root 607390683 Jun  5 01:49 harbor-offline-installer-v2.8.2.tgz
drwxr-xr-x. 5 root root        41 Jun 15 05:23 nginx
-rw-------. 1 root root 145921536 Jun 15 07:24 nginx.20230615.1.0.0.tar
drwxr-xr-x. 8 root root        80 Jun  6 00:14 onlyoffice7
drwxr-xr-x. 2 root root        28 Jun  9 06:14 prometheus
drwxr-xr-x. 3 root root        20 Jun  9 07:11 software


2)恢复镜像
#强制删除本地的镜像
[root@k8s01 ~]# docker rmi -f 192.168.56.11/test/nginx:20230615.1.0.0
Untagged: 192.168.56.11/test/nginx:20230615.1.0.0
Untagged: 192.168.56.11/test/nginx@sha256:217b4c27354af3ce21b0adc449e2716daf00d4810f466f7288ce498b9dc5f6b1

#确认镜像已被删除
[root@k8s01 ~]# docker images |grep 192.168.56.11/test/nginx

#从备份文件中恢复镜像
[root@k8s01 ~]# docker load -i /opt/nginx.20230615.1.0.0.tar
Loaded image: 192.168.56.11/test/nginx:20230615.1.0.0

[root@k8s01 ~]# docker images |grep 192.168.56.11/test/nginx
192.168.56.11/test/nginx        20230615.1.0.0   61e12793b5a2   About an hour ago   141MB
4.总结篇
# 前面的操作,我们其实已经用到docker相关的很多命令,如:

docker login
docker search
docker tag
docker pull
docker push
docker cp
docker commit
docker save
docker load
docker run
docker exec
docker images
docker rmi
docker ps
docker rm
docker start
docker stop

#熟练掌握docker相关的命令后,面对非常棘手的问题时,在还有一线希望的情况下,总会有解决问题的特殊手段。