详解七层反向代理与四层反向代理【Nginx+Tomcat负载均衡、动静分离】
文章目录
- 1. 反向代理和正向代理概述
- 2.七层反向代理实例
-
- 2.1 实验环境描述
- 2.2 部署Nginx负载均衡器
- 2.3 部署2台Tomcat应用服务器
-
- 2.3.1 部署CentOS 7-5 Tomcat服务器
- 2.3.2 部署CentOS 7-6 Tomcat多实例服务器
- 3.四层反向代理实例
-
- 3.1 实验环境描述
- 3.2 部署Nginx负载均衡器(CentOS 7-3)
- 3.3 部署Nginx服务器(转发)(CentOS 7-2)
1. 反向代理和正向代理概述
1.代理服务器如果配置在客户端即为正向代理,如果配置在服务端即为反向代理,和机器个数没有关系。
2.正向代理代替客户端去发送请求,反向代理代替服务端接受请求。
3.正是因为正向代理代替客户端发送请求,正向代理服务器和客户端对外表现为一个客户端,所以正向代理隐藏了真实的客户端;反向代理代替服务端接受请求,反向代理服务器和真实服务器对外表现为一个服务端,所以反向代理服务器隐藏真实的服务端。
综上,本质上代理服务器还是那个代理服务器,如果替客户端干活就是正向代理,如果替服务端干活就是反向代理。
2.七层反向代理实例
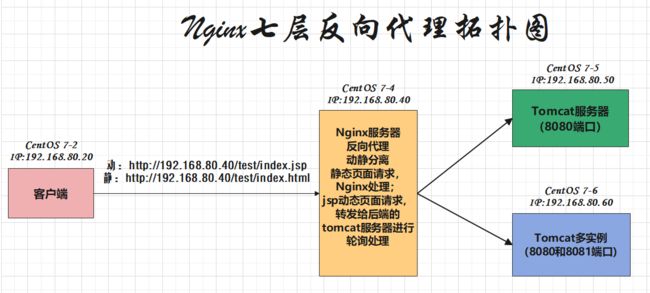
2.1 实验环境描述
-
Nginx服务器CentOS 7-4:192.168.80.40:80
-
Tomcat服务器CentOS 7-5:192.168.80.50:80
-
Tomcat服务器CentOS 7-6:192.168.80.60:8080 192.168.80.60:8081
2.2 部署Nginx负载均衡器
###关闭和禁止防火墙开机自启功能
systemctl stop firewalld
systemctl disable firewalld
setenforce 0
vim /etc/selinux/config
SELINUX=disabled
(1)安装依赖包
yum -y install pcre-devel zlib-devel openssl-devel gcc gcc-c++ make
(2)创建运行nginx用户、组
useradd -M -s /sbin/nologin nginx
(3)编译安装nginx
cd /opt
rz -E
tar xf nginx-1.24.0.tar.gz
cd nginx-1.24.0/
./configure --prefix=/usr/local/nginx --user=nginx --group=nginx --with-file-aio --with-http_stub_status_module --with-http_gzip_static_module --with-http_flv_module --with-stream

make -j2 && make install
详解configue配置模块;
./configure \
--prefix=/usr/local/nginx \
--user=nginx \
--group=nginx \
--with-file-aio \									#启用文件修改支持
--with-http_stub_status_module \					#启用状态统计
--with-http_gzip_static_module \					#启用gzip静态压缩
--with-http_flv_module \							#启用flv模块,提供对 flv 视频的伪流支持
--with-http_ssl_module								#启用SSL模块,提供SSL加密功能
--with-stream										#启用stream模块,提供4层调度
(4)将nginx服务链接到/usr/local/sbin/系统环境变量中
ln -s /usr/local/nginx/sbin/nginx /usr/local/sbin/ #让系统识别nginx的操作命令
(5)在/lib/systemd/system/目录中,添加nginx.service文件,便于能够使用systemctl启动和关闭nginx服务
vim /lib/systemd/system/nginx.service

[Unit]
Description=nginx
After=network.target
[Service]
Type=forking
PIDFile=/usr/local/nginx/logs/nginx.pid
ExecStart=/usr/local/nginx/sbin/nginx
ExecrReload=/bin/kill -s HUP $MAINPID
ExecrStop=/bin/kill -s QUIT $MAINPID
PrivateTmp=true
[Install]
WantedBy=multi-user.target
(6)修改nginx.service的执行权限并启动服务
chmod 754 /lib/systemd/system/nginx.service
systemctl start nginx.service
systemctl enable nginx.service
netstat -lntp | grep nginx
(7)制作nginx服务的网页数据内容;
mkdir -p /usr/local/nginx/html/test
vim /usr/local/nginx/html/test/index.html
<html>
<head>
<title>HTML test page!</title>
</head>
<body>
<h1>IP:192.168.80.40!this is jingtai nginx html web!</h1>
</body>
</html>
(8)浏览器访问,验证nginx服务是否正确启动
http://192.168.80.40/test/index.html
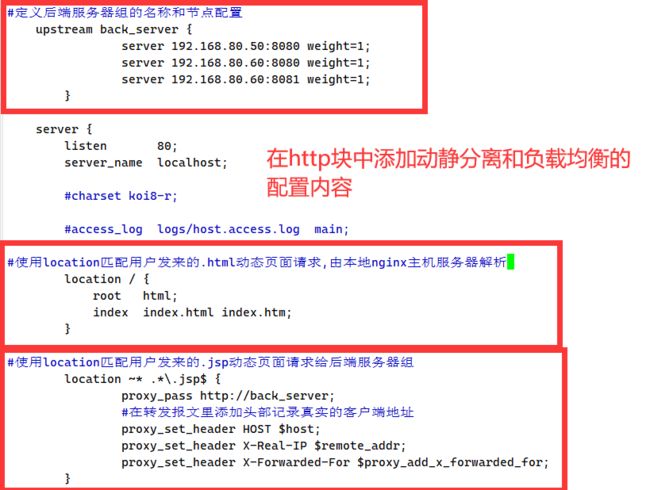
(9)修改Nginx服务的主配置文件nginx.conf,添加upstream模块
vim /usr/local/nginx/conf/nginx.conf
----------------------在http的server块中添加以下内容--------------------------------------
http {
-------------------------------------------------------------------------------------------------------
    keepalive_timeout  0;
#定义后端服务器组的名称和节点配置
    upstream back_server {
                server 192.168.80.50:8080 weight=1;
                server 192.168.80.60:8080 weight=1;
                server 192.168.80.60:8081 weight=1;
        }

-------------------------------------------------------------------------------------------------------
    server {
        listen       80;
        server_name  localhost;

#使用location匹配用户发来的.html动态页面请求,由本地nginx主机服务器解析
        location / {
            root   html;
            index  index.html index.htm;
        }
-------------------------------------------------------------------------------------------------------

#使用location匹配用户发来的.jsp动态页面请求给后端服务器组
        location ~* .*\.jsp$ {
                proxy_pass http://back_server;
                #在转发报文里添加头部记录真实的客户端地址
                proxy_set_header HOST $host;
                proxy_set_header X-Real-IP $remote_addr;
                proxy_set_header X-Forwarded-For $proxy_add_x_forwarded_for;
        }

(10)重新启动所有服务,包括重新启动后端tomcat服务器
###启动nginx服务器
systemctl restart nginx
netstat -lntp | grep nginx

###启动tomcat服务器
systemctl restart tomcat
netstat -natp | grep java

###启动tomcat多实例服务器
/usr/local/tomcat/tomcat1/bin/startup.sh
/usr/local/tomcat/tomcat2/bin/startup.sh
netstat -natp | grep java
(11)浏览服务器,分别访问动静页面,验证结果是否正确;
http://192.168.80.40/test/index.html
http://192.168.80.40/test/index.jsp

以.jsp结尾的动态页面,实现动态轮询tomcat服务器的效果;

至此,七层反向代理实验,已圆满结束!
2.3 部署2台Tomcat应用服务器
2.3.1 部署CentOS 7-5 Tomcat服务器
###关闭和禁止防火墙开机自启功能
systemctl stop firewalld
systemctl disable firewalld
setenforce 0
vim /etc/selinux/config
SELINUX=disabled
(1)将安装Tomcat所需软件包传到/opt目录下
cd  /opt
rz -E
tar xf jdk-8u91-linux-x64.tar.gz -C /usr/local/
(2)设置JDK环境变量
vim /etc/profile.d/java.sh
export JAVA_HOME=/usr/local/jdk1.8.0_91
export JRE_HOME=$JAVA_HOME/jre
export CLASSPATH=.:$JAVA_HOME/lib:$JRE_HOME/lib
export PATH=$JAVA_HOME/bin:$JRE_HOME/bin:$PATH

source /etc/profile.d/java.sh
java -version
(3)安装启动Tomcat
cd /opt
rz -E
tar xf apache-tomcat-9.0.16.tar.gz
ls
apache-tomcat-9.0.16  apache-tomcat-9.0.16.tar.gz  jdk-8u91-linux-x64.tar.gz  rh
mv apache-tomcat-9.0.16 /usr/local/tomcat
(4)在/lib/systemd/system/目录中,添加tomcat.service文件,便于能够使用systemctl启动和关闭tomcat服务
vim /usr/lib/systemd/system/tomcat.service
[Unit]
Description=tomcat server
Wants=network-online.target
After=network.target
[Service]
Type=forking
Environment="JAVA_HOME=/usr/local/jdk1.8.0_91"
Environment="PATH=$JAVA_HOME/bin:/usr/local/sbin:/usr/local/bin:/usr/sbin:/usr/bin:/root/bin"
Environment="CLASSPATH=.:$JAVA_HOME/lib/dt.jar:$JAVA_HOME/lib/tools.jar"
ExecStart=/usr/local/tomcat/bin/startup.sh
ExecStop=/usr/local/tomcat/bin/shutdown.sh
Restart=on-failure
[Install]
WantedBy=multi-user.target

systemctl daemon-reload
systemctl start tomcat
netstat -natp | grep 8080
tcp6       0      0 :::8080                 :::*                    LISTEN      4213/java
mkdir /usr/local/tomcat/webapps/test
vim /usr/local/tomcat/webapps/test/index.jsp

<%@ page language="java" import="java.util.*" pageEncoding="UTF-8"%>


JSP test1 page!


<% out.println("IP:192.168.80.50:8080 JSP动态页面1 http://www.test1.com");%>
在主配置文件server.xml中,修改网页根目录地址;
vim /usr/local/tomcat/conf/server.xml
#由于主机名name配置都为localhost,需要删除前面的HOST配置(删除148和149两行)


systemctl restart tomcat
netstat -natp | grep java
(6)浏览器访问,验证是否成功
http://192.168.80.50:8080/test/index.jsp
2.3.2 部署CentOS 7-6 Tomcat多实例服务器
###关闭和禁止防火墙开机自启功能
systemctl stop firewalld
systemctl disable firewalld
setenforce 0
vim /etc/selinux/config
SELINUX=disabled
(1)安装jdk环境和tomcat服务
cd /opt
 rz -E
 mkdir /usr/local/tomcat
tar xf apache-tomcat-9.0.16.tar.gz
mv apache-tomcat-9.0.16 /usr/local/tomcat/tomcat1
 mv apache-tomcat-9.0.16 /usr/local/tomcat/tomcat2
(2)配置tomcat环境变量
vim /etc/profile.d/tomcat.sh
#tomcat1
export CATALINA_HOME1=/usr/local/tomcat/tomcat1
export CATALINA_BASE1=/usr/local/tomcat/tomcat1
export TOMCAT_HOME1=/usr/local/tomcat/tomcat1

#tomcat2
export CATALINA_HOME2=/usr/local/tomcat/tomcat2
export CATALINA_BASE2=/usr/local/tomcat/tomcat2
export TOMCAT_HOME2=/usr/local/tomcat/tomcat2

source /etc/profile.d/tomcat.sh
(3)修改tomcat2中的server.xml文件,要求各tomcat实例配置不能有重复的端口号
vim /usr/local/tomcat/tomcat2/conf/server.xml
#22行,修改Server prot,默认为8005 -> 修改为8006
修改为8081
(4)修改各tomcat实例中的startup.sh和shutdown.sh文件,添加tomcat环境变量
修改tomcat1实例startup.sh和shutdown.sh文件中的环境变量;
vim /usr/local/tomcat/tomcat1/bin/startup.sh
# ---------------------------------------------------------------------------
# Start Script for the CATALINA Server
# ---------------------------------------------------------------------------
##添加以下内容
export CATALINA_BASE=$CATALINA_BASE1
export CATALINA_HOME=$CATALINA_HOME1
export TOMCAT_HOME=$TOMCAT_HOME1

vim /usr/local/tomcat/tomcat1/bin/shutdown.sh
# ---------------------------------------------------------------------------
# Stop script for the CATALINA Server
# ---------------------------------------------------------------------------
export CATALINA_BASE=$CATALINA_BASE1
export CATALINA_HOME=$CATALINA_HOME1
export TOMCAT_HOME=$TOMCAT_HOME1
修改tomcat2实例startup.sh和shutdown.sh文件中的环境变量;
vim /usr/local/tomcat/tomcat2/bin/startup.sh
# ---------------------------------------------------------------------------
# Start Script for the CATALINA Server
# ---------------------------------------------------------------------------
export CATALINA_BASE=$CATALINA_BASE2
export CATALINA_HOME=$CATALINA_HOME2
export TOMCAT_HOME=$TOMCAT_HOME2


vim /usr/local/tomcat/tomcat2/bin/shutdown.sh
# ---------------------------------------------------------------------------
# Stop script for the CATALINA Server
# ---------------------------------------------------------------------------
export CATALINA_BASE=$CATALINA_BASE2
export CATALINA_HOME=$CATALINA_HOME2
export TOMCAT_HOME=$TOMCAT_HOME2
(5)动静分离配置
制作多实例tomcat1的网页数据内容;
mkdir /usr/local/tomcat/tomcat1/webapps/test /usr/local/tomcat/tomcat2/webapps/test
vim /usr/local/tomcat/tomcat1/webapps/test/index.jsp

<%@ page language="java" import="java.util.*" pageEncoding="UTF-8"%>


JSP test2 page


<% out.println("IP:192.168.80.60:8080 JSP动态页面2 http://www.test2.com");%>
制作多实例tomcat2的网页数据内容;
vim /usr/local/tomcat/tomcat2/webapps/test/index.jsp

<%@ page language="java" import="java.util.*" pageEncoding="UTF-8"%>


JSP test3 page


<% out.println("IP:192.168.80.60:8081 JSP动态页面3 http://www.test3.com");%>
在多实例tomcat1的主配置文件server.xml中,修改网页根目录地址;
vim /usr/local/tomcat/tomcat1/conf/server.xml
#删除前面的HOST配置(删除148和149行内容)


/usr/local/tomcat/tomcat1/bin/shutdown.sh
/usr/local/tomcat/tomcat1/bin/startup.sh
在多实例tomcat2的主配置文件server.xml中,修改网页根目录地址;
[root@localhost /opt]# vim /usr/local/tomcat/tomcat2/conf/server.xml
#删除前面的HOST配置(删除148和149行内容)
(6)启动各tomcat中的/bin/startup.sh
/usr/local/tomcat/tomcat1/bin/startup.sh
/usr/local/tomcat/tomcat2/bin/startup.sh
netstat -natp | grep java
tcp6       0      0 127.0.0.1:8005          :::*                    LISTEN      3530/java
tcp6       0      0 127.0.0.1:8006          :::*                    LISTEN      3590/java
tcp6       0      0 :::8009                 :::*                    LISTEN      3530/java
tcp6       0      0 :::8010                 :::*                    LISTEN      3590/java
tcp6       0      0 :::8080                 :::*                    LISTEN      3530/java
tcp6       0      0 :::8081                 :::*                    LISTEN      3590/java
(7)浏览器访问,验证tomcat服务是否配置成功
http://192.168.80.60:8080/test/index.jsp
http://192.168.80.60:8081/test/index.jsp
3.四层反向代理实例
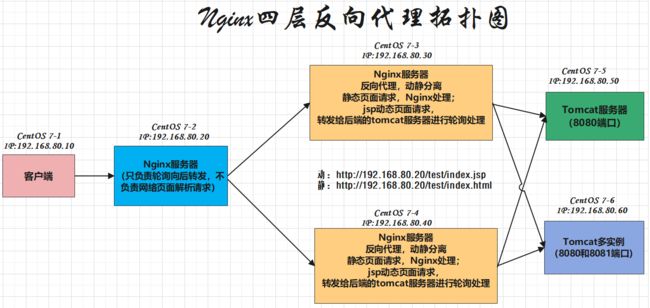
3.1 实验环境描述
-
Nginx服务器(转发)CentOS 7-2:192.168.80.20:80
-
Nginx服务器CentOS 7-3:192.168.80.30:80
-
Nginx服务器CentOS 7-4:192.168.80.40:80
-
Tomcat服务器CentOS 7-5:192.168.80.50:80
-
Tomcat服务器CentOS 7-6:192.168.80.60:8080 192.168.80.60:8081
3.2 部署Nginx负载均衡器(CentOS 7-3)
注意:该四层反向代理实例,是在上面实验七层反向代理实例的基础之上完成的!!!!!
###关闭和禁止防火墙开机自启功能
systemctl stop firewalld
systemctl disable firewalld
setenforce 0
vim /etc/selinux/config
SELINUX=disabled
(1)此处采用yum安装nginx服务器
cd /etc/yum.repos.d
mkdir /etc/yum.repos.d/repo.bak
mv  /etc/yum.repos.d/*.repo  /etc/yum.repos.d/repo.bak/
vim /etc/yum.repos.d/nginx.repo
[nginx-stable]
name=nginx stable repo
baseurl=http://nginx.org/packages/centos/7/$basearch/
gpgcheck=0
enabled=1

yum install nginx -y
nginx -v
(2)启动服务,并使用浏览器访问测试
systemctl start nginx
netstat -lntp | grep nginx
http://192.168.80.30
(3)制作nginx服务的网页数据内容;
yum安装的nginx服务器的网页根目录位于 /usr/share/nginx/html
mkdir -p  /usr/share/nginx/html/test
vim  /usr/share/nginx/html/test/index.html


HTML30  test page!


IP:192.168.80.30!this is jingtai30 nginx html web!
再次重新启动服务,并使用浏览器访问测试
systemctl restart nginx
netstat -lntp | grep nginx
http://192.168.80.30/test/index.html

(4)修改Nginx服务的默认主配置文件default.conf,添加upstream模块
cp /etc/nginx/conf.d/default.conf /etc/nginx/conf.d/default.conf.bak
vim /etc/nginx/conf.d/default.conf
----------------------在第一行添加以下内容--------------------------------------
#定义后端服务器组的名称和节点配置
    upstream back_server {
                server 192.168.80.50:8080 weight=1;
                server 192.168.80.60:8080 weight=1;
                server 192.168.80.60:8081 weight=1;
        }

-------------------------------------------------------------------------------------------------------
    server {
        listen       80;
        server_name  localhost;

#使用location匹配用户发来的.html动态页面请求,由本地nginx主机服务器解析
        location / {
            root   html;
            index  index.html index.htm;
        }
-------------------------------------------------------------------------------------------------------

#使用location匹配用户发来的.jsp动态页面请求给后端服务器组
        location ~* .*\.jsp$ {
                proxy_pass http://back_server;
                #在转发报文里添加头部记录真实的客户端地址
                proxy_set_header HOST $host;
                proxy_set_header X-Real-IP $remote_addr;
                proxy_set_header X-Forwarded-For $proxy_add_x_forwarded_for;
        }
systemctl restart nginx
netstat -lntp | grep nginx
###访问静态
http://192.168.80.30/test/index.html
###访问动态
http://192.168.80.30/test/index.jsp

以.jsp结尾的动态页面,实现动态轮询tomcat服务器的效果;

3.3 部署Nginx服务器(转发)(CentOS 7-2)
###关闭和禁止防火墙开机自启功能
systemctl stop firewalld
systemctl disable firewalld
setenforce 0
vim /etc/selinux/config
SELINUX=disabled
(1)安装依赖包
yum -y install pcre-devel zlib-devel openssl-devel gcc gcc-c++ make
(2)创建运行nginx用户、组
useradd -M -s /sbin/nologin nginx
(3)编译安装nginx
cd /opt
rz -E
tar xf nginx-1.24.0.tar.gz
cd nginx-1.24.0/
./configure --prefix=/usr/local/nginx --user=nginx --group=nginx --with-file-aio --with-http_stub_status_module --with-http_gzip_static_module --with-http_flv_module --with-stream

make -j2 && make install
(4)将nginx服务链接到/usr/local/sbin/系统环境变量中
ln -s /usr/local/nginx/sbin/nginx /usr/local/sbin/ #让系统识别nginx的操作命令
(5)在/lib/systemd/system/目录中,添加nginx.service文件,便于能够使用systemctl启动和关闭nginx服务
vim /lib/systemd/system/nginx.service

[Unit]
Description=nginx
After=network.target
[Service]
Type=forking
PIDFile=/usr/local/nginx/logs/nginx.pid
ExecStart=/usr/local/nginx/sbin/nginx
ExecrReload=/bin/kill -s HUP $MAINPID
ExecrStop=/bin/kill -s QUIT $MAINPID
PrivateTmp=true
[Install]
WantedBy=multi-user.target
(6)修改nginx.service的执行权限并启动服务
chmod 754 /lib/systemd/system/nginx.service
systemctl start nginx.service
systemctl enable nginx.service
netstat -lntp | grep nginx
(7)浏览器访问,验证nginx服务是否正确启动
http://192.168.80.20
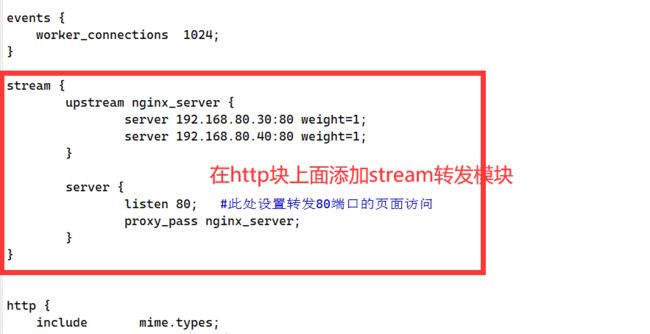
(8)修改Nginx服务的主配置文件nginx.conf,添加stream模块
vim /usr/local/nginx/conf/nginx.conf
stream {
        upstream nginx_server {
                server 192.168.80.30:80 weight=1;
                server 192.168.80.40:80 weight=1;
        }

        server {
                listen 80;   #此处设置转发80端口的页面访问
                proxy_pass nginx_server;
        }
}


----------------------在http块上面添加以下内容-----------------------------------------------
http {
-------------------------------------------------------------------------------------------------------
    keepalive_timeout  0;
    server {
        listen       8080;  #修改本地页面端口为8080
        server_name  localhost;
(9)重新启动所有服务,包括重新启动后端tomcat服务器
###启动nginx服务器
systemctl restart nginx
netstat -lntp | grep nginx

###启动tomcat服务器
systemctl restart tomcat
netstat -natp | grep java

###启动tomcat多实例服务器
/usr/local/tomcat/tomcat1/bin/startup.sh
/usr/local/tomcat/tomcat2/bin/startup.sh
netstat -natp | grep java
(10)浏览服务器,分别访问动静页面,验证结果是否正确;
http://192.168.80.20/test/index.html
http://192.168.80.20/test/index.jsp
以.jsp结尾的动态页面,实现动态轮询tomcat服务器的效果;

至此,四层反向代理实验,已圆满结束!


