Node.js路由方法
前往我的主页以获得更好的阅读体验
端口监听
服务器的本质是端口通讯,因此只需要对80端口进行监听,就可以进行Http通讯。本文使用express模块进行监听
//引入express模块
const Express = require("express");
//创建服务器应用
const App = Express();
//监听80端口
App.listen(80);

现在一个服务器应用就创建好了,在电脑上打开127.0.0.1,如果看到"Cannot GET /",就表示服务器运行正常

处理请求
//引入express模块
const Express = require("express");
//创建服务器应用
const App = Express();
App.get('/',(request, response)=>{
    response.write("Hello World!");//写入网页内容
    response.end();//结束响应
});
//监听80端口
App.listen(80);
在response里输出网页的内容,并用end()来结束响应。
end()方法使服务器认为所有数据都已经发送完毕,无论客户端是否收到,都强制中断连接。如果在end()之后尝试发送数据,则会产生报错
控制台输出
使用console即可在控制台输出
//引入express模块
const Express = require("express");
//创建服务器应用
const App = Express();
App.get('/',(request, response)=>{
    console.log("this is a log");
    console.error("this is an error");
    response.end();//结束响应
});
//监听80端口
App.listen(80);
Url解析
request中包含了有关url的变量,request.hostname表示主机名(在公网里就是域名),request.url表示主机名后面的地址
以https://blog.dearxuan.com/404?from=csdn为例
- url: /404?from=csdn
- hostname: blog.dearxuan.com
除了获取url之外,还可以使用query解析url中的参数
各个参数之间使用&分割,如果一个参数出现了多次,则会自动存为数组
需要注意的是,空格和空字符也会被包含在内
//引入express模块
const Express = require("express");
//创建服务器应用
const App = Express();
App.get('/',(request, response)=>{
    const dic = request.query;
    console.log(dic);
    response.end();//结束响应
});
//监听80端口
App.listen(80);
使用浏览器访问:http://localhost/?a=1&b=&&&a=2,则会在控制台输出
{ a: [ '1', '2' ], b: '' }
响应
重定位
response.redirect("https://blog.dearxuan.com")
响应头
下面的代码将响应头改为404,即使页面存在,也会在客户端显示找不到页面
//引入express模块
const Express = require("express");
//创建服务器应用
const App = Express();
App.get('/',(request, response)=>{
    response.writeHead(404,{})//404 Not Found
    response.end();//结束响应
});
//监听80端口
App.listen(80);
主体
用send()方法将网页内容发送到客户端
//引入express模块
const Express = require("express");
//创建服务器应用
const App = Express();
App.get('/',(request, response)=>{
    response.send("Hello World");
    response.end();//结束响应

});
//监听80端口
App.listen(80);
路由
为了方便对不同地址的管理,express支持为不同的路由设置不同的函数
项目结构
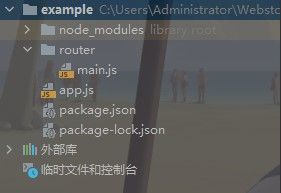
为了增强代码的可扩展性,将所有路由对应的方法存放在"router"文件夹下,比如现在"router"文件夹下就有一个main.js文件,用来处理/main开头的url路径,但是/main/*不在这个范围内
项目的文件结构如下
自定义处理函数
module.exports = {
    //MainPage函数可被导出
    MainPage
}

function MainPage(request, response){
    response.write("Main");
    response.end();
}
设置路由
const Express = require("express");

const Main = require("./router/main");
const App = Express();

//用Main.MainPage函数来处理该路由下的get方法
App.get('/main',Main.MainPage);

App.listen(80);
现在可以正常访问http://localhost/main,但是访问http://localhost/main/a就会出错
使用App.get('/main/a',Main_a.Func)是个不错的方法,但是如果想要访问http://localhost/main/a/a或者http://localhost/main/abc/a/b,这种方法就会显得笨拙
通配符
" * " (星号)表示匹配所有字符,因此如果你写下App.get('/m*',Main.MainPage),那么所有m开头的url都会被MainPage()函数处理,无论是http://localhost/ma或是http://localhost/main/a/b
占位符
为了匹配看起来像http://localhost/page/12的路径,可以使用占位符
App.get('/page/:id',(request, response)=>{
    console.log(request.params.id);
    response.end();
});
此时控制台会输出: 12
加上问号则表示该占位符可有可无
例如App.get('/page/:a?/:b',func)
则它对应的url包括
localhost/page/12/34: a='12', b='34'
localhost/page/34: a=undefined, b='34'
控制权
Express会根据url逐一比较所有路由,直到遇到一个相匹配的路由
当所有路由都无法匹配url时,就会显示Cannot GET /...
为了能将用户导航到指定的错误页面,使用通配符来匹配所有url
App.get('/main',func1);
App.get('/page',func2);
//匹配所有url
App.get('*',(request, response)=>{
    response.write("404 Not Found")
    response.end();
});
需要注意路由的顺序,如果第一个路由就使用了通配符,那么接下来所有路由都无法获得这个请求
控制权转移
在函数中调用next()函数可以放弃自己的控制权,并交由下面的路由来处理请求
App.get('/main',(request, response, next)=>{
    next();
});
App.get('*',(request, response)=>{
    response.write("404 Not Found")
    response.end();
});
静态网页
express支持直接返回静态文件,而不使用繁琐的文件读写
//直接返回index.html
App.use('/main',Express.static('index.html'));


