Springboot整合Camunda工作流引擎实现审批流程实例
环境:Spingboot2.6.14 +
camunda-spring-boot-starter7.18.0
环境配置
依赖配置
7.18.0

  org.camunda.bpm.springboot
  camunda-bpm-spring-boot-starter-webapp
  ${camunda.version}


  org.camunda.bpm.springboot
  camunda-bpm-spring-boot-starter-rest
  ${camunda.version}
应用程序配置
camunda.bpm:
  webapp:
    # 设置管理控制台的访问上下文
    application-path: /workflow
  auto-deployment-enabled: true
  admin-user:
    # 配置登录管理控制台的用户
    id: admin
    password: admin
    firstName: admin
  filter:
    create: All tasks
  database:
    #数据库类型
    type: mysql
    #是否自动更新表信息
    schema-update: true
logging:
  level:
    #配置日志,这样在开发过程中就能看到每步执行的SQL语句了
    '[org.camunda.bpm.engine.impl.persistence.entity]': debug
---
spring:
  jersey:
    application-path: /api-flow
    type: servlet
    servlet:
      load-on-startup: 0
通过上面的配置后访问控制台:
http://localhost:8100/workflow/

默认是没有上面的tasks中的内容,这里是我之前测试数据
环境准备好后,接下来就可以设计工作流程。
上面的
camunda-bpm-spring-boot-starter-rest依赖中定义了一系列操作camunda的 rest api 这api的实现是通过jersey实现,我们可以通过/api-flow前缀来访问这些接口,具体有哪些接口,我们可以通过官方提供的
camunda-bpm-run-7.18.0.zip 解压后运行访问如下地址就能查看所有的api接口:
http://localhost:8080/swaggerui/#/
设计流程
这里设计两个节点的审批流程,经理审批---》人事审批 流程。
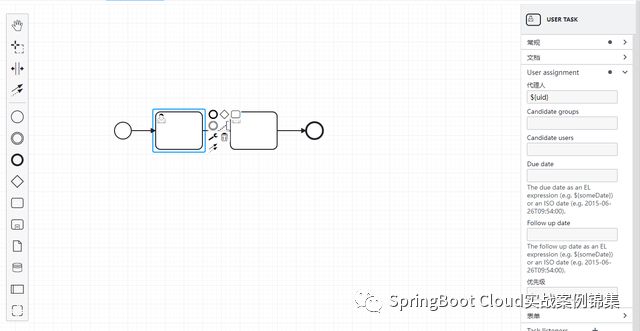
经理审批节点

人事审批节点
上面配置了2个用户任务节点,并且为每个任务节点都设置了表达式,指定节点的审批人。
最终生成的流程XML内容如下:
      Flow_18pxcpx


      Flow_18pxcpx
      Flow_0n014x3


      Flow_0n014x3
      Flow_0dsfy6s


      Flow_0dsfy6s
部署流程
这里我不通过上面的rest api 进行部署,而是通过自定义的接口然后调用camunda的相关api来实现流程部署。
上面的流程设计我是通过vue整合的camunda进行设计,并没有使用官方提供的设计器。设计完成后直接上传到服务端。
接口
@RestController
@RequestMapping("/camunda")
public class BpmnController {

  // 上传路径
  @Value("${gx.camunda.upload}")
  private String path ;

  // 通用的工作流操作api服务类
  @Resource
  private ProcessService processService ;

  @PostMapping("/bpmn/upload")
  public AjaxResult uploadFile(MultipartFile file, String fileName, String name) throws Exception {
    try {
      // 上传并返回新文件名称
      InputStream is = file.getInputStream() ;
      File storageFile = new File(path + File.separator + fileName) ;
      FileOutputStream fos = new FileOutputStream(new File(path + File.separator + fileName)) ;
      byte[] buf = new byte[10 * 1024] ;
      int len = -1 ;
      while((len = is.read(buf)) > -1) {
        fos.write(buf, 0, len) ;
      }
      fos.close() ;
      is.close() ;
      // 创建部署流程
      processService.createDeploy(fileName, name, new FileSystemResource(storageFile)) ;
      return AjaxResult.success();
    } catch (Exception e) {
      return AjaxResult.error(e.getMessage());
    }
  }
}
部署流程Service
// 这个是camunda spring boot starter 自动配置
@Resource
private RepositoryService repositoryService ;

public void createDeploy(String resourceName, String name, org.springframework.core.io.Resource resource) {
  try {
    Deployment deployment = repositoryService.createDeployment()
      .addInputStream(resourceName, resource.getInputStream())
      .name(name)
      .deploy();
    logger.info("流程部署id: {}", deployment.getId());
    logger.info("流程部署名称: {}", deployment.getName());
  } catch (IOException e) {
    throw new RuntimeException(e) ;
  }
}
执行上面的接口就能将上面设计的流程部署到camunda中(其实就是将流程文件保存到了数据库中,对应的数据表是:act_ge_bytearray)。
启动流程
启动流程还是一样,通过我们自己的接口来实现。
接口
@RestController
@RequestMapping("/process")
public class ProcessController {

  @Resource
  private ProcessService processService ;

  // 根据流程定义id,启动流程;整个流程需要动态传2个参数(审批人),如果不传将会报错
  @GetMapping("/start/{processDefinitionId}")
  public AjaxResult startProcess(@PathVariable("processDefinitionId") String processDefinitionId) {
    Map variables = new HashMap<>() ;
    variables.put("uid", "1") ;
    variables.put("mid", "1000") ;
    processService.startProcessInstanceAssignVariables(processDefinitionId, "AKF", variables) ;
    return AjaxResult.success("流程启动成功") ;
  }
}
服务Service接口
@Resource
private RuntimeService runtimeService ;
public ProcessInstance startProcessInstanceAssignVariables(String processDefinitionId, String businessKey, Map variables) {
ProcessInstance processInstance = runtimeService.startProcessInstanceById(processDefinitionId, businessKey, variables);
logger.info("流程定义ID: {}", processInstance.getProcessDefinitionId());
logger.info("流程实例ID: {}", processInstance.getId());
logger.info("BussinessKey: {}", processInstance.getBusinessKey()) ;
return processInstance ;
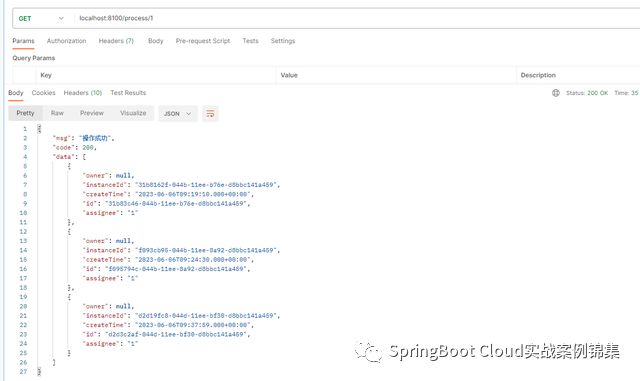
} 流程启动后就可以查看当前需要自己审批的所有审批单
接口实现
@Resource
private TaskService taskService ;
@Resource
private ManagementService managementService ;
// 根据时间段查询
public List queryTasksByBusinessAndCreateTime(String assignee, String businessKey, String startTime, String endTime) {
  NativeTaskQuery nativeQuery = taskService.createNativeTaskQuery() ;
  nativeQuery.sql("select distinct RES.* from " + managementService.getTableName(TaskEntity.class) +  " RES "
                  + " left join " + managementService.getTableName(IdentityLinkEntity.class) + " I on I.TASK_ID_ = RES.ID_ "
                  + " WHERE (RES.ASSIGNEE_ = #{assignee} or "
                  + " (RES.ASSIGNEE_ is null and I.TYPE_ = 'candidate' "
                  + " and (I.USER_ID_ = #{assignee} or I.GROUP_ID_ IN ( #{assignee} ) ))) "
                  + " and RES.CREATE_TIME_ between #{startTime} and #{endTime} "
                  + " order by RES.CREATE_TIME_ asc LIMIT #{size} OFFSET 0") ;
  nativeQuery.parameter("assignee", assignee) ;
  nativeQuery.parameter("startTime", startTime) ;
  nativeQuery.parameter("endTime", endTime) ;
  nativeQuery.parameter("size", Integer.MAX_VALUE) ;
  return nativeQuery.list() ;
}
审批流程
流程启动后,接下来就是各个用户任务节点配置的用户进行审批
接口
@GetMapping("/approve/{id}")
public AjaxResult approve(@PathVariable("id") String instanceId) {
  if (StringUtils.isEmpty(instanceId)) {
    return AjaxResult.error("未知审批任务") ;
  }
  // 下面的参数信息应该自行保存管理(与发起审批设置的指派人要一致)
  Map variables = new HashMap<>() ;
  // 第一个节点所要提供的遍历信息(这里就是依次类推,mid等)
  variables.put("uid", "1") ;
  processService.executionTask(variables, instanceId, task -> {}, null) ;
  return AjaxResult.success() ;
}
服务Service接口
@Resource
private TaskService taskService ;
@Resource
private RuntimeService runtimeService ;

@Transactional
public void executionTask(Map variables, String instanceId, Consumer consumer, String type) {
  Task task = taskService.createTaskQuery().processInstanceId(instanceId).singleResult() ;
  if (task == null) {
    logger.error("任务【{}】不存在", instanceId) ;
    throw new RuntimeException("任务【" + instanceId + "】不存在") ;
  }
  taskService.setVariables(task.getId(), variables);
  taskService.complete(task.getId(), variables) ;
  long count = runtimeService.createExecutionQuery().processInstanceId(instanceId).count();
  if (count == 0) {
    consumer.accept(task) ;
  }
}
以上就完成了从整个流程的生命周期:
设计流程 ---》部署流程 ---》启动流程 ---》审批流程
完毕!!!