Nginx优化与防盗链
文章目录
- Nginx服务优化
-
- 1.配置Nginx隐藏版本号
- 2.更改程序运行用户与组
- 3.配置网页缓存时间
- 4.Nginx日志切割
- 5.设置连接超时
- 6.更改进程数
- 7.配置网页压缩与防盗链
- 2. Nginx深入优化
Nginx服务优化
1.配置Nginx隐藏版本号

(1)修改配置文件法/usr/local/nginx/conf/nginx.conf


(1)修改源码法

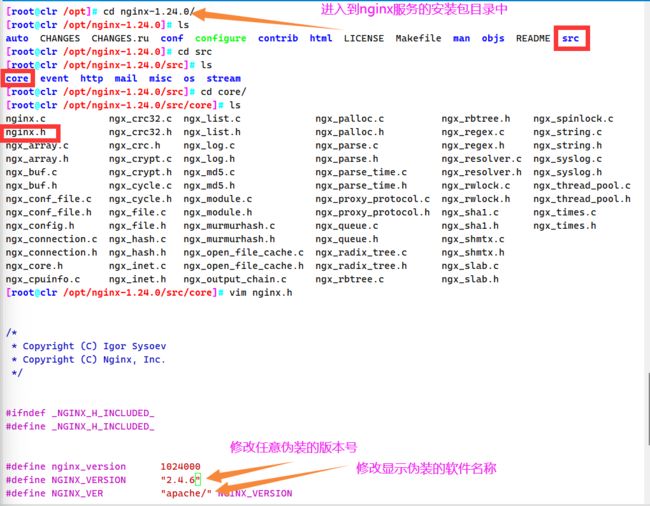
[root@clr /opt]# ls
nginx-1.24.0  nginx-1.24.0.tar.gz  rh
[root@clr /opt]# cd /opt/nginx-1.24.0/src/core
[root@clr /opt/nginx-1.24.0/src/core]# vim nginx.h
#define NGINX_VERSION      "2.4.6"       #修改版本号
#define NGINX_VER          "apache/" NGINX_VERSION    #修改软件名称

[root@clr /opt/nginx-1.24.0/src/core]# cd /opt/nginx-1.24.0/
[root@clr /opt/nginx-1.24.0]# ./configure --prefix=/usr/local/nginx --user=nginx --group=nginx --with-http_stub_status_module && make && make install

[root@clr /opt/nginx-1.24.0]# cd /usr/local/nginx/conf
[root@clr /usr/local/nginx/conf]# vim nginx.conf

    server_tokens on;   #显示软件版本号

[root@clr /usr/local/nginx/conf]# systemctl restart nginx  #重启nginx服务
[root@clr /usr/local/nginx/conf]# curl -I http://192.168.80.50
HTTP/1.1 200 OK
Server: apache/2.4.6    #此处显示的伪装的版本号

2.更改程序运行用户与组
修改Nginx用户与组


(1)编译安装时指定用户与组
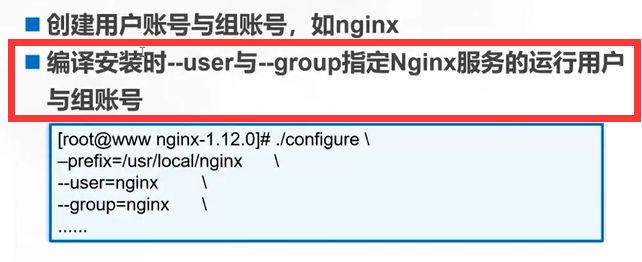
./configure --prefix=/usr/local/nginx --user=nginx --group=nginx --with-http_stub_status_module && make && make install # --user指定用户, --group指定组
(2)修改配置文件法指定

[root@clr /usr/local/nginx/conf]# ps aux | grep nginx
root      71319  0.0  0.0  20584   620 ?        Ss   16:15   0:00 nginx: master process /usr/local/nginx/sbinnginx
nginx     71320  0.0  0.0  23112  1628 ?        S    16:15   0:00 nginx: worker process
root      71477  0.0  0.0 112824   976 pts/2    S+   16:31   0:00 grep --color=auto nginx
[root@clr /usr/local/nginx/conf]# vim nginx.conf
user  nobody;     #修改允许访问nginx服务的组账号与用户账号

[root@clr /usr/local/nginx/conf]# systemctl restart nginx
[root@clr /usr/local/nginx/conf]# ps aux | grep nginx
root      71524  0.0  0.0  20588   624 ?        Ss   16:35   0:00 nginx: master process /usr/local/nginx/sbinnginx
nobody    71525  0.0  0.0  23116  1384 ?        S    16:35   0:00 nginx: worker process
root      71527  0.0  0.0 112824   976 pts/2    S+   16:35   0:00 grep --color=auto nginx

[root@clr /usr/local/nginx/conf]# vim nginx.conf
user  nginx nginx;   #第一个nginx代表用户名,第二个nginx代表组名

[root@clr /usr/local/nginx/conf]# systemctl restart nginx
[root@clr /usr/local/nginx/conf]# ps aux | grep nginx
root      71556  0.0  0.0  20588   624 ?        Ss   16:37   0:00 nginx: master process /usr/local/nginx/sbinnginx
nginx     71557  0.0  0.0  23116  1384 ?        S    16:37   0:00 nginx: worker process
root      71559  0.0  0.0 112824   980 pts/2    S+   16:37   0:00 grep --color=auto nginx

3.配置网页缓存时间


-
http段:实现对所有虚拟主机站点网页进行缓存;
-
server段:实现对某一个虚拟主机的一个站点中所有网页进行缓存;
-
location段:实现对某一个虚拟主机的某个指定访问路径进行缓存;

[root@clr /usr/local/nginx/conf]# vim nginx.conf
server {
location ~ \.(html|htm|gif|png|jpg|jpeg)$ { #针对不同后缀的文件进行缓存
root html;
expires 1d;
}
}
[root@clr /usr/local/nginx/conf]# nginx -t
nginx: the configuration file /usr/local/nginx/conf/nginx.conf syntax is ok
nginx: configuration file /usr/local/nginx/conf/nginx.conf test is successful
[root@clr /usr/local/nginx/conf]# systemctl restart nginx
[root@clr /usr/local/nginx/conf]# cd ../
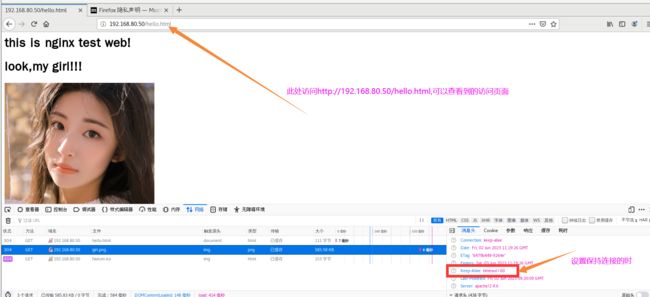
[root@clr /usr/local/nginx/html]# vim test.html #编写静态访问页面
this is nginx test web!
look,my girl!!!


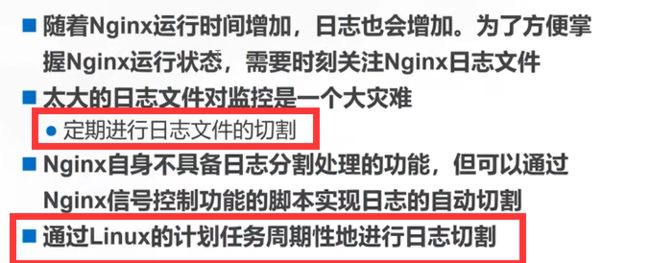
4.Nginx日志切割
[root@clr /usr/local/nginx]# vim fengge.sh
#!/bin/bash
#该脚本用于存放nginx服务三个月内的的分割日志
#定义变量获取当前时间前一天的时间格式
lastday=$(date -d "-1 day" +%Y-%m-%d)
#定义变量指定存放分割日志的目录
log_path="/var/log/nginx"
#定义变量指定nginx的工作目录
nginx_home="/usr/local/nginx"
#定义变量指定nginx服务的pid号文件路径
pid_path="$nginx_home/logs/nginx.pid"
#############main################
#判断存放分割日志的目录是否存在,如若不存在则创建
if [ ! -d $log_path ];then
mkdir -p $log_path
fi
#[ -d $log_path ] || mkdir -p $log_path
#执行日志分割操作,将访问/错误日志移动到指定目录/var/log/nginx/中,并以指定时间格式保存
mv $nginx_home/logs/access.log $log_path/access.log-$lastday
mv $nginx_home/logs/error.log $log_path/error.log-$lastday
#重建新日志文件
kill -USR1 $(cat $pid_path)
#删除90天(3个月)前的旧日志文件
find $log_path -mtime +90 | xargs rm -rf
[root@clr /usr/local/nginx]# ls /var/log | grep nginx
[root@clr /usr/local/nginx]# ls /var/log/nginx
ls: 无法访问/var/log/nginx: 没有那个文件或目录
[root@clr /usr/local/nginx]# bash fengge.sh
[root@clr /usr/local/nginx]# ls /var/log/nginx
access.log-2023-06-01 error.log-2023-06-01 #按照指定格式新生成的nginx服务的日志文件
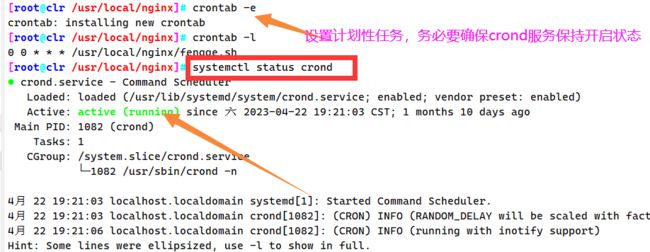
[root@clr /usr/local/nginx]# crontab -e #设置计划性任务,每天的0点0分执行脚本文件
0 0 * * * /usr/local/nginx/fengge.sh
[root@clr /usr/local/nginx]# crontab -l
0 0 * * * /usr/local/nginx/fengge.sh
[root@clr /usr/local/nginx]# systemctl status crond
● crond.service - Command Scheduler
Loaded: loaded (/usr/lib/systemd/system/crond.service; enabled; vendor preset: enabled)
Active: active (running) since 六 2023-04-22 19:21:03 CST; 1 months 10 days ago

5.设置连接超时

HTTP有一个KeepAlive模式,它告诉web服务器在处理完一个请求后保持这个TCP连接的打开状态。若接收到来自同一客户端的其它请求,服务端会利用这个未被关闭的连接,而不需要再建立一个连接。
KeepAlive在一段时间内保持打开状态,它们会在这段时间内占用资源。占用过多就会影响性能。
keepalive_timeout
指定KeepAlive的超时时间(timeout)。指定一个长连接最多可以保持多长时间,服务器将会在这个时间后关闭连接。 Nginx的默认值是65秒,有些浏览器最多只保持60秒,所以可以设定为60秒。若将它设置为0,就禁止了keepalive 连接。
第二个参数(可选的)指定了在响应头Keep-Alive:timeout=time中的time值。这个头能够让一些浏览器主动关闭连接,这样服务器就不必去关闭连接了。没有这个参数,Nginx不会发送Keep-Alive响应头。
client_header_timeout
客户端向服务端发送一个完整的request header的超时时间。如果客户端在指定时间内没有发送一个完整的 request header,Nginx返回HTTP 408(Request Timed Out)。
client_body_timeout
指定客户端与服务端建立连接后发送request body的超时时间。如果客户端在指定时间内没有发送任何内容,Nginx返回HTTP 408(Request Timed Out)。

[root@clr /usr/local/nginx/conf]# vim nginx.conf
    #keepalive_timeout  0;
    keepalive_timeout  60 60;      #第一个60代表服务器端主动断开连接保持时间,第二个60代表客户端主动断开连接保持时间
    client_header_timeout 80;
    client_body_timeout 80;
6.更改进程数


[root@clr /usr/local/nginx/conf]# vim nginx.conf

worker_processes  auto;    #此处设置为auto,代表自动获取系统的cpu个数
[root@clr /usr/local/nginx/conf]# nginx -t
[root@clr /usr/local/nginx/conf]# systemctl restart nginx.service
[root@clr /usr/local/nginx/conf]# ps aux | grep nginx
root      73918  0.0  0.0  20588   636 ?        Ss   19:27   0:00 nginx: master process /usr/local/nginx/sbinnginx
nginx     73919  0.0  0.0  23116  1396 ?        S    19:27   0:00 nginx: worker process
nginx     73920  0.0  0.0  23116  1396 ?        S    19:27   0:00 nginx: worker process
root      73922  0.0  0.0 112824   980 pts/2    S+   19:27   0:00 grep --color=auto nginx
[root@clr /usr/local/nginx/conf]# lscpu
Architecture:          x86_64
CPU op-mode(s):        32-bit, 64-bit
Byte Order:            Little Endian
CPU(s):                2    #查看系统的cpu个数为2


[root@clr /usr/local/nginx/conf]# vim nginx.conf
user  nginx nginx;
worker_processes  auto;
worker_cpu_affinity 01 10;       #为两核cpu绑定进程

[root@clr /usr/local/nginx/conf]# nginx -t
[root@clr /usr/local/nginx/conf]# systemctl restart nginx.service

7.配置网页压缩与防盗链


[root@clr /usr]# cd /opt/nginx-1.24.0/
[root@clr /opt/nginx-1.24.0]# ls
auto  CHANGES  CHANGES.ru  conf  configure  contrib  html  LICENSE  Makefile  man  objs  README  src
[root@clr /opt/nginx-1.24.0]# cd auto/
[root@clr /opt/nginx-1.24.0/auto]# ls
cc      endianness  have          headers  init     lib   module   nohave   os       stubs    threads  unix
define  feature     have_headers  include  install  make  modules  options  sources  summary  types
[root@clr /opt/nginx-1.24.0/auto]# cat options | grep YES
HTTP=YES
HTTP_CACHE=YES
HTTP_CHARSET=YES
HTTP_GZIP=YES
HTTP_SSI=YES
HTTP_ACCESS=YES
HTTP_AUTH_BASIC=YES
HTTP_MIRROR=YES
HTTP_USERID=YES
HTTP_AUTOINDEX=YES
HTTP_GEO=YES


[root@clr /opt/nginx-1.24.0/auto]# cd /usr/local/nginx/conf
[root@clr /usr/local/nginx/conf]# vim nginx.conf
    gzip on;							#取消注释,开启gzip压缩功能
   gzip_min_length 1k;      		#最小压缩文件大小
   gzip_buffers 4 64k;      		#压缩缓冲区,大小为4个64k缓冲区
   gzip_http_version 1.1;   		#压缩版本(默认1.1,前端如果是squid2.5请使用1.0)
   gzip_comp_level 6;       		#压缩比率
   gzip_vary on;					#支持前端缓存服务器存储压缩页面
   gzip_types text/plain text/javascript application/x-javascript text/css text/xml application/xml application/xml+rss image/jpg image/jpeg image/png image/gif application/x-httpd-php application/javascript application/json;		#压缩类型,表示哪些网页文档启用压缩功能


盗链网站中设置以下配置操作
[root@clr ~]# vim /etc/httpd/conf/httpd.conf
ServerName www.accp.com:80

[root@clr ~]# cd /var/www/html
[root@clr /var/www/html]# vim daolian.html


this is dao lian web!!!!!
     #图片路径信息来自于源网站的地址


[root@clr /usr/local/nginx/conf]# vim nginx.conf
http {
    server {
        location ~ \.(gif|jpg|jpeg)$ {
             root  html;
             expires 1h;

             valid_referers none blocked *.gzy.com gzy.com;
             if ($invalid_referer) {
                rewrite ^/ http://www.gzy.com/error.png;
            }
        }
     }
}


2. Nginx深入优化
应用程序级别的优化:
| 优化名称 | 操作关键字 |
|---|---|
| 隐藏版本号 | server_tokens off; |
| 设置运行用户/组 | user 用户组 组名; |
| 页面缓存时间 | expires 时间; |
| 连接保持超时 | keepalive_timeout 服务器超时时间 [客户端超时时间]; |
| 设置工作进程数 | worker_processes auto; 或者同CPU数量 worker_cpu_affinity 绑核 |
| 设置并发 | worker_rlimit_nofile、worker_connections |
| 网页压缩 | gzip on; |
| 防盗链 | rewrite |
| IO模型 IO多路复用 | events { use epoll; } |
| 日志分割 | 脚本 |
系统内核级别的优化
ulimit -n
/etc/security/limits.conf
*                soft    nofile          65535			打开文件数
*                hard    nofile          65535
*                soft    nproc           65535			打开进程数
*                hard    nproc           65535
*                soft    memlock         unlimited		内存锁定不限制
*                hard    memlock         unlimited
/etc/sysctl.conf
net.ipv4.tcp_syncookies =1			开启SYNCookies
net.ipv4.tcp_tw_reuse = 1			允许将TIME-WAIT sockets重新用于新的TCP连接,
net.ipv4.tcp_tw_recycle = 1			开启TCP连接中TIME-WAIT sockets的快速回收
net.ipv4.tcp_fin_timeout = 30		修改系统默认的fin TIMEOUT 时间

net.ipv4.ip_local_port_range = 1024 65535   外向连接的端口范围
net.ipv4.tcp max tw buckets= 5000           系统同时保持TIME WAIT最大数量
net.ipv4.tcp_max_syn_backlog = 8192         SYN队列长度
net.ipv4.tcp_keepalive_time = 1200          发送keepalive探测包消息的频度
用过哪些nginx模块?
| 关键字 | 模块名称 |
|---|---|
| http_gzip_static_module | 网页压缩模块 |
| http_stub_status_module | 状态统计模块 |
| http_rewrite_module | URL重写模块 |
| http_auth_basic_module | 用户认证模块 |
| http_fastcgi_module | fastcgi转发php-fpm模块 |
| http_ssl_module | https安全加密认证模块 |
| http_proxy_module | 请求转发模块 |
| http_upstream_*_module | 反向代理负载均衡模块 |
| http_stream_*_module | 四层反向代理模块 |
| http_limit conn module | 限制最大连接数模块 |
| http_limit reg module | 限制最大访问频率模块 |