WCF学习笔记(一)
最近开始学习WCF,发现学了不用后,很快就遗忘了,并不是什么很好的教程,只是把自己的学习笔记贴出来,跟大家分享一下.
WCF(Windows Communication Foundation)是一种使软件中的不同部分相互通信的技术.现在也有很多的类似技术,就算你没有用过,肯定也听说过,比如说COM(Components Object Model),DCOM(分布式组件对象模型),MSMQ(Microsoft Message Queueing,Microsoft消息队列)等技术,但这些技术跟WCF有很大的区别,这些技术只能在特定的场景中运行.
空洞的理论很难理解,就跟我一块慢慢感受WCF的魅力吧!
为了让其他软件能跟我们定义的类进行通信,我们将利用WCF访问模型为其添加通信功能,我们可以创建一个WCF服务,然后在终端访问我们所编写的服务,说白了,就是远程调用我们所编写的服务类,只不过这个类的调用功能很强的,你可以用java编写的程序调用我们编写的类,也可以用其他语言类调用.
定义WCF的契约很简单,只需定义一个接口,然后在接口上添加一些属性就实现了,下面让我一起来编写一个WCF服务吧.
(1)从VS2008菜单中选择文件,新建,项目,其他项目类型,visual Studio解决方案,命名为WCFSolution,在解决方案中添加一个类库,命名为Calculator。
(2)将Calculator中默认的Class.cs文件删除,新建一个接口ICalculator,代码如下:
using System;
using System.Collections.Generic;
using System.Linq;
using System.Text;
namespace Calculator
{
public interface ICalculator
{
int Add(int num1, int num2);
int Multiply(int num1,int num2);
}
}
(3)现在这个借口只是一个普通的接口,并不能成为WCF的接口,想要这接口成为WCF接口,我们必须给其添加一些属性。在引用中添加引用,.NET,选择System.ServiceModel,然后点击确定。
(4)现在我修改刚才我们定义的接口代码如下:
using System;
using System.Collections.Generic;
using System.Linq;
using System.Text;
using System.ServiceModel;
namespace Calculator
{
//定义一个契约
[ServiceContract]
public interface ICalculator
{
//定义一个操作方法
[OperationContract]
int Add(int num1, int num2);
//定义一个操作方法
[OperationContract]
int Multiply(int num1,int num2);
}
}
(5)已经创建了一个接口,现在我们来创建一个方法来实现这个接口,在库类中添加一个类命名为RealCalculator.cs,代码如下:
using System;
using System.Collections.Generic;
using System.Linq;
using System.Text;
namespace Calculator
{
public class RealCalculator:ICalculator
{
public int Add(int num1, int num2)
{
return num1 + num2;
}
public int Multiply(int num1, int num2)
{
return num1 * num2;
}
}
}
在WCF中,服务类是实现了服务契约的类,在这个例子中,我们是先定义了一个实现服务契约的接口,然后用一个类来实现接口,所以,实现了这个接口的类也是一个实现了服务契约的类。我们完全可以不用定义接口,直接在类上添加实现服务契约的属性,但在接口上定义服务契约,然后再用类来实现,这样的灵活性更大。
(12)编译,确保所写代码没有错误(生成,生成解决方案)
(13)我们已经创建了一个WCF服务,现在我们该来发布这个服务了,发布WCF的方法有很多种,在这里,我将用两种方法来发布这个WCF服务
(14)第一种发布方法,在解决方案中添加,新建项目,控制台应用程序,命名为Host,然后在Host添加引用,System.ServiceModel,System.Configuration,Calculator
(15)修改Program.cs中的文件内容如下:
using System;
using System.Collections.Generic;
using System.Linq;
using System.Text;
using System.ServiceModel;
using System.Configuration;
using Calculator;
namespace Host
{
class Program
{
static void Main(string[] args)
{
Type serviceType = typeof(RealCalculator);
using (ServiceHost host = new ServiceHost(serviceType))
{
host.Open();
Console.WriteLine("The host is open");
Console.ReadKey(true);
host.Close();
}
}
}
}
编译一下确保没有错误
(16)WCF终结点包含了地址,绑定和契约。现在我们提供计算的类的服务已经定义好了,我们还需要提供地址和绑定已完成终结点的定义。
(17)在Host中添加一个App.config配置文件,代码如下:
<?xml version="1.0" encoding="utf-8" ?>
<configuration>
<system.serviceModel>
<services>
<service name ="Calculator.RealCalculator">
<host>
<baseAddresses>
<add baseAddress ="http://localhost:8000/Calculator/"/>
<add baseAddress ="net.tcp://localhost:8010/Calculator/"/>
</baseAddresses>
</host>
<endpoint address="Calculator" binding ="basicHttpBinding" contract ="Calculator.ICalculator"></endpoint>
</service>
</services>
</system.serviceModel>
</configuration>
关于这段代码的解释,我会在下一节中进行详细的解释
(18)现在我们来运行一下,看看效果(将Host设为启动项)
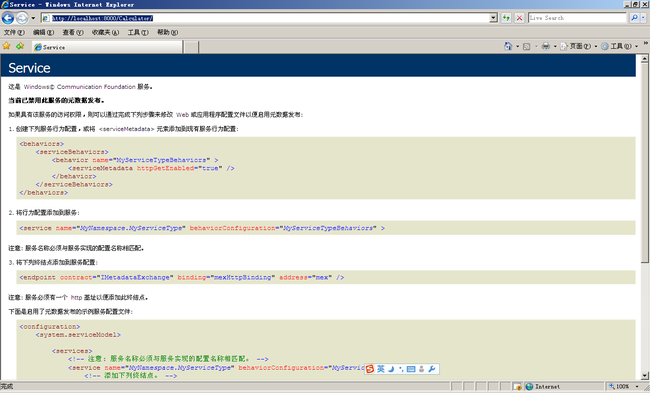
然后在浏览器中输入http://localhost:8000/Calculator/
我们会看到如下:
你也许会纳闷,以前我们在写webservice时,服务只要一发布,我们就可以使用这个服务类了,但这个服务好像还不能用,别急,我们慢慢来改。
(19)我来现在来修改App.config中的文件,修改后内容如下:
<?xml version="1.0" encoding="utf-8" ?>
<configuration>
<system.serviceModel>
<services>
<service name ="Calculator.RealCalculator" behaviorConfiguration ="Calculator">
<host>
<baseAddresses>
<add baseAddress ="http://localhost:8000/Calculator/"/>
<add baseAddress ="net.tcp://localhost:8010/Calculator/"/>
</baseAddresses>
</host>
<endpoint address="Calculator" binding ="basicHttpBinding" contract ="Calculator.ICalculator"></endpoint>
</service>
</services>
<behaviors>
<serviceBehaviors>
<behavior name ="Calculator">
<serviceMetadata httpGetEnabled ="true"/>
</behavior>
</serviceBehaviors>
</behaviors>
</system.serviceModel>
</configuration>
(20)服务端我们已经编写完成了,现在我们来编写客户端,调用WCF服务
我们将使用SvcUtil.exe工具,生成计算器客户端组件。
1) 打开SDK命令窗口
2) 输入cd: C:"Documents and Settings"Administrator"桌面"WCFSolution,你把这个路径改成你的解决方案所放的路径。
3) 然后在 输入 svcutil http://localhost:8000/Calculator/ /out:Client.cs /config:app.config,这时你会在你的解决方案的文件夹中看到两个文件 Client.cs,app.config
这时WCF工具生成的客户端代理类
(21)现在我们来编写客户端,调用WCF服务,在解决方案中添加一个名为Client的windows窗体应用程序,添加刚才工具生产的Client.cs和app.config文件
(22)windows窗体设计如下:
在Button1,Button2中分别加入如下代码:
private void button1_Click(object sender, EventArgs e)
{
using (CalculatorClient proxy = new CalculatorClient("BasicHttpBinding_ICalculator"))
{
proxy.Open();
int num1 = Convert.ToInt32(textBox1 .Text);
int num2 = Convert.ToInt32(textBox2 .Text);
int result = proxy.Add(num1, num2);
label3.Text = result.ToString();
proxy.Close();
}
}
private void button2_Click(object sender, EventArgs e)
{
using(CalculatorClient proxy=new CalculatorClient ("BasicHttpBinding_ICalculator"))
{
int num1 = Convert.ToInt32(textBox3 .Text);
int num2 = Convert.ToInt32(textBox4 .Text);
proxy.Open();
label6.Text = proxy.Multiply(num1, num2).ToString();
proxy.Close();
}
}
这只是一个Demo,所以我并没有做验证,如果你在输入框中输入非数字,肯定会出错的,调试界面如下:
好了,现在第一例子我已经做完了,至于代码,还有其他的WCF发布方式,我在下几节中,将会一一的讲解。今天就到这吧。


