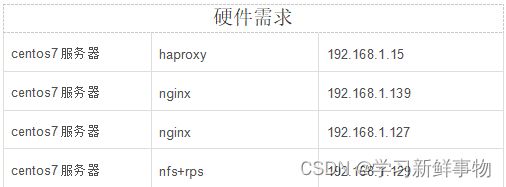
centos7上部署haproxy+nginx+nfs(脚本部署)
目录
1.haproxy服务器导入shell安装 haproxy
2. 由于nginx服务需要用的nfs共享目录,这里我们先部署nfs在部署nginx
3.nginx服务器1部署
4.nginx服务器2部署
简介:部署haproxy+nginx+nfs的目的是为了实现负载均衡、高性能Web服务器、文件共享等功能,并通过脚本自动化部署和配置以提高效率和减少错误。
环境准备 关闭防火墙 systemctl stop firewalld.service #停止防火墙服务
sed -i 's/SELINUX=.*/SELINUX=disabled/' /etc/sysconfig/selinux #将selinux的配置文件改为不启动
重启服务器,修改selinux配置后重启生效
1.haproxy服务器导入shell安装 haproxy
[root@haproxy ~]#touch haproxy             创建文件夹
[root@haproxy ~]# chmod 755 haproxy        给它权限因为是用./启动的
[root@haproxy ~]# vim haproxy               进入

#!/bin/bash
#function:安装haproxy修改配置文件并添加两台web
#author:999vip 2021118
yum install haproxy -y  #yum安装haproxy
echo 请输入nginx服务器1ip
read a                  #弹出输入框并将输入内容作为变量a
echo 请输入nginx服务器2ip
read b                  #弹出输入框并将输入内容作为变量a
sed -i "82s/127.0.0.1:5001/$a:80/"  /etc/haproxy/haproxy.cfg        #替换haproxy的配置文件82行为nginx1>的ip
sed -i "83s/127.0.0.1:5002/$b:80/"  /etc/haproxy/haproxy.cfg        #替换haproxy的配置文件83行为nginx2>的ip
sed -i '63s/5000/80/'  /etc/haproxy/haproxy.cfg                     #将haproxy的默认5000端口改为80端口
echo "listen admin_stats" >> /etc/haproxy/haproxy.cfg               #设置haproxy的web管理用户
echo "stats enable" >> /etc/haproxy/haproxy.cfg                     #开启haproxy程序web服务
echo "bind *:8080" >> /etc/haproxy/haproxy.cfg                      #haproxy管理页面端口为8080
echo "mode http" >> /etc/haproxy/haproxy.cfg                        #以下为haproxy系统配置
echo "option httplog" >> /etc/haproxy/haproxy.cfg
echo "log global" >> /etc/haproxy/haproxy.cfg
echo "maxconn 10" >> /etc/haproxy/haproxy.cfg
echo "stats refresh 30s" >> /etc/haproxy/haproxy.cfg
echo "stats uri /admin" >> /etc/haproxy/haproxy.cfg
echo "stats realm haproxy" >> /etc/haproxy/haproxy.cfg
echo "stats auth admin:admin" >> /etc/haproxy/haproxy.cfg
echo "stats hide-version" >> /etc/haproxy/haproxy.cfg
echo "stats admin if TRUE" >> /etc/haproxy/haproxy.cfg              #以上为haproxy系统配置
systemctl start haproxy.service                                     #开启haproxy程序
c=$(ip a | grep "inet "|grep ens33| awk '{print $2}'|awk -F/ '{print $1}')  #变量c等于本机ip
[root@haproxy ~]# ./haproxy 启动最后输入两台njinx服务器的IP(根据实际环境输入)
请输入nginx服务器1ip
192.168.1.139
请输入nginx服务器2ip
192.168.1.127
现在网页搜索 haproxy服务器的IP端口加admin
用户名admin 密码admin
出来这样的页面

2. 由于nginx服务需要用的nfs共享目录,这里我们先部署nfs在部署nginx
创建nfs 给权限 进入 启动
[root@nginx1 ~]# touch nfs 创建
[root@nginx1 ~]# chmod 755 nfs 给权限
[root@nginx1 ~]# vim nfs 进入
#!/bin/bash
#function:安装nfs 创建/app/file作为共享文件
#author:999vip 20211118
yum install nfs-utils rpcbind -y #yum安装nfs和rpc服务
touch /etc/exports #创建nfc的配置文件
mkdir -p /app/file #创建nfc共享文件目录
chown -R nfsnobody.nfsnobody /app/file/ #赋予共享目录nfs权限
echo "/app/file *(rw,sync)" >> /etc/exports #允许所有IP访问nfs共享目录并有可>读写权限
exportfs -rv #载入配置
systemctl enable nfs #开机自启动nfs
systemctl enable rpcbind #开机自启动rps
systemctl start nfs #启动nfs程序
systemctl start rpcbind #启动rps程序
touch /app/file/index.html #在共享目录下创建网页文件
echo "999vip
" >> /app/file/index.html #在网页文件中写入要显示的数据
[root@nginx1 ~]# ./nginx1 启动
运行结果如下表示已完成nfs服务部署

3.nginx服务器1部署
创建nginx1 给权限 进入 启动
[root@nginx1 ~]# touch nginx1                  创建
[root@nginx1 ~]# chmod 755 nginx1              给权限
[root@nginx1 ~]# vim nginx1                    进入
#!/bin/bash
#function: Centos7一键安装nginux
#author:999vip 20211117
yum -y install  gcc gcc-c++ autoconf automake libtool make openssl openssl-devel pcre pcre-devel #安装nginx所需环境
cd  /usr/local/src/                                                                              #切换>到安装目录
wget  http://nginx.org/download/nginx-1.8.1.tar.gz                                               #下载nginx到当前目录
tar -zxvf nginx-1.8.1.tar.gz                                                                     #解压nginx安装包
cd  nginx-1.8.1                                                                                  #进入>解压后目录
./configure \--prefix=/usr/local/nginx \--with-http_ssl_module \--with-http_flv_module \--with-http_stub_status_module \--with-http_gzip_static_module \--with-pcre                                                     #编译文件
make && make install                                                                             #编译>安装
cd  /usr/local/nginx                                                                             #进入nginx安装目录
sed -i '14s/nginx/BDQN/' /usr/local/nginx/html/index.html                                        #方便>测试区分将网页中nginx改为BDQN
/usr/local/nginx/sbin/nginx                                                                      #启动nginx服务
echo nginx部署完成,请测试web页面                                                                #屏幕>输出内容提醒用户
echo 接下来将部署nfs并映射html,请确认是否继续                                                    #屏幕>输出内容提醒用户
echo 键入任意值将继续操作,如需中断请按Ctrl+c                                                    #屏幕>输出内容提醒用户
read a                                                                                           #弹出>框暂停执行,用户键入任意值继续执行,键入值作为变量a但后续并不调用这个变量
yum install nfs-utils rpcbind  -y                                                                #安装nfs和rpc服务
systemctl enable nfs                                                                             #开机>自启动nfs服务
systemctl enable rpcbind                                                                         #开机>自启动rps服务
systemctl start nfs                                                                              #启动nfs服务
systemctl start rpcbind                                                                          #启动rpc服务
echo nfs服务安装完成,接下来将进行挂载操作                                                       #屏幕>输出内容提醒用户
echo 键入任意值将继续操作,如需中断请按Ctrl+c                                                    #屏幕>输出内容提醒用户
echo 请输入nfs服务器ip                                                                           #屏幕>输出内容提醒用户
read b                                                                                           #将键>入值作为变量b
mount -t nfs $b:/app/file /usr/local/nginx/html/                                                 #挂载nfs上的目录到nginx的html目录下

[root@nginx1 ~]# ./nginx1          启动
还要输入nfs的IP 看到这就成功了

4.nginx服务器2部署
创建nginx2 给权限 vim进入 启动
[root@nginx1 ~]# touch nginx2                 创建
[root@nginx1 ~]# chmod 755 nginx2             给权限
[root@nginx1 ~]# vim nginx2                   启动
#!/bin/bash
#function: Centos7一键安装nginux
#author:999vip 20211117
yum -y install  gcc gcc-c++ autoconf automake libtool make openssl openssl-devel pcre pcre-devel #安装nginx所需环境
cd  /usr/local/src/                                                                              #切换到安装目录
wget  http://nginx.org/download/nginx-1.8.1.tar.gz                                               #下载nginx到当前目录
tar -zxvf nginx-1.8.1.tar.gz                                                                     #解压nginx安装包
cd  nginx-1.8.1                                                                                  #进入解压后目录
./configure \--prefix=/usr/local/nginx \--with-http_ssl_module \--with-http_flv_module \--with-http_stub_status_module \--with-http_gzip_static_module \--with-pcre                                                     #编译文件
make && make install                                                                             #编译安装
cd  /usr/local/nginx                                                                             #进入nginx安装目录
/usr/local/nginx/sbin/nginx                                                                      #启动nginx服务
echo nginx部署完成,请测试web页面                                                                #屏幕输出内容提醒用户
echo 接下来将部署nfs并映射html,请确认是否继续                                                    #屏幕输出内容提醒用户
echo 键入任意值将继续操作,如需中断请按Ctrl+c                                                    #屏幕输出内容提醒用户
read a                                                                                           #弹出框暂停执行,用户键入任意值继续执行,键入值作为变量a但后续并不调用这个变量
yum install nfs-utils rpcbind  -y                                                                #安装nfs和rpc服务
systemctl enable nfs                                                                             #开机自启动nfs服务
systemctl enable rpcbind                                                                         #开机自启动rps服务
systemctl start nfs                                                                              #启动nfs服务
systemctl start rpcbind                                                                          #启动rpc服务
echo nfs服务安装完成,接下来将进行挂载操作                                                       #屏幕输出内容提醒用户
echo 键入任意值将继续操作,如需中断请按Ctrl+c                                                    #屏幕输出内容提醒用户
echo 请输入nfs服务器ip                                                                           #屏幕输出内容提醒用户
read b                                                                                           #将键入值作为变量b
mount -t nfs $b:/app/file /usr/local/nginx/html/                                                 #挂载nfs上的目录到nginx的html目录下

[root@nginx2 ~]# ./njinx2         启动
还要输入nfs的IP 看到这就成功了

查看

在nfs服务器配置文件中更改显示数据

