SAP CAP篇五:为CAP添加Fiori Elements程序(2)
本文目录
- 本系列之前的文章
- 新建Fiori Elements Application
-
- 选择Application Type
- Data Source
- Entity Selection
- Project Information
- Launchpad Setting
- 修改`manage-books`文件夹
-
- 子文件夹 `webapp`
- 重命名 `annotations.cds`
- 更新`fiori-service.cds`
- `manifest.json`
- 添加`services.cds`到`app`文件夹
- 添加`xs-app.json`到`app`文件夹
本系列之前的文章
SAP CAP篇一:快速创建一个Service,基于Java的实现
SAP CAP篇二:为Service加上数据库支持
SAP CAP篇三:定义Model
SAP CAP篇四:为CAP添加Fiori Elements程序(1)
新建Fiori Elements Application
通过VS Code的Fiori Tools Extension来新建"Fiori Elements Application”。通过VS Code的"View"菜单,选择"Command Palette",选择"Fiori: Open Application Generator"。
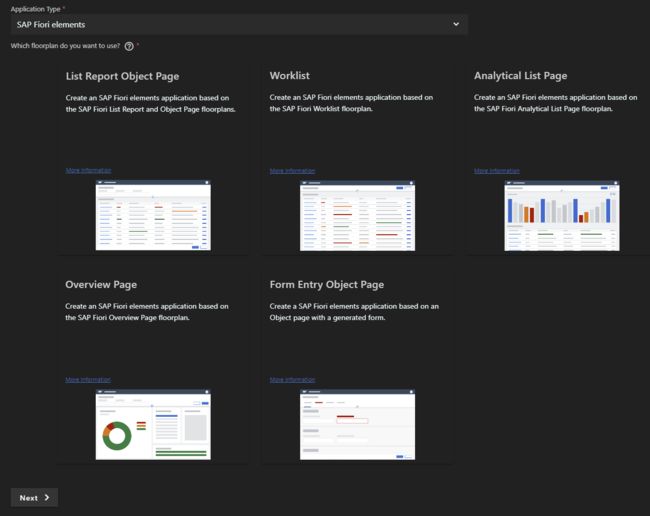
选择Application Type
选择Application Type为"List Report Object Page"。
Data Source
然后,选择"Data Source"为"Use a Local CAP Project",然后选择CAP Project文件夹。然后选择OData Service。这里选择"AdminService"。

Entity Selection
第三步,从OData Source中选择对应的Entity。

Project Information
填充Project Information。

其中,module name其实是folder名字。这里,需要“Add FLP configuration”。
Launchpad Setting
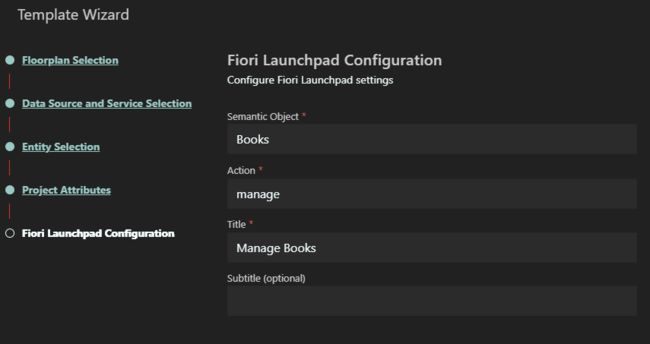
这里需要定义Semantic Object和Action。在SAP CAP篇四:为CAP添加Fiori Elements程序(1)中,最后的appconfig的文件中,对应了这里的Semantic Object和Action。
 "manage-books": {
     "semanticObject": "Books",
     "action": "manage",
     "signature": {
       "parameters": {},
       "additionalParameters": "allowed"
     },
     "resolutionResult": {
       "applicationType": "SAPUI5",
       "additionalInformation": "SAPUI5.Component=manage-books",
       "url": "/manage-books/webapp"
     }
 }
修改manage-books文件夹
子文件夹 webapp
该子文件夹中,除了i18n之外的文件夹之外,别的子文件夹都可以删除。
需要删除的子文件夹:
annotationslocalServicetest
重命名 annotations.cds
将annotations.cds重命名为fiori-service.cds。
更新fiori-service.cds
添加一下Annotations到fiori-service.cds。
using AdminService as service from '../../srv/admin-service';

annotate AdminService.Books with @odata.draft.enabled;
annotate AdminService.Books with @fiori.draft.enabled;


annotate AdminService.Books with @(
  UI: {
    SelectionFields: [ ID, price, currency_code ],
    LineItem: [
      {Value: title},
      {Value: price},
      {Value: currency.symbol, Label:' '},
    ]
  }
);
manifest.json
修改文件manifest.json,将dataSource的部分关于local annoation的部分删掉。
最后的dataSources如下:
"dataSources": {
   "mainService": {
     "uri": "/odata/v4/AdminService/",
     "type": "OData",
     "settings": {
       "odataVersion": "4.0"
     }
   }
},
添加services.cds到app文件夹
在app文件夹下添加services.cds:
using from './manage-books/Fiori-service';
添加xs-app.json到app文件夹
在app文件夹,添加xs-app.json:
{
	"welcomeFile": "/app/fiori.html",
	"authenticationMethod": "route",
	"routes": [
	  {
		"source": "^/app/(.*)$",
		"cacheControl": "no-cache, no-store, must-revalidate",
		"target": "$1",
		"localDir": "./"
	  },
	  {
		"source": "^/appconfig/(.*)$",
		"localDir": "./",
		"authenticationType": "xsuaa"
	  }
  ]
}
到面前为止,app文件夹已经初步准备完毕。下一篇会讲如何在SAP CAP (Java)来打开app文件夹来模拟Fiori Launchpad效果。