VUE 2X 条件&列表渲染 ⑧
目录
- 文章有误请指正,如果觉得对你有用,请点三连一波,蟹蟹支持✨
- V u e j s Vuejs Vuejs
- 条件渲染
- 列表渲染
- 基本列表
- Key的原理
- 列表过滤
- 列表排序
- 列表更新小问题
- 监测数据改变的原理~对象
- V u e S e t VueSet VueSet的使用
- V u e Vue Vue监测数据改变的原理~数组及总结
- 总结
文章有误请指正,如果觉得对你有用,请点三连一波,蟹蟹支持✨
                    ⡖⠒⠒⠒⠤⢄⠀⠀⠀
⠀⠀⠀⠀⠀⠀⠀⠀⠀⠀⠀⠀⠀⠀⠀⢸   ⠀⠀⠀⡼⠀⠀⠀⠀ ⠀
⠀⠀⠀⠀⠀⠀⠀⠀⠀⠀⠀⠀⢶⣲⡴⣗⣲⡦⢤⡏⠀⠀⠀⠀⠀
⠀⠀⠀⠀⠀⠀⠀⠀⠀⠀⠀⠀⣰⠋⠉⠉⠓⠛⠿⢷⣶⣦⠀⠀⠀
⠀⠀⠀⠀⠀⠀⠀⠀⠀⠀⠀⢠⠇⠀⠀⠀⠀⠀⠀⠘⡇⠀⠀⠀⠀
⠀⠀⠀⠀⠀⠀⠀⠀⠀⠀⠀⡞⠀⠀⠀⠀⠀⠀⠀⢰⠇⠀⠀⠀⠀
⠀⠀⠀⠀⠀⠀⠀⠀⡴⠊⠉⠳⡄⠀⢀⣀⣀⡀⠀⣸⠀⠀⠀⠀⠀
⠀⠀⠀⠀⠀⠀⠀⢸⠃⠀⠰⠆⣿⡞⠉⠀⠀⠉⠲⡏⠀⠀⠀⠀⠀
⠀⠀⠀⠀⠀⠀⠀⠈⢧⡀⣀⡴⠛⡇⠀⠈⠃⠀⠀⡗⠀⠀⠀⠀⠀
⠀⠀⠀⠀⠀⠀⠀⠀⠀⣿⣱⠃⡴⠙⠢⠤⣀⠤⡾⠁⠀⠀⠀⠀⠀
⠀⠀⠀⠀⠀⠀⠀⠀⢀⡇⣇⡼⠁⠀⠀⠀⠀⢰⠃⠀⠀⠀⠀⠀⠀
⠀⠀⠀⠀⠀⠀⠀⠀⣸⢠⣉⣀⡴⠙⠀⠀⠀⣼⠀⠀⠀⠀⠀⠀⠀
⠀⠀⠀⠀⠀⠀⠀⠀⡏⠀⠈⠁⠀⠀⠀⠀⢀⡇⠀⠀⠀⠀⠀⠀⠀
⠀⠀⠀⠀⠀⠀⠀⢸⠃⠀⠀⠀⠀⠀⠀⠀⡼⠀⠀⠀⠀⠀⠀⠀⠀
⠀⠀⠀⠀⠀⠀⠀⢸⠀⠀⠀⠀⠀⠀⠀⣰⠃⠀⠀⠀⠀⠀⠀⠀⠀
⠀⠀⠀⠀⠀⣀⠤⠚⣶⡀⢠⠄⡰⠃⣠⣇⠀⠀⠀⠀⠀⠀⠀⠀⠀
⠀⢀⣠⠔⣋⣷⣠⡞⠀⠉⠙⠛⠋⢩⡀⠈⠳⣄⠀⠀⠀⠀⠀⠀⠀
⠀⡏⢴⠋⠁⠀⣸⠁⠀⠀⠀⠀⠀ ⠀⣹⢦⣶⡛⠳⣄⠀⠀⠀⠀⠀
⠀⠙⣌⠳⣄⠀⡇   不能   ⡏⠀⠀  ⠈⠳⡌⣦⠀⠀⠀⠀
⠀⠀⠈⢳⣈⣻⡇   白嫖 ⢰⣇⣀⡠⠴⢊⡡⠋⠀⠀⠀⠀
⠀⠀⠀⠀⠳⢿⡇⠀⠀⠀⠀⠀⠀⢸⣻⣶⡶⠊⠁⠀⠀
⠀⠀⠀⠀⠀⢠⠟⠙⠓⠒⠒⠒⠒⢾⡛⠋⠁⠀⠀⠀⠀⠀⠀⠀⠀
⠀⠀⠀⠀⣠⠏⠀⣸⠏⠉⠉⠳⣄⠀⠙⢆⠀⠀⠀⠀⠀⠀⠀⠀⠀
⠀⠀⠀⡰⠃⠀⡴⠃⠀⠀⠀⠀⠈⢦⡀⠈⠳⡄⠀⠀⠀⠀⠀⠀⠀
⠀⠀⣸⠳⣤⠎⠀⠀⠀⠀⠀⠀⠀⠀⠙⢄⡤⢯⡀⠀⠀⠀⠀⠀⠀
⠀⠐⡇⠸⡅⠀⠀⠀⠀⠀⠀⠀⠀⠀⠀⠀⠹⡆⢳⠀⠀⠀⠀⠀⠀
⠀⠀⠹⡄⠹⡄⠀⠀⠀⠀⠀⠀⠀⠀⠀⠀⠀⣇⠸⡆⠀⠀⠀⠀⠀
⠀⠀⠀⠹⡄⢳⡀⠀⠀⠀⠀⠀⠀⠀⠀⠀⠀⢹⡀⣧⠀⠀⠀⠀⠀
⠀⠀⠀⠀⢹⡤⠳⡄⠀⠀⠀⠀⠀⠀⠀⠀⠀⢀⣷⠚⣆⠀⠀⠀⠀
⠀⠀⠀⡠⠊⠉⠉⢹⡀⠀⠀⠀⠀⠀⠀⠀⠀⢸⡎⠉⠀⠙⢦⡀⠀
⠀⠀⠾⠤⠤⠶⠒⠊⠀⠀⠀⠀⠀⠀⠀⠀⠀⠀⠉⠙⠒⠲⠤⠽
提示:以下是本篇文章正文内容
V u e j s Vuejs Vuejs
简介 : Vue 是一套用于构建用户界面的 渐进式 框架。与其它大型框架不同的是,Vue 被设计为可以自底向上逐层应用。Vue 的核心库只关注视图层,不仅易于上手,还便于与第三方库或既有项目整合。另一方面,当与现代化的工具链以及各种支持类库结合使用时,Vue 也完全能够为复杂的单页应用提供驱动。
- 官方
- 中文 : https://cn.vuejs.org/
- 英文 : https://vuejs.org/
- Vue2API : https://v2.cn.vuejs.org/
- Vue2 相关包 : https://github.com/vuejs/awesome-vue
- Vue2 入门安装官方 :https://v2.cn.vuejs.org/v2/guide/installation.html
- Vue 相关插件 : https://awesomejs.dev/for/vue/
条件渲染
-
条件渲染指令
- v-if与v-else
- v-show
–
-
v-if VS v-show
- 如果需要频繁切换 v-show 较好
- 当条件不成立时, v-if的所有子节点不会解析(项目中使用)
—代码演示
<!DOCTYPE html>
<html>

<head>
	<meta charset="UTF-8" />
	<title>条件渲染</title>
	<script type="text/javascript" src="../js/vue.js"></script>
	<style>
		img {
			width: 100px;
		}
	</style>
</head>

<body>
	<!-- 准备好一个容器-->
	<div id="root">
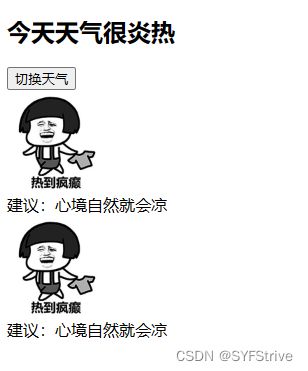
		<h2>今天天气很{{isHot ? '炎热' : '凉爽'}}</h2>
		<button @click="isHot = !isHot">切换天气</button>

		<!-- 使用v-show做条件渲染 -->
		<!-- 只有天气炎热,才会展示下面的div -->
		<div v-show="isHot">
			<img src="https://s3.ax1x.com/2020/12/13/reC1IA.jpg" alt=""><br />
			<span>建议:心境自然就会凉</span>
		</div>

		<!-- 只有天气凉爽,才会展示下面的div -->
		<div v-show="!isHot">
			<img src="https://s3.ax1x.com/2020/12/13/reCaqg.jpg" alt=""><br />
			<span>建议:妈妈告诉你要穿秋裤了</span>
		</div>

		<!-- ---------------------------------------------------------- -->

		<!-- 使用v-if、v-else-if、v-else做条件渲染 -->
		<div v-if="isHot">
			<img src="https://s3.ax1x.com/2020/12/13/reC1IA.jpg" alt=""><br />
			<span>建议:心境自然就会凉</span>
		</div>

		<div v-else>
			<img src="https://s3.ax1x.com/2020/12/13/reCaqg.jpg" alt=""><br />
			<span>建议:妈妈告诉你要穿秋裤了</span>
		</div>

	</div>

	<script type="text/javascript">
		const vm = new Vue({
			el: "#root",
			data: {
				isHot: false
			}
		})
	</script>
</body>

</html>
效果
列表渲染
-
列表显示指令
- 遍历数组: v-for / index
- 遍历对象: v-for / key
基本列表
— 基本列表 代码演示
<!DOCTYPE html>
<html>

<head>
	<meta charset="UTF-8" />
	<title>基本列表</title>
	<script type="text/javascript" src="../js/vue.js"></script>
</head>

<body>
	<!-- 准备好一个容器-->
	<div id="root">
		<h2>人员列表</h2>
		<ul>
			<!-- 使用v-for遍历数组 -->
			<li v-for="(p,index) in persons" :key="p.id">
				{{p.name}}--{{p.sex}}--{{p.age}}岁
			</li>
		</ul>
		<h2>汽车信息</h2>
		<ul>
			<!-- 使用v-for遍历对象 -->
			<li v-for="(value,key) in car" :key="key">{{value}}</li>
		</ul>
	</div>

	<script type="text/javascript">
		new Vue({
			el: '#root',
			data: {
				persons: [
					{ id: '001', name: '老刘', age: 20, sex: '男' },
					{ id: '002', name: '老李', age: 19, sex: '女' },
					{ id: '003', name: '老王', age: 18, sex: '男' },
					{ id: '004', name: '老张', age: 17, sex: '女' },
				],
				car: {
					name: '奔驰c63',
					price: '60万',
					color: '灰色'
				},
				str: 'abcde',
			}
		})
	</script>
</body>

</html>
Key的原理
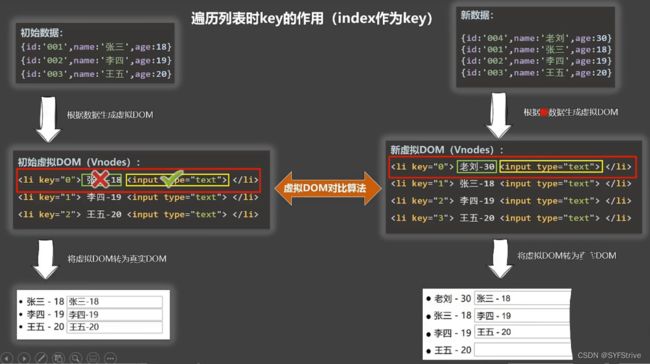
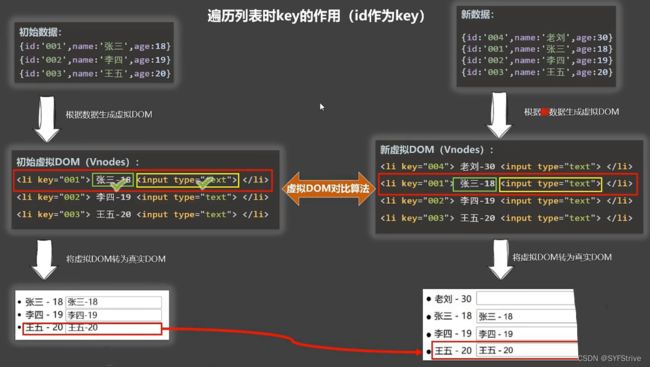
— Key的原理 DIFF~
index 作为Key
id 作为Key
代码演示
<!DOCTYPE html>
<html>

<head>
	<meta charset="UTF-8" />
	<title>key的原理</title>
	<script type="text/javascript" src="../js/vue.js"></script>
</head>

<body>
	<!-- 准备好一个容器-->
	<div id="root">
		<!-- 遍历数组 -->
		<h2>人员列表(遍历数组)</h2>
		<button @click.once="add">添加一个老刘</button>
		<ul>
			<li v-for="(p,index) of persons" :key="index">
				{{p.name}}-{{p.age}}
				<input type="text">
			</li>
		</ul>
	</div>

	<script type="text/javascript">
		Vue.config.productionTip = false

		new Vue({
			el: '#root',
			data: {
				persons: [
					{ id: '001', name: '张三', age: 18 },
					{ id: '002', name: '李四', age: 19 },
					{ id: '003', name: '王五', age: 20 }
				]
			},
			methods: {
				add() {
					const p = { id: '004', name: '老刘', age: 40 }
					this.persons.unshift(p)
				}
			},
		})
	</script>

</html>
列表过滤
— 列表过滤 代码演示
<!DOCTYPE html>
<html>

<head>
	<meta charset="UTF-8" />
	<title>基本列表</title>
	<script type="text/javascript" src="../js/vue.js"></script>
</head>

<body>
	<!--
		-->
	<!-- 准备好一个容器-->
	<div id="root">
		<h2>人员列表</h2>
		<input v-model="keyWord" type="text" placeholder="请输入姓名">
		<ul>
			<li v-for="(p,index) in fmtPersons" :key="p.id">
				{{p.name}}--{{p.sex}}--{{p.age}}岁
			</li>
		</ul>
	</div>

	<script type="text/javascript">
		new Vue({
			el: '#root',
			data: {
				keyWord: '',
				persons: [
					{ id: '001', name: '马冬梅', age: 35, sex: '女' },
					{ id: '002', name: '周冬雨', age: 20, sex: '女' },
					{ id: '003', name: '周杰伦', age: 41, sex: '男' },
					{ id: '004', name: '温兆伦', age: 25, sex: '男' },
				]
			},

			//使用computed过滤,优势:不影响原数据
			computed: {
				fmtPersons() {
					const { persons, keyWord } = this
					return persons.filter(p => p.name.indexOf(keyWord) !== -1)
				}
			}

			//在watch修改原数据,会导致原数据的丢失
			/* watch:{
				keyWord(value){
					const arr = this.persons.filter( p => p.name.indexOf(value) !== -1)
					this.persons = arr
				}
			} */
		})
	</script>
</body>

</html>
注意 : 想要对数据加工后再展示,且不想破坏原数据,最好用计算属性。
列表排序
— 基本列表 代码演示
<!DOCTYPE html>
<html>

<head>
	<meta charset="UTF-8" />
	<title>列表排序</title>
	<script type="text/javascript" src="../js/vue.js"></script>
</head>

<body>
	<!-- 准备好一个容器-->
	<div id="root">
		<h2>人员列表</h2>
		<input v-model="keyWord" type="text" placeholder="请输入姓名">
		<button @click="sortType = 1">年龄升序↓</button>
		<button @click="sortType = 2">年龄降序↓</button>
		<button @click="sortType = 0">原顺序</button>
		<ul>
			<li v-for="(p,index) in fmtPersons" :key="p.id">
				{{p.name}}--{{p.sex}}--{{p.age}}岁
			</li>
		</ul>
	</div>

	<script type="text/javascript">
		new Vue({
			el: '#root',
			data: {
				keyWord: '',
				sortType: 0, //0原顺序 1升序  2降序
				persons: [
					{ id: '001', name: '马冬梅', age: 35, sex: '女' },
					{ id: '002', name: '周冬雨', age: 20, sex: '女' },
					{ id: '003', name: '周杰伦', age: 41, sex: '男' },
					{ id: '004', name: '温兆伦', age: 25, sex: '男' },
				]
			},

			//使用computed过滤,优势:不影响原数据
			computed: {
				fmtPersons() {
					const { persons, keyWord, sortType } = this
					//根据关键词过滤
					let arr = persons.filter(p => p.name.indexOf(keyWord) !== -1)
					//若需要排序
					if (sortType) {
						//排序
						arr.sort((a, b) => {
							if (sortType === 1) return a.age - b.age
							else return b.age - a.age
						})
					}
					return arr
				}
			}
		})
	</script>
</body>

</html>
注意 : 想要对数据加工后再展示,且不想破坏原数据,最好用计算属性。
列表更新小问题
— 基本列表 代码演示
methods:{
	updateMei(){
		console.log(this)
		// this.persons[0].name = '小佩奇' //代码奏效
		// this.persons[0].age = 99 //代码奏效
		// this.persons[0].sex = '男' //代码奏效
		this.persons[0] = {name:'小佩奇',age:99,sex:'男'} //不奏效
	}
},
监测数据改变的原理~对象
— 监测数据 代码演示
Document
V u e S e t VueSet VueSet的使用
— 代码演示
"UTF-8" />
Vue监测数据改变的原理
"root">
学生信息
"student.sex">性别:{{student.sex}}
年龄:真实{{student.age.rAge}},对外{{student.age.sAge}}
V u e Vue Vue监测数据改变的原理~数组及总结
- 修改数组数据 参考文档 :https://v2.cn.vuejs.org/v2/guide/list.html
— 代码演示
methods: {
	addSex(){
		// Vue.set(this.student,'sex','男')
		this.$set(this.student,'sex','男')
	},
	addFriend(){
		this.student.friends.unshift({name:'jack',age:70})
	},
	updateFirstFriendName(){
		this.student.friends[0].name = '张三'
	},
	addHobby(){
		this.student.hobby.push('学习')
	},
	updateHobby(){
		// this.student.hobby.splice(0,1,'开车')
		// Vue.set(this.student.hobby,0,'开车')
		this.$set(this.student.hobby,0,'开车')
	},
	removeSmoke(){
		this.student.hobby = this.student.hobby.filter((h)=>{
			return h !== '抽烟'
		})
	}
}
总结
以上是个人学习Vue的相关知识点,一点一滴的记录了下来,有问题请评论区指正,共同进步,这才是我写文章的原因之,如果这篇文章对您有帮助请三连支持一波


