SpringBoot相关知识
SpringBoot知识
1 SpringBoot 介绍及其使用原因
Spring Boot是一个用于创建独立的、基于Java的生产级别的应用程序的框架。它旨在简化Spring应用程序的开发过程,减少开发人员的配置工作,从而提高开发效率。
原因:
(1) 简化开发:Spring Boot通过自动配置和约定优于配置的原则,大大简化了Spring应用程序的开发过程。减少了繁琐的配置和集成工作,开发人员可以更专注于业务逻辑的实现。
(2) 快速启动和部署:Spring Boot内置了多个常用的服务器,例如 Tomcat、Jetty等。可以将应用程序打包成可执行的JAR文件,直接运行,无需额外的服务器安装和配置。
(3)微服务架构支持:Spring Boot对构建微服务架构提供了良好的支持。它提供了各种特性,易于扩展的RESTful API开发、服务注册与发现、配置中心等,可以帮助开发人员快速构建和管理微服务应用程序。
(4)== 生态系统丰富==:Spring Boot建立在Spring Framework的基础上,继承了Spring的强大生态系统。开发人员可以轻松地集成各种Spring模块和第三方库,如Spring Data、Spring Security、Spring Cloud等,以及其他开源组件和工具,加快开发速度。
(5)易于测试和维护:Spring Boot鼓励良好的测试实践,并提供了测试工具和支持。开发人员可以使用各种测试框架和工具对应用程序进行全面的自动化测试,确保代码的质量和稳定性。此外,Spring Boot的模块化结构和清晰的约定使得应用程序的维护更加容易。
(6)应用监控:Spring Boot提供一系列端点可以监控服务及应用,做健康检测。
2 如何构建SpringBoot项目
(1) 通过Web界面使用。http://start.spring.io,快速构建SpringBoot项目,设置项目的依赖等,然后设置完下载导入到自己的环境中即可。这种方法快速简捷,但是构建项目的时候,SpringBoot版本选择比较少,往往是最新的版本。
(2) 通过IDEA以及maven来构建。(本人推荐这种方式来创建,可以指定SpringBoot版本)
下图就是IDEA和maven构建的
在项目的pom.xml添加, 继承spring-boot-starter-parent
<parent>
        <groupId>org.springframework.bootgroupId>
        <artifactId>spring-boot-starter-parentartifactId>
        <version>2.3.4.RELEASEversion>
    parent>
点击spring-boot-starter-parent,进入,我们可以看到许多依赖。
3 SpringBoot的配置文件及其格式
配置文件:
Spring Boot 的核心配置文件是 application 和 bootstrap 配置文件。
application:用于 Spring Boot 项目的自动化配置。
bootstrap:
boostrap 由父 应用上下文加载,比 applicaton 优先加载。优先级更高。
boostrap 里面的属性不能被覆盖,通常在使用 Spring Cloud Config 配置中心时,这时需要在 bootstrap 配置文件中添加连接到配置中心的配置属性;
bootstrap里面配置通常涉及加密,解密的场景
配置文件格式:
.properties 和 .yml
例如:用.properties配置项目的端口:
server.port: 8080
用.yml配置项目的端口
server:
  port: 8080
注意:用yml配置文件一定注意层级。
配置文件优先级: SpringBoot配置文件可以放到多个位置,但是优先级不同。
这里由于涉及图,于是自已画了个图,因为更直观。图画得丑,请见谅。 见下图

大致展示了一个SpringBoot项目目录,图中的1 2 3 4,刚好是配置文件的加载优先级,数字越小,优先级越高。使用的最多就是4。
4 SpringBoot项目的启动方式
(1)打包命令或者放到容器中运行。
(2)用 Maven/ Gradle 插件运行。
(3)直接执行 main 方法运行。、
5 SpringBoot注解
@SpringBootApplication 标记项目是SpringBoot应用。主要组合包含了以下 3 个注解: @SpringBootConfiguration:组合了 @Configuration 注解,实现配置文件的功能。
@EnableAutoConfiguration:打开自动配置的功能,
也可以关闭某个自动配置的选项,如关闭数据源自动配置功能:(比如在开发时,有的微服务不需要访问数据库) @SpringBootApplication(exclude = { DataSourceAutoConfiguration.class })。
@ComponentScan:Spring组件扫描。
6 假设我们的SpringBoot项目需要兼容Spring项目,该怎么配置呢
在SpringBoot的主启动类,使用注解@ImportResource(locations = {“classpath:spring.xml”}),导入Spring配置文件。
7 SpringBoot配置热部署
热部署: 指在应用程序运行期间,对应用程序的部分或全部代码进行修改后,无需重启应用程序,即可使修改的代码生效。
在Spring Boot中实现热部署可以提高开发效率,下面介绍两种常用的热部署方式:
(1)使用Spring Boot DevTools
在项目的pom.xml文件中添加DevTools依赖:
<dependency>
    <groupId>org.springframework.bootgroupId>
    <artifactId>spring-boot-devtoolsartifactId>
    <scope>runtimescope>
dependency>
在IDEA中,打开项目的设置(Preferences)窗口,选择“Build, Execution, Deployment” -> “Compiler”,并勾选“Build project automatically”选项。
运行应用程序时,可以在IDEA的“Run”菜单中选择“Enable Auto-Reload”选项来开启自动重载功能。
(2) 使用Spring Loaded或JRebel
8 SpringBoot和日志
Spring Boot 支持 Java Util Logging, Log4j2, Lockback 作为日志框架,如果使用 Starters 启动器,Spring Boot 将使用 Logback 作为默认日志框架。如果需要自定义日志输出,比如输出到文件和控制台,那么需要自定义日志配置文件。比如,用Lockback。在前面的博文提到过。
9 SpringBoot读取配置文件的方式
主要有以下注解:@PropertySource, @Value, @Environment, @ConfigurationProperties 来绑定变量。下面用案例讲解最常用的两种方式。
(1)Value注解
例如,在application.properties或application.yml中定义了一个属性:
spring:
  application:
    name: service-core # 服务名
然后在需要读取该属性的类中使用@Value注解:
@Component
public class MyComponent {
    @Value("${spring.application.name}")
    private String appName;

    // ...
}
appName属性将会被注入为service-core。
(2) ConfigurationProperties 注解
配置文件如案例(1),创建一个用于存储配置属性的Java类,并使用@ConfigurationProperties注解指定前缀。例如,创建一个名为MyConfig的类:
@Component
@Data
@ConfigurationProperties(prefix = "spring.application")
public class MyConfig {
    private String name;
}
在配置文件中,将属性以指定前缀的方式进行设置, MyConfig类中的name属性将会被自动注入为service-core。
10 SpringBoot整合渲染视图模板
在Spring Boot中,可以通过整合渲染视图模板来生成动态的HTML页面。Spring Boot支持多种视图模板引擎,如Thymeleaf、Freemarker、Velocity等。下面以Thymeleaf为例,介绍如何整合并渲染视图模板。
Thymeleaf是一款用于渲染XML/XHTML/HTML5内容的模板引擎。 它可以轻易的与Spring MVC等Web框架进行集成作为Web应用的模板引擎。与其它模板引擎相比, Thymeleaf最大的特点是能够直接在浏览器中打开并正确显示模板页面,而不需要启动整个Web应用。
首先,我们利用maven和IDEA创建一个springBoot项目名为demo。
pom.xml导入的依赖如下:
 <parent>
        <groupId>org.springframework.bootgroupId>
        <artifactId>spring-boot-starter-parentartifactId>
        <version>2.3.4.RELEASEversion>
        <relativePath/>
    parent>

    <dependencies>
        <dependency>
            <groupId>org.springframework.bootgroupId>
            <artifactId>spring-boot-starter-webartifactId>
        dependency>
        <dependency>
            <groupId>org.springframework.bootgroupId>
            <artifactId>spring-boot-starter-thymeleafartifactId>
        dependency>

    dependencies>
然后创建主启动类和controller包,在resources目录下创建templates目录(这里存放的是静态HTML页面),配置文件配置端口8280; 项目结构如下:

DemoController文件内容如下:
@Controller
@RequestMapping("/demo")
public class DemoController {

    @GetMapping("index")
    public String index(){
        return "index";  // 渲染路径 默认是 /resources/templates;
    }
}
视图默认路径是resources/templates, 这个可以从源码可以看到,如下图,这里是针对thymeleaf。当然,也可以自定义路径,不过需要配置,这里不再赘述。

index.html页面内容如下
DOCTYPE html>
<html lang="en">
<head>
<meta charset="UTF-8">
<title>测试title>
head>
<body>
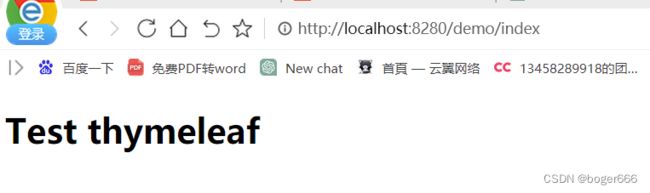
<h1>Test thymeleafh1>
body>
html>
启动程序 访问localhost:8280/demo/index,访问成功。
下面来整合thymeleaf,进行渲染页面。
首先将index.html页面 的 改为 引入thymeleaf。
测试1: th:text 渲染文本 th:value 给标签进行赋值
后端代码
 @GetMapping("index")
    public String index(HttpServletRequest request){
        request.setAttribute("name","boger");  // 设置数据;
        return "index";  // 渲染路径 默认是 /resources/templates;
    }
前端: index.html页面 来获取
<p th:text="hello + ${name}" th:value="${name}">p>
访问 localhost:8280/demo/index,测试成功。
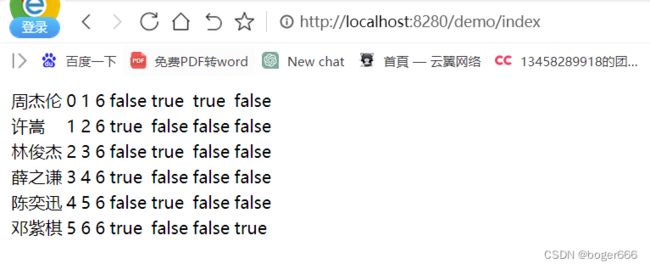
测试2: ==thymeleaf的循环 th:each ==
后端代码: 添加一个集合,设置多条数据
@GetMapping("index")
    public String index(HttpServletRequest request){
        // request.setAttribute("name","boger");
        List<String> list = Arrays.asList("周杰伦","许嵩","林俊杰","薛之谦","陈奕迅","邓紫棋");
        request.setAttribute("arrayList",list);
        return "index";  // 渲染路径 默认是 /resources/templates;
    }
前端代码:
<table>

    <tr th:each="s,stat: ${arrayList}">
        <td th:text="${s}">td>
        <td th:text="${stat.index}">td>
        <td th:text="${stat.count}">td>
        <td th:text="${stat.size}">td>
        <td th:text="${stat.even}">td>
        <td th:text="${stat.odd}">td>
        <td th:text="${stat.first}">td>
        <td th:text="${stat.last}">td>
    tr>
table>
stat 称作状态变量,属性有
index:当前迭代对象的 index(从 0 开始计算)
count:当前迭代对象的 index(从 1 开始计算)
size:被迭代对象的大小
even/odd:布尔值,当前循环是否是偶数/奇数
first:布尔值,当前循环是否是第一个
last:布尔值,当前循环是否是最后一个
访问 localhost:8280/demo/index,测试成功。如下图
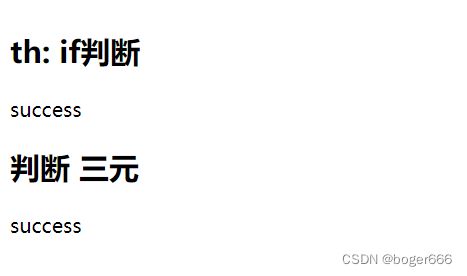
测试3: thymeleaf的if判断 th:if 条件成立显示 th:unless 条件不成立的时候才会显示内容
后端代码:
 @GetMapping("index")
    public String index(HttpServletRequest request, Model model){
        // request.setAttribute("name","boger");
        //List list = Arrays.asList("周杰伦","许嵩","林俊杰","薛之谦","陈奕迅","邓紫棋");
        // request.setAttribute("arrayList",list);
        model.addAttribute("age",20);
        return "index";  // 渲染路径 默认是 /resources/templates;
    }
前端代码:
<h2>th: if判断h2>
<div th:if="${age}>=20" th:text="success">div>
<div th:if="${age}<20" th:text="failure">div>

<div th:if="${age}==20" th:href="@{http://www.qq.com/}">div>
<a th:unless="${age != 18}" th:href="@{http://www.baidu.com/}" >baidua>
<h2>判断 三元h2>
<div th:text="${age}>=20?'success':'failure'">div>
访问 localhost:8280/demo/index,测试成功。如下图
当然,还有其他的语法,都可以尝试一下,我这里也只是测试了几个案例。今天就到这里吧,下期再见。