Android动态加载apk或jar文件
1、前言
插件化要解决的三个核心问题:类加载、资源加载、组件生命周期管理。
在Android插件化中其原理实际是 Java ClassLoader的原理,此博文主要对Android插件化中类加载中的DexClassLoader做总结,便于之后对Android插件化的理解学习。
Android的Dalvik虚拟机和Java虚拟机的运行原理相同都是将对应的java类加载在内存中运行。而Java虚拟机是加载class文件,也可以将一段二进制流通过defineClass方法生产Class进行加载。Dalvik虚拟机加载的dex文件。dex文件是Android对与Class文件做的优化,以便于提高手机的性能。可以想象dex为class文件的一个压缩文件。dex在Android中的加载和class在jvm中的相同都是基于双亲委派模型,都是调用ClassLoader的loadClass方法加载类。
2、DexClassLoader和PathClassLoader区别
Android 也有自己的 ClassLoader,分为 DexClassLoader和PathClassLoader,这两者有什么区别和关联呢?
阅读源码可以看到两者的构造方法分别为:
public class PathClassLoader extends BaseDexClassLoader {
    public PathClassLoader(String dexPath, ClassLoader parent) {
        super(dexPath, null, null, parent);
    }
    public PathClassLoader(String dexPath, String libraryPath,
            ClassLoader parent) {
        super(dexPath, null, libraryPath, parent);
    }
}

public class DexClassLoader extends BaseDexClassLoader {
    public DexClassLoader(String dexPath, String optimizedDirectory,
            String libraryPath, ClassLoader parent) {
        super(dexPath, new File(optimizedDirectory), libraryPath, parent);
    }
}
可以发现DexClassLoader 比 PathClassLoader 多一个参数String optimizedDirectory,那这个参数具体做什么的呢?继续查看源码我们可以知道optimizedDirectory是用来缓存我们需要加载的dex文件的,并创建一个DexFile对象,如果它为null,那么会直接使用dex文件原有的路径来创建DexFile 对象,其具体体现在如下代码区域:
private static DexFile loadDexFile(File file, File optimizedDirectory)
        throws IOException {
    if (optimizedDirectory == null) {
        return new DexFile(file);
    } else {
        String optimizedPath = optimizedPathFor(file, optimizedDirectory);
        return DexFile.loadDex(file.getPath(), optimizedPath, 0);
    }
}
因此两者区别在于 PathClassLoader 不能直接从 zip 包中得到 dex,因此只支持直接操作 dex 文件或者已经安装过的 apk。而 DexClassLoader 可以加载外部的 apk、jar 或 dex文件,并且会在指定的 outpath 路径存放其 dex 文件。所以在插件化中我们使用DexClassLoader来加载class的,接下来讲解DexClassLoader的用法。
3、DexClassLoader用法
其构造方法为:
DexClassLoader(
	String dexPath,
	String optimizedDirectory,
	String librarySearchPath,
 	ClassLoader parent)
dexPath:被解压的apk路径,不能为空。
optimizedDirectory:解压后的.dex文件的存储路径,不能为空。这个路径强烈建议使用应用程序的私有路径,不要放到sdcard上,否则代码容易被注入攻击。
libraryPath:os库的存放路径,可以为空,若有os库,必须填写。
parent:父亲加载器,一般为context.getClassLoader(),使用当前上下文的类加载器。
接下来讲解具体使用流程:
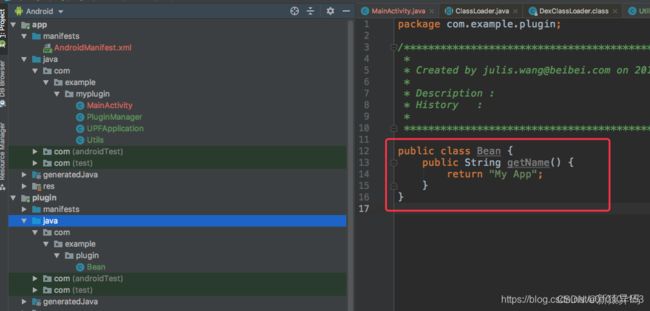
1、新建一个名为plugin的project,其中新建一个Bean类,只有一个方法getName()返回一个字符串“My App",然后对plugin这个工程打包为apk,将apk放在主工程的asser目录中。
2、构造Classloader
  File extractFile = getFileStreamPath("app-debug.apk");
  String dexPath = extractFile.getPath();
  File fileRelease = getDir("dex", 0);
  ClassLoader classLoader = new DexClassLoader(dexPath, fileRelease.getAbsolutePath(), null, getClassLoader());
3、利用构造好的Classloader反射调用插件类中的方法
  Class mLoadClassBean;
  try {
        mLoadClassBean = classLoader.loadClass("com.example.plugin.Bean");
        Object beanObject = mLoadClassBean.newInstance();
        Method getNameMethod = mLoadClassBean.getMethod("getName");
        getNameMethod.setAccessible(true);
        String name = (String) getNameMethod.invoke(beanObject);
        Log.e("julis", name);
    } catch(Exception e) {
        e.printStackTrace();
    }
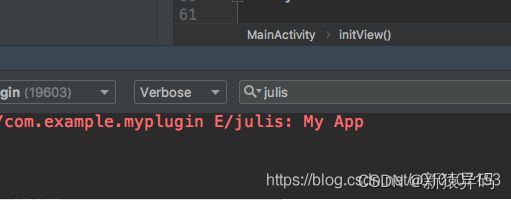
成功打印出结果:
参考:
https://www.jianshu.com/p/4b4f1fa6633c
https://www.jianshu.com/p/53aa2de20cf8
https://cloud.tencent.com/developer/article/1071815
————————————————
版权声明:本文为CSDN博主「落叶挽歌」的原创文章,遵循CC 4.0 BY-SA版权协议,转载请附上原文出处链接及本声明。
原文链接:https://blog.csdn.net/u010107153/article/details/100082921

