Observability:如何把 Elastic Agent 采集的数据输入到 Logstash 并最终写入到 Elasticsearch
在之前的文章 “安装独立的 Elastic Agents 并采集数据 - Elastic Stack 8.0”,我们详述了如何使用 No Fleet Server 来把数据写入到 Elasticsearch 中。在今天的文章中,我们来详述如下使用 Elastic Agents 在独立(standalone)模式下来采集数据并把数据最终通过 Logstash 来写入到 Elasticsearch 中去。
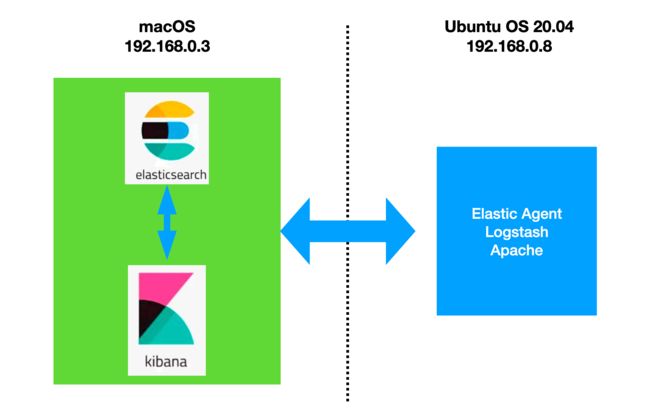
在今天的练习中,我将使用如下的架构来搭建我的测试环境:
我在 macOS 下安装 Elasticsearch 及 Kibana,在 Ubuntu OS 下安装 Apache, Elastic Agent 及 Logstash。在本展示中,我将使用最新的 Elastic Stack 8.8.1 来进行展示。
安装
Elasticsearch 及 Kibana
如果你还没有安装好自己的 Elasticsearch 及 Kibana,请参考如下的文章来进行安装:
-
如何在 Linux,MacOS 及 Windows 上进行安装 Elasticsearch
-
Kibana:如何在 Linux,MacOS 及 Windows 上安装 Elastic 栈中的 Kibana
在安装的时候,需要特别注意的是:请选择 Elastic Stack 8.x 的安装指南来进行安装。在默认的情形下,Elasticsearch 的访问是带 HTTPS 访问的。
Elastic Agent
我们可以到 Elastic 的官方网站 Download Elastic Products | Elastic 下载和 Elasticsearch 版本一致的并且和自己电脑操作系统匹配的安装包。
wget https://artifacts.elastic.co/downloads/beats/elastic-agent/elastic-agent-8.8.1-linux-arm64.tar.gz

tar xzf elastic-agent-8.8.1-linux-arm64.tar.gz

cd elastic-agent-8.8.1-linux-arm64
我们可以在当前的目录下看到如下的文件:
 pwd
/home/parallels/fleet/elastic-agent-8.8.1-linux-arm64
parallels@ubuntu2004:~/fleet/elastic-agent-8.8.1-linux-arm64$ ls
data  elastic-agent  elastic-agent.reference.yml  elastic-agent.yml  fleet.enc.lock  LICENSE.txt  NOTICE.txt  README.m
在上面的 elastic-agent.yml 文件就 Elastic Agent 的配置文件。有关 Elastic Agent 在 standalone 模式下的配置请详细参阅 Elastic 官方链接 Install standalone Elastic Agents (advanced users) | Fleet and Elastic Agent Guide [8.8] | Elastic。
我们首先来尝试直接把 Elastic Agent 的数据发送至 Elasticsearch。如果我们打开 默认的 elastic-agent.yml 文件,我们会发现,在缺省的情况下,它会采集系统的 metrics。在这里,我们先不引入任何的 integration。我们打开 elastic-agent.yml 文件:
如上所示,为了方便展示,我使用超级用户 elastic 来进行配置。这在实际的使用中,我们并不建议。你需要根据自己的需求创建一个合适权限的账号来进行配置。另外上面的 fingerprint 也是可以在 Elasticsearch 第一次启动的时候,在 terminal 的输出中可以找到。
你也可以在 config/kibana.yml 的文件最后部分找到。你也可以通过阅读文章 “Elasticsearch:关于在 Python 中使用 Elasticsearch 你需要知道的一切 - 8.x” 来了解如何得到这个 fingerprint。
注意:在上面,我们使用用户名及密码的方式来配置 elastic-agent.yml 文件。你也可以采用使用 API Key 的方式来进行配置。有关如何得到 API key,请参阅文章 “Elasticsearch:关于在 Python 中使用 Elasticsearch 你需要知道的一切 - 8.x”。
配置完上面的 elastic-agent.yml 文件后,我们运行如下的命令:
sudo ./elastic-agent installparallels@ubuntu2004:~/fleet/elastic-agent-8.8.1-linux-arm64$ sudo ./elastic-agent install
Elastic Agent will be installed at /opt/Elastic/Agent and will run as a service. Do you want to continue? [Y/n]:y
Do you want to enroll this Agent into Fleet? [Y/n]:n
Elastic Agent has been successfully installed.
我们可以在 Kibana 里进行查看:
我们也可以到 Discover 里进行查看:
在 Discover 里我们可以看到刚被摄入的 metrics 数据。请注意在目前为止,我们只摄入默认的 system metrics 数据。
把 elastic agent 的数据写入到 Logstash
安装 Logstash 并配置
我们接下来把 elastic agent 的输出数据写入到 Logstash。我们可以参考 Elastic 的官方文档 Logstash output | Fleet and Elastic Agent Guide [8.8] | Elastic。我们首先需要安装 Logstash。请参考之前的文章 “如何安装 Elastic 栈中的 Logstash”。我们也可以直接到 Elastic 的官方网站 Download Logstash Free | Get Started Now | Elastic 去下载和 Elasticsearch 相匹配的 Logstash 版本。
wget https://artifacts.elastic.co/downloads/logstash/logstash-8.8.1-linux-aarch64.tar.gz
tar xzf logstash-8.8.1-linux-aarch64.tar.gz
cd logstash-8.8.1
为了做测试,我们需要创建一个 logstash.conf 的配置文件:
logstash.conf
input {
  elastic_agent {
    port => 5044
  }
}

output {
   stdout {}
}
在上面,我们的 Logstash pipeline 非常简单。为了测试方便,我们并没有直接写入到 Elasticsearch,而是使用 stdout 来输出进行测试。Logstash 侦听 elastic agent 的 5044 端口号。我们使用如下的命令来启动 Logstash:
./bin/logstash -f logstash$ pwd
/home/parallels/logstash/logstash-8.8.1
parallels@ubuntu2004:~/logstash/logstash-8.8.1$ ./bin/logstash -f logstash.conf
重新配置 Elastic Agent
在上面我们已经启动了 Elastic Agent。为了能够重新配置 Elastic Agent,我们需要停止它之前的服务,并重新安装它。我们首先打入如下的命令:
parallels@ubuntu2004:~$ su
Password:
root@ubuntu2004:/home/parallels# cd /opt/Elastic/Agent/
root@ubuntu2004:/opt/Elastic/Agent# ./elastic-agent uninstall
Elastic Agent will be uninstalled from your system at /opt/Elastic/Agent. Do you want to continue? [Y/n]:y
Elastic Agent has been uninstalled.
我们可以通过如下的命令来获得当前 Logstash 运行的 IP 地址:
 ip a | grep inet
    inet 127.0.0.1/8 scope host lo
    inet6 ::1/128 scope host
    inet 192.168.0.8/24 brd 192.168.0.255 scope global noprefixroute eth0
    inet6 fe80::d246:4880:928b:f508/64 scope link noprefixroute
在上面,我们卸载了之前安装的 Elastic Agent。我们接下来重新配置 elastic-agent.yml 文件:
elastic-agent.yml
我们再次使用如下的命令来启动 elastic agent:
sudo ./elastic-agent installparallels@ubuntu2004:~/fleet/elastic-agent-8.8.1-linux-arm64$ sudo ./elastic-agent install
[sudo] password for parallels:
Elastic Agent will be installed at /opt/Elastic/Agent and will run as a service. Do you want to continue? [Y/n]:y
Do you want to enroll this Agent into Fleet? [Y/n]:n
Elastic Agent has been successfully installed.我们可以使用如下的命令来进行检查:
./elastic-agent inspect从上面的输出中,我们可以看出来 outputs 是写入到 Logstash 的端口 5044。
我们可以切换到 Logstash 运行的 terminal 中进行查看:
从 Logstash 的 terminal 中,我们可以看到有很多的输出。我们需要注意的是,在我们之前的配置中,我们并没有把数据写入到 Elasticsearch 中。为了把数据写入到 Elasticsearch 中,我们必须重新配置 logstash.conf 文件。我们终止 Logstash 的运行。我们可以参考文章 “Logstash:如何连接到带有 HTTPS 访问的集群” 及 “Beats:使用 fingerprint 来连接 Beats/Logstash 和 Elasticsearch”。
logstash.conf
input {
  elastic_agent {
    port => 5044
  }
}

output {
   stdout {}

   elasticsearch {
      hosts => ["https://192.168.0.3:9200"]
      index => "data-%{+YYYY.MM.dd}"
      ssl => true
      ilm_enabled => true
      user => "elastic"
      password => "z5nxTriCD4fi7jSS=GFM"
      ca_trusted_fingerprint => "783663875df7ae1daf3541ab293d8cd48c068b3dbc2d9dd6fa8a668289986ac2"
    }
}
关于这里的 user,password 及 ca_trusted_fingerprint,请参考上面的 elastic-agent.yml 的配置。
我们再次重新运行 Logstash:
./bin/logstash -f logstash.conf我们回到 Kibana 的界面来进行查看:
我们可以看到新生成的 data-2023.06.21 索引文件。这样我们就把数据通过 Logstash 把数据写入到 Logstash 里了,进而写入到 Elasticsearch 中去了。
通过 Kibana 配置 elastic-agent.yml 文件
在我们上面的展示中,我们使用了默认的 elastic-agent.yml 文件。它只能针对当前的机器收集 metrics 这些指标信息。如果我们想使用它针对其他的许多 integration 来进行操作,那么它的手动配置将会是非常麻烦的,而且我们也不是很在行。你可以详细研究上面在 elastic-agent 安装目录下的 elastic-agent.reference.yml 文件。在进行下面的练习之前,我们还是和之前一样,先下载之前安装的 elastic agent:
parallels@ubuntu2004:~$ su
Password:
root@ubuntu2004:/home/parallels# cd /opt/Elastic/Agent/
root@ubuntu2004:/opt/Elastic/Agent# ls
data           elastic-agent.reference.yml  fleet.enc       LICENSE.txt  README.md
elastic-agent  elastic-agent.yml            fleet.enc.lock  NOTICE.txt   vault
root@ubuntu2004:/opt/Elastic/Agent# ./elastic-agent uninstall
Elastic Agent will be uninstalled from your system at /opt/Elastic/Agent. Do you want to continue? [Y/n]:y
Elastic Agent has been uninstalled.
针对很多复制的集成,我们需要借助 Kibana 中集成的工具来帮我们配置 elastic-agent.yml 文件。
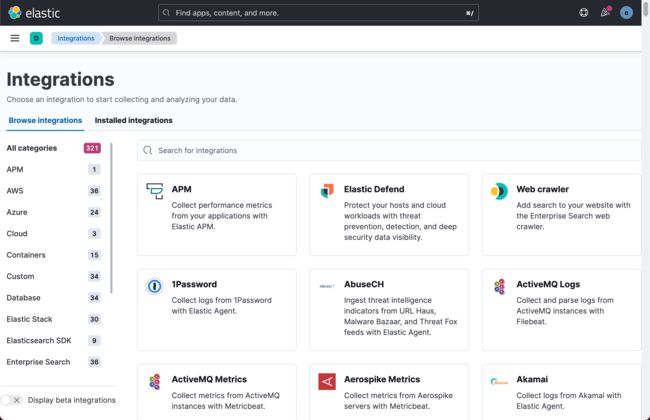
我们打开 Kibana:
如上所示, Elastic 为我们提供了丰富的 integrations 来方便地采集数据,比如我们常见的 Nginx,Apache 等。作为例子,我们选择 Apache 服务器来做展示。按照如下的命令在 Ubuntu OS 上来进行安装:
sudo apt install apache2
从上面的输出中,我们可以看到 Apache 服务器已经成功地运行起来了。
接下来我们来创建如何收集 Apache 服务器的 elastic-agent.yml 文件。
我们把上面的 elastic-agent.yml 内容拷贝下来。
我们接下来回到之前安装的 elastic agent 根目录下:
parallels@ubuntu2004:~/fleet/elastic-agent-8.8.1-linux-arm64$ mv elastic-agent.yml elastic-agent.back.yml
parallels@ubuntu2004:~/fleet/elastic-agent-8.8.1-linux-arm64$ vi elastic-agent.yml
我们把上面拷贝过来的 elastic-agent.yml 内容粘贴过来:
我们根据自己的配置修改为:
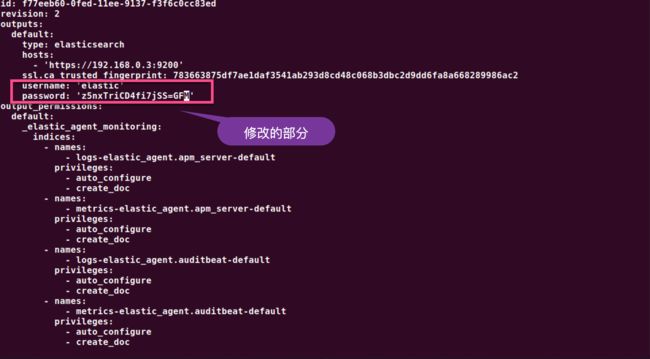 我们保存上面的 elastic-agent.yml 文件,并使用如下的命令来进行安装:
sudo ./elastic-agent installparallels@ubuntu2004:~/fleet/elastic-agent-8.8.1-linux-arm64$ sudo ./elastic-agent install
[sudo] password for parallels:
Elastic Agent will be installed at /opt/Elastic/Agent and will run as a service. Do you want to continue? [Y/n]:y
Do you want to enroll this Agent into Fleet? [Y/n]:n
Elastic Agent has been successfully installed.我们点击上面的第一个链接:
我们在 Apache 的页面上点击 refresh 按钮几次:
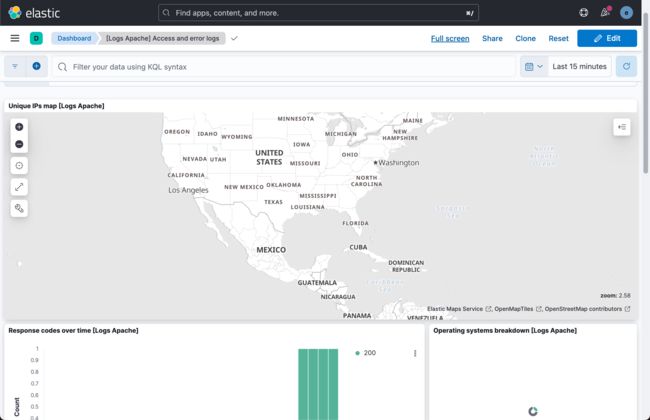
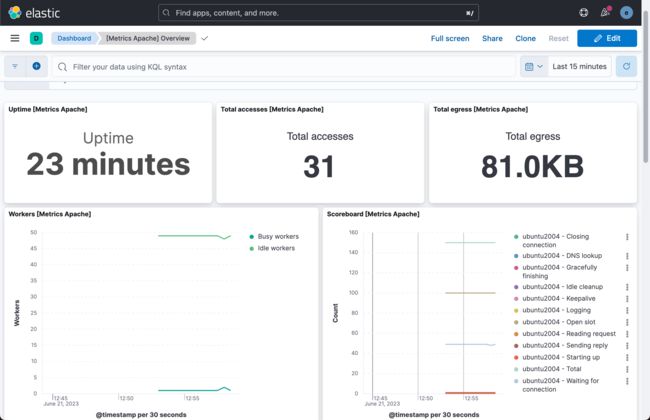
我们查看这个页面:
我们可以回到 Stack Management 界面来进行查看:
我们可以通过 Discover 来进行查看:
把 Apache 数据通过 Logstash 写入到 Elasticsearch
为了能够把 Apache 的日子数据通过 Logstash 写入,我们只需要修改 elastic-agent.yml 文件:
elastic-agent.yml
我们启动 Logstash。我们先卸载之前安装的 elastic agent,并再次重新运行 elastic agent 后。我们可以在 Logstash 的 terminal 中看到如下的输出:
我们运行如下的命令几次:
curl http://192.168.0.8:80我们可以在 Kibana 中进行查看:
我们可以看到数据被正确地写入到 Elasticsearch 中来了。

