SpringBoot2.3集成Spring Security(一)
业务背景
首先一个项目最基础的部分一定是登录部分,那么有了登录肯定会有对应的权限校验、身份校验。
那么在没有使用Spring Security之前,大多数设计思路都是通过各种拦截器、监听器来控制用户的访问。但是这种方式,后续的维护会越来越复杂,如果要增加或者修改一个逻辑,其中拦截器、监听器的改动会很多。
因此,在这种情况下,我们使用spring Security帮助我们进行身份认证、访问授权等功能。
Spring Security简介
附上一段官网的解释:
Spring Security is a powerful and highly customizable authentication and access-control framework. It is the de-facto standard for securing Spring-based applications.
Spring Security is a framework that focuses on providing both authentication and authorization to Java applications. Like all Spring projects, the real power of Spring Security is found in how easily it can be extended to meet custom requirements
翻译:Spring Security 是一个功能强大且高度可定制的身份验证和访问控制框架。 它是保护基于 Spring 的应用程序的事实标准
Spring Security 是一个专注于为 Java 应用程序提供身份验证和授权的框架。 像所有 Spring 项目一样,Spring Security 的真正强大之处在于它可以轻松扩展以满足自定义需求
SpringBoot集成Spring Security
1. 添加maven包
        <dependency>
            <groupId>org.springframework.bootgroupId>
            <artifactId>spring-boot-starter-securityartifactId>
        dependency>
2. 启动项目

访问地址:http://localhost:8888/login

输入用户名:user
输入密码:控制台打印
即可登录成功。
就这么简单?
以上方式,可以看出来:Spring Security 对于集成还是很友好的。只需要添加maven文件就可以了。
但问题是:谁会用这种方式?每次启动都使用随机密码?一个很破的登录页面?
因此,从这里开始,才是本文真正开始介绍Spring Security。
从哪儿开始?Spring Security 三种认证方式
有点蒙,这下一步应该从哪儿开始?稍微网上翻一翻我们就能知道,Spring Security提供了三种认证方式。既然我们暂时没有思路的话,就先从这三种认证方式下手吧。
1. 默认身份认证:就是我们启动项目之后,控制台打印的密码。默认用户名:user
2. 内存身份认证:
直接上代码:
/**
 * Spring Security 配置类
 *
 * @author caojing
 * @since 2023/6/14
 */
@Configuration
public class SecurityConfig extends WebSecurityConfigurerAdapter {

    @Override
    protected void configure(HttpSecurity http) throws Exception {
        http.formLogin().successForwardUrl("/test");
    }

    @Override
    protected void configure(AuthenticationManagerBuilder auth) throws Exception {
        BCryptPasswordEncoder encoder = new BCryptPasswordEncoder();
        auth.inMemoryAuthentication()
                .passwordEncoder(new BCryptPasswordEncoder())
                .withUser("user").password(encoder.encode("123456")).roles("USER");
    }
}
注意点:这里一定要设置加密方式,不然会报错:
java.lang.IllegalArgumentException: There is no PasswordEncoder mapped for the id "null"
3. 自定义实现类
自定义一个类MyUserDetailService实现UserDetailService接口:代码如下所示:
/**
 * 自定义认证方式
 *
 * @author caojing
 * @since 2023/6/14
 */
@Service
public class MyUserDetailService implements UserDetailsService {
    @Override
    public UserDetails loadUserByUsername(String username) throws UsernameNotFoundException {
        //todo 这里可以从数据库获取对应的用户信息

        // 权限信息设置
        List<GrantedAuthority> auths = AuthorityUtils.commaSeparatedStringToAuthorityList("role");
        // 设置用户名密码和权限信息
        return new UserBean("caojing", new BCryptPasswordEncoder().encode("123"), auths);

    }
}
SecurityConfig类:
/**
 * Spring Security 配置类
 *
 * @author caojing
 * @since 2023/6/14
 */
@Configuration
public class SecurityConfig extends WebSecurityConfigurerAdapter {

    @Autowired
    private MyUserDetailService userDetailService;

    @Override
    protected void configure(HttpSecurity http) throws Exception {
        http.formLogin().successForwardUrl("/test");
    }

    @Override
    protected void configure(AuthenticationManagerBuilder auth) throws Exception {
        //BCryptPasswordEncoder encoder = new BCryptPasswordEncoder();
//        auth.inMemoryAuthentication()
//                .passwordEncoder(new BCryptPasswordEncoder())
//                .withUser("user").password(encoder.encode("123456")).roles("USER");
        auth.userDetailsService(userDetailService).passwordEncoder(new BCryptPasswordEncoder());
    }
}
UserBean实体类:
/**
 * @author CAOJING
 * @date 2023/4/26
 * @description
 */
@Data
public class UserBean implements UserDetails {
    private int id;
    private String name;
    private int age;
    private String password;
    private Date createTime;
    Collection<? extends GrantedAuthority> authorities;

    public UserBean(String name, String password, List<GrantedAuthority> auths) {
        this.name = name;
        this.password = password;
        this.authorities = auths;
    }

    @Override
    public Collection<? extends GrantedAuthority> getAuthorities() {
        return new ArrayList<>();
    }

    @Override
    public String getPassword() {
        return password;
    }

    @Override
    public String getUsername() {
        return name;
    }

    @Override
    public boolean isAccountNonExpired() {
        return true;
    }

    @Override
    public boolean isAccountNonLocked() {
        return true;
    }

    @Override
    public boolean isCredentialsNonExpired() {
        return true;
    }

    @Override
    public boolean isEnabled() {
        return true;
    }
}
启动项目,访问地址:http://localhost:8888/login,输入帐号名:caojing。密码:123。成功

思路分析:
咱们从结果来看。不管是内存模式还是自定义模式,我们是不是都是在一个继承了WebSecurityConfigurerAdapter的配置类中,有个方法:configure(AuthenticationManagerBuilder auth)进行配置的?
那么,我们可以稍微分析一下这个方法:
先看参数:AuthenticationManagerBuilder
/**
 * {@link SecurityBuilder} used to create an {@link AuthenticationManager}. Allows for
 * easily building in memory authentication, LDAP authentication, JDBC based
 * authentication, adding {@link UserDetailsService}, and adding
 * {@link AuthenticationProvider}'s.
 *
 * @author Rob Winch
 * @since 3.2
 */
 public class AuthenticationManagerBuilder extends
		AbstractConfiguredSecurityBuilder<AuthenticationManager, AuthenticationManagerBuilder>
		implements ProviderManagerBuilder<AuthenticationManagerBuilder> {
很明显,这个验证了我们刚才设置方式的做法:内存模式、LDAP模式、JDBC模式(注意这个模式是配置数据库连接,跟我们实际想要的效果还是不太一样)。
不管是我们刚才配置的内存模式、自定义模式都是通过AuthenticationManagerBuilder这个类进行配置.
疑问:为什么要实现 UserDetailService接口?
或者说:为什么实现了这个接口,spring Security 验证的时候,就能走我实现的类?
一步一步往下走,看源码。从SecurityConfig的userDetailsService方法进去

注意到这里是new了一个 DaoAuthenticationConfigurer类,并且初始化的时候,把我们自己的useDetailService作为构造参数传入
继续查看DaoAuthenticationConfigurer类

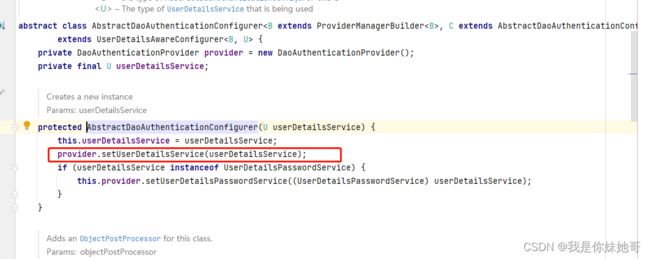
想不到啊。这还是个父类,继续往下:

这里又将我们自定义的类赋值到DaoAuthenticationProvider类中。
到这里停一停:其实源码翻到这儿差不多就知道为什么要实现UserDetailsService类了。不知道大家注意到了没?我们看到的几个set方法,参数都是接口类UserDetailsService。因此,我们在配置类中设置的自定义类如果不实现UserDetailsService,编译的时候都会报错,所以肯定是要实现这个接口。
但是,到这里。还不能完全解决我的疑问:现在是解决了为什么要这样?但是还没解决为什么这样就可以了
go on
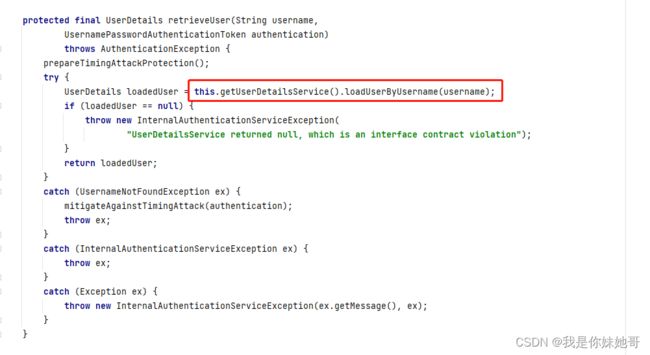
查看DaoAuthenticationProvider类
这个类代码不多,一共200行不到。我们可以看下UserDetailsService在哪边使用到了

!!!终于找到了,在DaoAuthenticationProvider的 108行调用了我们自定义的类。
思路总结:
- 先实现想要的效果:从结果开始导向。
- 从源码中分析:有子类先看子类,子类中不存在查看对应的父类。
- 反向:
AuthenticationManagerBuilder->AbstractDaoAuthenticationConfigurer->DaoAuthenticationProvider->retrieveUser方法108行
下一步
这篇文章已经初步集成了Spring Security ,并且用户的来源是数据库。但是这样的一个集成效果其实还是没有达到我们真正使用的标准,以下是我觉得还能进一步集成的点。
现在大多数项目都是前后端分离的项目,因此传统的seesion方式前后端绑定太严格,我们不予采用,因此需要一种更为简便、快捷的方式。也就是JWT。
下一篇文章,会给大家介绍如何在spring Security中集成 JWT。