mysql-canal-rabbitmq 安装部署教程
1.1. 开启 MySQL 的 binlog 日志
- 修改
my.cnf或my.ini(windows), 添加配置项:
# binlog 日志存放路径
log-bin=D:\env\mysql-5.7.28-winx64\binlog
# 日志中记录每一行数据被修改的形式
binlog-format=ROW
# 当前机器的服务 ID, 如果为集群时不能重复
server_id=1
- 重启 mysql 服务后, 查看配置变量是否生效:
mysql> show variables like '%log_bin%';
+---------------------------------+----------------------+
| Variable_name                   | Value                |
+---------------------------------+----------------------+
| log_bin                         | ON                   |
| log_bin_basename                | D:\env\mysql-5       |
| log_bin_index                   | D:\env\mysql-5.index |
| log_bin_trust_function_creators | OFF                  |
| log_bin_use_v1_row_events       | OFF                  |
| sql_log_bin                     | ON                   |
+---------------------------------+----------------------+
6 rows in set, 1 warning (0.00 sec)
- 配置 mysql 数据库的
canal用户
mysql -uroot -p 登录 mysql, 创建并授权用户 canal;
CREATE USER canal IDENTIFIED BY 'canal';
GRANT SELECT, REPLICATION SLAVE, REPLICATION CLIENT ON *.* TO 'canal'@'%';
FLUSH PRIVILEGES;
1.2. 配置 rabbitmq Exchanges 和 Queues
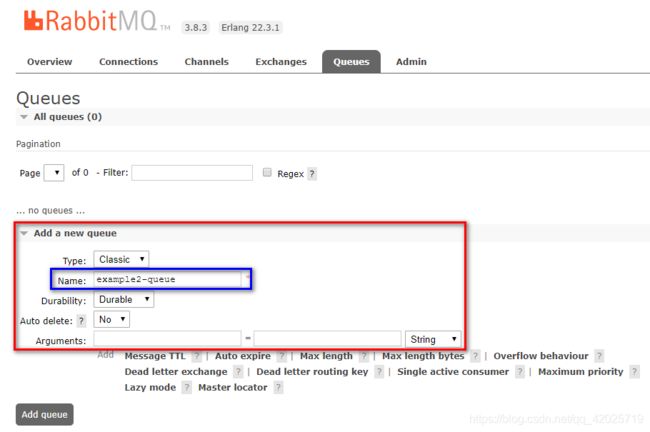
- 新建
Queue
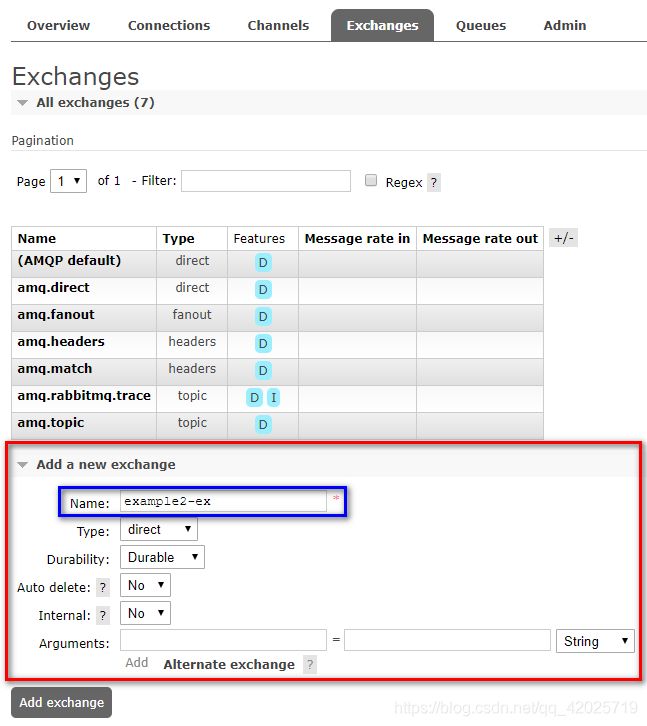
- 新建
Exchange
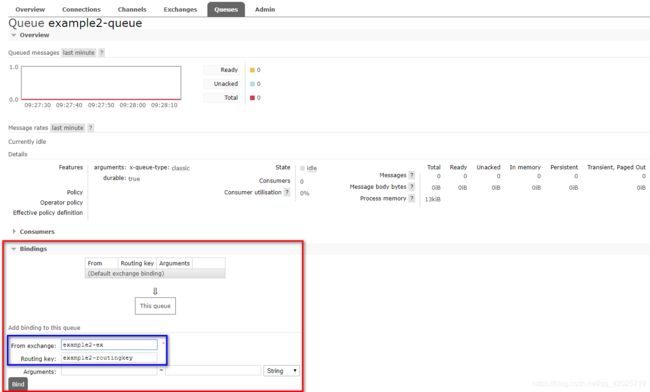
- 设置 Queue 里的 Bindings, 填写
Exchange名称, 以及路由Routing key;
1.3. 安装单机 canal
1.3.1. 下载安装
下载 并解压缩;
sudo wget https://github.com/alibaba/canal/releases/download/canal-1.1.4/canal.deployer-1.1.4.tar.gz
sudo tar -zxvf canal.deployer-1.1.4.tar.gz
最新版本 1.1.5的安装
sudo wget https://github.com/alibaba/canal/releases/download/canal-1.1.5-alpha-1/canal.deployer-1.1.5-SNAPSHOT.tar.gz
sudo tar -zxvf canal.deployer-1.1.5-SNAPSHOT.tar.gz
1.3.2. 配置文件
1.3.2.1. 节点配置文件 canal.properties
# tcp bind ip, 当前节点的 IP 地址
canal.ip = 192.168.2.108
# register ip to zookeeper, 注册到 ZK 的 IP 地址, 如下图1.
canal.register.ip = 192.168.2.108

canal.zkServers = zk集群

# tcp, kafka, RocketMQ, 最新版本 1.1.5 可以直接连接 rabbitmq
canal.serverMode = rabbitmq

# destinations, 当前 server 上部署的 instance 列表, 对应各个实例文件夹(../conf/)名称
canal.destinations = example2

# 设置 mq 服务器地址, 此处为 rabbitmq 的服务器地址
# !! 此处下载后默认的配置是有配置IP:端口的
# rabbitmq 此处则不需要配置端口
canal.mq.servers = 192.168.208.100

# 一下几项均为 1.1.5 新版本新增支持 rabbitmq 的配置
canal.mq.vhost=/
canal.mq.exchange=example2-ex # 指定 rabbitmq 上的 exchange 名称, "新建 `Exchange`" 步骤新建的名称
canal.mq.username=admin # 连接 rabbitmq 的用户名
canal.mq.password=**** # 连接 rabbitmq 的密码
canal.mq.aliyunuid=
1.3.2.2. 实例配置文件 instance.properties
# position info, 数据库的连接信息
canal.instance.master.address=192.168.2.108:3306
# 以下两个配置, 需要在上面配置的 address 的数据库中执行 `SHOW MASTER STATUS` 获取的 `File` 和 `Position` 两个字段值
canal.instance.master.journal.name=mysql-5.7
canal.instance.master.position=674996

# table meta tsdb info, 禁用 tsdb 记录 table meta 的时间序列版本
canal.instance.tsdb.enable=false

# username/password, 实例连接数据的用户名和密码
canal.instance.dbUsername=canal
canal.instance.dbPassword=canal

# table regex, 正则匹配需要监听的数据库表
canal.instance.filter.regex=ysb\\.useropcosttimes_prod

# mq config, 指定 rabbitmq 设置绑定的路由, 详见"配置rabbitmq"步骤里的第三步配置的`Routing key`
canal.mq.topic=example2-routingkey
1.3.3. 启动 canal 服务
Linux 对应的启动脚本 ./bin/startup.sh, Windows 对应的启动脚本 ./bin/startup.bat; 以 Windows 为例:
λ .\startup.bat
start cmd :  java   -Xms128m -Xmx512m -XX:PermSize=128m  -Djava.awt.headless=true -Djava.net.preferIPv4Stack=true -Dapplication.codeset=UTF-8 -Dfile.encoding=UTF-8  -server -Xdebug -Xnoagent -Djava.compiler=NONE -Xrunjdwp:transport=dt_socket,address=9099,server=y,suspend=n  -DappName=otter-canal -Dlogback.configurationFile="d:\env\green\canal-1.1.5\bin\\..\conf\logback.xml" -Dcanal.conf="d:\env\green\canal-1.1.5\bin\\..\conf\canal.properties" -classpath "d:\env\green\canal-1.1.5\bin\\..\conf\..\lib\*;d:\env\green\canal-1.1.5\bin\\..\conf" java   -Xms128m -Xmx512m -XX:PermSize=128m  -Djava.awt.headless=true -Djava.net.preferIPv4Stack=true -Dapplication.codeset=UTF-8 -Dfile.encoding=UTF-8  -server -Xdebug -Xnoagent -Djava.compiler=NONE -Xrunjdwp:transport=dt_socket,address=9099,server=y,suspend=n  -DappName=otter-canal -Dlogback.configurationFile="d:\env\green\canal-1.1.5\bin\\..\conf\logback.xml" -Dcanal.conf="d:\env\green\canal-1.1.5\bin\\..\conf\canal.properties" -classpath "d:\env\green\canal-1.1.5\bin\\..\conf\..\lib\*;d:\env\green\canal-1.1.5\bin\\..\conf" com.alibaba.otter.canal.deployer.CanalLauncher
Java HotSpot(TM) Server VM warning: ignoring option PermSize=128m; support was removed in 8.0
Listening for transport dt_socket at address: 9099
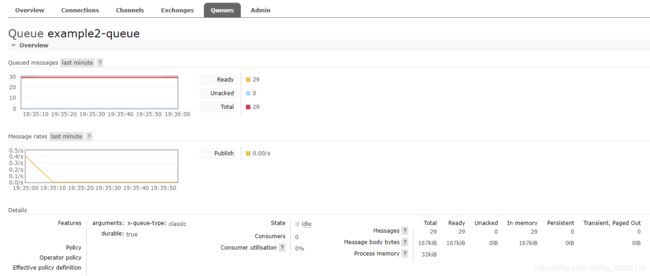
最后手动修改数据库数据, 或者等待其他的修改, 再查看一下 rabbitmq 上的监控即可知道流程是否走通了.
1.4. 安装集群 canal
1.4.1. 安装 canal-admin
1.4.1.1. 下载安装
下载并解压缩
sudo wget https://github.com/alibaba/canal/releases/download/canal-1.1.5-alpha-1/canal.admin-1.1.5-SNAPSHOT.tar.gz
sudo tar -zxvf canal.deployer-1.1.5-SNAPSHOT.tar.gz
1.4.1.2. 配置文件
application.yml
server:
  port: 8089
spring:
  jackson:
    date-format: yyyy-MM-dd HH:mm:ss
    time-zone: GMT+8

spring.datasource:
  address: 192.168.2.108:3306
  database: canal_manager
  username: canal
  password: canal
  driver-class-name: com.mysql.jdbc.Driver
  # 数据库连接字符串末尾需添加`serverTimezone=UTC`, 否则启动时会报时区异常;
  url: jdbc:mysql://${spring.datasource.address}/${spring.datasource.database}?useUnicode=true&characterEncoding=UTF-8&useSSL=false&serverTimezone=UTC
  hikari:
    maximum-pool-size: 30
    minimum-idle: 1

canal:
  # 配置 canal-admin 的管理员账号和密码
  adminUser: admin
  adminPasswd: 123456
canal_manager.sql
在管理canal-admin数据的数据库中执行该 sql 脚本, 初始化一些表;
1.4.1.3. 启动 canal-admin 服务
Linux 对应的启动脚本 ./bin/startup.sh, Windows 对应的启动脚本 ./bin/startup.bat; 以 Windows 为例:
λ .\startup.bat
start cmd :  java   -Xms128m -Xmx512m  -Djava.awt.headless=true -Djava.net.preferIPv4Stack=true -Dapplication.codeset=UTF-8 -Dfile.encoding=UTF-8  -DappName=canal-admin -classpath "D:\env\green\canal-1.1.5-admin\bin\\..\conf\..\lib\*;D:\env\green\canal-1.1.5-admin\bin\\..\conf" com.alibaba.otter.canal.admin.CanalAdminApplication
2020-04-13 20:01:39.495 [main] INFO  com.alibaba.otter.canal.admin.CanalAdminApplication - Starting CanalAdminApplication on Memento-PC with PID 50696 (D:\env\green\canal-1.1.5-admin\lib\canal-admin-server-1.1.5-SNAPSHOT.jar started by Memento in D:\env\green\canal-1.1.5-admin\bin)
2020-04-13 20:01:39.527 [main] INFO  com.alibaba.otter.canal.admin.CanalAdminApplication - No active profile set, falling back to default profiles: default
2020-04-13 20:01:39.566 [main] INFO  o.s.b.w.s.c.AnnotationConfigServletWebServerApplicationContext - Refreshing org.springframework.boot.web.servlet.context.AnnotationConfigServletWebServerApplicationContext@13a5bf6: startup date [Mon Apr 13 20:01:39 CST 2020]; root of context hierarchy
2020-04-13 20:01:41.149 [main] INFO  o.s.boot.web.embedded.tomcat.TomcatWebServer - Tomcat initialized with port(s): 8089 (http)
2020-04-13 20:01:41.166 [main] INFO  org.apache.coyote.http11.Http11NioProtocol - Initializing ProtocolHandler ["http-nio-8089"]
2020-04-13 20:01:41.176 [main] INFO  org.apache.catalina.core.StandardService - Starting service [Tomcat]
2020-04-13 20:01:41.177 [main] INFO  org.apache.catalina.core.StandardEngine - Starting Servlet Engine: Apache Tomcat/8.5.29
...
2020-04-13 20:01:42.996 [main] INFO  org.apache.coyote.http11.Http11NioProtocol - Starting ProtocolHandler ["http-nio-8089"]
2020-04-13 20:01:43.007 [main] INFO  org.apache.tomcat.util.net.NioSelectorPool - Using a shared selector for servlet write/read
2020-04-13 20:01:43.019 [main] INFO  o.s.boot.web.embedded.tomcat.TomcatWebServer - Tomcat started on port(s): 8089 (http) with context path ''
2020-04-13 20:01:43.024 [main] INFO  com.alibaba.otter.canal.admin.CanalAdminApplication - Started CanalAdminApplication in 3.919 seconds (JVM running for 5.241)
1.4.1.4. 注意事项
canal-admin 连接数据库的账号, 必须有建表, 读写数据的权限, 如果还是采用上文中创建的 canal 账号, 需要另外扩展一下权限:
GRANT ALL PRIVILEGES ON *.* TO 'canal'@'%' ;
1.4.2. 添加单机 canal-server 节点
1.4.2.1. 启动 canal-server 节点服务
单机 canal-server 照常启动, 此时, canal-server 默认加载的 ../conf/canal.properties 里的配置信息, 可以从 ../bin/startup.bat[startup.sh] 脚本中获悉, 获取从执行的脚本命令提示里获悉;
1.4.2.2. 新建单机 server
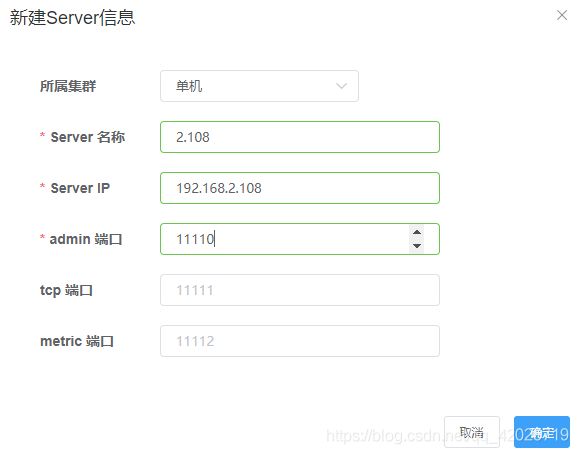
在 canal-admin 中新建一个单机 server
该 server 会自动识别已启动的 canal-server 节点, 但是此时由 admin 接管后, 不会自动加载 ../conf/canal.properties 的配置文件, 点击最右侧的 操作-配置 查看, 该 server 加载的是默认的配置信息
需要手动将 1.3.2 中配置好的 ../conf/canal.properties 里的配置信息拷贝到该配置里进行覆盖!
1.4.2.3. 新建实例 instance
手动在 canal-admin 中新建一个 instance, 对应单机 canal-server 配置下的实例 example2; 同样, 需要手动将 ./conf/<实例名称>/instance.properies 配置文件手动拷贝到 admin 中
!!注意
在新建或启动 instance 实例时, 先删除实例文件夹下的 meta.dat 文件, 并更新 canal.instance.master.journal.name=..., canal.instance.master.position=... 两个配置项;
1.4.3. 添加集群 canal-server 节点
1.4.3.1. 新建集群
需要指定集群名称, 以及配置集群绑定的 zookeeper 集群地址;

新建成功后, 在最右侧的 操作-主配置 中配置集群的通用 server 配置信息
此处也可以将之前配置的 ../conf/canal.properties 配置直接拷贝过来, 稍微修改一下就可以用了
# canal admin config
canal.admin.manager = 192.168.2.108:8089

canal.instance.global.mode = manager
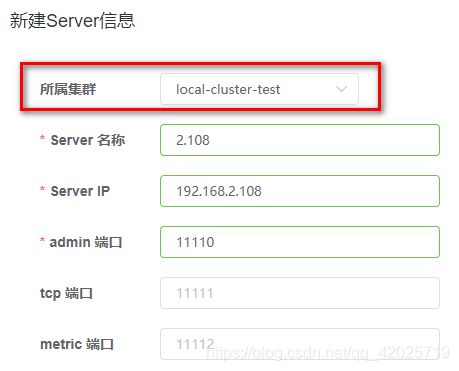
1.4.3.2. 新建 server
如果先前已经启动了 canal-server 节点服务, 则新建的 server 会自动识别为 启动 状态, 否则为 断开 状态;
这里有一点需要十分注意的地方
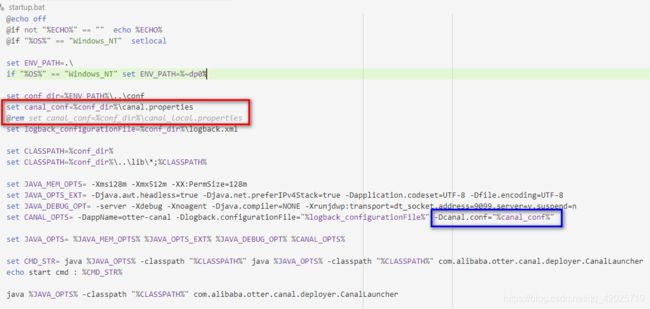
细心的人可能会发现, 除了 canal.properties 配置文件, 还有一个 canal_local.properties 的配置文件, 后者比前者的内容少了很多, 因为这个文件就是用于搭建 canal 集群时, 本地节点的配置文件, 而前者配置文件里的其他信息都是交由 canal-admin 集中配置管理的;
在 ./bin/startup.bat[startup.sh] 启动脚本里, 默认是加载 canal.properties 配置文件, 即以单机形式启动的服务;
windows 在搭建 canal 集群时, 需要手动修改 startup.bat, 蓝色标注处是加载 %canal_conf% 变量的配置文件路径, 所以需要将红色框内的变量调整为:
@rem set canal_conf=...
set canal_conf=%conf_dir%\canal_local.properties
使启动时加载 canal_local.properties 的配置文件
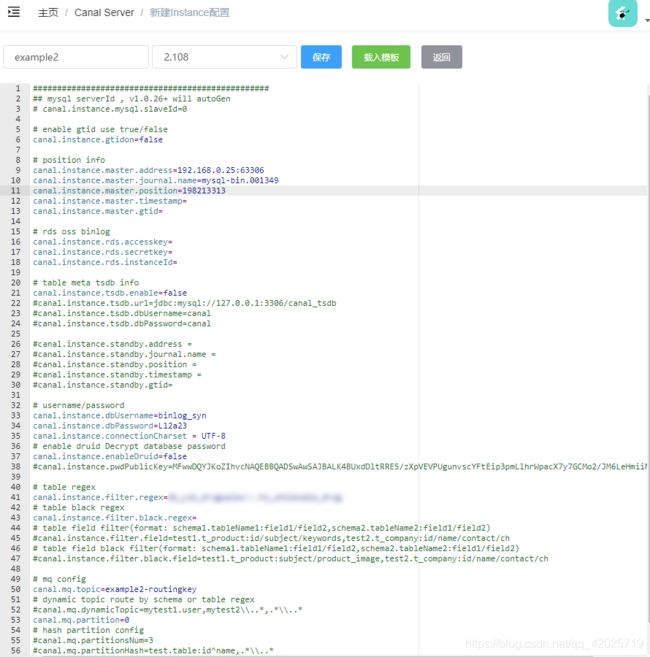
1.4.3.3. 新建 instance
此处配置也可以基于单机 server 中的实例 1.4.2.3 配置进行调整使用;
# 2. position info, 指定 mysql 开始同步的 binlog 位置信息
canal.instance.master.address=192.168.0.25:63306
canal.instance.master.journal.name=mysql-bin.001349
canal.instance.master.position=198213313

# 3. username/password, 设置同步 mysql 的数据库用户名和密码
canal.instance.dbUsername=xxxx
canal.instance.dbPassword=xxx

# 4. table regex, 正则匹配需要同步的数据表
canal.instance.filter.regex=xxxx

# 5. mq config, 指定 mysql 上的路由绑定, 见 `1.2.3`
canal.mq.topic=example2-routingkey
保存后即可在 操作 中启动该实例
后话
如果此处的 instance 无法启动, 按一下几个步骤检查操作一下试试:
- 检查集群里的
主配置里的canal.destinations是否包含新建的实例instance名称;- 检查
canal-server节点是否加载的canal_local.properties配置文件;- 删除实例文件夹下的
.db,.bat文件, 更新实例配置文件中的canal.instance.master.position的binglog位置后, 启动instance;
1.5. 问题处理
- windows 下执行
startup.bat启动 canal 时, 出现如下异常
Failed to instantiate [ch.qos.logback.classic.LoggerContext]
Reported exception:
ch.qos.logback.core.LogbackException: Unexpected filename extension of file [file:/D:/env/green/canal/conf/]. Should be either .groovy or .xml
        at ch.qos.logback.classic.util.ContextInitializer.configureByResource(ContextInitializer.java:79)
        at ch.qos.logback.classic.util.ContextInitializer.autoConfig(ContextInitializer.java:152)
        at org.slf4j.impl.StaticLoggerBinder.init(StaticLoggerBinder.java:85)
        at org.slf4j.impl.StaticLoggerBinder.(StaticLoggerBinder.java:55)
        at org.slf4j.LoggerFactory.bind(LoggerFactory.java:141)
        at org.slf4j.LoggerFactory.performInitialization(LoggerFactory.java:120)
        at org.slf4j.LoggerFactory.getILoggerFactory(LoggerFactory.java:331)
        at org.slf4j.LoggerFactory.getLogger(LoggerFactory.java:283)
        at org.slf4j.LoggerFactory.getLogger(LoggerFactory.java:304)
        at com.alibaba.otter.canal.deployer.CanalLauncher.(CanalLauncher.java:29)
解决方法:
将 startup.bat 里的一下这行代码注释打开
@rem set logback_configurationFile=%conf_dir%\logback.xml
注, 新版 1.1.5 不存在该问题, 1.1.5这个文件中的这一行是没有注释掉的.
1.1.5新版本canal-admin启动时出现如下异常:
2020-04-10 18:55:40.406 [main] ERROR com.zaxxer.hikari.pool.HikariPool - HikariPool-1 - Exception during pool initialization.
java.sql.SQLException: The server time zone value '�й���ʱ��' is unrecognized or represents more than one time zone. You must configure either the server or JDBC driver (via the serverTimezone configuration property) to use a more specifc time zone value if you want to utilize time zone support.
解决方法
spring.datasource.url 配置的 mysql 连接地址后面加上参数 &serverTimezone=UTC
Instance日志里出现异常errno = 1236, sqlstate = HY000 errmsg = log event entry exceeded max_allowed_packet;
2020-04-13 13:06:09.507 [destination = example3 , address = /192.168.2.108:3306 , EventParser] ERROR com.alibaba.otter.canal.common.alarm.LogAlarmHandler - destination:example3[java.io.IOException: Received error packet: errno = 1236, sqlstate = HY000 errmsg = log event entry exceeded max_allowed_packet; Increase max_allowed_packet on master; the first event 'mysql-5.7' at 671745, the last event read from 'D:\env\mysql-5.7' at 673181, the last byte read from 'D:\env\mysql-5.7' at 673200.
	at com.alibaba.otter.canal.parse.inbound.mysql.dbsync.DirectLogFetcher.fetch(DirectLogFetcher.java:102)
	at com.alibaba.otter.canal.parse.inbound.mysql.MysqlConnection.dump(MysqlConnection.java:235)
	at com.alibaba.otter.canal.parse.inbound.AbstractEventParser$3.run(AbstractEventParser.java:265)
	at java.lang.Thread.run(Unknown Source)
]
解决方法
删除 canal/conf 下对应实例里的 meta.dat 文件, 让 canal-admin 自动再生成即可;
1.6. 参考资料
- canal(基于 mysql 数据库 binlog 的增量订阅和消费)
- Canal Admin 搭建 Canal 集群以及体验
- canal 整合RabbitMQ
