【首发】随身wifi编译/使用ffmpeg方法,包含openwrt和debian
目录
1.硬件改造
2.软件改造
3.下一步计划
背景是23年4月入了随身wifi的坑后,发现除了硬件上的改造,软件的可玩性也很大,网上可以找到不少打印机,直播推流,甚至家庭智能硬件的改造教程。笔者是因为改造遥控小车,接触到了随身wifi。因为早年市场上的商用的智能车大多运行linux系统,上面叠加一个摄像头,以mjpg的方式提供视频流。而现在无论是车还是手机,硬件能力都有大幅度提升,h264/h265已经成为主流。随身wifi的硬件是高通410,还没有硬件编码能力,软件编码找了一圈也没有人研究,在此背景下,产生了动手的想法。
1.硬件改造
要让随身wifi接摄像头,必要的硬件改造还是需要的,酷安上可以买到随身wifi的扩展板,也不贵。我追求硬件的体积小,所以就自己焊接了,随身wifi的usb的四个触点接usb摄像头的四个触点,额外引出两根电源线接5v电源。实际就是2公1母的usb延长线,马云家店里应该能买到。注意,焊接前先把随身wifi的系统烧录好,wifi可用,不然焊接了没usb口,连不上电脑,后面的软件改造就执行不下去了。
2.软件改造
第一步,把usb设置成host模式,不然识别不了usb摄像头,成功后/dev/video0设备就出现了,笔者的openwrt是/dev/video0,debian是/dev/video2。另外以下脚本是根据usb口是否接电源判定是否host模式,推荐使用,万一把无线搞坏了,usb口还能救砖。不计较时间成本,有备份恢复大法的可以忽略。
grep 0 /sys/kernel/debug/usb/ci_hdrc.0/device | grep speed
if [ $? -eq 0 ]
then
echo host > /sys/kernel/debug/usb/ci_hdrc.0/role
fi
第二步,debian安装ffmpeg
这个就不多说了,apt安装即可,很方便。但是,cpu占用较高,唯一的好处是插件很全,安装使用方便。
第三步,openwrt编译ffmpeg
为什么又折腾openwrt,笔者是因为debian在网络管理上功能缺失,对openwrt有依赖,所以不得不切换到openwrt。注意,以下教程在openwrt21.2上测试通过,更老的版本没试,主要是ffmpeg对cpu性能要求太高,太老的硬件没有意义。
openwrt的opkg install ffmpeg命令可以安装一个full版本的ffmpeg,但实际使用过程发现没有debian上支持的插件多,基本的x264,preset命令都不支持,所以产生了自己编译的想法,在我写这篇文章的时候,随身wifi的openwrt固件版本都是21.02,苏苏亮亮,水遍编译的固件都是基于github上HandsomeMod魔改而来,所以下载HandsomeMod编译即可
https://github.com/HandsomeMod
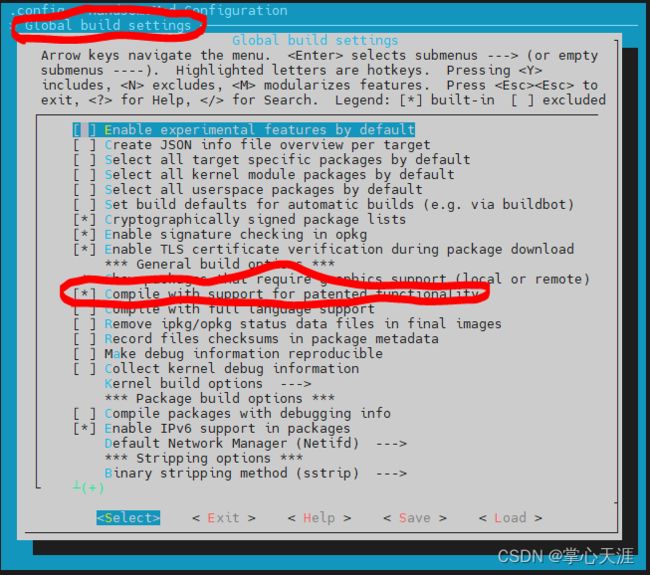
首先在menuconfig中,在multimeia下选择ffmpeg,,然后在library下选择libffmpeg-full和libx264.请按以下步骤操作:
图1:选择[Compile with support for patented functionality]
图2: 选择 [libffmpeg-full]和[]
图3: 选择[ffmpeg]
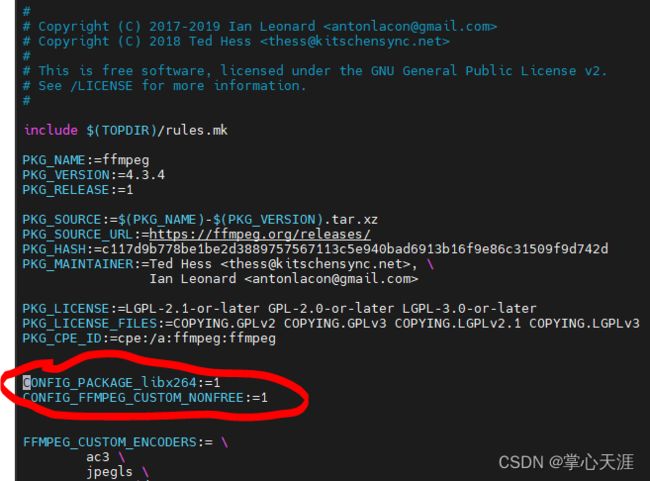
然后修改Makefile:
文件头部新增如下两行:
CONFIG_PACKAGE_libx264:=1
CONFIG_FFMPEG_CUSTOM_NONFREE:=1
改完是这个样子:
然后是修改full中编译的插件:
vim package/feeds/packages/ffmpeg/Makefile

找到 ifeq ($(BUILD_VARIANT),full)


注释掉disable
        ##      $(if $(CONFIG_BUILD_PATENTED),, \
        ##              $(call FFMPEG_DISABLE,decoder,$(FFMPEG_PATENTED_DECODERS)) \
        ##              $(call FFMPEG_DISABLE,encoder,$(FFMPEG_PATENTED_ENCODERS)) \
        ##              $(call FFMPEG_DISABLE,muxer,$(FFMPEG_PATENTED_MUXERS)) \
        ##              $(call FFMPEG_DISABLE,demuxer,$(FFMPEG_PATENTED_DEMUXERS)) \
        ##              $(call FFMPEG_DISABLE,parser,$(FFMPEG_PATENTED_PARSERS))) \


新增enable
        $(call FFMPEG_ENABLE,encoder,$(FFMPEG_CUSTOM_ENCODERS),CONFIG_FFMPEG_CUSTOM_ENCODER) \
        $(call FFMPEG_ENABLE,decoder,$(FFMPEG_CUSTOM_DECODERS),CONFIG_FFMPEG_CUSTOM_DECODER) \
        $(call FFMPEG_ENABLE,muxer,$(FFMPEG_CUSTOM_MUXERS),CONFIG_FFMPEG_CUSTOM_MUXER) \
        $(call FFMPEG_ENABLE,demuxer,$(FFMPEG_CUSTOM_DEMUXERS),CONFIG_FFMPEG_CUSTOM_DEMUXER) \
        $(call FFMPEG_ENABLE,parser,$(FFMPEG_CUSTOM_PARSERS),CONFIG_FFMPEG_CUSTOM_PARSER) \
        $(call FFMPEG_ENABLE,protocol,$(FFMPEG_CUSTOM_PROTOCOLS),CONFIG_FFMPEG_CUSTOM_PROTOCOL) \
改完是这个样子
然后就是编译了,很快,10分钟完事。
编译成功,后可以刷整个system镜像,也可以把编译出来的ipk拷贝到openwrt中手动安装,因为ffmpeg是纯软件实现,对内核和其他组件依赖较小,所以我采用的是后者。
新编译出来如下ipk文件,拷贝到openwrt中安装即可
第四步,运行ffmpeg
openwrt上编译后的ffmpeg与debian上安装的ffmpeg,插件一致,命令就可以保持相同,笔者的目的是把usb摄像头中的视频流取出来,h264编码后,发送到手机,ffmpeg命令可以这么写:
ffmpeg -y -f v4l2 -i /dev/video0 -vcodec libx264 -pix_fmt yuv420p -maxrate 1M -bufsize 4M -f h264 -最后一个"-"表示输出到pipe中,可以再用其他命令想办法把视频流发送到手机侧
第五步,安卓侧播放流媒体
因为服务端用的ffmpeg,所以很多同学就会想当然认为手机侧播放也依赖ffmpeg,而且网上搜安卓+ffmpeg,出来的大多是怎么编译ffmpeg的so,怎么写jni,怎么在android写java代码调用c代码库,甚至还有github上现成编译好或者叫二次封装过的安卓版ffmpeg库可以用。笔者decompile了不少支持h264流媒体播放的apk也都是这么干的。
上面的这些手段,笔者都尝试过,坑也踩过。现在,都不需要了,因为近几年绝大部分的安卓手机都支持硬件解码了,在安卓侧,直接可以调用安卓自带的MediaCodec接口使用硬解h264流媒体了,代码量还很少,运行效率高。
主要的类:H264SurfaceView,github>>>>>
package com.xxx.h264player;

import android.content.Context;
import android.graphics.Bitmap;
import android.opengl.GLSurfaceView;
import android.util.AttributeSet;
import android.util.Log;
import android.view.MotionEvent;

import java.nio.ByteBuffer;

import android.media.MediaCodec;
import android.media.MediaFormat;
import android.view.Surface;
import android.view.SurfaceHolder;
import android.view.SurfaceView;


public class H264SurfaceView extends SurfaceView implements SurfaceHolder.Callback  {
    static int mVideoHeight = 480;
    static int mVideoWidth = 640;
    public float ZOOM[] = {
        100F, 125F, 150F, 175F, 200F
    };
    public static int[] Video_WandH = new int[] { 640, 480 };
    Bitmap bitmap;
    float bx;
    float bx1;
    float by;
    float by1;
    long donw_time;
    public boolean isFirstChange;
    public int streamsize;
    private int targetZoom;
    int mCodecState = -1;
    Surface mSurface;
    MediaCodec mCodec;
    SurfaceHolder mSurfaceHolder;
    private int mFrameIndex = 0;

    public H264SurfaceView(Context context)
    {
        super(context);
        streamsize = 0;
        targetZoom = 0;
        bx1 = 0.0F;
        by1 = 0.0F;
        isFirstChange = true;
        initial();
    }

    public void initMediaCodec() {
        if (mCodecState > 0) return;

        MediaFormat mediaFormat = MediaFormat.createVideoFormat("video/avc", Video_WandH[0], Video_WandH[1]);

        /*mediaFormat.setInteger(MediaFormat.KEY_BIT_RATE, 1);
        mediaFormat.setInteger(MediaFormat.KEY_SAMPLE_RATE, 1);
        mediaFormat.setInteger(MediaFormat.KEY_CHANNEL_COUNT, 1);*/

        try {
            mCodec = MediaCodec.createDecoderByType("video/avc");
            if (mSurface != null && mSurface.isValid()) {
                mCodec.configure(mediaFormat, mSurface, null, 0);
                mCodec.start();
                mCodecState = 1;
            }
        } catch (Exception e) {
            Log.e("CameraView", " MediaCodec == " + e.getMessage());
            return;
        }
    }

    public H264SurfaceView(Context context, AttributeSet attributeset)
    {
        super(context, attributeset);
        streamsize = 0;
        targetZoom = 0;
        bx1 = 0.0F;
        by1 = 0.0F;
        isFirstChange = true;
        initial();
    }

    public final int getTargetZoom()
    {
        return targetZoom;
    }

    public float getTargetZoomValue()
    {
        return ZOOM[targetZoom];
    }

    public void initial()
    {
        mSurfaceHolder = getHolder();
        mSurfaceHolder.addCallback(this);
        initMediaCodec();
    }

    @Override
    public void surfaceCreated(SurfaceHolder holder) {

    }


    @Override
    public void surfaceChanged(SurfaceHolder holder, int format, int width, int height) {
        mSurface = holder.getSurface();
        initMediaCodec();
    }


    @Override
    public void surfaceDestroyed(SurfaceHolder holder) {
        if (mSurface != null) {
            mSurface.release();
        }
        mSurface = null;
    }

    public final void setTargetZoom(int i)
    {
        targetZoom = i;
    }

    public void takePicture()
    {
        //AppCameraSurfaceFunction.getAppCameraSurfaceFunctionInstance().CameraTakePicture();
    }

    public int zoomIn()
        throws InterruptedException
    {
        if(targetZoom >= 0 && targetZoom < 4)
        {
            //AppDecodeH264.GlZoomIn();
            targetZoom = targetZoom + 1;
        }
        return targetZoom;
    }

    public void zoomInit()
    {
        //AppDecodeH264.GlZoomInit();
        targetZoom = 0;
    }

    public int zoomOut()throws InterruptedException{
        if(targetZoom > 0 && targetZoom <= 4)
        {
            //AppDecodeH264.GlZoomOut();
            targetZoom = targetZoom - 1;
        }
        return targetZoom;
    }

    private byte[] Bitmap2Bytes() {
        Bitmap bitmap;
        byte abyte0[];
        int i=0;
        bitmap = Bitmap.createBitmap(Video_WandH[0], Video_WandH[1], android.graphics.Bitmap.Config.ARGB_8888);
        abyte0 = new byte[bitmap.getWidth() * bitmap.getHeight() * 4];
        int height = bitmap.getHeight();
        int width = bitmap.getWidth();
        while (i < height) {
            int j = 0;
            while (j < width) {
                abyte0[i * j] = (byte)0;
                j++;
            }
            i++;
        }
        return abyte0;
    }

    public void decodeOneFrame(byte[] data, int length) {
        if (mSurface != null && mSurface.isValid()) {
            if (mCodec != null) {
                try {

                    int inputBufferIndex = mCodec.dequeueInputBuffer(0);
                    if (inputBufferIndex >= 0) {
                        ByteBuffer inputBuffer = mCodec.getInputBuffers()[inputBufferIndex];
                        long timestamp = mFrameIndex++ * 1000000 / 30;
                        inputBuffer.clear();
                        inputBuffer.put(data, 0, length);
                        mCodec.queueInputBuffer(inputBufferIndex, 0, length, timestamp, 0);
                    }
                    MediaCodec.BufferInfo bufferInfo = new MediaCodec.BufferInfo();
                    int outputBufferIndex = mCodec.dequeueOutputBuffer(bufferInfo, 0);
                    while (outputBufferIndex >= 0) {
                        mCodec.releaseOutputBuffer(outputBufferIndex, true);
                        outputBufferIndex = mCodec.dequeueOutputBuffer(bufferInfo, 0);
                    }
                } catch (Throwable t) {
                    //Log.e(TAG, "offerDecoder233 == " + t.toString() + t.getMessage());

                    release();
                }

            }
        }
    }
    public void release() {
        if (mCodec != null) {
            mCodec.release();
            mCodec = null;
        }
    }

    public void stop() {
        if (mCodec != null) {
            mCodec.stop();
            mCodecState = 0;
        }
    }

    public void start() {
        if (mCodec != null) {
            mCodec.start();
            mCodecState = 1;
        }
    }
}
3.下一步计划
做了这么多,很多人关心视频质量如何,实际笔者测试过,网络条件正常的时候,分辨率720p以下,视频流畅度上h264和mjpg一样的,延迟h264高些,网络不好的时候,h264流畅度上略好。下一步,笔者计划把抽屉里的几个摄像头都翻出来,测试下1080p,720p,480p这些不同分辨率,不同码率下,视频的清晰度到底如何,给不同应用场景下摄像头的选择提供实际的数据。


