基于Python实现的CTF Crypto加密解密工具
记录一下自己小学期内做的项目。基于Python实现一个能够对凯撒密码、维吉尼亚密码、栅栏密码、摩斯密码、Base64编码、Ascii编码、AES、DES、RSA、RC4的加密解密以及维吉尼亚密文破解密钥和明文的CTF Crypto工具。其中程序的界面使用了qt以及pyside6实现。


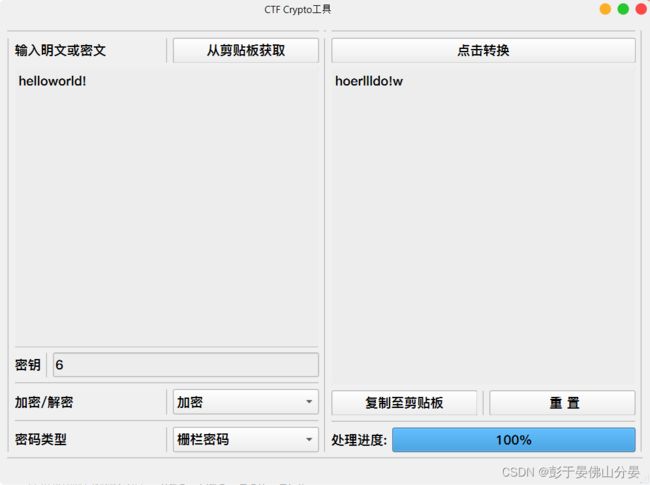
以上就是该程序实现的界面,下面简单记录一下从拿到这个项目大纲再到基本实现的过程:
目录
第一步:进行需求分析,确定实现的功能
第二步:为程序设计一个界面,我这里用的是qt以及pyside6实现
第三步:实例化窗口
第四步:实现不同密码类型下的加密和解密
第五步:将槽与信号和相关的函数进行绑定
总结:
第一步:进行需求分析,确定实现的功能
由于在CTF比赛里的Crypto题目中,经常会有一些大整数的运算用于对字符串的加密和解密,如果比赛中使用计算来对加解密的字符串进行处理会十分麻烦。因此,如果可以编写一个CTF Crypto工具自动处理字符串加解密就显得十分重要了。在众多密码类型中,常见的有以下几种:
常见的古典密码类型: 包括但不限于维吉利亚密码,凯撒密码,栅栏密码……
常见的现代密码类型: AES、DES、RSA、RC4……
常见的编码类型: Base64、Ascii、摩斯密码……
综合以上的需求分析,就尝试实现这几种吧…………
第二步:为程序设计一个界面,我这里用的是qt以及pyside6实现
qt以及pyside6安装:
pip install Pyside6
安装完后就可以进入Pyside6的文件目录下找到design.exe进入qt去设计程序的界面了

进入后一般选择MainWindow或者Widget就够用了

选择类型后就拖动左边的部件到程序的窗口进行设计了

具体的qt界面的使用这里就不再赘述了,可以去b站看一下大佬们的仔细讲解,这里附上个人觉得讲的非常好的两个大佬的视频链接:
Python图形界面 15分钟快速入门PySide/PyQt_哔哩哔哩_bilibili
【python】快速上手GUI图形界面的编写(一)(使用pyside6,pyqt6,pyside2,pyqt5)_哔哩哔哩_bilibili
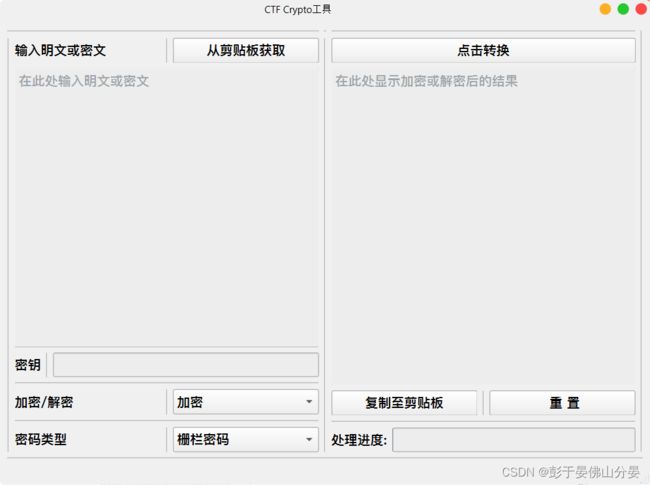
qt设计完界面后就是以下这个样子了
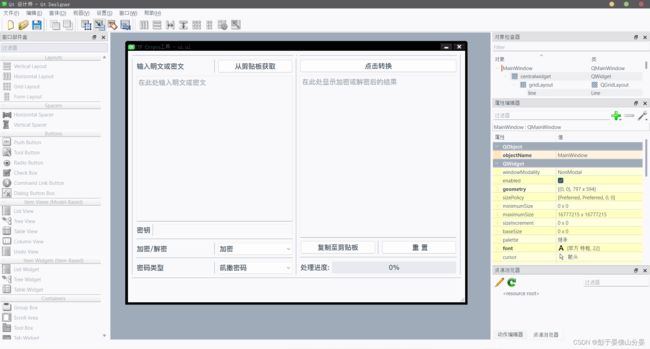
至此,程序的界面就已经设计完毕了,但目前这个ui文件并不能直接部署到python中去使用,需要将其转化为py类型的文件才可以使用
转化方法:
pyside6-uic xxxx.ui -o xxxx.py
转化完成后就可以进入下一步,进行部件与信号的绑定了
第三步:实例化窗口
首先是对ui的文件进行连接并实例化窗口,同时引入了qtmodern模块进行简单的美化
from PySide6.QtWidgets import QApplication, QMainWindow
from ui import Ui_MainWindow

import qtmodern.styles    #引入qtmodern模块,简单的美化程序界面
import qtmodern.windows

class MainWindow(QMainWindow):
    def __init__(self):
        super(MainWindow, self).__init__()
        self.ui = Ui_MainWindow()  # UI类的实例化()
        self.ui.setupUi(self)


if __name__ == '__main__':
    app = QApplication([])  # 启动一个应用
    qtmodern.styles.light(app)    #选择light风格,也可以选择另一个dark风格
    window = MainWindow()  # 实例化主窗口
    window = qtmodern.windows.ModernWindow(window)
    window.show()  # 展示主窗口
    app.exec()  # 避免程序执行到这一行后直接退出
运行看一下程序的界面:
至此,就完成了窗口的实例化了,非常简单。
第四步:实现不同密码类型下的加密和解密
1、凯撒密码的加密和解密
凯撒密码是已知最早、最简单的密码之一。它是一种替换密码,在这种密码中,明文中的每个字母都被“移位”到字母表中一定数量的位置。例如,移动1,A会被B取代,B会变成C,以此类推。这种方法以朱利叶斯·凯撒(Julius Caesar)的名字命名。
假设我们移位的值是6,掰起指头算一下,那么a对应的就是g,b对应h,c对应i等等。
加密前:i love csdn
加密后:o rubk iyjt
python实现代码:
def kaisa_encode(p:str,k:int):
    list = ''
    for word in p:
        if word == ' ':
            tword = ' '
        else:
            tword = chr((ord(word)-ord('a') + k) % 26 + ord('a'))
        list += tword
    return list
def kaisa_decode(c:str,k:int):
    list = ' '
    for word in c:
        if word == ' ':
            tword = ' '
        else:
            tword = chr((ord(word)-ord('a') - k) % 26 + ord('a'))
        list += tword
    return list
2、维吉尼亚密码的加密和解密
维吉尼亚密码是一种简单的多表代换密码(由26个类似的Caesar密码的代换表组成),
即由一些偏移量不同的恺撒密码组成,这些代换在一起组成了密钥。
英文中a~z,由0~25表示。
假设串长为m,明文为P,密文为C,密钥为K则

加密方法
加密公式:C = (P + K)%26
C:密文
P:原文
K:第几套加密方式
使用第几套加密方式是通过约定一个规则来确定的,这个规则就是“密钥”。
这样密钥和原文每个字符一一对应,如果密钥长度不足,那么循环替代。
解密方法
解密公式:P = (C - K)%26
C:密文
P:原文
K:第几套加密方式
python实现代码:
def Veginere_encode(p:str,key:str):
    keylen = len(key)
    plen = len(p)
    c = ''
    i = 0
    while i < plen:
        j = i % keylen
        k = letter.index(key[j])
        m = letter.index(p[i])
        c += letter[(m+k)%26]
        i +=1
    return c
def Veginere_decode(c:str,key:str):
    keylen = len(key)
    clen = len(c)
    p = ''
    i = 0
    while i < clen:
        j = i % keylen
        k = letter.index(key[j])
        m = letter.index(c[i])
        if m < k:
            m +=26
        p += letter[m-k]
        i +=1
    return p
3、栅栏密码的加密和解密
栅栏密码
所谓栅栏密码,就是把要加密的明文分成N个一组,然后把每组的第1个字连起来,形成一段无规律的话。 不过栅栏密码本身有一个潜规则,就是组成栅栏的字母一般不会太多。(一般不超过30个,也就是一、两句话),从本质上讲,栅栏密码是一种置换技术,即仅仅改变位置而不做替换。
加密原理
①把将要传递的信息中的字母交替排成上下两行。
②再将下面一行字母排在上面一行的后边,从而形成一段密码。
③
例如:
明文:THE LONGEST DAY MUST HAVE AN END
加密:
|:把将要传递的信息中的字母交替排成上下两行。
T E O G S D Y U T A E N N
H L N E T A M S H V A E D
II:
密文
:将下面一行字母排在上面一行的后边。
TEOGSDYUTAENN
HLNETAMSHVAED
解密
I.先将密文分为两行
T E O G S D Y U T A E N N
H L N E T A M S H V A E D
II.再按上下上下的顺序组合成一句话
明文:
THE LONGEST DAY MUST HAVE AN END
python实现代码:
def fence_encode(p:str,k:int):
    c = ''     #初始化密文
    n = 0               #提取第n列字符
    while n < k:
        m = 0           #第m分组
        while m < len(p) / k:  #明文长度/加密密钥  即得分组个数
            if (m * k+ n) < len(p):
                c = c + p[int(m * k+ n)]
                m += 1
            else :
                break
        n += 1
    return c
def fence_decode(c:str, k:int):
    kn = int(len(c) / k)
    pt = ''
    yushu = len(c) % k
    steps = []
    if len(c) % k == 0:           #不存在余数
        step = kn
        for i in range(k):
            steps.append(step)
    else:                           #存在余数
        big_step = math.ceil(len(c) / k)
        small_step = int(len(c) / k)
        for p in range(yushu):
            steps.append(big_step)
        for q in range(k - yushu):
            steps.append(small_step)
    n_column = 0
    while n_column < math.ceil(len(c) / k):
        count_steps = 0
        for one_step in steps:
            if len(pt) == len(c):
                break
            else:
                pt += c[n_column + count_steps]
                count_steps += one_step
        n_column += 1
    return pt
4、Base64编码的加密和解密
Base64编码,是由64个字符组成编码集:26个大写字母A~Z,26个小写字母a~z,10个数字0~9,符号“+”与符号“/”。Base64编码的基本思路是将原始数据的三个字节拆分转化为四个字节,然后根据Base64的对应表,得到对应的编码数据。
当原始数据凑不够三个字节时,编码结果中会使用额外的符号“=”来表示这种情况。
python实现代码:
def base64_encode(p: str):
    encodestr = base64.b64encode(p.encode('utf-8'))
    return str(encodestr,'utf-8')
def base64_decode(c: str):
    decodestr = base64.b64decode(c)
    return str(decodestr,'utf-8')
5、ASCii编码的加密和解密
ASCii编码相信大家都很熟悉了,在此就不在过多赘述了,而且在python中实现也非常简单
python实现代码:
def ascii_encode(p:str):
    ascii_values = []
    for character in p:
        ascii_values.append(ord(character))
        str_ascii = [str(i) for i in ascii_values]  # 转换str类型
        c = '/'.join(str_ascii)
    return c
def ascii_decode(strc:str):
    tc = strc
    c = re.findall(r"\d+\b",tc)
    c = list(map(int,c))
    str_values = []
    for character in c:
        str_values.append(chr(character))
        str_values = [str(i) for i in str_values]  # 转换str类型
        c = ''.join(str_values)
    return c
6、摩斯密码的加密和解密
摩尔斯电码(Morse code)也被称作摩斯密码,是一种时通时断的信号代码,通过不同的排列顺序来表达不同的英文字母、数字和标点符号。它发明于1837年,是一种早期的数字化通信形式。不同于现代化的数字通讯,摩尔斯电码只使用零和一两种状态的二进制代码,它的代码包括五种:短促的点信号“・”,保持一定时间的长信号“—”,表示点和划之间的停顿、每个词之间中等的停顿,以及句子之间长的停顿。
python实现代码:
def morse_encode(message:str):
    cipher = ''
    for code in message:
        if code != ' ':
            # 查字典并添加对应的摩斯密码
            # 用空格分隔不同字符的摩斯密码
            cipher += Dict_MorseCode[code] + ' '
        else:
            # 1个空格表示不同的字符
            # 2表示不同的词
            cipher += ' '
    return cipher
def morse_decode(message:str):
    # 在末尾添加额外空间以访问最后一个摩斯密码
    message += ' '
    decipher = ''
    citext = ''
    global i
    for code in message:
        # 检查空间
        if code != ' ':
            i = 0
            # 在空格的情况下
            citext += code
        # 在空间的情况下
        else:
            # 如果 i = 1 表示一个新字符
            i += 1
            # 如果 i = 2 表示一个新单词
            if i == 2:
                # 添加空格来分隔单词
                decipher += ' '
            else:
                # 使用它们的值访问密钥(加密的反向)
                decipher += list(Dict_MorseCode .keys())[list(Dict_MorseCode .values()).index(citext)]
                citext = ''
    return decipher
7、AES的加密和解密
AES中实现的是ECB模式
ECB模式:ECB (电子密码本)模式是最简单的块密码加密模式,加密前根据数据块大小(如AES为128位)分成若干块,之后将每块使用相同的密钥单独通过块加密器密器。这种加密模式的优点就是简单,不需要初始化向量(IV) ,每个数据块独立进行加/解密,利于并行计算,加/解密效率很高。但这种模式中,所有数据都采用相同密钥进行加/解密,也没有经过任何逻辑运算,相同明文得到相同的密文,所以可能导致“选择明文攻击”的发生。
python实现代码:
def aes_encrypt(key, data):
    key = key.encode('utf8')
    # 字符串补位
    data = pad(data)
    cipher = AES.new(key, AES.MODE_ECB)
    # 加密后得到的是bytes类型的数据,使用Base64进行编码,返回byte字符串
    result = cipher.encrypt(data.encode())
    encodestrs = base64.b64encode(result)
    enctext = encodestrs.decode('utf8')
    #print(enctext)
    return enctext
def aes_decrypt(key, data):
    key = key.encode('utf8')
    data = base64.b64decode(data)
    cipher = AES.new(key, AES.MODE_ECB)
    # 去补位
    text_decrypted = unpad(cipher.decrypt(data))
    text_decrypted = text_decrypted.decode('utf8')
    #print(text_decrypted)
    return text_decrypted
8、DES的加密和解密
DES (Data Encryption Standard,数据加密标准)是1972年美国IBM公司研制的对称密码体制(加密和解密使用相同的密钥)加密算法, 1977年被美国联邦政府的国家标准局确定为联邦资料处理标准(FIPS),并授权在非密级政府通信中使用,随后该算法在国际上广泛流传开来。
DES设计中使用了分组密码设计的两个原则:混淆(confusion)和扩散(diffusion),其目的是抗击敌手对密码系统的统计分析。混淆是使密文的统计特性与密钥的取值之间的关系尽可能复杂化,以使密钥和明文以及密文之间的依赖性对密码分析者来说是无法利用的。扩散的作用就是将每一位明文的影响尽可能迅速地作用到较多的输出密文位中,以便在大量的密文中消除明文的统计结构,并且使每一位密钥的影响尽可能迅速地扩展到较多的密文位中,以防对密钥进行逐段破译。
同样的,此处的DES实现的也是ECB模式
python实现代码:
# 采用ECB方式加密,填充方式采用zeropadding
# 明文输入需要是ASCII在 0-255之间的字符,中文输入暂时不支持
# 密钥需要是8字节字符串
# IP置换表
IP_table=[58, 50, 42, 34, 26, 18, 10,  2,
  60, 52, 44, 36, 28, 20, 12,  4,
  62, 54, 46, 38, 30, 22, 14,  6,
  64, 56, 48, 40, 32, 24, 16,  8,
  57, 49, 41, 33, 25, 17,  9,  1,
  59, 51, 43, 35, 27, 19, 11,  3,
  61, 53, 45, 37, 29, 21, 13,  5,
  63, 55, 47, 39, 31, 23, 15,  7
]

# 扩展置换表
extend_table=[32,  1,  2,  3,  4,  5,
  4,  5,  6,  7,  8,  9,
  8,  9, 10, 11, 12, 13,
  12, 13, 14, 15, 16, 17,
  16, 17, 18, 19, 20, 21,
  20, 21, 22, 23, 24, 25,
  24, 25, 26, 27, 28, 29,
  28, 29, 30, 31, 32,1
]

# S盒中的S1盒
S1 = [[14,  4, 13,  1,  2, 15, 11,  8,  3, 10,  6, 12,  5,  9,  0,  7],
[0, 15,  7,  4, 14,  2, 13,  1, 10,  6, 12, 11,  9,  5,  3,  8],
[4,  1, 14,  8, 13,  6,  2, 11, 15, 12,  9,  7,  3, 10,  5,  0],
[15, 12,  8,  2,  4,  9,  1,  7,  5, 11,  3, 14, 10,  0,  6, 13]
]
# S盒中的S2盒
S2 = [[15,  1,  8, 14,  6, 11,  3,  4,  9,  7,  2, 13, 12,  0,  5, 10],
[3, 13,  4,  7, 15,  2,  8, 14, 12,  0,  1, 10,  6,  9, 11,  5],
[0, 14,  7, 11, 10,  4, 13,  1,  5,  8, 12,  6,  9,  3,  2, 15],
[13,  8, 10,  1,  3, 15,  4,  2, 11,  6,  7, 12,  0,  5, 14,  9]
]
# S盒中的S3盒
S3 = [[10,  0,  9, 14,  6,  3, 15,  5,  1, 13, 12,  7, 11,  4,  2,  8],
[13,  7,  0,  9,  3,  4,  6, 10,  2,  8,  5, 14, 12, 11, 15,  1],
[13,  6,  4,  9,  8, 15,  3,  0, 11,  1,  2, 12,  5, 10, 14,  7],
[1, 10, 13,  0,  6,  9,  8,  7,  4, 15, 14,  3, 11,  5,  2, 12]
]
# S盒中的S4盒
S4 = [[7, 13, 14,  3,  0,  6,  9, 10,  1,  2,  8,  5, 11, 12,  4, 15],
[13,  8, 11,  5,  6, 15,  0,  3,  4,  7,  2, 12,  1, 10, 14,  9],
[10,  6,  9,  0, 12, 11,  7, 13, 15,  1,  3, 14,  5,  2,  8,  4],
[3, 15,  0,  6, 10,  1, 13,  8,  9,  4,  5, 11, 12,  7,  2, 14]
]
# S盒中的S5盒
S5 = [[2, 12,  4,  1,  7, 10, 11,  6,  8,  5,  3, 15, 13,  0, 14,  9],
[14, 11,  2, 12,  4,  7, 13,  1,  5,  0, 15, 10,  3,  9,  8,  6],
[4,  2,  1, 11, 10, 13,  7,  8, 15,  9, 12,  5,  6,  3,  0, 14],
[11,  8, 12,  7,  1, 14,  2, 13,  6, 15,  0,  9, 10,  4,  5,  3]
]
# S盒中的S6盒
S6 = [[12,  1, 10, 15,  9,  2,  6,  8,  0, 13,  3,  4, 14,  7,  5, 11],
[10, 15,  4,  2,  7, 12,  9,  5,  6,  1, 13, 14,  0, 11,  3,  8],
[9, 14, 15,  5,  2,  8, 12,  3,  7,  0,  4, 10,  1, 13, 11,  6],
[4,  3,  2, 12,  9,  5, 15, 10, 11, 14,  1,  7,  6,  0,  8, 13]
]
# S盒中的S7盒
S7 = [[4, 11,  2, 14, 15,  0,  8, 13,  3, 12,  9,  7,  5, 10,  6,  1],
[13,  0, 11,  7,  4,  9,  1, 10, 14,  3,  5, 12,  2, 15,  8,  6],
[1,  4, 11, 13, 12,  3,  7, 14, 10, 15,  6,  8,  0,  5,  9,  2],
[6, 11, 13,  8,  1,  4, 10,  7,  9,  5,  0, 15, 14,  2,  3, 12]
]
# S盒中的S8盒
S8 = [[13,  2,  8,  4,  6, 15, 11,  1, 10,  9,  3, 14,  5,  0, 12,  7],
[1, 15, 13,  8, 10,  3,  7,  4, 12,  5,  6, 11,  0, 14,  9,  2],
[7, 11,  4,  1,  9, 12, 14,  2,  0,  6, 10, 13, 15,  3,  5,  8],
[2,  1, 14,  7,  4, 10,  8, 13, 15, 12,  9,  0,  3,  5,  6, 11]
]
S = [S1, S2, S3, S4, S5, S6, S7, S8]

# P盒
P_table = [16,  7, 20, 21,
  29, 12, 28, 17,
  1, 15, 23, 26,
  5, 18, 31, 10,
  2,  8, 24, 14,
  32, 27,  3,  9,
  19, 13, 30,  6,
  22, 11,  4, 25
]

# 压缩置换表1,不考虑每字节的第8位,将64位密钥减至56位。然后进行一次密钥置换。
PC_1=[ 57, 49, 41, 33, 25, 17,  9,
  1, 58, 50, 42, 34, 26, 18,
  10,  2, 59, 51, 43, 35, 27,
  19, 11,  3, 60, 52, 44, 36,
  63, 55, 47, 39, 31, 23, 15,
  7, 62, 54, 46, 38, 30, 22,
  14,  6, 61, 53, 45, 37, 29,
  21, 13,  5, 28, 20, 12,  4
]

# 压缩置换表2,用于将循环左移和右移后的56bit密钥压缩为48bit。
PC_2=[14, 17, 11, 24,  1,  5,
3, 28, 15,  6, 21, 10,
  23, 19, 12,  4, 26,  8,
  16,  7, 27, 20, 13,  2,
  41, 52, 31, 37, 47, 55,
  30, 40, 51, 45, 33, 48,
  44, 49, 39, 56, 34, 53,
  46, 42, 50, 36, 29, 32
]
# 逆置换IP表
_IP_table=[40,  8, 48, 16, 56, 24, 64, 32,
  39,  7, 47, 15, 55, 23, 63, 31,
  38,  6, 46, 14, 54, 22, 62, 30,
  37,  5, 45, 13, 53, 21, 61, 29,
  36,  4, 44, 12, 52, 20, 60, 28,
  35,  3, 43, 11, 51, 19, 59, 27,
  34,  2, 42, 10, 50, 18, 58, 26,
  33,  1, 41,  9, 49, 17, 57, 25
]

# 循环移位位数表
moveNum=[1,1,2,2,2,2,2,2,1,2,2,2,2,2,2,1]


# IP置换函数
def IP(message):
    result = ''
    # 用IP表进行置换即可
    for i in IP_table:
        result += message[i-1]
    return result


# 扩展置换函数
def extend(R0):
    result=''
    # 用扩展置换表进行置换即可
    for i in extend_table:
        result += R0[i-1]
    return result


# S盒子压缩函数
def sbox(afterRoundKey):
    result = ''
    for m in range(0,48,6):
        # 通过第1位和第6位算出列号
        i = int(afterRoundKey[m])*2+int(afterRoundKey[m+5])
        # 通过第2、3、4、5位算出行号
        j = int(afterRoundKey[m+1])*8+int(afterRoundKey[m+2])*4+int(afterRoundKey[m+3])*2+int(afterRoundKey[m+4])
        result += str('{:04b}'.format(S[m//6][i][j]))
    return result


# 轮密钥加函数
def addRoundKey(afterExtend,roundKey):
    result = ''
    for i in range(48):
        # 进行按位异或运算
        result += str(int(afterExtend[i])^int(roundKey[i]))
    return result


# 线性置换P盒
def pbox(afterSbox):
    result = ''
    # 用P盒表进行置换即可
    for i in range(32):
        result += str(afterSbox[P_table[i]-1])
    return result


# F函数
def F(R0,key):
    # 扩展将32位扩展为48位
    R0 = extend(R0)
    # 与轮密钥进行按位异或
    afterRoundKey = addRoundKey(R0,key)
    # 放入S盒压缩
    afterSbox = sbox(afterRoundKey)
    # 放入P盒进行线性替换
    result = pbox(afterSbox)
    return result


#轮密钥生成
def generateKey(key):
    result = ''
    roundKey=[]
    # 进行第一次压缩置换,将64位密钥减至56位,即去除8个校验位
    for i in PC_1:
        result += key[i-1]
    # 分位左右两部分,每部分28位
    C0=result[:28]
    D0=result[28:]
    for i in range(16):
        # 按循环移位位数表进行移位操作
        C0=C0[moveNum[i]:]+C0[:moveNum[i]]
        D0=D0[moveNum[i]:]+D0[:moveNum[i]]
        tmp=C0+D0
        ret = ''
        # 进行第二次压缩将56位压缩减至48位
        for i in PC_2:
            ret+=tmp[i-1]
        # 生成轮密钥存储到列表中
        roundKey.append(ret)
    return roundKey


# IP逆置换
def inverseIP(afterF):
    ciphertext=''
    # 用逆IP表进行置换即可
    for i in _IP_table:
        ciphertext+=afterF[i-1]
    return ciphertext


# 加密函数
def encrypt(plaintext,roundKey):
    # 进行IP置换
    result = IP(plaintext)
    # 分左右32bit
    L0=result[:32]
    R0=result[32:]
    # 进行16轮加密
    for i in range(16):
        tmp=R0
        results = F(R0, roundKey[i])
        # print(results)
        # print(roundKey[0])
        R0=''
        for j in range(32):
            R0+=str(int(L0[j])^int(results[j]))
        L0=tmp
        # print(R0)
    # 最后一轮结束后结果要左右交换
    afterF = R0+L0
    # 进行逆IP置换得到密钥
    ciphertext=inverseIP(afterF)
    return ciphertext


# 解密函数
def decrypt(ciphertext, roundKey):
    result = IP(ciphertext)
    Li = result[:32]
    Ri = result[32:]
    # 解密函数对轮密钥使用要倒序使用
    for i in range(15,-1,-1):
        tmp=Ri
        results = F(Ri,roundKey[i])
        Ri = ''
        for j in range(32):
            Ri += str(int(Li[j])^int(results[j]))
        Li = tmp
    afterF = Ri+Li
    plaintext = inverseIP(afterF)
    return plaintext

# 0填充函数
def zeroPadding(message):
    # UTF-8解码
    message = list(bytes(message,'utf8'))
    # 先填充一个0,这使得如果明文本来就是64位仍然要填充64个0到末尾
    message.append(0)
    # 填充0到8字节的整数倍
    while len(message)%8!=0:
        message.append(0)
    ret = []
    strs=''
    # 分组,化为二进制串,然后没8字节分组放入ret列表中
    for i in range(len(message)):
        strs+=str('{:08b}'.format(message[i]))
        if (i+1)%8==0:
            ret.append(strs)
            strs=''
    return ret

# 处理密文函数
def progress(cipher):
    lens=len(cipher)
    # 因为密文输入是16进制,所以直接按没16个字符分一组即可,最后会被解释成16*4=64bit
    m=lens//16
    ret=[]
    for i in range(m):
        ret.append(cipher[i*16:(i+1)*16])
    return ret

# 将16进制位串变为字符
def to_chr(text):
    lens = len(text)
    # 每两个个16进制数被解释成一个ASCII码字符,2**8=256
    m = lens // 2
    lists = []
    for i in range(m):
        lists.append(text[i * 2:(i + 1) * 2])
    strs = ''
    for s in lists:
        tmp=int(s, 16)
        # 因为ascii码0不会被输入,因此认为是补位值,当存在补位值,后继必为补位值,直接舍弃即可
        # 对中文进行加解密时这里需要优化
        if tmp==0:
            break
        strs += chr(tmp)
    return strs
def des_encrypt(message:str,key:str):
    keylist = list(bytes(key, 'utf8')) # 将密钥变为ascii码
    if len(keylist)!=8:# 密钥应该为8字节的整数倍
        errorp = "错误!请输入8字节密钥!"
        return errorp
    else:
        key=''
        for i in keylist:
            key += str('{:08b}'.format(i)) # 将密钥的ascii码转为2进制
        roundKey = generateKey(key)# 生成轮密钥,用列表存储
        lists=zeroPadding(message) # 进行明文0填充,并分组,每64位一组
        cipher=''
        for p in lists:
            cipher+=encrypt(p, roundKey) # 每组分别加密,因为采用ECB方式,直接将各段加密结果链接即可
        cipher=str(hex(int(cipher,2)))[2:] # 将结果2进制串转化为16进制串输出
        return(cipher)
def des_decrypt(text:str,key:str):
        keylist = list(bytes(key, 'utf8'))
        if len(keylist)!=8:
            errorp = "错误!请输入8字节密钥!"
            return errorp
        else:
            key = ''
        for i in keylist:
            key += str('{:08b}'.format(i))
        roundKey = generateKey(key)
        cipherlist=progress(text)
        plaintext=''
        for c in cipherlist:
            message = str('{:064b}'.format(int(c, 16)))
            tmp=decrypt(message, roundKey)
            if c==cipherlist[-1] and  int(tmp,2)==0: # 如果当前段位最后一段且当前段值为0,认为是补位段,直接舍弃
                break
            plaintext+=tmp
        plaintext=str(hex(int(plaintext,2)))[2:]
        plaintext = to_chr(plaintext) # 将解密结果化为字符输出
        return(plaintext)
9、RSA的加密和解密
RSA加密算法是一种非对称加密算法,所谓非对称,就是指该算法加密和解密使用不同的密钥,即使用加密密钥进行加密、解密密钥进行解密。在RAS算法中,加密密钥(即公开密钥)PK是公开信息,而解密密钥(即秘密密钥)SK是需要保密的。加密算法E和解密算法D也都是公开的。虽然解密密钥SK是由公开密钥PK决定的,由于无法计算出大数n的欧拉函数phi(N),所以不能根据PK计算出SK。
也就是说,对极大整数做因数分解的难度决定了RSA算法的可靠性。理论上,只要其钥匙的长度n足够长,用RSA加密的信息实际上是不能被解破的。
RSA算法通常是先生成一对RSA密钥,其中之一是保密密钥,由用户保存;另一个为公开密钥,可对外公开。为提高保密强度,RSA密钥至少为500位长,一般推荐使用1024位。这就使加密的计算量很大。为减少计算量,在传送信息时,常采用传统加密方法与公开密钥加密方法相结合的方式,即信息采用改进的DES或IDEA密钥加密,然后使用RSA密钥加密对话密钥和信息摘要。对方收到信息后,用不同的密钥解密并可核对信息摘要。
python实现代码:
# ------------------------加密------------------------
def rsa_encrypt(text: str, public_key: bytes):
    # 字符串指定编码(转为bytes)
    text = text.encode('utf-8')
    # 构建公钥对象
    cipher_public = PKCS1_v1_5.new(RSA.importKey(public_key))
    # 加密(bytes)
    text_encrypted = cipher_public.encrypt(text)
    # base64编码,并转为字符串
    text_encrypted_base64 = base64.b64encode(text_encrypted).decode()
    return text_encrypted_base64
# ------------------------解密------------------------
def rsa_decrypt(text_encrypted_base64: str, private_key: bytes):
    # 字符串指定编码(转为bytes)
    text_encrypted_base64 = text_encrypted_base64.encode('utf-8')
    # base64解码
    text_encrypted = base64.b64decode(text_encrypted_base64)
    # 构建私钥对象
    cipher_private = PKCS1_v1_5.new(RSA.importKey(private_key))
    # 解密(bytes)
    text_decrypted = cipher_private.decrypt(text_encrypted, Random.new().read)
    # 解码为字符串
    text_decrypted = text_decrypted.decode()
    return text_decrypted
10、RC4的加密和解密
RC4算法的特点是算法简单,运行速度快,而且密钥长度是可变的,可变范围为1-256字节(8-2048比特),
在如今技术支持的前提下,当密钥长度为128比特时,用暴力法搜索密钥已经不太可行,所以可以预见
RC4的密钥范围任然可以在今后相当长的时间里抵御暴力搜索密钥的攻击。实际上,如今也没有找到对
于128bit密钥长度的RC4加密算法的有效攻击方法。
RC4加密算法中的几个关键变量:
1、密钥流:RC4算法的关键是根据明文和密钥生成相应的密钥流,密钥流的长度和明文的长度是对应的,
也就是说明文的长度是500字节,那么密钥流也是500字节。当然,加密生成的密文也是500字节,
因为密文第i字节=明文第i字节^密钥流第i字节;
2、状态向量S:长度为256,S[0],S[1].....S[255]。每个单元都是一个字节,算法运行的任何时候,
S都包括0-255的8比特数的排列组合,只不过值的位置发生了变换;
3、临时向量T:长度也为256,每个单元也是一个字节。如果密钥的长度是256字节,就直接把密钥
的值赋给T,否则,轮转地将密钥的每个字节赋给T;
4、密钥K:长度为1-256字节,注意密钥的长度keylen与明文长度、密钥流的长度没有必然关系,
通常密钥的长度趣味16字节(128比特)。
python实现代码:
def rc4_encrypt(text, skey):        # 加密
    key = bytes(skey, encoding='utf-8')
    enc = ARC4.new(key)
    res = enc.encrypt(text.encode('utf-8'))
    res=base64.b64encode(res)
    res = str(res,'utf-8')
    return res
def rc4_decrypt(text, skey):        # 解密
    text = base64.b64decode(text)
    key = bytes(skey, encoding='utf-8')
    enc = ARC4.new(key)
    res = enc.decrypt(text)
    res = str(res,'utf-8')
    return res
11、维吉尼亚密文破解密钥及明文
这个实现的原理建议看一下其他大佬写的博客
python代码:
MAX_KEY_LENGTH_GUESS = 20   #猜测密钥的最大长度
alphabet = 'abcdefghijklmnopqrstuvwxyz'

# 英文字母出现的频率
english_frequences = [0.08167, 0.01492, 0.02782, 0.04253, 0.12702, 0.02228, 0.02015,
					  0.06094, 0.06966, 0.00153, 0.00772, 0.04025, 0.02406, 0.06749,
					  0.07507, 0.01929, 0.00095, 0.05987, 0.06327, 0.09056, 0.02758,
					  0.00978, 0.02360, 0.00150, 0.01974, 0.00074]

# 返回给定密文的偏移量
def get_index_c(ciphertext):

	N = float(len(ciphertext))
	frequency_sum = 0.0

	# 重合指数公式  #频率总和+=密文中的字母*密文中的字母-1
	for letter in alphabet:
		frequency_sum+= ciphertext.count(letter) * (ciphertext.count(letter)-1)

	# 重合指数公式  #ic=频率和/(N*(N-1))
	ic = frequency_sum/(N*(N-1))
	return ic

#返回具有最高平均重合偏移量的密钥的长度
def get_key_length(ciphertext):
	ic_table=[]

#根据猜测的密钥长度将密文拆分为序列,从0到最大密钥长度猜测(20)
#将密文分解成序列并按符合指数排序的过程
#IC最高的猜测密钥长度是最可能的密钥长度
	for guess_len in range(MAX_KEY_LENGTH_GUESS):
		ic_sum=0.0
		avg_ic=0.0
		for i in range(guess_len):
			sequence=""
			#将密文分解为序列
			for j in range(0, len(ciphertext[i:]), guess_len):
				sequence += ciphertext[i+j]
			ic_sum+=get_index_c(sequence)
		if not guess_len==0:
			avg_ic=ic_sum/guess_len
		ic_table.append(avg_ic)

	#返回重合度最高的偏移量(也就是最可能的密钥的长度)
	best_guess = ic_table.index(sorted(ic_table, reverse = True)[0])
	second_best_guess = ic_table.index(sorted(ic_table, reverse = True)[1])

#因为这个程序有时会认为一个密钥实际上是自身的两倍,或者是自身的三倍,
#所以相同字符下最短的才可能是密钥。
#该错误的原因是密钥“dog”与“dogdog”的频率分布几乎相同
	if best_guess % second_best_guess == 0:
		return second_best_guess
	else:
		return best_guess

#对密文的“序列”执行频率分析,以返回密钥该部分的字母
#使用卡方统计来衡量两个概率分布的相似程度。
#(这两种是密文和常规英文分布)
def freq_analysis(sequence):
	all_chi_squareds = [0] * 26

	for i in range(26):

		chi_squared_sum = 0.0

		sequence_offset = [chr(((ord(sequence[j])-97-i)%26)+97) for j in range(len(sequence))]
		v = [0] * 26
		#计算ascii中已存在的偏移量中每个字母的数字
		for l in sequence_offset:
			v[ord(l) - ord('a')] += 1
		#将数组除以序列的长度,得到频率百分比
		for j in range(26):
			v[j] *= (1.0/float(len(sequence)))

		#比较字母的频率
		for j in range(26):
			chi_squared_sum+=((v[j] - float(english_frequences[j]))**2)/float(english_frequences[j])
		all_chi_squareds[i] = chi_squared_sum

#返回需要移动的密钥的字母
#这可以通过最小的卡方统计(序列分布和)
	shift = all_chi_squareds.index(min(all_chi_squareds))

	return chr(shift+97)

def get_key(ciphertext, key_length):
	key = ''

	#计算密钥的每个字母的字母频率表
	for i in range(key_length):
		sequence=""
		#将密文分解为序列
		for j in range(0,len(ciphertext[i:]), key_length):
			sequence+=ciphertext[i+j]
		key+=freq_analysis(sequence)

	return key

#返回给定密文和密钥的明文
def decrypt(ciphertext, key):
	#创建密文和密钥的ascii值数组
	cipher_ascii = [ord(letter) for letter in ciphertext]
	key_ascii = [ord(letter) for letter in key]
	plain_ascii = []

	#将密文的每个ascii值转换为明文的ascii值
	for i in range(len(cipher_ascii)):
		plain_ascii.append(((cipher_ascii[i]-key_ascii[i % len(key)]) % 26) +97)

	#将ascii值数组转换为字符
	plaintext = ''.join(chr(i) for i in plain_ascii)
	return plaintext
def getkey(text:str):
	ciphertext_unfiltered = text
	ciphertext = ''.join(x.lower() for x in ciphertext_unfiltered if x.isalpha())
	key_length=get_key_length(ciphertext)
	key = get_key(ciphertext, key_length)
	return key
def getplaintext(text:str,key:str):
	ciphertext_unfiltered = text
	#过滤文本,使其仅为字母数字字符和小写字符
	ciphertext = ''.join(x.lower() for x in ciphertext_unfiltered if x.isalpha())
	plaintext = decrypt(ciphertext, key)
	return plaintext

if __name__ == '__main__':
	print()
第五步:将槽与信号和相关的函数进行绑定
进行按钮槽的绑定,也就是自定义按钮按下时的动作,这里的动作指的就是进行加解密的函数
class MainWindow(QMainWindow):
    def __init__(self):
        super(MainWindow, self).__init__()
        self.ui = Ui_MainWindow()  # UI类的实例化()
        self.ui.setupUi(self)
        self.clipboard=QApplication.clipboard()
        self.ui.getStr.clicked.connect(self.OngetStr)
        self.ui.getResult.clicked.connect(self.OngetResult)
        self.ui.resetButton.clicked.connect(self.Onresetbt)
        self.ui.button.clicked.connect(self.Onbutton)
        self.ui.progressBar.setRange(0,100)
        self.ui.cType.activated.connect(self.Chosectype)
        self.ui.eodType.activated.connect(self.Choseeod)
接下来只需要在相应的槽内调用之前实现的函数就可以了,过程比较简单就不再赘述了 ,接下来再介绍一下程序中的进度条槽和重置按钮槽的绑定操作
进度条:
对进度条增加分布延迟递增的操作,使其看起来是从0逐渐跑到100的,跑完后再将结果输出
        time_cost = 10
        for index, _ in enumerate(range(time_cost)):
            progress = index * 100 // time_cost
            self.ui.progressBar.setValue(progress)        #给进度条加上延迟分步实时输出
            time.sleep(0.035)
        self.ui.progressBar.setValue(100)
        if flag == 1:
            self.ui.keyText.setText(pkey)
            self.ui.resultText.setPlainText(result)
        else:
            self.ui.resultText.setPlainText(result)
重置按钮:
通过点击重置按钮将输入的明文密文、密钥、转换结果的文本框都清空,方便再次操作
    def Onresetbt(self):                  #按下重置按钮的操作
        self.ui.progressBar.reset()
        self.ui.strText.clear()
        self.ui.keyText.clear()
        self.ui.resultText.clear()
总结:
之前python并没有完整的部署一个项目并实现程序的界面设计。而通过这次实现的这个项目,令我从中学习到了很多,使我收益匪浅。
完整的项目下载地址:对凯撒密码、维吉尼亚密码、栅栏密码、摩斯密码、Base64编码、AES、DES、RSA、RC4维吉尼亚密钥破解的加密解密工具-Python文档类资源-CSDN下载