SpringSecurity
目录
一、简介
二、与Shiro比较
三、认证与授权
四、SpringSecurity+JWT+redis实现登录拦截
4.1导入依赖
4.2SecurityConfig配置类
4.3认证过滤器
4.4实现登录
4.5退出登录
一、简介
SpringSecurity 是一个功能强大且高度可定制的身份验证和访问控制框架。它是保护基于 Spring 的应用程序的事实上的标准。
SpringSecurity 是一个致力于为 Java 应用程序提供身份验证和授权的框架。像所有 Spring 项目一样,Spring Security 的真正强大之处在于它可以如何轻松地扩展以满足自定义需求
官网地址:Spring Security
二、与Shiro比较
功能,社区资源上SpringSecurity远远优于Shiro,但是Shiro是轻量级更加容易上手,在SSM框架中整合 Spring Security 比较麻烦,但是在SpringBoot项目中 Spring Security 提供了自动化配置方案,可以使用更少的配置来使用 Spring Security,所以推荐在SSM框架中使用Shiro,在SpringBoot和SpringCloud中使用SpringSecurity。
三、认证与授权
3.1认证
SpringSecurity 为身份验证提供了全面的支持。身份验证是我们验证试图访问特定资源的用户身份的方式。对用户进行身份验证的一种常见方法是要求用户输入用户名和密码。一旦执行了身份验证,我们就知道了身份并可以执行授权。SpringSecurity 内置了对用户身份验证的支持。
(1)使用SpringSecurity进行简单认证
导入依赖
    4.0.0

        org.springframework.boot
        spring-boot-starter-parent
        2.7.2


    com.dudu
    springsecuritydemo
    0.0.1-SNAPSHOT
    springsecuritydemo
    Demo project for Spring Boot

        1.8


            org.springframework.boot
            spring-boot-starter-web


            org.projectlombok
            lombok
            true


            org.springframework.boot
            spring-boot-starter-test
            test


                org.springframework.boot
                spring-boot-maven-plugin
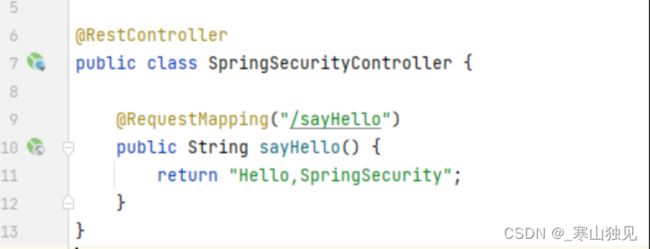
在Conbtroller中建立SpringSecurityController
运行项目,访问sayHello接口发现正常
接下来,导入SpringSecurity依赖
       org.springframework.boot
       spring-boot-starter-security
然后再次访问sayHello接口时,就会跳转到一个登录界面,但在我们实际项目中并没有这个登录界面的代码,这个登录界面是SpringSecurity内置的用户身份验证
同时,在运行项目时,我们注意观察打印台,会发现账号密码会在打印台输出,每次启动后密码都会变化!
四、SpringSecurity+JWT+redis实现登录拦截
4.1导入依赖
            org.springframework.boot
            spring-boot-starter-data-redis


            commons-codec
            commons-codec


            io.jsonwebtoken
            jjwt
            0.9.1


            redis.clients
            jedis
            3.2.0


            org.apache.commons
            commons-pool2
4.2SecurityConfig配置类
import com.example.cxsystem.demos.filter.JwtAuthenticationTokenFilter;
import org.springframework.beans.factory.annotation.Autowired;
import org.springframework.context.annotation.Bean;
import org.springframework.security.config.annotation.authentication.builders.AuthenticationManagerBuilder;
import org.springframework.security.config.annotation.web.builders.HttpSecurity;
import org.springframework.security.config.annotation.web.configuration.EnableWebSecurity;
import org.springframework.security.config.annotation.web.configuration.WebSecurityConfigurerAdapter;
import org.springframework.security.config.http.SessionCreationPolicy;
import org.springframework.security.crypto.bcrypt.BCryptPasswordEncoder;
import org.springframework.security.crypto.password.PasswordEncoder;
import org.springframework.security.web.authentication.UsernamePasswordAuthenticationFilter;


@EnableWebSecurity
public class SecurityConfig extends WebSecurityConfigurerAdapter {

    @Autowired
    private JwtAuthenticationTokenFilter jwtAuthenticationTokenFilter;

    //创建BCryptPasswordEncoder注入容器
    @Bean
    public PasswordEncoder passwordEncoder() {
        return new BCryptPasswordEncoder();
    }

    //链式编程
    @Override
    protected void configure(HttpSecurity http) throws Exception {
        //首页所有人可以访问,功能页只有对应有权限的人才能访问

        //请求授权的规则
        http.authorizeHttpRequests()
                .antMatchers("/")
                .permitAll()
                .antMatchers("/html1/**").hasRole("vip1")//vip1才能访问html1页面下的
                .antMatchers("/html2/**").hasRole("vip2");  //vip2才能访问html2页面下的


        //不通过Session获取SecurityContext
        http.sessionManagement().sessionCreationPolicy(SessionCreationPolicy.STATELESS);

        //没有权限默认回到登录页面,需要开启登录页面
        //定制登录页   loginPage("/loginPage")
        http.formLogin().loginPage("/loginPage").usernameParameter("user").passwordParameter("pwd").loginProcessingUrl("login");

        //注销,注销完后返回首页
        http.csrf().disable();  //关闭csrf功能,登陆失败存在的原因
        http.logout().logoutUrl("/");

        //开启记住我功能(cookie)  自定义接受前端的参数
        http.rememberMe().rememberMeParameter("remember");

        http.addFilterBefore(jwtAuthenticationTokenFilter, UsernamePasswordAuthenticationFilter.class);
    }

    //认证
    //密码编码:应该加密
    //在SpringSecurity增加了许多加密方法
    @Override
    protected void configure(AuthenticationManagerBuilder auth) throws Exception {
        //这些数据正常的话应该从数据库中获取
        auth.inMemoryAuthentication().passwordEncoder(new BCryptPasswordEncoder())
                .withUser("zzm").password(new BCryptPasswordEncoder().encode("123456")).roles("vip1","vip2")
                .and()
                .withUser("root").password(new BCryptPasswordEncoder().encode("123456")).roles("vip1","vip2");
    }
}
4.3认证过滤器
@Component
public class JwtAuthenticationTokenFilter extends OncePerRequestFilter {

    @Autowired
    private RedisTemplate redisTemplate ;

    @Override
    protected void doFilterInternal(HttpServletRequest request, HttpServletResponse response, FilterChain filterChain) throws ServletException, IOException {

        // 1、从请求头中获取token,如果请求头中不存在token,直接放行即可!由Spring Security的过滤器进行校验!
        String token = request.getHeader("token");
        if(token == null || "".equals(token)) {
            filterChain.doFilter(request , response);
            return ;
        }

        // 2、对token进行解析,取出其中的userId
        String userId = null ;
        try {
            Claims claims = JwtUtils.getClaims(token);
            userId= claims.get("userId").toString();
        }catch (Exception e) {
            e.printStackTrace();
            throw new RuntimeException("token非法") ;
        }

        // 3、使用userId从redis中查询对应的LoginUser对象
        String loginUserJson = redisTemplate.boundValueOps("login_user:" + userId).get();
        LoginUser loginUser = JSON.parseObject(loginUserJson, LoginUser.class);
        if(loginUser != null) {
            // 4、然后将查询到的LoginUser对象的相关信息封装到UsernamePasswordAuthenticationToken对象中,然后将该对象存储到Security的上下文对象中
            UsernamePasswordAuthenticationToken authenticationToken = new UsernamePasswordAuthenticationToken(loginUser, null , null) ;
            SecurityContextHolder.getContext().setAuthentication(authenticationToken);
        }

        // 5、放行
        filterChain.doFilter(request , response);
    }

}
4.4实现登录
UserController
@RestController
@RequestMapping(value = "/user")
public class UserController {
@Autowired
private UserService userService ;
@PostMapping(value = "/login")
public ResponseResultUserService
@Service
public class UserServiceImpl implements UserService {
@Autowired
private AuthenticationManager authenticationManager ;
@Autowired
private RedisTemplate redisTemplate ;
@Override
public ResponseResult 4.5退出登录
@Override
public ResponseResult logout() {

    // 获取登录的用户信息
    LoginUser loginUser = (LoginUser) SecurityContextHolder.getContext().getAuthentication().getPrincipal();
    Long userId = loginUser.getUser().getId();

    // 删除Redis中的用户数据
    redisTemplate.delete("login_user:" + userId) ;

    // 返回
    return new ResponseResult(200 , "退出成功" , null) ;

}
