Redis基础
redis
文章目录
- redis
-
- 1.redis介绍
- 2.java使用Redis 步骤
-
-
- java使用linux中的redis服务
-
- 第一步:修改配置文件redis.conf
- 第二步:开启redis服务
- 第三步:防火墙开放redis端口
- 第四步:在java中,使用Jedis连接Redis
-
- 3.SpringBoot集成Redis
-
- 3.1 介绍
- 3.2 springboot集成Redis 步骤
- 3.3 在3.2 的基础上,对redis的数据进行序列化配置
1.redis介绍
-
远程字典服务器,Remote dictionary server
-
一个开源的基于内存的数据库,常用作键值存储、缓存和消息队列等
-
Redis通常将全部数据存储在内存中,也可以不时的将数据写入硬盘实现持久化,但仅用于重新启动后将数据加载回内存
*内存的速度比硬盘快一个数量级
2.java使用Redis 步骤
参考文章https://blog.csdn.net/Huang_ZX_259/article/details/122906569
java使用linux中的redis服务
第一步:修改配置文件redis.conf
注:redis.conf 在redis的安装目录下
-
(1)注释以下属性,因为我们是需要进行远程连接的:
#bind:127.0.0.1 -
(2)将protected-mode 设置为no
protected-mode no -
(3)设置为允许后台连接
daemonize yes
第二步:开启redis服务
如果没有开启,执行服务开启命令
systemctl start redis.service
第三步:防火墙开放redis端口
在远程服务器进行连接redis服务的防火墙设置
(1)使用防火墙,先确定防火墙服务是否开启,查看防火墙状态
systemctl start firewalld.service
没开启,就开启防火墙
(2)设置服务器的安全组开放6379端口
(3)防火墙开放redis服务端口
firewall-cmd --zone=public --add-port=6379/tcp --permanent
(4)重启防火墙:
systemctl restart firewalld.service
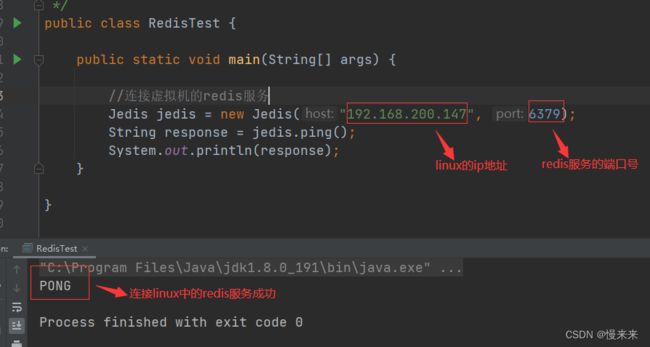
第四步:在java中,使用Jedis连接Redis
(1)创建一个Maven项目,并导入以下依赖:
<dependencies>

    <dependency>
        <groupId>redis.clientsgroupId>
        <artifactId>jedisartifactId>
        <version>3.2.0version>
    dependency>

    <dependency>
        <groupId>com.alibabagroupId>
        <artifactId>fastjsonartifactId>
        <version>1.2.62version>
    dependency>

dependencies>
(2)测试连接
3.SpringBoot集成Redis
3.1 介绍
springboot整合redis不使用jedis来进行连接,而是使用lettuce来进行连接,
jedis和lettuce的对比如下:
jedis:采用的直连,多个线程操作的话,是不安全的;想要避免不安全,使用jedis pool连接池。更像BIO模式
lettuce:采用netty,实例可以在多个线程中共享,不存在线程不安全的情况;可以减少线程数量。更像NIO模式
3.2 springboot集成Redis 步骤
第一步:创建Spring Boot项目
第二步:导入依赖 (如果第一步创建springboot项目时,勾选 spring Data Redis(Access+Driver)就会自动在prom文件名添加以下依赖)
            org.springframework.boot
            spring-boot-starter-data-redis


            org.springframework.boot
            spring-boot-starter-test
            test


            org.apache.commons
            commons-pool2
第三步:编写配置文件application.yml
#配置redis数据库连接信息

spring:
  redis:
    host: 192.168.200.147
    port: 6379   #确认远程的redis服务已启动
    database: 0
    lettuce:
      pool:  #注意,需要导入commons-pool2依赖
        max-active: 1000 #连接池最大连接数(使用负值表示没有限制)
        max-idle: 10 #连接池中的最大空闲连接
        min-idle: 3 #连接池中的最小空闲连接
        max-wait: -1 #连接池最大阻塞等待时间(使用负值表示没有限制)
注意:但对于application.properties文件,配置pool,不需要再pom文件中导入commons-pool2依赖,所以(很奇怪)
第四步:编写程序测试使用redis(redisTemplate操作着不同的redis数据类型)
在这种连接方式中,redisTemplate操作着不同的数据类型,api和我们的指令是一样的。

opsForValue:操作字符串 类似String
opsForList:操作List 类似List
opsForSet:操作Set,类似Set
opsForHash:操作Hash
opsForZSet:操作ZSet
opsForGeo:操作Geospatial
opsForHyperLogLog:操作HyperLogLog
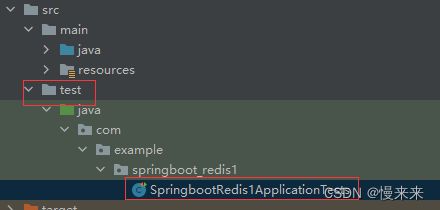
截图:
代码:
@SpringBootTest
class SpringbootRedis1ApplicationTests {

    @Autowired
    private RedisTemplate redisTemplate;

    /**
    *向redis中存数据
    */
    @Test
    void set() {
        ValueOperations ops = redisTemplate.opsForValue();  //opsForValue 用于操作String 数据
        ops.set("address1","zhengzhou");
    }

    /**
     *  取数据
     */
    @Test
    void get() {
        ValueOperations ops = redisTemplate.opsForValue();  //opsForValue 用于操作String 数据
        Object o = ops.get("address1");  // 获取Redis数据库中key为address1对应的value数据
        System.out.println(o);
    }

}
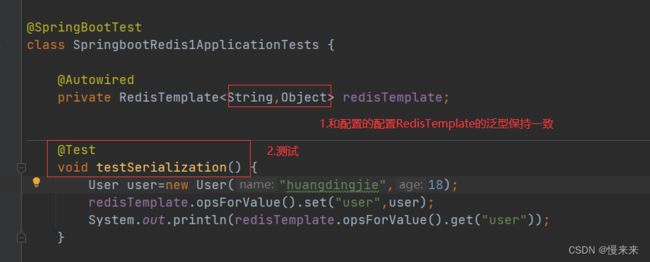
3.3 在3.2 的基础上,对redis的数据进行序列化配置
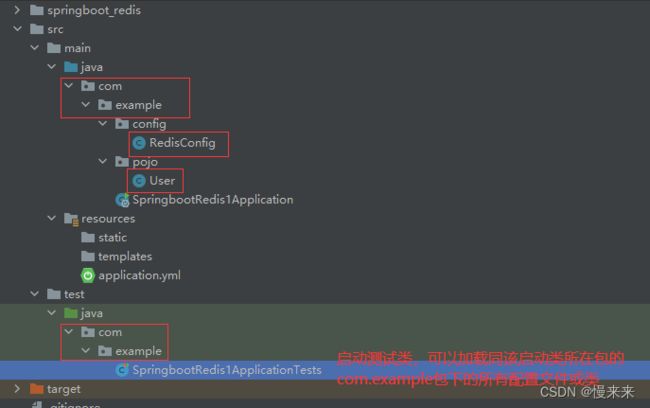
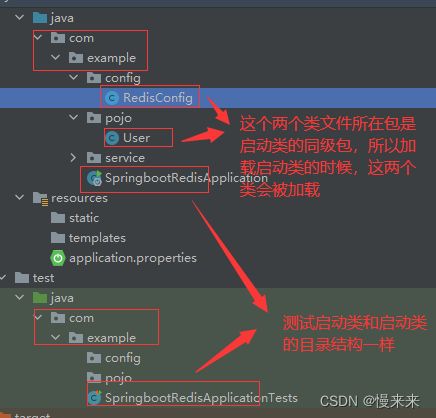
目录:
注意:启动类,是启动类的同级的包、子包或和启动类在同一个包,这些类或文件才会在
加载启动类的时候被加载
第一步:创建User类
package com.example.pojo;

import java.io.Serializable;

public class User implements Serializable {
    private String name;
    private int age;

    public  User(){
    }
    public User(String name, int age) {
        this.name = name;
        this.age = age;
    }
    public String getName() {
        return name;
    }
    public void setName(String name) {
        this.name = name;
    }
    public int getAge() {
        return age;
    }
    public void setAge(int age) {
        this.age = age;
    }

    @Override
    public String toString() {
        return "User{" +
                "name='" + name + '\'' +
                ", age=" + age +
                '}';
    }
}
第二步:创建对操作redis的RedisTemplate 进行配置
package com.example.springboot_redis1;
import com.fasterxml.jackson.annotation.JsonAutoDetect;
import com.fasterxml.jackson.annotation.PropertyAccessor;
import com.fasterxml.jackson.databind.ObjectMapper;
import org.springframework.context.annotation.Bean;
import org.springframework.context.annotation.Configuration;
import org.springframework.data.redis.connection.RedisConnectionFactory;
import org.springframework.data.redis.core.RedisTemplate;
import org.springframework.data.redis.serializer.Jackson2JsonRedisSerializer;
import org.springframework.data.redis.serializer.StringRedisSerializer;
@Configuration
public class RedisConfig {
@Bean
@SuppressWarnings("all")
public RedisTemplate<String, Object> redisTemplate(RedisConnectionFactory factory) {
//为了自己开发方便,一般直接使用 第三步:测试对RedisTemplate的序列化配置
测试结果:

