QT(31)-QTMqtt客户端-Qt官方提供的基于MQTT的封装
Qt开发MQTT程序有两种方式,一个是Qt官方提供的基于MQTT的封装,一个是第三方(EMQ)开发的用于Qt调用MQTT的接口,二者使用方法大同小异,并且均提供了源码。
1.安装MQTT服务器+MQTT客户端
2.Qtmqtt编译环境搭建
3.demo
1.安装MQTT服务器+MQTT客户端
qt程序安装目录bin目录放入环境变量中。
1.1安装mqtt服务器
#1.安装mqtt服务器
   apt install msquitto
#2.配置服务器
   cd /etc/mosquitto
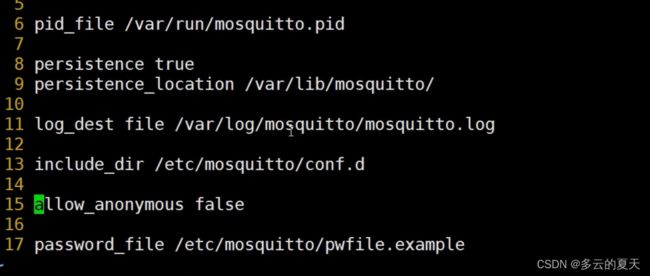
#3. vim mosquitto.conf  或者把配置文件放在 conf.d下 配置文件如下

#4.重启服务器
  service mosquitto restart
#5.修改用户名密码    -C 是表示先清空
  mosquitto_passwd -C /etc/mosquitto/pwfile.example test
#6.显示所有端口显示情况 默认服务器是1883
  lsof|grep mosquitto
  lsof -i |grep mosquitto
1.2安装MQTT客户端
1.2.1订阅消息
#1.安装客户端
   apt install mosquitto-client
#订阅

#2.链接-h 地址  -p 端口 -u 用户 -p 密码 -t 主题
   mosquitto-client -h "110.42.167.18" -p 1883 -u test -P test -t "hello"
#3.确认服务器链接建立
   lsof -i|grep mosquitto
#4.
多的链接来自14.67.208.140:46952
1.2.2 发布消息
#订阅消息
mosquitto_sub -h "110.42.167.18" -p 1883 -u test -P test -t "11" -m "helloworld"
2.Qtmqtt编译环境搭建
Qt开发MQTT程序有两种方式,一个是Qt官方提供的基于MQTT的封装,一个是第三方(EMQ)开发的用于Qt调用MQTT的接口,二者使用方法大同小异,并且均提供了源码
2.1下载源码并编译
2.1.1 下载源码: https://github.com/qt/qtmqtt
2.1.2 复制头文件到 到QT的安装目录下:
D:\QTPrj\mqtt\qtmqtt-5.15\src\mqtt
新建文件夹:QtMqtt
D:\QT\Qt5.14.2\5.14.2\mingw73_64\include
D:\QT\Qt5.14.2\5.14.2\mingw73_32\include
2.1.3编译如下错误:

qmqttconnection.cpp 中 168行有这么一句:
connect(socket, &QAbstractSocket::errorOccurred, this, &QMqttConnection::transportError);
改写成:
connect(socket, static_cast (&QAbstractSocket::error),
            this, static_cast(&QMqttConnection::transportError) );
2.1.4编译好后,把dll文件放入安装目录:Qt5Mqtt.dll,Qt5Mqttd.dll
编译好的目录和文件:
D:\QTPrj\mqtt\build-qtmqtt-Desktop_Qt_5_14_2_MinGW_32_bit-Debug\bin
安装目录:
D:\QT\Qt5.14.2\5.14.2\mingw73_32\bin
D:\QT\Qt5.14.2\5.14.2\mingw73_32\include
3.demo

3.1 修改项目配置
a)添加动态库和静态库:
LIBS += D:\QTPrj\mqtt\build-qtmqtt-Desktop_Qt_5_14_2_MinGW_32_bit-Debug\lib\libQt5Mqtt.a
LIBS += D:\QTPrj\mqtt\build-qtmqtt-Desktop_Qt_5_14_2_MinGW_32_bit-Debug\lib\Qt5Mqtt.dll
debug 时用.dll动态库
release时用.a静态库
b)添加网络

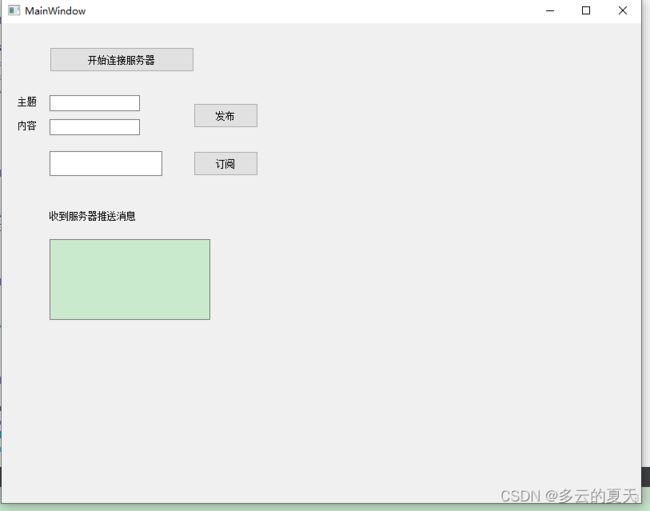
3.2.h文件
#ifndef MAINWINDOW_H
#define MAINWINDOW_H

#include
#include

QT_BEGIN_NAMESPACE
namespace Ui { class MainWindow; }
QT_END_NAMESPACE

class MainWindow : public QMainWindow
{
    Q_OBJECT

public:
    MainWindow(QWidget *parent = nullptr);
    ~MainWindow();

private slots:
    void on_pushButton_clicked();
    void connectSuccessSlot();
    //接收到的消息,引用的主题
    void recvMessageSlot(const QByteArray &ba,const QMqttTopicName &topic);

    void on_subButton_clicked();

    void on_pubButton_clicked();

private:
    Ui::MainWindow *ui;
    QMqttClient *client;
};
#endif // MAINWINDOW_H
3.3.cpp文件
#include "mainwindow.h"
#include "ui_mainwindow.h"
#include

MainWindow::MainWindow(QWidget *parent)
    : QMainWindow(parent)
    , ui(new Ui::MainWindow)
{
    ui->setupUi(this);
    client =new QMqttClient;
    //1.设置连接服务器的参数设置
    client->setHostname("110.42.167.18");
    client->setPort(1883);
    client->setUsername("test");
    client->setPassword("test");

    //2.一旦连接成功 通过槽函数来处理
    connect(client,&QMqttClient::connected,this,&MainWindow::connectSuccessSlot);
}

MainWindow::~MainWindow()
{
    delete ui;
}

//点击后连接服务器
void MainWindow::on_pushButton_clicked()
{
    client->connectToHost();
}

void MainWindow::connectSuccessSlot()
{
    QMessageBox::information(this,"连接提示","连接成功");
    connect(client,&QMqttClient::messageReceived,this,&MainWindow::recvMessageSlot);
    connect(client,&QMqttClient::disconnected,[this](){
        QMessageBox::warning(this,"连接提示","服务器断开!");
    });


}

void MainWindow::recvMessageSlot(const QByteArray &ba,const QMqttTopicName &topic)
{
   //
    QString str=topic.name()+QString(ba);
    ui->textEdit->setText(str);

}

void MainWindow::on_subButton_clicked()
{
    //订阅
    client->subscribe(ui->subTopicEdit->text());

}
//发布
void MainWindow::on_pubButton_clicked()
{
    QString msg=ui->msgEdit->text();
    QByteArray ba;
    ba.append(msg);
   client->publish(ui->pubTopicEdit->text(),ba);

}
源码下载地址:用QT写的简单的mqttclient程序。-C++文档类资源-CSDN下载

