Jmeter接口关联(一)【使用json层级方式提取值】与python中使用层级方式提取值 完成接口关联
文章目录
- 前言
- 一、按照 json 的路径来提取
- (1)成功匹配到数据的案例(按照层级匹配)
- (2)失败未匹配到数据的案例(没有按照层级匹配)
- json提取器
- 二、使用完整的接口关联,完成两个接口的请求
- 三、使用Python来完成接口的关联
- 四、注意点
前言
使用了聚合数据里面的接口来做接口,已经接口关联。
聚合数据网址:聚合数据-个人中心
选择两个接口:
天气预报接口
老黄历接口
天气预报接口:
请求Key:79a35e2a5997710f3bdc86de81f21dbb
根据城市查询天气
接口地址:http://apis.juhe.cn/simpleWeather/query
请求方式:http get/post
返回类型:json
接口描述:通过城市名称或城市ID查询天气预报情况
接口调试: API测试工具
请求Header:
| 名称 | 值 | |
|---|---|---|
| Content-Type | application/x-www-form-urlencoded |
请求参数说明:
| 名称 | 必填 | 类型 | 说明 | |
|---|---|---|---|---|
| city | 是 | string | 要查询的城市名称/id,城市名称如:温州、上海、北京,需要utf8 urlencode | |
| key | 是 | string | 在个人中心->我的数据,接口名称上方查看 |
老黄历接口:
请求Key:949e4265cda71e7be277a3a25e23c576
日历
接口地址:http://v.juhe.cn/laohuangli/d
请求方式:http get/post
返回类型:json/xml
接口描述:日期开始时间为2010-01-01
接口调试: API测试工具
请求Header:
| 名称 | 值 | |
|---|---|---|
| Content-Type | application/x-www-form-urlencoded |
请求参数说明:
| 名称 | 必填 | 类型 | 说明 | |
|---|---|---|---|---|
| key | 是 | string | 在个人中心->我的数据,接口名称上方查看 | |
| date | 是 | string | 日期,格式2014-09-09 |
一、按照 json 的路径来提取
使用这种方法就需要按照json格式的层级才会匹配到数据,这种方法就是老老实实的一层一层的匹配,就是绝对路径匹配。
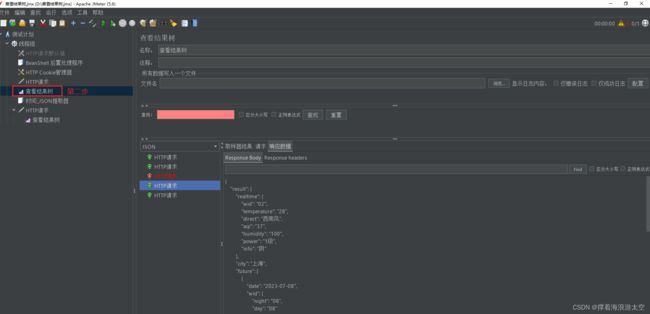
在察看结果树中,先使用测试的方式进行匹配。
步骤:察看结果树
(1)成功匹配到数据的案例(按照层级匹配):
(2)失败未匹配到数据的案例(没有按照层级匹配):
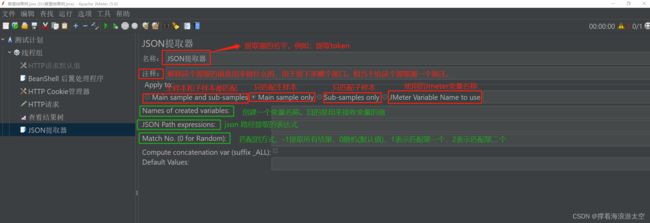
json提取器
步骤:
右键线程组——添加——后置处理器——json提取器
json提取器中的字段解释:
二、使用完整的接口关联,完成两个接口的请求
1、请求天气预报的接口,获取到时间
2、在请求老黄历接口中使用天气预报接口里面的时间
步骤:
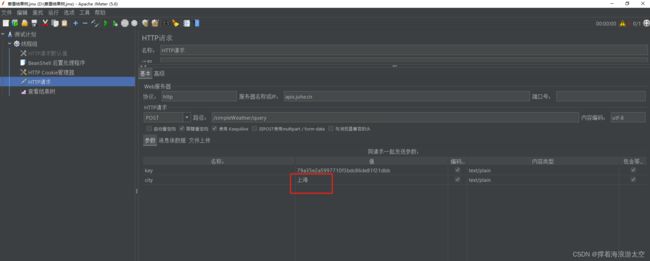
(1)添加一个http请求,用来请求天气预报接口
(2)添加一个查看结果树——(目的是用来查看天气预报接口返回的数据)
在这一步中我们需要实际模拟一下json路径的提取
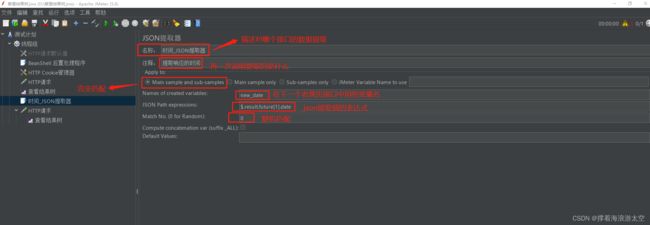
(3) 添加一个json 路径提取器——(主要是用来提取天气预报接口的数据)
(4)添加一个http请求——(主要是发送老黄历接口)
(5)再次添加一个察看结果树——(目的是用来查看老黄历返回的数据)
注意:察看结果树,其实可以只添加一个就行。因为这个东西就是用来察看结果的,会把所有响应的数据都放在这个里面。但是放两个或者多个也不影响。如果放多个在每一个响应的后面,便于观察每一个结果返回的数据。
三、使用Python来完成接口的关联
import requests

# 天气预报的接口所需要传的参数
url1 = "http://apis.juhe.cn/simpleWeather/query"
key1 = "79a35e2a5997710f3bdc86de81f21dbb"

# 老黄历接口所需要传的参数
url2 = "http://v.juhe.cn/laohuangli/d"
key2 = "949e4265cda71e7be277a3a25e23c576"

# 把两个参数放在data字段中
data1 = {
    "city": "上海",
    "key": key1
}

# 发送接口的请求
req1 = requests.request(method="post", url=url1, data=data1)

# 把json格式的字符转化为字典格式,便于使用字典的提取方式提取值
a = req1.json()
print(a)  # 这个地方是打印出来看下返回的结果
#

# 使用字典的方式提取想要的值,这里我是固定提取了第三个值,因为索引是从0开始
new_time = a["result"]['future'][2]["date"]

# a={'reason': '查询成功!', 'result': {'city': '上海', 'realtime': {'temperature': '30', 'humidity': '90', 'info': '小雨', 'wid': '07', 'direct': '西北风', 'power': '2级', 'aqi': '52'}, 'future': [{'date': '2023-07-10', 'temperature': '27/34℃', 'weather': '小雨转阴', 'wid': {'day': '07', 'night': '02'}, 'direct': '南风'}, {'date': '2023-07-11', 'temperature': '28/35℃', 'weather': '阴转多云', 'wid': {'day': '02', 'night': '01'}, 'direct': '南风'}, {'date': '2023-07-12', 'temperature': '27/35℃', 'weather': '多云转阴', 'wid': {'day': '01', 'night': '02'}, 'direct': '南风'}, {'date': '2023-07-13', 'temperature': '27/35℃', 'weather': '阴', 'wid': {'day': '02', 'night': '02'}, 'direct': '南风'}, {'date': '2023-07-14', 'temperature': '28/35℃', 'weather': '阴', 'wid': {'day': '02', 'night': '02'}, 'direct': '南风'}]}, 'error_code': 0}
#
# b=a["result"]['future'][2]["date"]

print(new_time)  # 打印出来看看是不是我们想要的那个值

# 把上面提取出来的值放在老黄历接口的数据中
data2 = {
    "key": key2,
    "date": new_time
}

# 请求老黄历接口
req2 = requests.request(method="post", url=url2, data=data2)
# 打印出返回的数据
print(req2.text)
{'reason': '查询成功!', 'result': {'city': '上海', 'realtime': {'temperature': '31', 'humidity': '88', 'info': '小雨', 'wid': '07', 'direct': '西北风', 'power': '2级', 'aqi': '52'}, 'future': [{'date': '2023-07-10', 'temperature': '27/34℃', 'weather': '小雨转阴', 'wid': {'day': '07', 'night': '02'}, 'direct': '南风'}, {'date': '2023-07-11', 'temperature': '28/35℃', 'weather': '阴转多云', 'wid': {'day': '02', 'night': '01'}, 'direct': '南风'}, {'date': '2023-07-12', 'temperature': '27/35℃', 'weather': '多云转阴', 'wid': {'day': '01', 'night': '02'}, 'direct': '南风'}, {'date': '2023-07-13', 'temperature': '27/35℃', 'weather': '阴', 'wid': {'day': '02', 'night': '02'}, 'direct': '南风'}, {'date': '2023-07-14', 'temperature': '28/35℃', 'weather': '阴', 'wid': {'day': '02', 'night': '02'}, 'direct': '南风'}]}, 'error_code': 0}
2023-07-12
{"reason":"successed","result":{"id":"4795","yangli":"2023-07-12","yinli":"癸卯(兔)年五月廿五","wuxing":"路旁土 建执位","chongsha":"冲牛(乙丑)煞西","baiji":"辛不合酱主人不尝 未不服药毒气入肠","jishen":"守日 月恩 圣心","yi":"嫁娶 纳采 出行 祭祀 祈福 解除 移徙 入宅","xiongshen":"小时 月建 土府 元武","ji":"动土 安葬"},"error_code":0}
进程已结束,退出代码0
用json层级的方式验证提取的值
首先把第一个天气预报的接口的数据拿出来(注意:先把返回的接口的数据从json格式的字符串转换成字典)
a={'reason': '查询成功!', 'result': {'city': '上海', 'realtime': {'temperature': '31', 'humidity': '88', 'info': '小雨', 'wid': '07', 'direct': '西北风', 'power': '2级', 'aqi': '52'}, 'future': [{'date': '2023-07-10', 'temperature': '27/34℃', 'weather': '小雨转阴', 'wid': {'day': '07', 'night': '02'}, 'direct': '南风'}, {'date': '2023-07-11', 'temperature': '28/35℃', 'weather': '阴转多云', 'wid': {'day': '02', 'night': '01'}, 'direct': '南风'}, {'date': '2023-07-12', 'temperature': '27/35℃', 'weather': '多云转阴', 'wid': {'day': '01', 'night': '02'}, 'direct': '南风'}, {'date': '2023-07-13', 'temperature': '27/35℃', 'weather': '阴', 'wid': {'day': '02', 'night': '02'}, 'direct': '南风'}, {'date': '2023-07-14', 'temperature': '28/35℃', 'weather': '阴', 'wid': {'day': '02', 'night': '02'}, 'direct': '南风'}]}, 'error_code': 0}


# 使用json层级(在这里可以理解为字典的层级)方式,来提取值
new_time = a["result"]['future'][2]["date"]

# 打印出来看看是否被提取到想要的值
print(new_time)
四、注意点:
在Jmeter中,参数字段填写中,中文字符不不要加上引号,这里会直接变成字符串
总结:
本篇文章里面涉及到:
json提取器的字段解释
Jmeter中使用json层级提取器
Jmeter中接口关联的变量和提取


