【图像处理】经营您的第一个U-Net以进行图像分割
一、说明
AI厨师们,今天您将学习如何准备计算机视觉中最重要的食谱之一:U-Net。本文将叙述:1语义与实例分割,2 图像分割中还使用了其他损失,例如Jaccard损失,焦点损失;3 如果2D图像分割对您来说太容易了,您可以查看3D图像分割,因为模型要大得多,因此要困难得多。
必要的项目代码在下面地址获取,
1)你可以在Github或Google Colab上找到完整的代码。
2)我们将把U-Net应用于Kaggle的MRI分割数据集,可在此处访问:
脑部MRI图像与手动FLAIR异常分割掩模一起
www.kaggle.com
二、食谱的成分
- 数据集的探索
- 创建数据集和数据加载器类
- 架构的创建
- 检查损失(DICE和二进制交叉熵)
- 结果
- 烹饪后技巧,为事情增添趣味!
三、数据集的探索
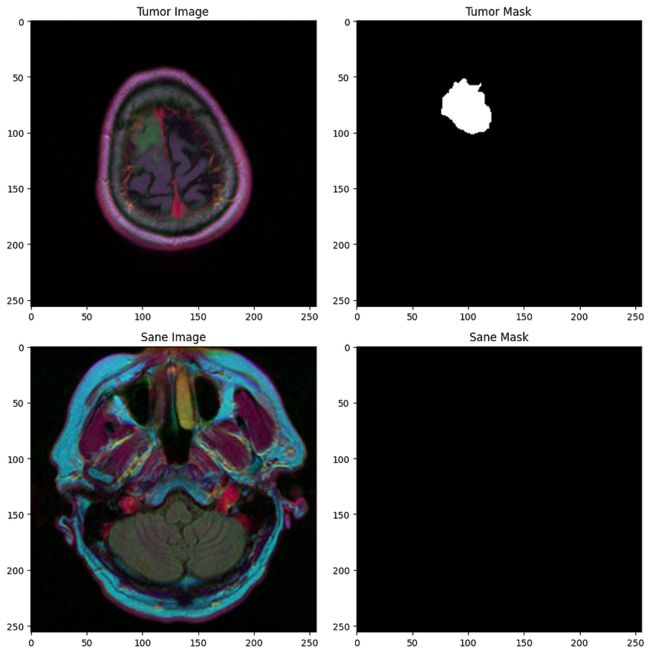
我们得到了一组(255 x 255)MRI扫描的2D图像,以及它们相应的掩模,我们必须将每个像素分类为0(理智)或1(肿瘤)。
以下是一些示例:
第一行:肿瘤,第二行:理智的受试者
四、数据集和数据加载器类
这是您在涉及神经网络的每个项目中找到的步骤。我们
4.1 数据集类
import torch
import torch.nn as nn
import torch.nn.functional as F
from torch.utils.data import Dataset, DataLoader

class BrainMriDataset(Dataset):
    def __init__(self, df, transforms):
        # df contains the paths to all files
        self.df = df
        # transforms is the set of data augmentation operations we use
        self.transforms = transforms

    def __len__(self):
        return len(self.df)

    def __getitem__(self, idx):
        image = cv2.imread(self.df.iloc[idx, 1])
        mask = cv2.imread(self.df.iloc[idx, 2], 0)

        augmented = self.transforms(image=image,
                                    mask=mask)

        image = augmented['image'] # Dimension (3, 255, 255)
        mask = augmented['mask']   # Dimension (255, 255)

        # We notice that the image has one more dimension (3 color channels), so we have to one one "artificial" dimension to the mask to match it
        mask = np.expand_dims(mask, axis=0) # Dimension (1, 255, 255)

        return image, mask
4.2 数据加载器
现在我们已经创建了 Dataset 类来重塑张量,我们需要首先定义训练集(用于训练模型)、验证集(用于监视训练和避免过度拟合)和一个测试集,以最终评估模型在看不见的数据上的性能。
# Split df into train_df and val_df
train_df, val_df = train_test_split(df, stratify=df.diagnosis, test_size=0.1)
train_df = train_df.reset_index(drop=True)
val_df = val_df.reset_index(drop=True)

# Split train_df into train_df and test_df
train_df, test_df = train_test_split(train_df, stratify=train_df.diagnosis, test_size=0.15)
train_df = train_df.reset_index(drop=True)

train_dataset = BrainMriDataset(train_df, transforms=transforms)
train_dataloader = DataLoader(train_dataset, batch_size=32, shuffle=True)

val_dataset = BrainMriDataset(val_df, transforms=transforms)
val_dataloader = DataLoader(val_dataset, batch_size=32, shuffle=False)

test_dataset = BrainMriDataset(test_df, transforms=transforms)
test_dataloader = DataLoader(test_dataset, batch_size=32, shuffle=False)
4.3 U-Net 架构
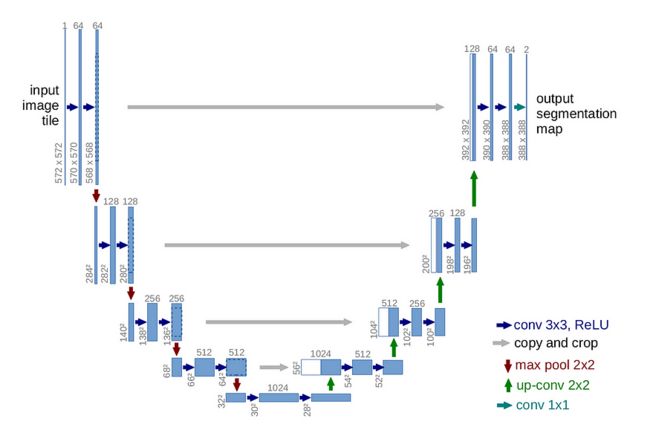
U-Net架构是图像分割任务的强大模型,是一种卷积神经网络(CNN),其名称来自其U形结构。U-Net最初由Olaf Ronneberger等人在2015年题为“U-Net:用于生物医学图像分割的卷积网络”的论文中开发。
其结构涉及编码(下采样)路径和解码(上采样)路径。
如今,U-Net仍然是一个非常成功的模式,它的成功来自两个主要因素:
- 其对称结构(U形)
- 前向连接(图片上的灰色箭头)
前向连接的主要思想是,随着我们在图层中越来越深入,我们会丢失一些关于原始图像的信息。然而,我们的任务是分割图像,我们需要精确的图像来分类每个像素。这就是为什么我们在对称解码器层的编码层的每一层重新注入图像的原因。
以下是在 Pytorch 中对其进行编码的方法:
train_dataset = BrainMriDataset(train_df, transforms=transforms)
train_dataloader = DataLoader(train_dataset, batch_size=32, shuffle=True)

val_dataset = BrainMriDataset(val_df, transforms=transforms)
val_dataloader = DataLoader(val_dataset, batch_size=32, shuffle=False)

test_dataset = BrainMriDataset(test_df, transforms=transforms)
test_dataloader = DataLoader(test_dataset, batch_size=32, shuffle=False)


class UNet(nn.Module):

    def __init__(self):
        super().__init__()

        # Define convolutional layers
        # These are used in the "down" path of the U-Net,
        # where the image is successively downsampled
        self.conv_down1 = double_conv(3, 64)
        self.conv_down2 = double_conv(64, 128)
        self.conv_down3 = double_conv(128, 256)
        self.conv_down4 = double_conv(256, 512)

        # Define max pooling layer for downsampling
        self.maxpool = nn.MaxPool2d(2)

        # Define upsampling layer
        self.upsample = nn.Upsample(scale_factor=2, mode='bilinear', align_corners=True)

        # Define convolutional layers
        # These are used in the "up" path of the U-Net,
        # where the image is successively upsampled
        self.conv_up3 = double_conv(256 + 512, 256)
        self.conv_up2 = double_conv(128 + 256, 128)
        self.conv_up1 = double_conv(128 + 64, 64)

        # Define final convolution to output correct number of classes
        # 1 because there are only two classes (tumor or not tumor)
        self.last_conv = nn.Conv2d(64, 1, kernel_size=1)

    def forward(self, x):
        # Forward pass through the network

        # Down path
        conv1 = self.conv_down1(x)
        x = self.maxpool(conv1)
        conv2 = self.conv_down2(x)
        x = self.maxpool(conv2)
        conv3 = self.conv_down3(x)
        x = self.maxpool(conv3)
        x = self.conv_down4(x)

        # Up path
        x = self.upsample(x)
        x = torch.cat([x, conv3], dim=1)
        x = self.conv_up3(x)
        x = self.upsample(x)
        x = torch.cat([x, conv2], dim=1)
        x = self.conv_up2(x)
        x = self.upsample(x)
        x = torch.cat([x, conv1], dim=1)
        x = self.conv_up1(x)

        # Final output
        out = self.last_conv(x)
        out = torch.sigmoid(out)

        return out
五、损失和评估标准
像每个神经网络一样,有一个目标函数,一个损失,我们用梯度下降来最小化。我们还引入了评估标准,这有助于我们训练模型(如果它没有改善,比如说连续 3 个 epoch,那么我们在模型过度拟合的情况下进行训练)。
这里要保留本段的两点主要内容:
- 损失函数是两个损失函数的组合(DICE损失,二进制交叉熵)
- 评估功能是DICE分数,不要与DICE损失混淆
如果你做到了这一步,恭喜你!你已经做了最努力的事情。现在,让我们训练模型并观察结果。
5.1 骰子损失
骰子损失
备注:我们添加了一个平滑参数(epsilon)以避免被零除。
5.2 二进制交叉熵损失:
公元前,最后,我们的总损失是:
让我们一起实现它:
def dice_coef_loss(inputs, target):
    smooth = 1.0
    intersection = 2.0 * ((target * inputs).sum()) + smooth
    union = target.sum() + inputs.sum() + smooth

    return 1 - (intersection / union)


def bce_dice_loss(inputs, target):
    inputs = inputs.float()
    target = target.float()

    dicescore = dice_coef_loss(inputs, target)
    bcescore = nn.BCELoss()
    bceloss = bcescore(inputs, target)

    return bceloss + dicescore
5.3 评估标准(骰子系数):
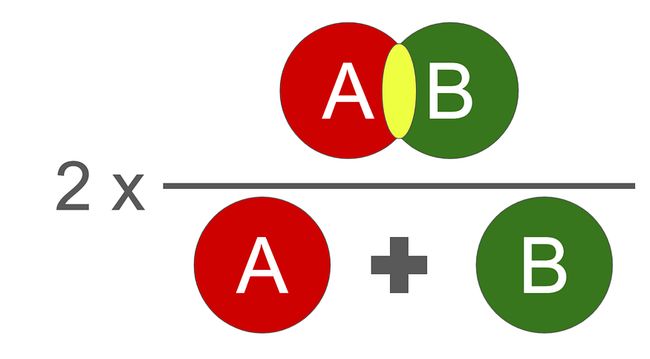
我们使用的评估函数是DICE分数。它介于 0 和 1 之间,1 是最好的。
骰子分数的插图,其数学实现如下:
def dice_coef_metric(inputs, target):
    intersection = 2.0 * (target * inputs).sum()
    union = target.sum() + inputs.sum()
    if target.sum() == 0 and inputs.sum() == 0:
        return 1.0

    return intersection / union
六、训练循环
def train_model(model_name, model, train_loader, val_loader, train_loss, optimizer, lr_scheduler, num_epochs):

    print(model_name)
    loss_history = []
    train_history = []
    val_history = []

    for epoch in range(num_epochs):
        model.train()  # Enter train mode

        # We store the training loss and dice scores
        losses = []
        train_iou = []

        if lr_scheduler:
            warmup_factor = 1.0 / 100
            warmup_iters = min(100, len(train_loader) - 1)
            lr_scheduler = warmup_lr_scheduler(optimizer, warmup_iters, warmup_factor)

        # Add tqdm to the loop (to visualize progress)
        for i_step, (data, target) in enumerate(tqdm(train_loader, desc=f"Training epoch {epoch+1}/{num_epochs}")):
            data = data.to(device)
            target = target.to(device)

            outputs = model(data)

            out_cut = np.copy(outputs.data.cpu().numpy())

            # If the score is less than a threshold (0.5), the prediction is 0, otherwise its 1
            out_cut[np.nonzero(out_cut < 0.5)] = 0.0
            out_cut[np.nonzero(out_cut >= 0.5)] = 1.0

            train_dice = dice_coef_metric(out_cut, target.data.cpu().numpy())

            loss = train_loss(outputs, target)

            losses.append(loss.item())
            train_iou.append(train_dice)

            # Reset the gradients
            optimizer.zero_grad()
            # Perform backpropagation to compute gradients
            loss.backward()
            # Update the parameters with the computed gradients
            optimizer.step()

            if lr_scheduler:
                lr_scheduler.step()

        val_mean_iou = compute_iou(model, val_loader)

        loss_history.append(np.array(losses).mean())
        train_history.append(np.array(train_iou).mean())
        val_history.append(val_mean_iou)

        print("Epoch [%d]" % (epoch))
        print("Mean loss on train:", np.array(losses).mean(),
              "\nMean DICE on train:", np.array(train_iou).mean(),
              "\nMean DICE on validation:", val_mean_iou)

    return loss_history, train_history, val_history
七、结果
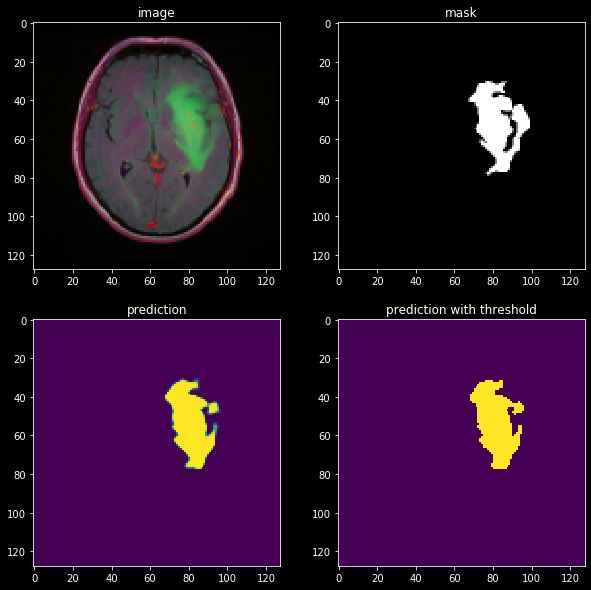
让我们评估一下我们在肿瘤受试者上的模型:
结果看起来还不错!我们可以看到,该模型肯定已经学习了一些关于图像结构的有用信息。但是,它可以更好地优化细分,这可以通过我们稍后将审查的更高级技术来实现。
八、后记!
如果你到目前为止已经成功了,恭喜你!如果你想为最后一餐增添趣味,这里有一些有趣的资源可以看看:
- 语义与实例分割
- 图像分割中还使用了其他损失,例如Jaccard损失,焦点损失
- 如果2D图像分割对您来说太容易了,您可以查看3D图像分割,因为模型要大得多,因此要困难得多。
- nnUNet,在许多不同的领域都是最先进的。自U-Net以来,该神经网络没有引入突破性的新功能,但是它的设计非常好,并测试了UNet的不同配置,并将它们集成以构建最强大的基线。
参考来源
- Ronneberger O.,Fischer P.,Brox T.(2015)U-Net:用于生物医学图像分割的卷积网络。在:Navab N.,Hornegger J.,Wells W.,Frangi A.(编辑)医学图像计算和计算机辅助干预 - MICCAI 2015。MICCAI 2015.计算机科学讲义,第 9351 卷。斯普林格,湛。U-Net: Convolutional Networks for Biomedical Image Segmentation | SpringerLink
- Brain MRI segmentation | Kaggle
- Brain MRI | Data Visualization | UNet | FPN | Kaggle
- Isensee,Fabian,Paul F. Jaeger,Simon AA Kohl,Jens Petersen和Klaus H. Maier-Hein。“nnU-Net:一种基于深度学习的生物医学图像分割的自我配置方法。”自然方法 18,第 2 期(2021):203–211。


